

How to Insert Equations in PowerPoint (Easy Way)
Last updated on December 26th, 2023
Mathematics is a language that demands precision and clarity, not just in computation but also in communication. When it comes to sharing complex mathematical concepts and present them to an audience, is important to be clear presenting the formulas and equations, so these can be understood by the audience.
Microsoft PowerPoint Equation Editor is a powerful tool for educators who needs to create clear, accurate, and professional-looking mathematical presentations. This article is designed for educators, students, professionals, and anyone who wishes to enhance their presentations with well-formatted mathematical expressions. Whether you are new to PowerPoint or looking to refine your equation-editing skills, this guide will walk you through the ins and outs of the Equation Editor.
Accessing the Equation Editor: How to Open PowerPoint Equation Editor?
PowerPoint’s Equation Editor is just a few clicks away in the ribbon. To access it, open PowerPoint, navigate to the Insert tab, and click on Equation . This opens a new menu that allows you to insert a variety of predefined equations or create your own from scratch.
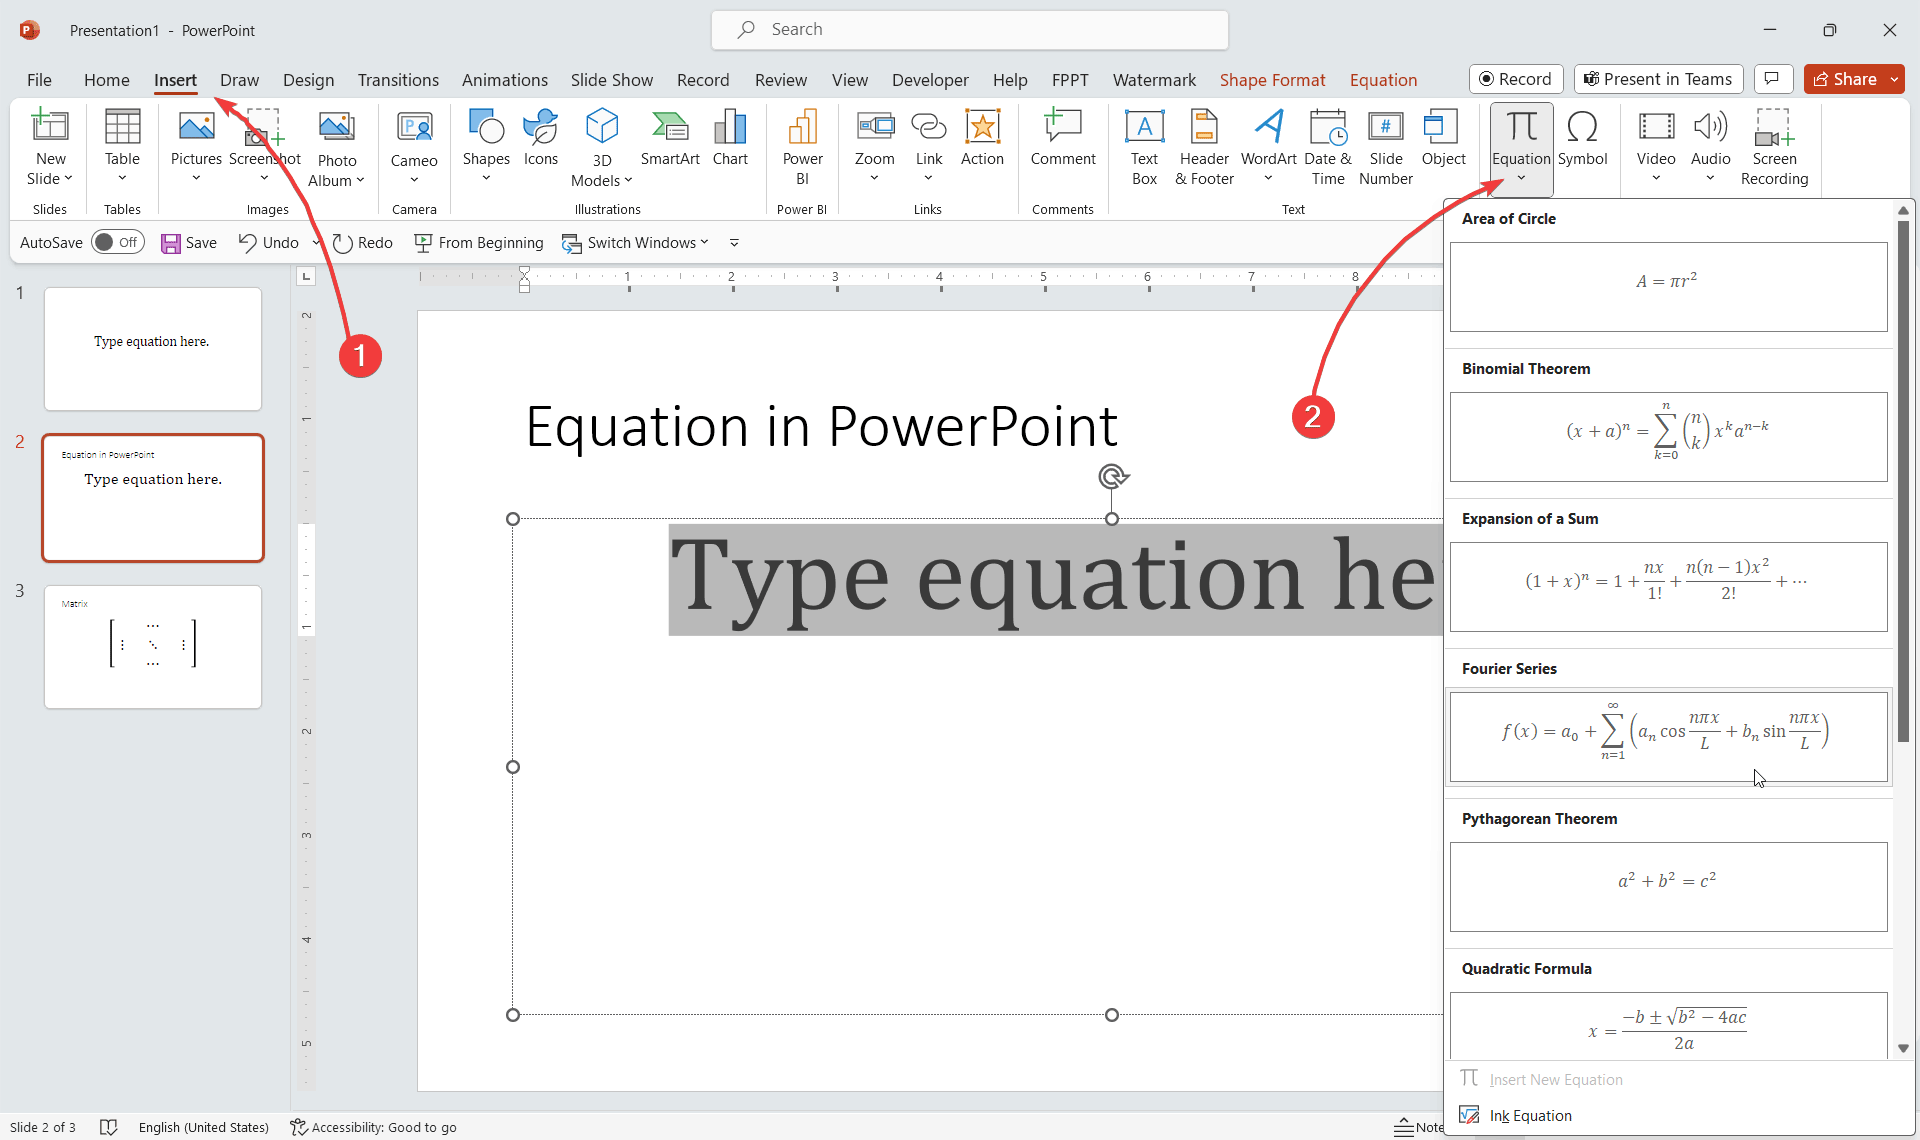
In the screenshot, you can see how the insert equation button shows a series of popular Equation templates that you can easily insert in your slides. Area of a Circle, Binomial Theorem, Expansion of a Sum, etc.
For those who prefer shortcuts, pressing “Alt” + “=” on your keyboard will launch the editor instantly.
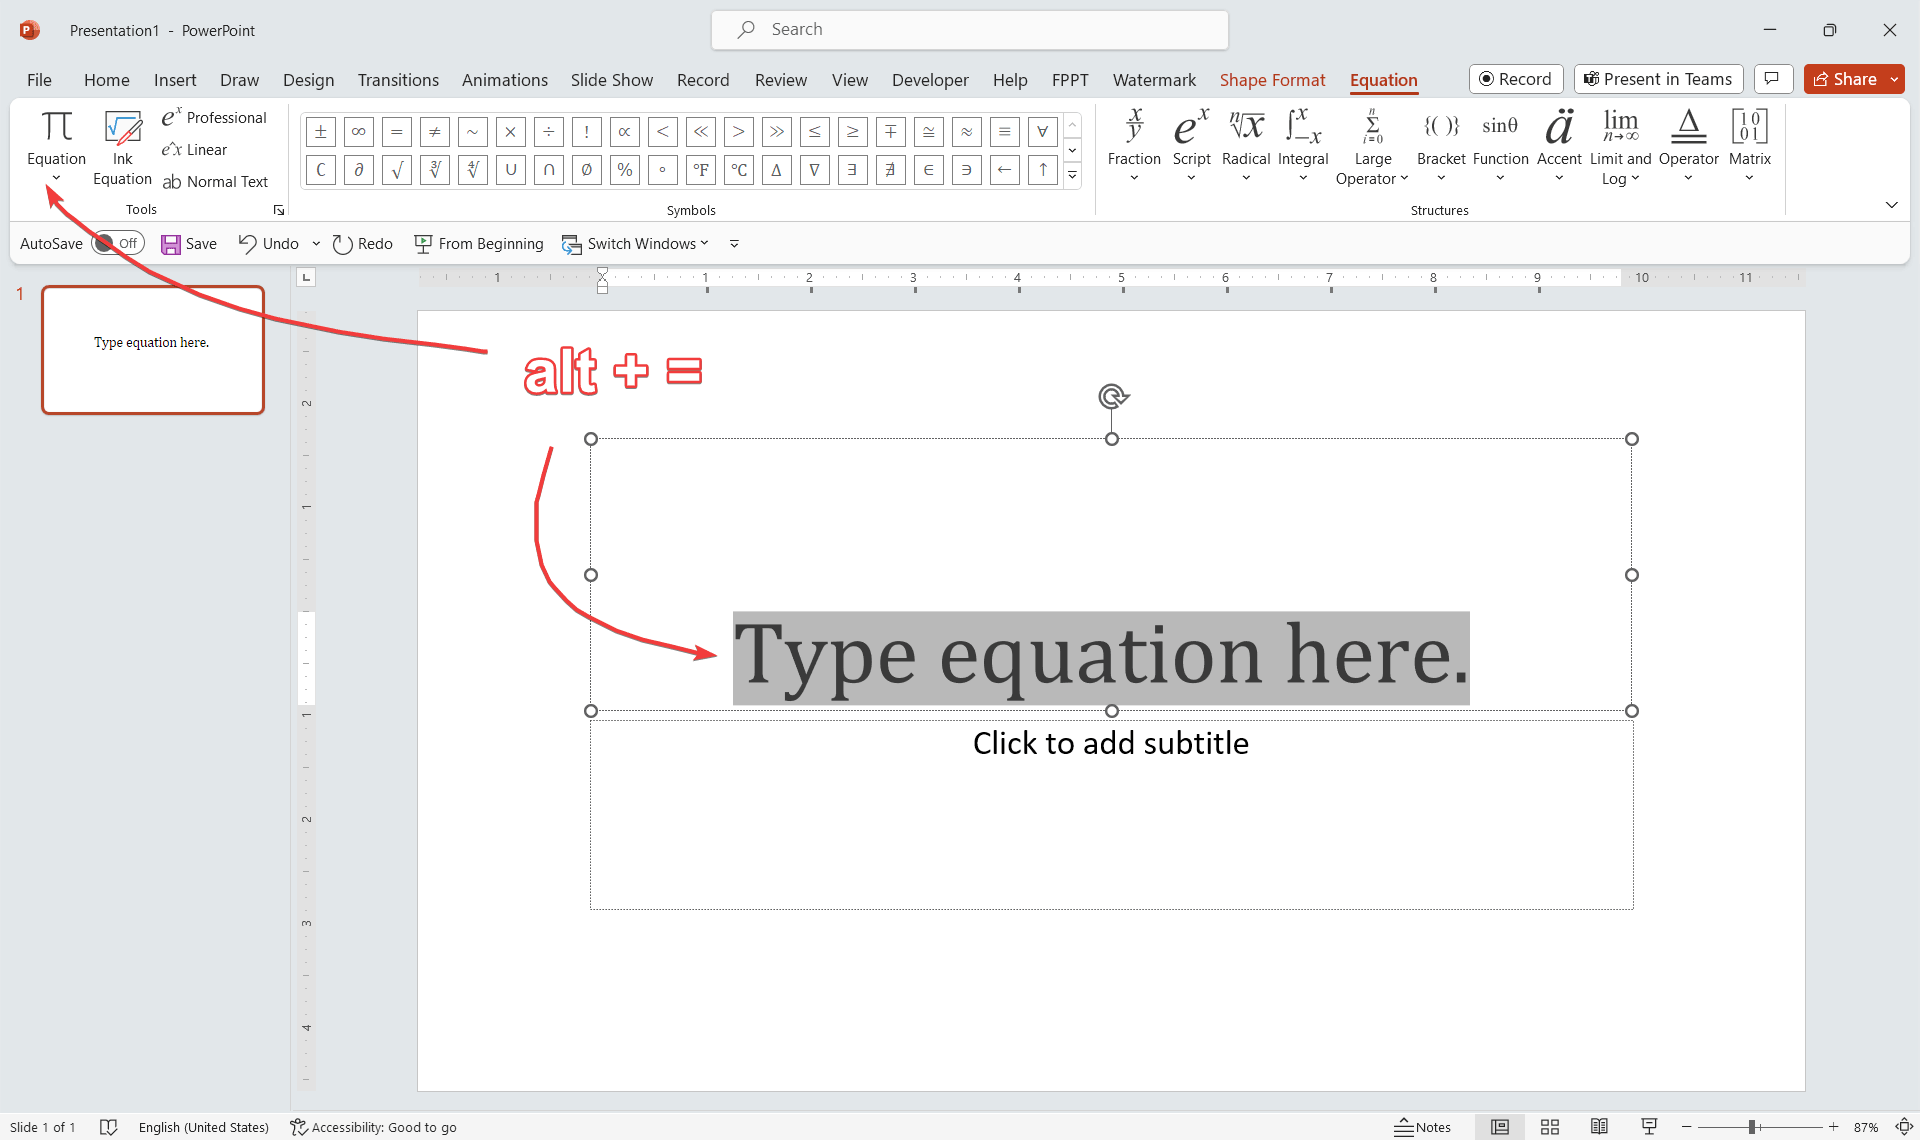
Creating Equations: How to Insert Equations in PowerPoint?
The true power of the Equation Editor lies in its ease of use. To create an equation, you can either select one from the gallery, which provides templates for commonly used equations, or start typing your equation directly.
For speed, familiarize yourself with keyboard shortcuts — for example, “^” for exponents or “/” for fractions — which allow you to type out equations without taking your hands off the keyboard. Don’t worry about getting it perfect on the first go; you can always edit later.
By using the equations editor you can insert simple and complex equations. Here is a non-comprehensive list of equations and math expressions available in PowerPoint Equations Editor:
- Math Fraction
- Integration
- Large operators
- Functions sin, cos, tan
- Limit and log functions
- Advanced operators
- Complex matrix
The equations editor also include lot of equations symbols ready to be used, for example alpha beta gamma and other letters of the Greek alphabet. Besides these characters and symbols you can also use the end of proof symbols for demonstrations as well as asterisks and arrows.
Using the PowerPoint Equation Editor for Matrices
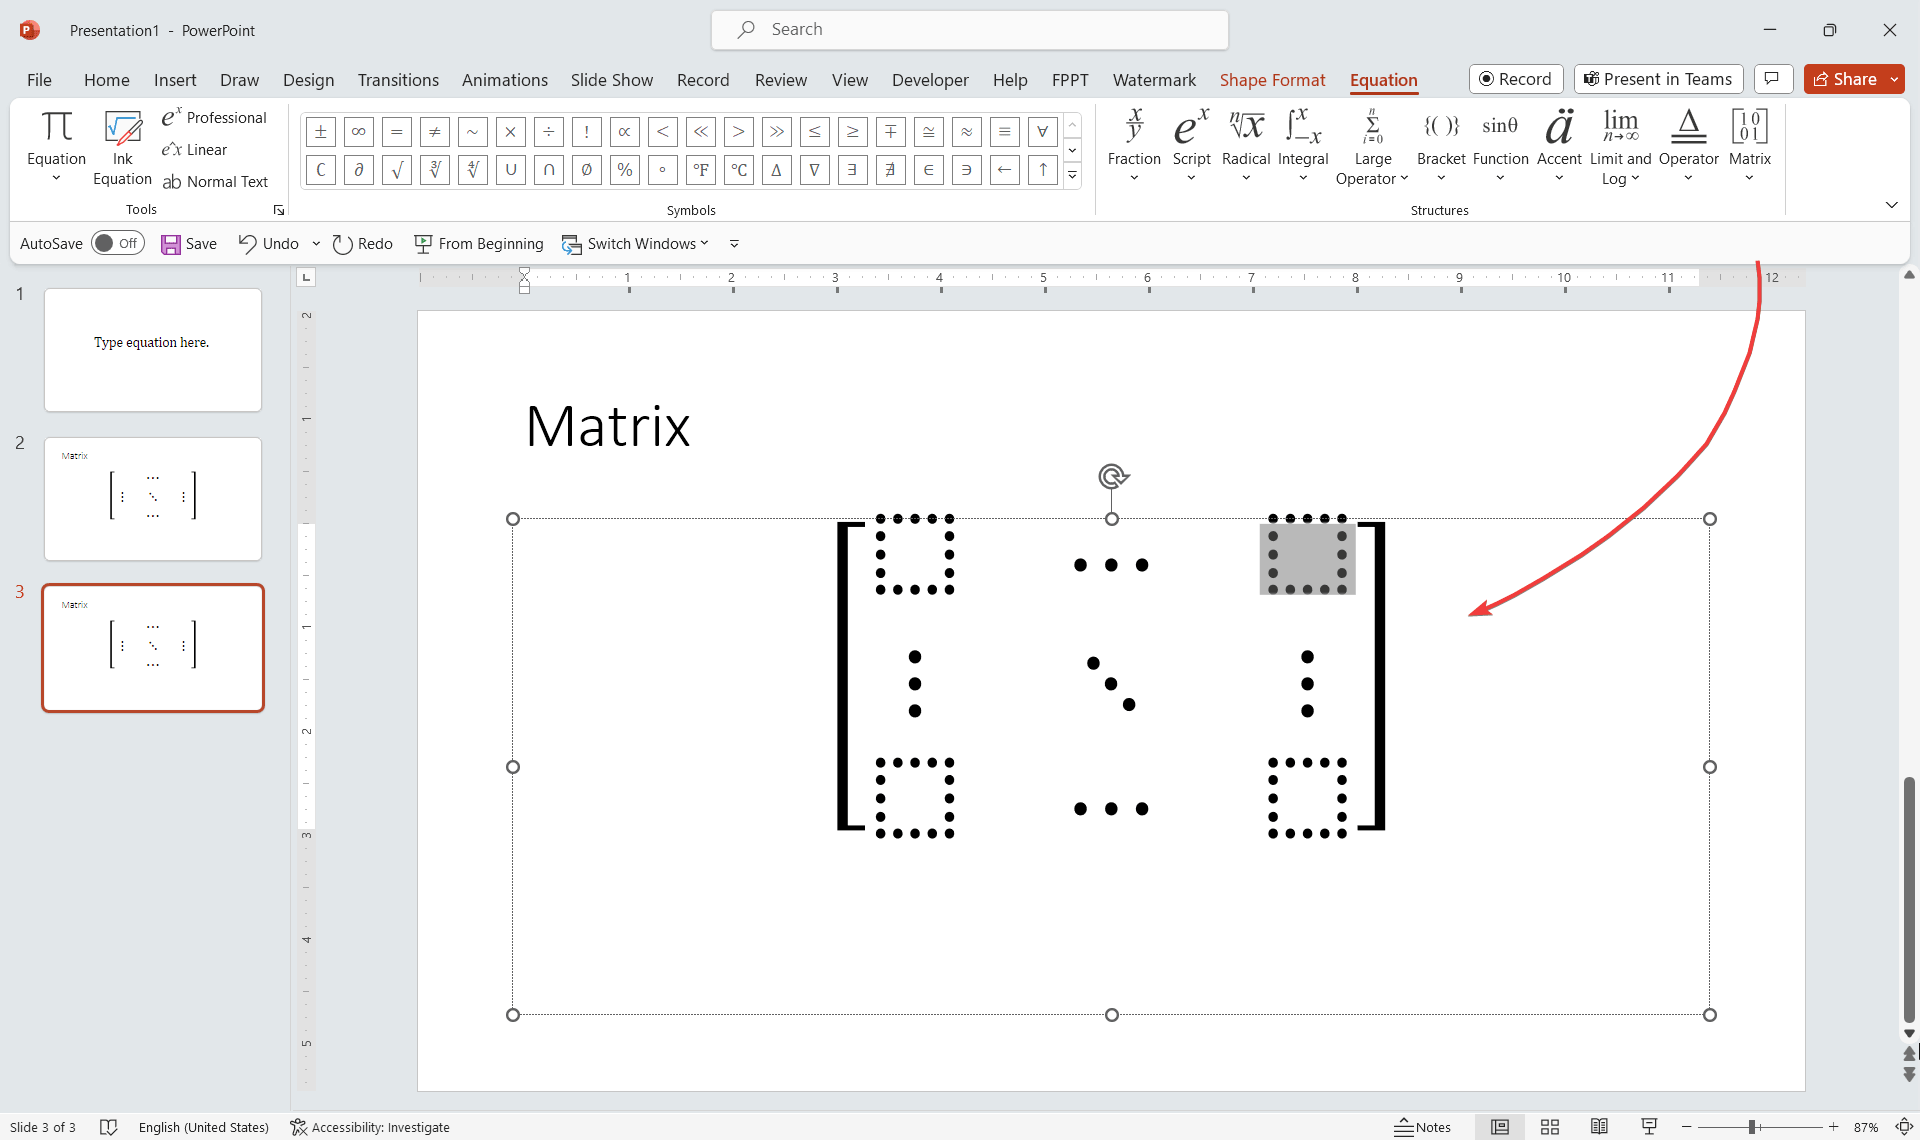
Matrices are a staple in various mathematical fields, including algebra and statistics, as well as in practical applications like computer graphics and systems engineering. The PowerPoint Equation Editor is equipped to handle matrix creation with ease, allowing presenters to clearly display complex matrix operations or data sets. Here’s how you can use the editor to insert and format matrices. In this example, we present a 2×2 matrix example inserted with PowerPoint Equation Editor:
Editing and Formatting Equations
Once your equation is in place, fine-tuning it for readability and emphasis is straightforward. Clicking on different parts of the equation will reveal new formatting options, including changing the font size, style, or even color. It’s crucial to maintain consistency in formatting to avoid confusion, but don’t shy away from using color judiciously to highlight important parts of the equation.
The Equation Editor isn’t just for simple algebra. It handles a range of advanced mathematical operations and even supports ink handwriting conversion for tablet users.
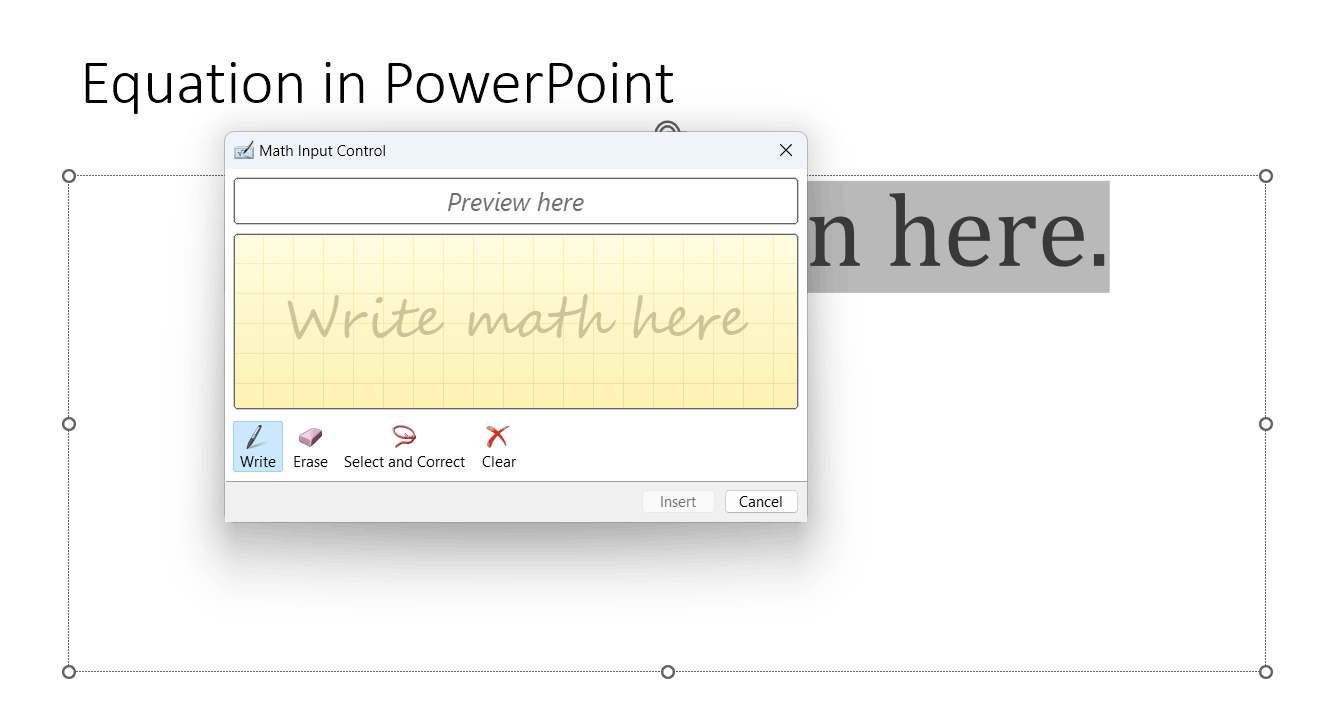
You can also use the Ink Equation functionality to open a pane and draw your equation in the designed area. With Ink Equations, you can write equations by hand, and PowerPoint will convert them into typed text. This is especially useful for those who find it quicker to jot down equations with a stylus or for adding a personal touch to presentations.
PowerPoint Equations Examples
Practical examples can be the best way to illustrate how to use PowerPoint’s Equation Editor effectively.
You can use the PowerPoint Equations Editor to prepare lectures, e.g. for Introduction to Equations PowerPoint presentations.
Let’s walk through how to input two fundamental mathematical expressions: the Binomial Theorem and the formula for the Area of a Circle.
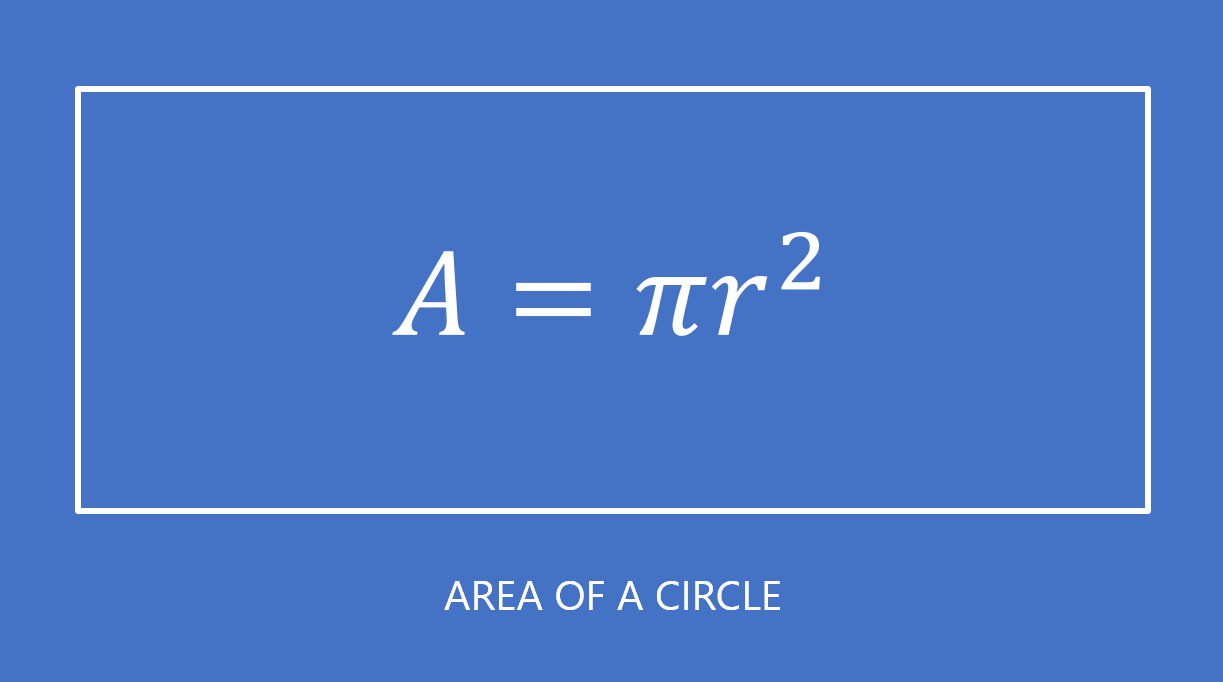
Area of a Circle Equation Example
The formula for the area of a circle, which is A = πr², is straightforward but a good example of superscript formatting in PowerPoint .
Binomial Theorem Equation Example
The Binomial Theorem is an essential formula in algebra that describes the algebraic expansion of powers of a binomial. According to the theorem, it can be expressed as:
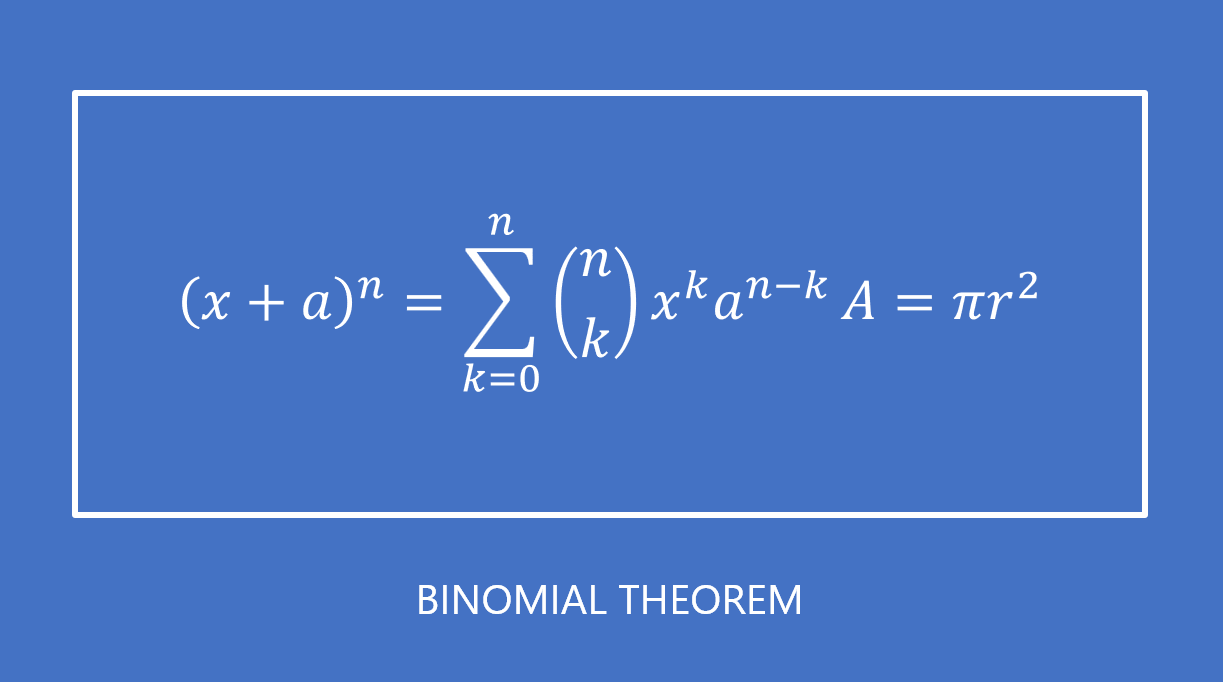
In both cases, your equations will be neatly formatted in the PowerPoint slide, ready for presentation. Remember that these are static examples. If you link to an external data source like Excel, you can make your equations dynamic and data-driven, allowing them to update automatically with new values.
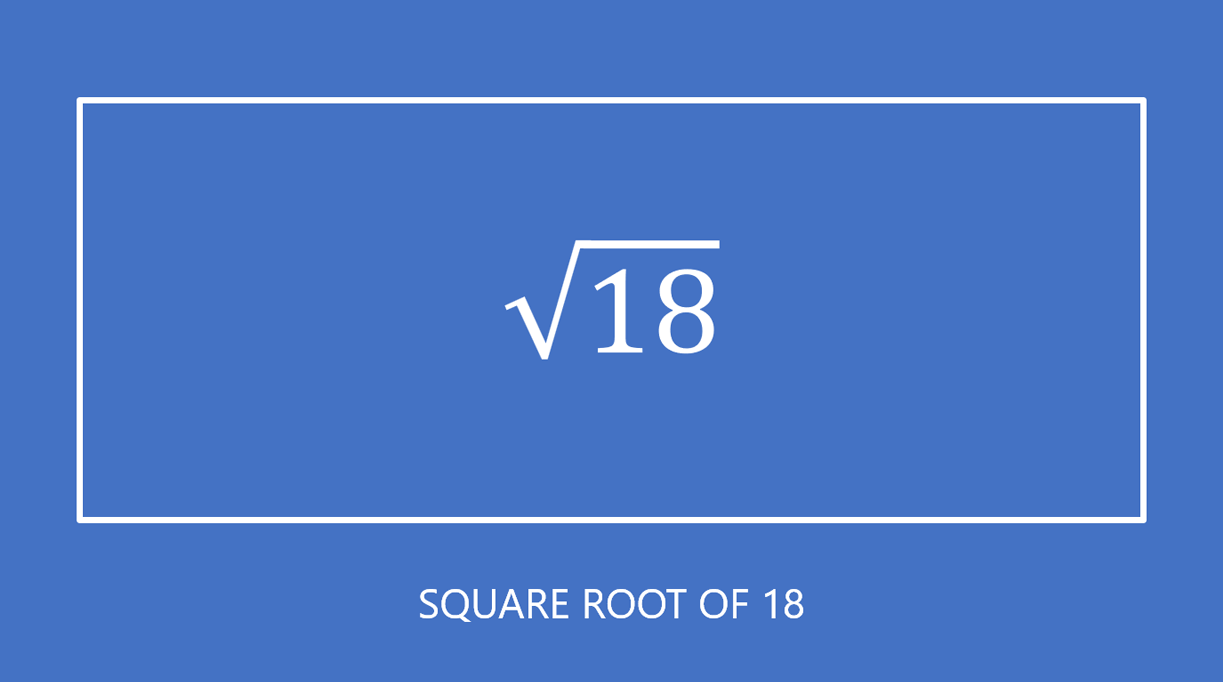
Square Root of 18
Best Practices using PowerPoint Equations Editor for your Presentation Slides
Presenting equations isn’t just about accuracy; it’s also about how they fit into your overall slide design. Keep equations large enough to be easily readable by your audience, and always preview your slides to check how they appear on different screens.
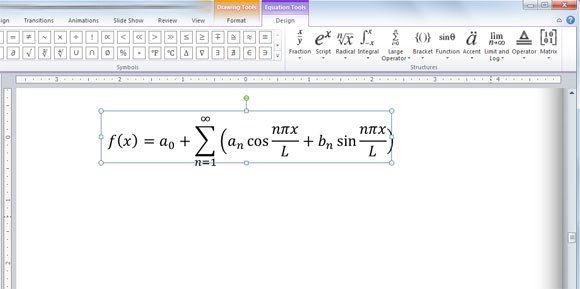
Avoid overusing animations with equations as they can distract from the content. Always remember to add alternative text to your equations to ensure accessibility for audience members who may be using screen readers. Also, consider adjusting the font size so the Equation can be seen by the audience from a far distance, especially when presenting lectures in Universities.
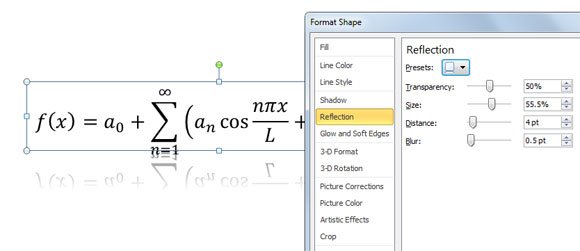
If you want to apply some special effects, you can do that as you do it with other conventional shapes or text. Something good about equations from Microsoft PowerPoint is that you can treat equations in the same way as you did with shapes. For example, in the following screenshot we show you how to apply Reflection style (this is just a sample.
PowerPoint Equation Editor vs. Other Equation Editors (Comparison)
For some, the choice of equation editor comes down to personal preference or specific requirements of their field.
LaTeX, for example, is a typesetting system that’s particularly popular in academia and offers great precision and a vast array of symbols.
MathType is another powerful tool that integrates with PowerPoint.
It’s important to weigh the pros and cons of each tool in relation to your needs, considering factors such as ease of use, compatibility, and the nature of your content.
Final thoughts
Mastering PowerPoint’s Equation Editor can dramatically improve the quality of your mathematical presentations and allows you to insert simple and complex equations or math expressions in your PowerPoint presentation slides . With practice, you can quickly input complex equations that look clean and professional, ensuring your audience can focus on the content rather than getting distracted by formatting inconsistencies or errors. Remember, the ultimate goal is to communicate effectively, and a well-presented equation can often be worth a thousand words.
We will send you our curated collections to your email weekly. No spam, promise!
Navigation menu
Making good looking equations in powerpoint presentations.
- 1.1.1 Microsoft Office PowerPoint 2003
- 1.1.2 Microsoft Office PowerPoint 2007
- 1.2 Entering and editing the equation
- 1.3.1 Resizing: Microsoft Office PowerPoint 2003
- 1.3.2 Resizing: Microsoft Office PowerPoint 2007
- 1.4 Final Processing of the Equation
- 1.5.1 Changing the text color: Microsoft Office PowerPoint 2003
- 1.5.2 Changing the text color: Microsoft Office PowerPoint 2007
- 1.6 Summary
Technical professionals frequently have to include mathematical equations in their PowerPoint presentations. Unfortunately, in many cases the results are not very professional looking, with everything being different sizes and misaligned. In an effort to improve things, some presenters take screen shots of equations that do look good, and then paste it onto their slide, making a grainy image of what used to be a good looking equation with a background that doesn't match the rest of the slide. We can do better.
It's not hard to make an equation in PowerPoint that looks good and makes you look good. First, we'll review how to put an equation into PowerPoint, and then how to make it look good.
Starting the equation editor
Microsoft office powerpoint 2003.
First, we'll review how to put an equation on a PowerPoint slide. First, bring up the slide that you want to have the equation and click on the text area to highlight it. Next, look at the menu at the top of the PowerPoint window and you'll find an item called "Insert". Click it and a dropdown menu will appear. Click on "Object" and a popup window will appear. If you don't see the "Object" item right away, keep the mouse on the menu and it will expand so that you can see the item. After the popup window appears, make sure the "New Item" radio button has been selected (it usually is by default), and in the middle of the window you'll see a lengthy list of things you can include, in alphabetical order. Scroll down until you see "Microsoft Equation 3.0" and double click it. Another popup window will appear that will contain the equation you make.
Microsoft Office PowerPoint 2007
Note: PowerPoint 2007 lost some significant functionality compared to PowerPoint 2003. Specifically, if you want equation text other than black, you will not be able to do it in PowerPoint. To do this, create the equation in Word, including all the formatting you want. Then triple click the equation. Then right click and select Copy in the menu that pops up. Then switch to PowerPoint. On the Home tab on the ribbon, click on the arrow below the Paste icon. On the menu that pops up, select Paste Special . On the menu that pops up, select Picture (Enhanced Metafile) and click OK . If this choice is not available, click Cancel , go back to Word, and try again. When you're successful, the equation will appear in your slide, and you can move it to where you want it. We know this is an ugly workaround, but we have yet to find a better way. Hopefully, Microsoft will fix this problem in the near future, and we'll update this page.
First, we'll review how to put an equation on a PowerPoint slide. First, bring up the slide that you want to have the equation and click on the text area to highlight it. Next, click the Insert tab on the ribbon. Click on the Object icon in the Text group, which will bring up a popup window. After the popup window appears, make sure the "Create New" radio button has been selected (it usually is by default), and in the middle of the window you'll see a lengthy list of things you can include, in alphabetical order. Scroll down until you see "Microsoft Equation 3.0" and double click it. Another popup window will appear that will contain the equation you make.
Entering and editing the equation
At the top of the window there should be a toolbar of mathematical symbols you can use, as shown in Figure 1.

If you don't see the toolbar, you can make it visible by going to the menu at the top and clicking "View", and then clicking on "Toolbar" in the menu. This will put a check next to the item which will make the toolbar appear at the top of the window.
As an example, we'll make a variation of the equation that you made in Lab 1. In this case, we'll have the phrase "root=" and then the quadratic equation. Note the box in the Equation Editor window, and the flashing cursor. Like Word, this is where anything you type will appear.
In the text that follows, when we say to type something followed by text in quotes, you should omit the quotes. Start by typing "root=". Note that the text is relatively large script italics. Next, we want the fraction. Since you've already done this in Lab 1, we'll summarize the instructions:
On the toolbar, look for the fraction symbol in the bottom row. Select the fraction symbol out of the dropdown menu. You get a fraction with two boxes, and the top box has the cursor. Type "-b". Then select the "±" symbol in the top row of the toolbar. Next, select the square root symbol, which is in the same dropdown menu as the fraction. We need an exponential, so we select the exponential symbols from the dropdown menu next to the fraction dropdown menu. The exact item you want is the leftmost item in the fourth row. To help you select the proper item, we show the dropdown menu in Figure 2.

Some new boxes appear, and the cursor is where the exponential goes. Type the number "2" and you have the proper power. Now press the cursor down key, or click on the main box, and the cursor will move down to where you type what will be squared. Type "b". We can now finish up what goes inside the square root by typing "-4ac". Next, we'll do the bottom of the fraction. Click on the empty box at the bottom of the fraction and type "2a". You've now completed the formula.
The formula is mathematically correct, but it doesn't look very pretty. What you have should look like Figure 3.
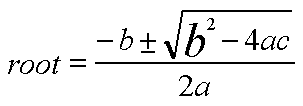
There are multiple type sizes and styles. Also, sometimes you might see strange spacing in words. The problem is that as you type the equation, Microsoft Equation compares what you type with a list of known equations that it recognizes. It then "helps" you by separating the equation name from what comes next, which it views as a variable name. The results are frequently wrong. For example, if we use the word "Pride", Microsoft Equation will recognize this as a function called "Pr" for assigning probabilities) followed by a variable name "ide", and will produce the result "Pride". We need to fix these kinds of problems along with the rest.
We'll now clean everything up so that the result looks professional. First, let's see why things look different. Click on the word "root". Then go up to the menu at the top of the window and click "Style". Note that it there is a check next to the word "Math". Click on the "Size" item on the menu and you'll see a check mark next to the word "Full". Now click on the "b" that's part of the b 2 inside the square root. Once again, click on the "Style" item in the menu and you'll see that "Math" is checked, but when you click on "Size" you'll see that "Symbol" is checked instead of "Full". This is why this is a different size. We'll now make this the same size as everything else so that it looks better. Double click the "b" that's the wrong size so that it's highlighted. Now go up to the "Size" menu item and click on the word "Full". The check mark moves from "Symbol" to "Full", and the "b" becomes the same size as everything else, making things look much better. The result is shown in Figure 4.

You can now use this technique any time you enter an equation to make it look good.
Some people don't like the italicized script. You can change this too if you'd like. The style is what's making the equation look this way. Let's change the equation to a different style. First, select the entire equation by putting the mouse to the left of the equation, pressing the left mouse button, dragging the mouse across the entire equation, and releasing the mouse button. The entire equation will now be highlighted. Click on the "Style" menu item and select "Text" instead of "Math". Unfortunately, after changing the style, the sizes will set back to the default, and the "b" will be the wrong size again. Set the size back to "Full" as described above to fix this. The equation now looks like Figure 5.

If you want, you can try other styles, or define your own. However, the "Math" style, once you fix the size issues, usually looks very good.
Putting the result on your PowerPoint slide
Now that you have an equation that looks good, you can now easily put it on the PowerPoint slide. Just close the Equation Editor by clicking on "File" and "Exit and Return to Presentation", or just clicking on the "X" on the window in the top right corner, like any other window. You'll now return to your presentation with the equation on the slide, but probably not where you want it. Figure 6 shows a typical slide.
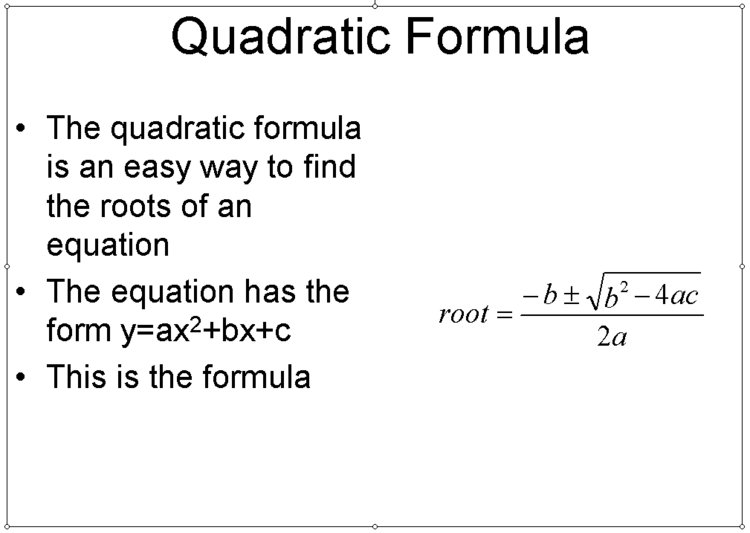
We'll now move the formula to the right place, and also resize it. The equation works just like any other image, so if you know how to work with images on slides you can skip the rest of this.
Resizing: Microsoft Office PowerPoint 2003
If you click on the equation a box of little circles will appear around and the cursor will turn into crosshairs with arrows on them. You can now drag the equation to where you want it. Just press the left mouse button, drag the mouse to where you want the equation, and release the button. You can also stretch and resize the equation if you want. If you "grab" one of the corner circles by putting the mouse on it and pressing the left mouse button, you can make the equation bigger and smaller, releasing the mouse button when it's the right size. You can also stretch the equation in just one direction by "grabbing" a circle at the top or bottom, or one of the sides. We advise against stretching the equation because it usually ends up with a result that looks weird
Resizing: Microsoft Office PowerPoint 2007
If you click on the equation a box will appear around and the cursor will turn into crosshairs with arrows on them. You can now drag the equation to where you want it. Just press the left mouse button, drag the mouse to where you want the equation, and release the button. You can also stretch and resize the equation if you want. The corners have a group of three dots framing the corner, and the edges have a group of three dots in line. If you "grab" one of the corner dot groups by putting the mouse on it and pressing the left mouse button, you can make the equation bigger and smaller, releasing the mouse button when it's the right size. You can also stretch the equation in just one direction by "grabbing" a group of dots at the top or bottom, or one of the sides. We advise against stretching the equation because it usually ends up with a result that looks weird
Final Processing of the Equation
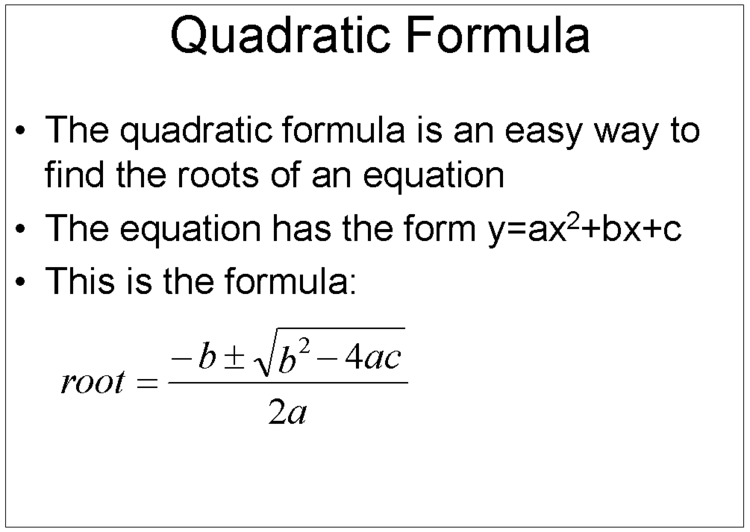
Figure 7 shows the final product where the equation has been moved and resized, and Figure 8 shows the same slide where the equation was stretched. As you can see, Figure 7 looks much better.
Getting the Colors Right
When you make an equation, the characters will be black. This is probably acceptable for a Word document, but can be disastrous in PowerPoint, especially if a dark background is chosen for your slides. In this case you have two options:
- Choose a different slide background for your presentation, with a white background being the most desirable
- Change the color used in the equations from black to one of your choice
This section will describe how to pursue the second option.
First, all the work you've done so far is fine. All we need to do is some "post processing" to the equation to get it right. After you've gotten the equation on the slide in the right place, we'll change the color of the characters. To understand how this works, you need to know that PowerPoint considers the equation to be a special form of picture, so that's how we'll proceed.
Make sure the equation has been selected. You can tell that it has been selected by seeing the white dots around the perimeter of the equation. If you don't see the dots, click on the equation once and they will appear. Note: Do not double click on the equation, or you'll end up back in Equation Editor. The dots around the perimeter can be used to resize the equation, but right now we just want to make sure the equation is selected.
Changing the text color: Microsoft Office PowerPoint 2003
Once the equation is selected, move the mouse over the equation and right click the mouse. This will bring up a popup menu. About halfway down the menu you'll see an item "Show Picture Toolbar". Click this item. A small toolbar will appear over the slide containing a number of icons. At the right end of the toolbar you'll see an icon of a can of paint being poured over a picture. If you "hover" the mouse over this icon, you'll see a "popup tip" with the caption "Recolor Picture". Click on this icon.
A popup window will occur with a title of "Recolor Picture", with your equation being shown (probably in black) on the right side of the window. On the left side of the window you'll see several lines of color bars, with each line containing a column called "Original" and "New". What these bars do is allow you to map the "Original" color into the "New" color of your choice. To the right of the "New" color is a pulldown arrow. Click on this arrow and a popup selection of colors will appear. If you like one of the colors shown, click on it. This will cause the "New" color in the bar to change to your selection, and a checkmark to appear in the box at the left end of this line to indicate that the original color is being changed. If you find the election of colors to be too limiting, when the popup selection appears, click on "More Colors..." and you'll see all the colors PowerPoint can make, arranged like an artist's palette. In the bottom right corner of this window is a box of the color you selected. Click the dot of the color you want. The box in the lower right corner will now show the old color and the new color. If you don't like your choice, keep clicking dots until you see one your like, or click "Cancel" to give up. If you find a color you like, click "OK" and you'll return to the "Recolor Picture" window. The right side of the window will now show the equation in the color you chose. If you don't like the result, just repeat this process. If you do, click "OK", and you'll return back to your slide with the equation in the color you like.
Changing the text color: Microsoft Office PowerPoint 2007
This functionality is not available in PowerPoint 2007. The workaround to this lack is to create and properly format the equation in Word 2007, and then copy and "Paste Special" into PowerPoint 2007, as described at the start of this page.
You now know how you can make good looking slides with good looking equations in them. This will give you a competitive edge against others who don't know how to do this. You'll find that the same techniques can be used for many other types of objects, such as Excel spreadsheets, video files, and many others. If you want to review the full range of what you can include, go to back to the PowerPoint menu and select "Insert" and "Object" again. This time scroll through the list of types and you'll see a rich selection. All of them work the same way, as we described here.
Return to Table of Contents
- View source
- Privacy policy
- About EG1004 Lab Manual
- Disclaimers
- Login / Create Account
- Powered by MediaWiki

- Search Search Search …
Free Templates for Math for PowerPoint and Google Slides
Make your presentations and lessons stand out with these free Math templates.
Download them to use with PowerPoint or edit them in Google Slides and start creating!

Unleash the wild fun in your classroom with this FREE PowerPoint Template and Google Slides Theme. Liven up your classroom with a touch of the jungle! This free downloadable theme features adorable monkeys swinging through lush green backgrounds and bright banana trees. It’s more than just cute though – this theme is […]
Cute Monkeys, mini theme and subtraction drag and drop activity.
Transport Your Audience Back to the 90s with This Groovy Template for PowerPoint and Google Slides. Relive the nostalgia of the 1990s with this free and creative PowerPoint template and Google Slides theme. This vibrant design is packed with fun icons, geometric shapes, and bright colors that will transport your audience back to […]
90’s Vibes free creative Powerpoint template and Google Slides theme.
Geometrical shapes and volume formulas free PowerPoint Template and Google Slides Theme Ready to dive into geometry and volume? This template is perfect for this type of Math. Paper like backgrounds, highlighters, pen, ruler and a compass are featured in this free theme, along with some geometric shapes and their […]
Geometrical Shapes and Volume, free school template.
Free template with a retro interface look for Google Slides and PowerPoint. This template has a retro style with a grid background, featuring a colorful interface with geometric shapes. The pink, blue and yellow tones create a vibrant and dynamic look that will catch your audience’s attention. Whether you want […]
Simple retro interface free ppt and slides template.

Free PowerPoint template and Google Slides theme. Jones is a simple presentation template for marketing, school or to present your next business idea. Even though I used black and yellow as their main colors, you can edit the theme and change its look with just a few clicks. DOWNLOAD POWERPOINT […]
Jones, simple presentation template with hand drawn doodles

Free template for Google Slides and PowerPoint. Thena features fresh colors and geometric shapes. It can be used for a number of different topics, such as a presentation about modern art or a geometry lesson. I’ve used theme colors, so if you wish to change its accents, follow this tutorial. […]
Thena, fun template with geometric shapes.
Free education templates for Google Slides and PowerPoint. 17 different layouts. Utilize them in PowerPoint or Google Slides. Or customize them, save them as JPEG and use them in Google Jamboard or Microsoft Whiteboard. – Or print them out! – This bundle includes: – Frayer model– Weekly planner– Station rotation– […]
School Bundle 06. Templates for education.

Free PowerPoint template and Google Slides theme. Spilsbury free slides theme can be used in the classroom or for a presentation about psychology, mental health, education and more. I used theme colors, so you can edit the master (theme) and change the accent colors for any colors you like. I’ve […]
Spilsbury, puzzle slides theme. Updated Template.

Free PowerPoint template and Google Slides theme. Free multipurpose template for PowerPoint and Google Slides presentations. Lane is a formal template with beautiful tiles made with shapes and lines. Since it’s a multipurpose template, you can use it for different topics. If you need this template to match the colors […]
Lane, free theme with blue tiles.

Free PowerPoint template and Google Slides theme. Free fun template to celebrate we are back to school! Ready to start school? We are almost there! You can use this fun template to welcome your students! Not only it’s great as a Back to School theme, but also works for Math […]
Welcome back to School! Fun slides theme.
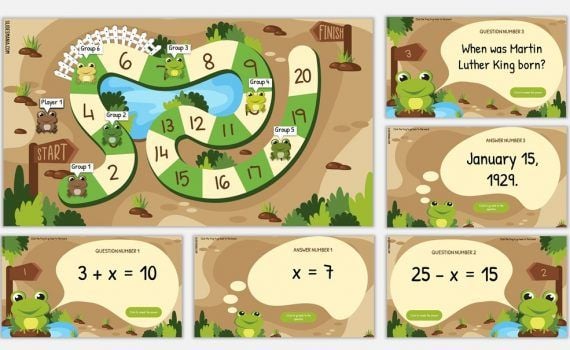
Free PowerPoint template and Google Slides theme. Free interactive gameboard template for the little ones (and for the not so little too!) If you are thinking on creating some fun end of the year activities, this template is perfect! To set it up, simply add your questions, activities or challenges […]
Frogtastic! Fun free digital board game template.

Get a copy of this template here.
Jamboard for Equivalent Fractions

Free PowerPoint template and Google Slides theme. Unbox your lesson with this template! It comes with an agenda slide. Are you ready to unbox your ideas? This template is perfect to get them out of your head and share them with your colleagues or classmates! And not only you can […]
Unbox your ideas presentation template.
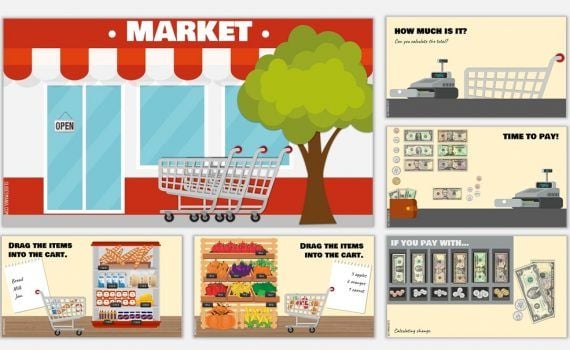
Free PowerPoint template and Google Slides theme. Buying groceries and counting money template. If you are teaching your students how to count money, this Market template can come quite handy! Go to the market and start adding your list items into the shopping cart! – To modify prices, go to […]
Market, interactive template for counting money.
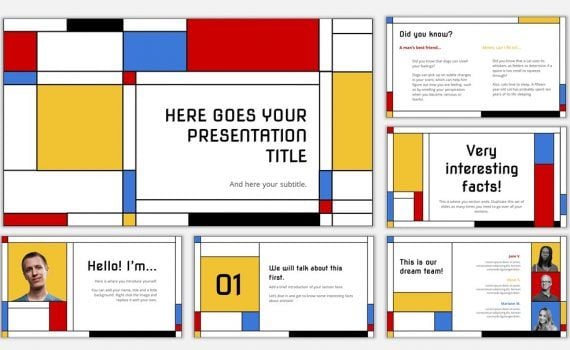
Free PowerPoint template and Google Slides theme. A classic Bauhaus-inspired free presentation slides. Morris is a free multi-purpose template, its geometric shapes and editable colors make it perfect for many different topics. To customize the colors to fit your topic or brand, go to Slide > Edit Theme, click on […]
Morris, Bauhaus presentation template.
How to insert the mathematical and other symbols into the PowerPoint slide
1. In the slide where you want to insert the symbol, click Alt+= to insert equitation:

2. In the equitation without any additional actions, enter any of the symbols that you need using a \+Name of the symbol . E.g.,
3. After entering the symbol, click the space; it changed entering a name to the appropriate symbol.
4. Click Alt+= again to exit from the equitation.
Now you can continue entering your text.
Note: you can see all of Name of the symbol combinations that you can use in the AutoCorrect Options . See How to quickly insert Greek symbols into your slide for more details.
See also this tip in French: Comment insérer les symboles mathématiques dans la diapositive PowerPoint .
Please, disable AdBlock and reload the page to continue
Today, 30% of our visitors use Ad-Block to block ads.We understand your pain with ads, but without ads, we won't be able to provide you with free content soon. If you need our content for work or study, please support our efforts and disable AdBlock for our site. As you will see, we have a lot of helpful information to share.
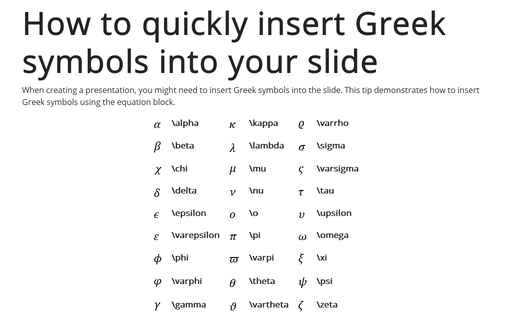
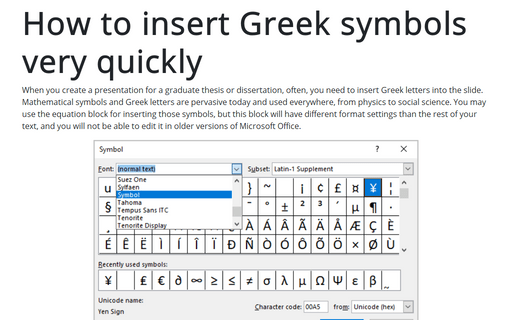
How to quickly insert Greek symbols into your slide
How to insert Greek symbols very quickly
How to create water stains effects in PowerPoint
Animated Math Equations For PowerPoint Presentations
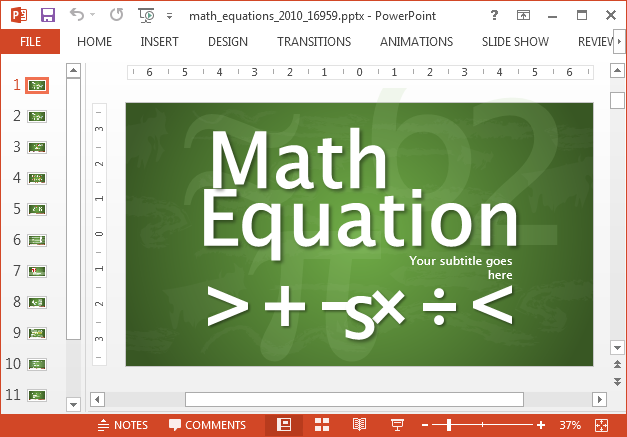
Math equations might be required in PowerPoint presentations to present complex calculations before an audience. For example, this might include a class lecture from a math or statistics teacher who might require revealing various formulas and calculations in the form of PowerPoint slides. The Animated Math Equations Template for PowerPoint provides a wide range of animated slides and equations which can be used for making slide decks with mathematical and geometry related icons and symbols .
Editable Equations and Animated Layouts
With editable math equations and customizable layouts with animations, you get a very handy toolkit which can be easily moulded for different types of math and geometry related presentations. You can switch between animated and static layouts, as well as move objects around using nothing more than drag and drop.
Related: Free Math PowerPoint Templates
Highlight Parts of Your Mathematical Equations
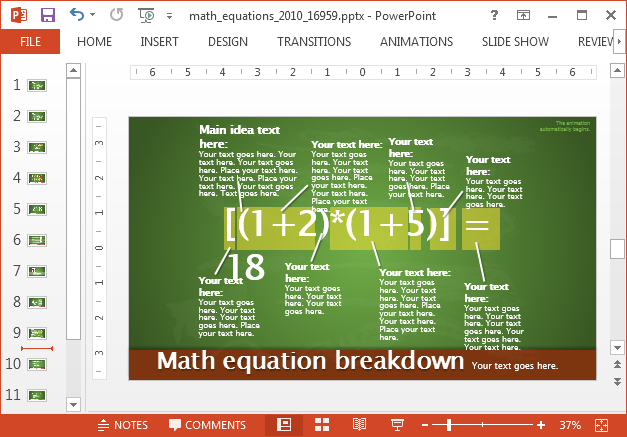
There are also red circles which come within sample slides which can be moved over an equation to highlight parts of your slide. You can also copy these red circles to create more of them and even change the color of the circles.
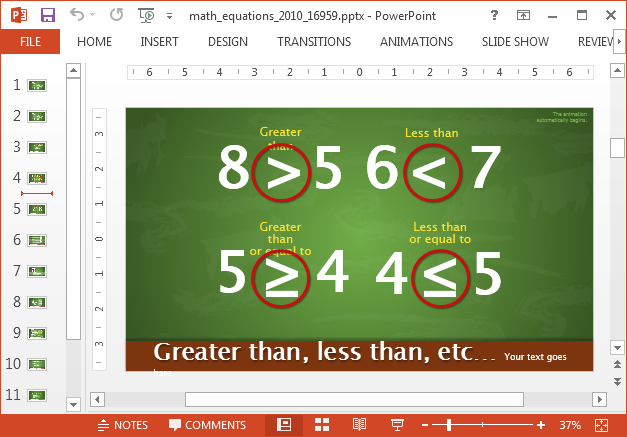
Create Complex Formulas and Equations in Slides
You can mix and mash the given equations to depict complex formulas and equations for your audience. The equations in sample slides act like clipart, which can be moved around, resized and recolored.
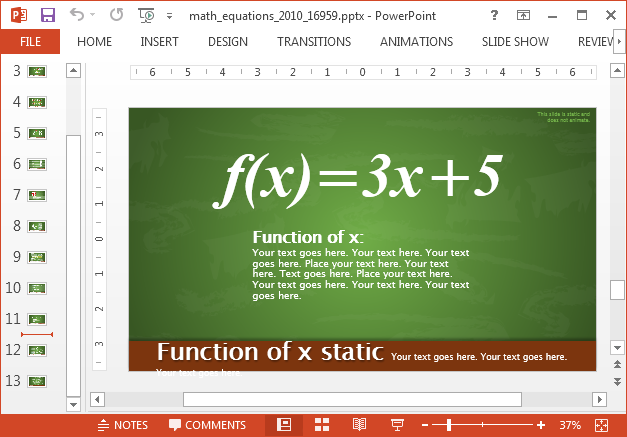
Sample Symbols and Clipart
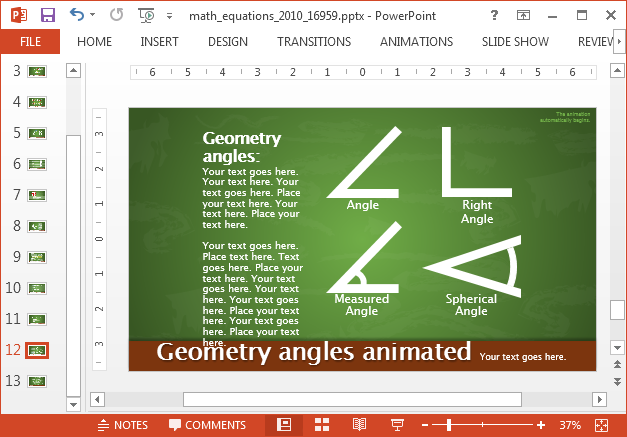
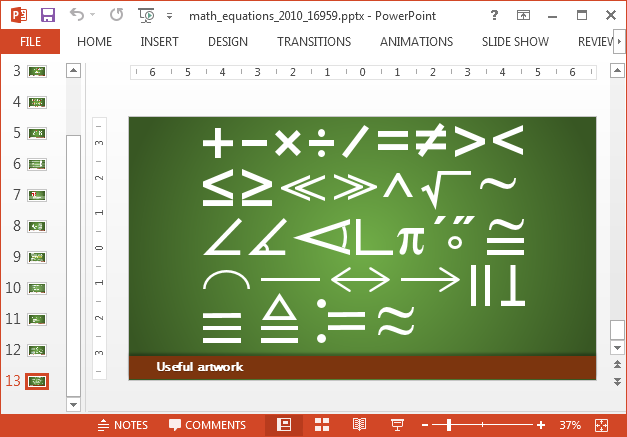
There are also geometry symbols which can be incorporated in your slides. Moreover, the template also offers exclusive clipart slide which provides various useful symbols in the form of reusable clipart.
The slide title ‘Useful Artwork’ is the last slide in the template and contains all major mathematical symbols. These symbols can help create equations, formulas and to explain basic or complex mathematical concepts.
Other than PowerPoint, both the Standard and Widescreen edition of this template are also available for Keynote.
Go to Presenter Media – Animated Math Equations Template for PowerPoint (Standard 4:3)
Go to Presenter Media – Animated Math Equations Template for PowerPoint (Widescreen 16:9)
Browse Templates
- Best PowerPoint Templates
- Accounting & Finance
- Corporate Strategy
- Health & Medical Services
- Entertainment
Popular Topics
Related blog posts.
How to Create a QR Code for PowerPoint Presentations
8 Tips for Making Effective PowerPoint Presentations for College Students
Using the 10 20 30 Rule for PowerPoint Presentations in 2023
10 Uses of PowerPoint: Creating More than Just Presentations

How to Add Exponent in PowerPoint

Do you want to make your PowerPoint presentations more impactful and engaging? Adding exponents can help you achieve that goal! An exponent – also known as a superscript or power – is a small raised number that indicates how many times a base number should be multiplied by itself. For example, in 2^3, 2 is the base number and 3 is the exponent. This means that 2 should be multiplied by itself three times, which equals 8. Exponents are commonly used in math equations, scientific formulas, and other technical contexts.
Table of Contents
What is an Exponent?
An exponent is a mathematical symbol that is used to indicate repeated multiplication of a base number. It is written as a small raised number to the right of the base number. For example, if you want to write “2 to the power of 3” in PowerPoint, you would write 2^3. This means that 2 should be multiplied by itself three times, which equals 8. Exponents are commonly used in mathematical expressions, formulas, and equations, as well as in scientific and technical contexts.
Exponents are also used to represent very large or very small numbers in a compact form. For instance, the speed of light in a vacuum is approximately 299,792,458 meters per second. This number can be written as 2.99792458 x 10^8 m/s using scientific notation, where the exponent 8 indicates that the decimal point should be moved 8 places to the right.
Exponents can also be negative, which means that the base number is divided by itself a certain number of times. For example, 2^-3 is equal to 1/(2^3), which is equal to 1/8 or 0.125. Negative exponents are commonly used in physics and engineering to represent quantities such as resistance, capacitance, and attenuation.
The Importance of Using Exponents in PowerPoint
Exponents can be a useful tool in PowerPoint presentations for several reasons. Firstly, they help to convey complex mathematical or scientific concepts in a clear and concise way. Instead of writing out lengthy equations, you can use exponents to represent the same information in a more compact format. Secondly, exponents can make your presentation more visually appealing and easy to read. By using different text formatting and styles, you can draw attention to key points and emphasize important information.
Another benefit of using exponents in PowerPoint is that they can help to save time during your presentation. Instead of spending valuable time writing out equations or formulas on a whiteboard or flipchart, you can simply include them in your PowerPoint slides using exponents. This can help to keep your presentation moving at a steady pace and ensure that you cover all of the necessary information within your allotted time.
Finally, using exponents in PowerPoint can also help to improve audience engagement and understanding. By presenting information in a clear and concise manner, you can help your audience to better grasp complex concepts and ideas. Additionally, by using visual aids such as exponents, you can make your presentation more interactive and engaging, which can help to keep your audience interested and focused throughout your talk.
Understanding the Different Ways to Add Exponents in PowerPoint
There are several ways to add exponents in PowerPoint, depending on your preference and the specific context of your presentation. Here are some of the most common methods:
- Use the Superscript Button: The Superscript button is located on the Home tab in the Font group. Simply select the base number you want to raise and click the button to convert it into a superscript.
- Use the Keyboard Shortcut: To add a superscript using your keyboard, simply select the base number and press CTRL + Shift + + (plus sign).
- Use the Font Dialog Box: You can also access the Font dialog box by right-clicking on the selected text and choosing Font. From here, you can choose the Superscript option to convert the text to a superscript.
- Type the Exponent Manually: If you prefer, you can also type the exponent as a separate character using the “^” symbol. Simply type the base number, then the “^” symbol, and then the exponent in normal font. Select the exponent only and click on the superscript button or use the keyboard shortcut to make it into a superscript.
It is important to note that when adding exponents in PowerPoint, you should consider the font size and style of your text. If your text is too small or the font style is too thin, the superscript may not be easily visible to your audience. In this case, you may want to consider increasing the font size or using a bolder font style to make the superscript stand out.
Additionally, if you are presenting complex mathematical equations or formulas, you may want to consider using a specialized equation editor in PowerPoint. This will allow you to easily add exponents, as well as other mathematical symbols and notations, in a clear and organized manner.
Step-by-Step Guide on Adding Exponents in PowerPoint
Now, let’s go through a step-by-step guide on how to add an exponent in PowerPoint. Here’s what you need to do:
- Select the base number you want to raise.
- Click on the Superscript button on the Home tab in the Font group, or use the keyboard shortcut CTRL + Shift + + (plus sign) to make the selected text into a superscript.
- Alternatively, you can access the Font dialog box by right-clicking on the selected text and choosing Font. From here, you can choose the Superscript option to convert the text to a superscript.
- If you want to type the exponent manually, type the base number, then the “^” symbol, and then the exponent in normal font. Select the exponent only and click on the superscript button or use the keyboard shortcut to make it into a superscript.
- You can also format and customize the superscript as needed by changing the font, size, color, and other settings.
How to Add a Superscript in PowerPoint
Adding a superscript in PowerPoint is easy and can be done in several ways:
- Method 1: Use the Superscript Button on the Home tab in the Font group
- Method 2: Use the Keyboard Shortcut CTRL + Shift + + (plus sign)
- Method 3: Use the Font Dialog Box
- Method 4: Type the exponent manually using the “^” symbol
How to Add a Subscript in PowerPoint
Adding a subscript in PowerPoint is similar to adding a superscript:
- Method 1: Use the Subscript Button on the Home tab in the Font group
- Method 2: Use the Keyboard Shortcut CTRL + = (equal sign)
- Method 4: Type the subscript manually using the “_” symbol
Using Keyboard Shortcuts to Add Exponents in PowerPoint
If you prefer to use keyboard shortcuts, there are several shortcuts you can use to add exponents in PowerPoint:
- To add a superscript: CTRL + Shift + + (plus sign)
- To add a subscript: CTRL + = (equal sign)
Adding Special Characters as Exponents in PowerPoint
If you need to add a special character as an exponent in PowerPoint, you can do so using the Insert Symbol feature. Here’s how:
- Place the cursor where you want to insert the special character.
- Click on the Insert tab, then choose Symbol in the Symbols group.
- Select the font that contains the symbol you want to insert. For example, if you want to insert the symbol for a square root, choose the Symbol font.
- Scroll through the list to find the symbol you want to insert, or use the Search box to find it more quickly.
- Click on the symbol to insert it into your PowerPoint slide.
- Select the symbol and click on the Superscript button or use the keyboard shortcut to make it into a superscript.
Tips for Formatting and Customizing Exponents in PowerPoint
Here are some tips for formatting and customizing exponents in PowerPoint:
- Choose a font size and style that is easy to read, even when the text is small.
- Use consistent formatting throughout your presentation to keep it looking professional and cohesive.
- Experiment with different colors and styles to draw attention to key points and emphasize important information.
- Consider using a different font for exponents to make them stand out more clearly.
Common Mistakes to Avoid When Adding Exponents in PowerPoint
While using exponents in PowerPoint can enhance the effectiveness of your presentation, there are some common mistakes to avoid:
- Using exponents unnecessarily – only use exponents when they add value to your presentation and make it more clear or concise.
- Making the exponent too small – ensure that the exponent is large enough to be read easily by your audience, even from a distance.
- Making the exponent too large – avoid making the exponent too large, as it can make your slide look cluttered and distract from other elements.
- Not using a consistent style – ensure that you use a consistent style for all exponents in your presentation, to keep it looking professional and unified.
Troubleshooting Issues When Adding Exponents in PowerPoint
If you encounter any issues when adding exponents in PowerPoint, here are some troubleshooting tips:
- Make sure that you are formatting the text as a superscript, and not a subscript or regular text.
- Ensure that the font size and style are appropriate for the size of the exponent and its placement on the slide.
- Check that the exponent is clear and easy to read – if not, adjust the formatting or choose a different font or color.
- If you are having difficulty typing the exponential symbol (^), try copying and pasting it from a different source.
Best Practices for Adding Exponents in Your PowerPoint Presentations
Here are some best practices to keep in mind when adding exponents to your PowerPoint presentations:
- Use exponents sparingly, and only in cases where they add value to your presentation.
- Ensure that your exponents are visually consistent and easy to read.
- Keep the font size and style appropriate for the size and placement of the exponent on the slide.
- Avoid cluttering your slide with too many exponents or too much text in general.
- Proofread your presentation carefully to ensure that all exponents are correctly formatted and in the correct location.
Examples of Using Exponents Effectively in Your Presentation Slides
Finally, here are some examples of how you can use exponents effectively in your PowerPoint presentation slides:
- Using exponents to represent mathematical formulas or scientific concepts.
- Using exponents to show the compounding effect of interest rates over time.
- Using exponents to indicate the power of a brand or product in the market.
- Using exponents to highlight key statistics or numerical data.
- Using exponents to create eye-catching titles or headlines for your slides.
As you can see, adding exponents in PowerPoint is not only easy but also a powerful tool for communicating complex ideas and data. By following the tips and guidelines outlined in this article, you can create effective and engaging presentations that are sure to make an impact.
By humans, for humans - Best rated articles:
Excel report templates: build better reports faster, top 9 power bi dashboard examples, excel waterfall charts: how to create one that doesn't suck, beyond ai - discover our handpicked bi resources.
Explore Zebra BI's expert-selected resources combining technology and insight for practical, in-depth BI strategies.

We’ve been experimenting with AI-generated content, and sometimes it gets carried away. Give us a feedback and help us learn and improve! 🤍
Note: This is an experimental AI-generated article. Your help is welcome. Share your feedback with us and help us improve.

Home / Free PowerPoint Templates / Math lesson Slides
Math lesson Slides

- Share this template
Math lesson Presentation
Free google slides theme, powerpoint template, and canva presentation template.
This cheerful Math Lesson template comes in purple, blue and orange. Packed with quirky math-themed doodles and illustrations, these slides have everything you need to plan an effective lesson. Fill out the timeline and agenda, list main topics and concepts, add charts and graphs and present your main points on fully customizable slides. Keep the color scheme as is or branch out. Stick to the Poppins font style or choose your own. Check out the Elements and Icons resource pages for even more ideas. At the start of the deck you can learn how to use this as a Math PowerPoint template, math themed Google Slides or Canva design.
Features of this template
- 25+ stunning slides designed by professionals
- 80+ icons and a world map (you can change sizes and colors)
- 16:19 screen layout (can change to 4:3 with a click)
- Simple to share or download as a PDF or JPG
- Ready for use with PowerPoint or Google Slides
- Millions of high-quality photos, illustrations and fonts
- A handy drag-and-drop tool for elements and graphics
- A library of designer-curated elements and icons
- Collaboration features so you can design with others
- Videos and soundtracks for multi-media appeal
- Pre-recorded Talking Presentations for easy prep
People who find this template also visit
- Free PowerPoint Templates
- Free Google Slides Templates
- Customizable and Feature-Rich Canva Templates
- Editor's Choice of Best Presentation Templates
- Popular Presentation Templates
Related templates

Science and Engineering Practices for Middle School Slides

Scrapbook Style Book Club Slides

Cool Soccer Poster

Scrapbook New Resolutions Education Pack Slides
Illustrated Division Math Puzzle Worksheet

Clean Minimal IT Consulting Slides
Supercharge your slides with canva..
Add dynamic GIF's, captivating videos, and stylish photo frames directly from Canva's royalty-free asset library effortlessly. Share or export anywhere, be it PPT or Google Slides.
Magic Write
Go from idea to your first draft *in seconds with Magic Write, our content generation tool powered by OpenAI.

Image generator
Dream it up, then add it to your design. Watch your words and phrases transform into beautiful images.

Background remover
Click to remove image backgrounds, perfect for product photos, headshots, or transparent PNGs.
Export your results to PPT and Google Slides
Canva allows you to export to a perfect PPT or Google Slide when you are done.

Learn how to export from Canva to other formats
Canva to PowerPoint Canva to Google Slides
- 1. Open the template in Canva .
- 2. In Canva click on "Share" at the top right-hand corner, then click "More"
- 3. Scroll down further and you will see "Google Drive" button.
- 4. Choose the "PPTX" or Powerpoint file type. Make sure to click "All Pages" on select pages.
- 5. Your template is exported to Google Slides!
- 1. Click on Canva button to open the design.
- 2. Once the Canva file is opened, click on "Share" at the top right hand corner, then click on "Download"
- 3. Once you clicked on "Download" , choose the "PPTX" or Powerpoint file type
- 4. Your template is now ready for use on Powerpoint!
Professional designs for your presentations
SlidesCarnival templates have all the elements you need to effectively communicate your message and impress your audience.
Suitable for PowerPoint and Google Slides
Download your presentation as a PowerPoint template or use it online as a Google Slides theme. 100% free, no registration or download limits.
- Google Slides
- Editor’s Choice
- All Templates
- Frequently Asked Questions
- Google Slides Help
- PowerPoint help
- Who makes SlidesCarnival?
Critical PowerPoint Shortcuts – Claim Your FREE Training Module and Get Your Time Back!

How to Make a PowerPoint Presentation (Step-by-Step)
- PowerPoint Tutorials
- Presentation Design
- January 22, 2024
In this beginner’s guide, you will learn step-by-step how to make a PowerPoint presentation from scratch.
While PowerPoint is designed to be intuitive and accessible, it can be overwhelming if you’ve never gotten any training on it before. As you progress through this guide, you’ll will learn how to move from blank slides to PowerPoint slides that look like these.

Table of Contents
Additionally, as you create your presentation, you’ll also learn tricks for working more efficiently in PowerPoint, including how to:
- Change the slide order
- Reset your layout
- Change the slide dimensions
- Use PowerPoint Designer
- Format text
- Format objects
- Play a presentation (slide show)
With this knowledge under your belt, you’ll be ready to start creating PowerPoint presentations. Moreover, you’ll have taken your skills from beginner to proficient in no time at all. I will also include links to more advanced PowerPoint topics.
Ready to start learning how to make a PowerPoint presentation?
Take your PPT skills to the next level
Start with a blank presentation.
Note: Before you open PowerPoint and start creating your presentation, make sure you’ve collected your thoughts. If you’re going to make your slides compelling, you need to spend some time brainstorming.
For help with this, see our article with tips for nailing your business presentation here .
The first thing you’ll need to do is to open PowerPoint. When you do, you are shown the Start Menu , with the Home tab open.
This is where you can choose either a blank theme (1) or a pre-built theme (2). You can also choose to open an existing presentation (3).
For now, go ahead and click on the Blank Presentation (1) thumbnail.

Doing so launches a brand new and blank presentation for you to work with. Before you start adding content to your presentation, let’s first familiarize ourselves with the PowerPoint interface.
The PowerPoint interface

Here is how the program is laid out:
- The Application Header
- The Ribbon (including the Ribbon tabs)
- The Quick Access Toolbar (either above or below the Ribbon)
- The Slides Pane (slide thumbnails)
The Slide Area
The notes pane.
- The Status Bar (including the View Buttons)
Each one of these areas has options for viewing certain parts of the PowerPoint environment and formatting your presentation.
Below are the important things to know about certain elements of the PowerPoint interface.
The PowerPoint Ribbon

The Ribbon is contextual. That means that it will adapt to what you’re doing in the program.
For example, the Font, Paragraph and Drawing options are greyed out until you select something that has text in it, as in the example below (A).

Furthermore, if you start manipulating certain objects, the Ribbon will display additional tabs, as seen above (B), with more commands and features to help you work with those objects. The following objects have their own additional tabs in the Ribbon which are hidden until you select them:
- Online Pictures
- Screenshots
- Screen Recording
The Slides Pane

This is where you can preview and rearrange all the slides in your presentation.
Right-clicking on a slide in the pane gives you additional options on the slide level that you won’t find on the Ribbon, such as Duplicate Slide , Delete Slide , and Hide Slide .

In addition, you can add sections to your presentation by right-clicking anywhere in this Pane and selecting Add Section . Sections are extremely helpful in large presentations, as they allow you to organize your slides into chunks that you can then rearrange, print or display differently from other slides.

The Slide Area (A) is where you will build out your slides. Anything within the bounds of this area will be visible when you present or print your presentation.
Anything outside of this area (B) will be hidden from view. This means that you can place things here, such as instructions for each slide, without worrying about them being shown to your audience.

The Notes Pane is the space beneath the Slide Area where you can type in the speaker notes for each slide. It’s designed as a fast way to add and edit your slides’ talking points.
To expand your knowledge and learn more about adding, printing, and exporting your PowerPoint speaker notes, read our guide here .
Your speaker notes are visible when you print your slides using the Notes Pages option and when you use the Presenter View . To expand your knowledge and learn the ins and outs of using the Presenter View , read our guide here .

You can resize the Notes Pane by clicking on its edge and dragging it up or down (A). You can also minimize or reopen it by clicking on the Notes button in the Status Bar (B).
Note: Not all text formatting displays in the Notes Pane, even though it will show up when printing your speaker notes. To learn more about printing PowerPoint with notes, read our guide here .
Now that you have a basic grasp of the PowerPoint interface at your disposal, it’s time to make your presentation.
Adding Content to Your PowerPoint Presentation
Notice that in the Slide Area , there are two rectangles with dotted outlines. These are called Placeholders and they’re set on the template in the Slide Master View .
To expand your knowledge and learn how to create a PowerPoint template of your own (which is no small task), read our guide here .

As the prompt text suggests, you can click into each placeholder and start typing text. These types of placeholder prompts are customizable too. That means that if you are using a company template, it might say something different, but the functionality is the same.

Note: For the purposes of this example, I will create a presentation based on the content in the Starbucks 2018 Global Social Impact Report, which is available to the public on their website.
If you type in more text than there is room for, PowerPoint will automatically reduce its font size. You can stop this behavior by clicking on the Autofit Options icon to the left of the placeholder and selecting Stop Fitting Text to this Placeholder .
Next, you can make formatting adjustments to your text by selecting the commands in the Font area and the Paragraph area of the Home tab of the Ribbon.

The Reset Command: If you make any changes to your title and decide you want to go back to how it was originally, you can use the Reset button up in the Home tab .

Insert More Slides into Your Presentation
Now that you have your title slide filled in, it’s time to add more slides. To do that, simply go up to the Home tab and click on New Slide . This inserts a new slide in your presentation right after the one you were on.

You can alternatively hit Ctrl+M on your keyboard to insert a new blank slide in PowerPoint. To learn more about this shortcut, see my guide on using Ctrl+M in PowerPoint .
Instead of clicking the New Slide command, you can also open the New Slide dropdown to see all the slide layouts in your PowerPoint template. Depending on who created your template, your layouts in this dropdown can be radically different.

If you insert a layout and later want to change it to a different layout, you can use the Layout dropdown instead of the New Slide dropdown.
After inserting a few different slide layouts, your presentation might look like the following picture. Don’t worry that it looks blank, next we will start adding content to your presentation.

If you want to follow along exactly with me, your five slides should be as follows:
- Title Slide
- Title and Content
- Section Header
- Two Content
- Picture with Caption
Adding Content to Your Slides
Now let’s go into each slide and start adding our content. You’ll notice some new types of placeholders.

On slide 2 we have a Content Placeholder , which allows you to add any kind of content. That includes:
- A SmartArt graphic,
- A 3D object,
- A picture from the web,
- Or an icon.
To insert text, simply type it in or hit Ctrl+C to Copy and Ctrl+V to Paste from elsewhere. To insert any of the other objects, click on the appropriate icon and follow the steps to insert it.
For my example, I’ll simply type in some text as you can see in the picture below.

Slides 3 and 4 only have text placeholders, so I’ll go ahead and add in my text into each one.

On slide 5 we have a Picture Placeholder . That means that the only elements that can go into it are:
- A picture from the web

To insert a picture into the picture placeholder, simply:
- Click on the Picture icon
- Find a picture on your computer and select it
- Click on Insert
Alternatively, if you already have a picture open somewhere else, you can select the placeholder and paste in (shortcut: Ctrl+V ) the picture. You can also drag the picture in from a file explorer window.

If you do not like the background of the picture you inserted onto your slide, you can remove the background here in PowerPoint. To see how to do this, read my guide here .
Placeholders aren’t the only way to add content to your slides. At any point, you can use the Insert tab to add elements to your slides.
You can use either the Title Only or the Blank slide layout to create slides for content that’s different. For example, a three-layout content slide, or a single picture divider slide, as shown below.

In the first example above, I’ve inserted 6 text boxes, 3 icons, and 3 circles to create this layout. In the second example, I’ve inserted a full-sized picture and then 2 shapes and 2 text boxes.
The Reset Command: Because these slides are built with shapes and text boxes (and not placeholders), hitting the Reset button up in the Home tab won’t do anything.
That is a good thing if you don’t want your layouts to adjust. However, it does mean that it falls on you to make sure everything is aligned and positioned correctly.
For more on how to add and manipulate the different objects in PowerPoint, check out our step-by-step articles here:
- Using graphics in PowerPoint
- Inserting icons onto slides
- Adding pictures to your PowerPoint
- How to embed a video in PowerPoint
- How to add music to your presentation
Using Designer to generate more layouts ideas
If you have Office 365, your version of PowerPoint comes with a new feature called Designer (or Design Ideas). This is a feature that generates slide layout ideas for you. The coolest thing about this feature is that it uses the content you already have.
To use Designer , simply navigate to the Design tab in your Ribbon, and click on Design Ideas .

NOTE: If the PowerPoint Designer is not working for you (it is grey out), see my troubleshooting guide for Designer .
Change the Overall Design (optional)
When you make a PowerPoint presentation, you’ll want to think about the overall design. Now that you have some content in your presentation, you can use the Design tab to change the look and feel of your slides.
For additional help thinking through the design of your presentation, read my guide here .
A. Picking your PowerPoint slide size
If you have PowerPoint 2013 or later, when you create a blank document in PowerPoint, you automatically start with a widescreen layout with a 16:9 ratio. These dimensions are suitable for most presentations as they match the screens of most computers and projectors.
However, you do have the option to change the dimensions.
For example, your presentation might not be presented, but instead converted into a PDF or printed and distributed. In that case, you can easily switch to the standard dimensions with a 4:3 ratio by selecting from the dropdown (A).
You can also choose a custom slide size or change the slide orientation from landscape to portrait in the Custom Slide Size dialog box (B).

To learn all about the different PowerPoint slide sizes, and some of the issues you will face when changing the slide size of a non-blank presentation, read my guide here .
B. Selecting a PowerPoint theme
The next thing you can do is change the theme of your presentation to a pre-built one. For a detailed explanation of what a PowerPoint theme is, and how to best use it, read my article here .
In the beginning of this tutorial, we started with a blank presentation, which uses the default Office theme as you can see in the picture below.

That gives you the most flexibility because it has a blank background and quite simple layouts that work for most presentations. However, it also means that it’s your responsibility to enhance the design.
If you’re comfortable with this, you can stay with the default theme or create your own custom theme ( read my guide here ). But if you would rather not have to think about design, then you can choose a pre-designed theme.
Microsoft provides 46 other pre-built themes, which include slide layouts, color variants and palettes, and fonts. Each one varies quite significantly, so make sure you look through them carefully.
To select a different theme, go to the Design tab in the Ribbon, and click on the dropdown arrow in the Themes section .

For this tutorial, let’s select the Frame theme and then choose the third Variant in the theme. Doing so changes the layout, colors, and fonts of your presentation.

Note: The theme dropdown area is also where you can import or save custom themes. To see my favorite places to find professional PowerPoint templates and themes (and recommendations for why I like them), read my guide here .
C. How to change a slide background in PowerPoint
The next thing to decide is how you want your background to look for the entire presentation. In the Variants area, you can see four background options.

For this example, we want our presentation to have a dark background, so let’s select Style 3. When you do so, you’ll notice that:
- The background color automatically changes across all slides
- The color of the text on most of the slides automatically changes to white so that it’s visible on the dark background
- The colors of the objects on slides #6 and #7 also adjust, in a way we may not want (we’ll likely have to make some manual adjustments to these slides)

Note: If you want to change the slide background for just that one slide, don’t left-click the style. Instead, right-click it and select Apply to Selected Slides .
After you change the background for your entire presentation, you can easily adjust the background for an individual slide.

Inside the Format Background pane, you can see you have the following options:
- Gradient fill
- Picture or texture fill
- Pattern fill
- Hide background
You can explore these options to find the PowerPoint background that best fits your presentation.
D. How to change your color palette in PowerPoint
Another thing you may want to adjust in your presentation, is the color scheme. In the picture below you can see the Theme Colors we are currently using for this presentation.

Each PowerPoint theme comes with its own color palette. By default, the Office theme includes the Office color palette. This affects the colors you are presented with when you format any element within your presentation (text, shapes, SmartArt, etc.).

The good news is that the colors here are easy to change. To switch color palettes, simply:
- Go to the Design tab in the Ribbon
- In the Variants area, click on the dropdown arrow and select Colors
- Select the color palette (or theme colors) you want
You can choose among the pre-built color palettes from Office, or you can customize them to create your own.
As you build your presentation, make sure you use the colors from your theme to format objects. That way, changing the color palette adjusts all the colors in your presentation automatically.
E. How to change your fonts in PowerPoint
Just as we changed the color palette, you can do the same for the fonts.

Each PowerPoint theme comes with its own font combination. By default, the Office theme includes the Office font pairing. This affects the fonts that are automatically assigned to all text in your presentation.

The good news is that the font pairings are easy to change. To switch your Theme Fonts, simply:
- Go to the Design tab in the Ribbon
- Click on the dropdown arrow in the Variants area
- Select Fonts
- Select the font pairing you want
You can choose among the pre-built fonts from Office, or you can customize them to create your own.
If you are working with PowerPoint presentations on both Mac and PC computers, make sure you choose a safe PowerPoint font. To see a list of the safest PowerPoint fonts, read our guide here .
If you receive a PowerPoint presentation and the wrong fonts were used, you can use the Replace Fonts dialog box to change the fonts across your entire presentation. For details, read our guide here .
Adding Animations & Transitions (optional)
The final step to make a PowerPoint presentation compelling, is to consider using animations and transitions. These are by no means necessary to a good presentation, but they may be helpful in your situation.
A. Adding PowerPoint animations
PowerPoint has an incredibly robust animations engine designed to power your creativity. That being said, it’s also easy to get started with basic animations.
Animations are movements that you can apply to individual objects on your slide.

To add a PowerPoint animation to an element of your slide, simply:
- Select the element
- Go to the Animations tab in the Ribbon
- Click on the dropdown arrow to view your options
- Select the animation you want
You can add animations to multiple objects at one time by selecting them all first and then applying the animation.
B. How to preview a PowerPoint animation

There are three ways to preview a PowerPoint animation:
- Click on the Preview button in the Animations tab
- Click on the little star next to the slide
- Play the slide in Slide Show Mode
To learn other ways to run your slide show, see our guide on presenting a PowerPoint slide show with shortcuts .
To adjust the settings of your animations, explore the options in the Effect Options , Advanced Animation and the Timing areas of the Animation tab .

Note: To see how to make objects appear and disappear in your slides by clicking a button, read our guide here .
C. How to manage your animations in PowerPoint

The best way to manage lots of animations on your slide is with the Animation Pane . To open it, simply:
- Navigate to the Animations tab
- Select the Animation Pane
Inside the Animation Pane, you’ll see all of the different animations that have been applied to objects on your slide, with their numbers marked as pictured above.
Note: To see examples of PowerPoint animations that can use in PowerPoint, see our list of PowerPoint animation tutorials here .
D. How to add transitions to your PowerPoint presentation
PowerPoint has an incredibly robust transition engine so that you can dictate how your slides change from one to the other. It is also extremely easy to add transitions to your slides.
In PowerPoint, transitions are the movements (or effects) you see as you move between two slides.

To add a transition to a PowerPoint slide, simply:
- Select the slide
- Go to the Transitions tab in the Ribbon
- In the Transitions to This Slide area, click on the dropdown arrow to view your options
- Select the transition you want
To adjust the settings of the transition, explore the options in the Timing area of the Transitions tab.
You can also add the same transition to multiple slides. To do that, select them in the Slides Pane and apply the transition.
E. How to preview a transition in PowerPoint

There are three ways to preview your PowerPoint transitions (just like your animations):
- Click on the Preview button in the Transitions tab
- Click on the little star beneath the slide number in the thumbnail view
Note: In 2016, PowerPoint added a cool new transition, called Morph. It operates a bit differently from other transitions. For a detailed tutorial on how to use the cool Morph transition, see our step-by-step article here .
Save Your PowerPoint Presentation
After you’ve built your presentation and made all the adjustments to your slides, you’ll want to save your presentation. YOu can do this several different ways.

To save a PowerPoint presentation using your Ribbon, simply:
- Navigate to the File tab
- Select Save As on the left
- Choose where you want to save your presentation
- Name your presentation and/or adjust your file type settings
- Click Save
You can alternatively use the Ctrl+S keyboard shortcut to save your presentation. I recommend using this shortcut frequently as you build your presentation to make sure you don’t lose any of your work.

This is the standard way to save a presentation. However, there may be a situation where you want to save your presentation as a different file type.
To learn how to save your presentation as a PDF, see our guide on converting PowerPoint to a PDF .
How to save your PowerPoint presentation as a template
Once you’ve created a presentation that you like, you may want to turn it into a template. The easiest – but not technically correct – way, is to simply create a copy of your current presentation and then change the content.
But be careful! A PowerPoint template is a special type of document and it has its own parameters and behaviors.
If you’re interested in learning about how to create your own PowerPoint template from scratch, see our guide on how to create a PowerPoint template .
Printing Your PowerPoint Presentation
After finishing your PowerPoint presentation, you may want to print it out on paper. Printing your slides is relatively easy.

To open the Print dialog box, you can either:
- Hit Ctrl+P on your keyboard
- Or go to the Ribbon and click on File and then Print

Inside the Print dialog box, you can choose from the various printing settings:
- Printer: Select a printer to use (or print to PDF or OneNote)
- Slides: Choose which slides you want to print
- Layout: Determine how many slides you want per page (this is where you can print the notes, outline, and handouts)
- Collated or uncollated (learn what collated printing means here )
- Color: Choose to print in color, grayscale or black & white
There are many more options for printing your PowerPoint presentations. Here are links to more in-depth articles:
- How to print multiple slides per page
- How to print your speaker notes in PowerPoint
- How to save PowerPoint as a picture presentation
So that’s how to create a PowerPoint presentation if you are brand new to it. We’ve also included a ton of links to helpful resources to boost your PowerPoint skills further.
When you are creating your presentation, it is critical to first focus on the content (what you are trying to say) before getting lost inserting and playing with elements. The clearer you are on what you want to present, the easier it will be to build it out in PowerPoint.
If you enjoyed this article, you can learn more about our PowerPoint training courses and other presentation resources by visiting us here .
🔒 Unlock the PowerPoint Shortcuts Trusted by Industry Leaders KKR, American Express, HSBC, and More!
Join over 114,880 professionals from diverse fields including consulting, investment banking, advertising, marketing, sales, and business development who have supercharged their PowerPoint game with our proven methods.
✅ Customize compelling presentations effortlessly.
✅ Master time-saving techniques for faster deck creation.
✅ Boost your career prospects with top-notch PowerPoint skills.
Get FREE access to the Critical PowerPoint Shortcuts module of our premium training course by entering your name and email below.
DISCLAIMER: PC Users Only!
We respect your privacy and will keep your info safe and confidential.
About The Author
Popular Tutorials
- How to Strikethrough Text (l̶i̶k̶e̶ ̶t̶h̶i̶s̶) in Word, Excel & PowerPoint
- How to Make Animated Fireworks in PowerPoint (Step-by-Step)
- Strikethrough Shortcut (l̶i̶k̶e̶ ̶t̶h̶i̶s̶) for Word, Excel & PowerPoint
- How to Create a Flash Card Memory Game in PowerPoint (Like Jeopardy)
- Keyboard Shortcuts Not Working: Solved
PowerPoint Tutorial Categories
- Strategies & Opinions
- Shortcuts & Hacks
- Pictures, Icons, Videos, Etc.
- New Features
- Miscellaneous
- Charts & Data Viz
We help busy professionals save hours and gain peace of mind, with corporate workshops, self-paced courses and tutorials for PowerPoint and Word.
Work With Us
- Corporate Training
- Presentation & Template Design
- Courses & Downloads
- PowerPoint Articles
- Word Articles
- Productivity Resources
Find a Tutorial
- Free Training
- For Businesses
We help busy office workers save hours and gain peace of mind, with tips, training and tutorials for Microsoft PowerPoint and Word.
Master Critical PowerPoint Shortcuts – Secure Your FREE Training Module and Save Valuable Time!
⌛ Master time-saving expert techniques.
🔥 Create powerful presentations.
🚀 Propel your career to new heights.
We value your privacy – we keep your info safe.
Discover PowerPoint Hacks Loved by Industry Giants - KKR, AmEx, HSBC!
Over 114,880 professionals in finance, marketing and sales have revolutionized their PPT skills with our proven methods.
Gain FREE access to a full module of our premium PowerPoint training program – Get started today!
We hate spam too and promise to keep your information safe.
You are currently viewing a placeholder content from Facebook . To access the actual content, click the button below. Please note that doing so will share data with third-party providers.

Math in Office
User, developer, and accessibility info on math editing/display in Microsoft Office and Windows. New features and specifications of the RichEdit editor. Getting OfficeMath onto web apps
It’s been so fine!
Math Dictation
Itextdocument2 setproperty and getproperty, displaying math in wordpress, math speech strings and localization, using richedit for text processing, default math properties, richedit hyperlinks, setting and getting text in various formats, computers i have known.

How-To Geek
6 ways to create more interactive powerpoint presentations.
Engage your audience with cool, actionable features.
Quick Links
- Add a QR code
- Embed Microsoft Forms (Education or Business Only)
- Embed a Live Web Page
- Add Links and Menus
- Add Clickable Images to Give More Info
- Add a Countdown Timer
We've all been to a presentation where the speaker bores you to death with a mundane PowerPoint presentation. Actually, the speaker could have kept you much more engaged by adding some interactive features to their slideshow. Let's look into some of these options.
1. Add a QR code
Adding a QR code can be particularly useful if you want to direct your audience to an online form, website, or video.
Some websites have in-built ways to create a QR code. For example, on Microsoft Forms , when you click "Collect Responses," you'll see the QR code option via the icon highlighted in the screenshot below. You can either right-click the QR code to copy and paste it into your presentation, or click "Download" to add it to your device gallery to insert the QR code as a picture.
In fact, you can easily add a QR code to take your viewer to any website. On Microsoft Edge, right-click anywhere on a web page where there isn't already a link, and left-click "Create QR Code For This Page."
You can also create QR codes in other browsers, such as Chrome.
You can then copy or download the QR code to use wherever you like in your presentation.
2. Embed Microsoft Forms (Education or Business Only)
If you plan to send your PPT presentation to others—for example, if you're a trainer sending step-by-step instruction presentation, a teacher sending an independent learning task to your students, or a campaigner for your local councilor sending a persuasive PPT to constituents—you might want to embed a quiz, questionnaire, pole, or feedback survey in your presentation.
In PowerPoint, open the "Insert" tab on the ribbon, and in the Forms group, click "Forms". If you cannot see this option, you can add new buttons to the ribbon .
As at April 2024, this feature is only available for those using their work or school account. We're using a Microsoft 365 Personal account in the screenshot below, which is why the Forms icon is grayed out.
Then, a sidebar will appear on the right-hand side of your screen, where you can either choose a form you have already created or opt to craft a new form.
Now, you can share your PPT presentation with others , who can click the fields and submit their responses when they view the presentation.
3. Embed a Live Web Page
You could always screenshot a web page and paste that into your PPT, but that's not a very interactive addition to your presentation. Instead, you can embed a live web page into your PPT so that people with access to your presentation can interact actively with its contents.
To do this, we will need to add an add-in to our PPT account .
Add-ins are not always reliable or secure. Before installing an add-in to your Microsoft account, check that the author is a reputable company, and type the add-in's name into a search engine to read reviews and other users' experiences.
To embed a web page, add the Web Viewer add-in ( this is an add-in created by Microsoft ).
Go to the relevant slide and open the Web Viewer add-in. Then, copy and paste the secure URL into the field box, and remove https:// from the start of the address. In our example, we will add a selector wheel to our slide. Click "Preview" to see a sample of the web page's appearance in your presentation.
This is how ours will look.
When you or someone with access to your presentation views the slideshow, this web page will be live and interactive.
4. Add Links and Menus
As well as moving from one slide to the next through a keyboard action or mouse click, you can create links within your presentation to direct the audience to specific locations.
To create a link, right-click the outline of the clickable object, and click "Link."
In the Insert Hyperlink dialog box, click "Place In This Document," choose the landing destination, and click "OK."
What's more, to make it clear that an object is clickable, you can use action buttons. Open the "Insert" tab on the ribbon, click "Shape," and then choose an appropriate action button. Usefully, PPT will automatically prompt you to add a link to these shapes.
You might also want a menu that displays on every slide. Once you have created the menu, add the links using the method outlined above. Then, select all the items, press Ctrl+C (copy), and then use Ctrl+V to paste them in your other slides.
5. Add Clickable Images to Give More Info
Through PowerPoint's animations, you can give your viewer the power to choose what they see and when they see it. This works nicely whether you're planning to send your presentation to others to run through independently or whether you're presenting in front of a group and want your audience to decide which action they want to take.
Start by creating the objects that will be clickable (trigger) and the items that will appear (pop-up).
Then, select all the pop-ups together. When you click "Animations" on the ribbon and choose an appropriate animation for the effect you want to achieve, this will be applied to all objects you have selected.
The next step is to rename the triggers in your presentation. To do this, open the "Home" tab, and in the Editing group, click "Select", and then "Selection Pane."
With the Selection Pane open, select each trigger on your slide individually, and rename them in the Selection Pane, so that they can be easily linked to in the next step.
Finally, go back to the first pop-up. Open the "Animations" tab, and in the Advanced Animation group, click the "Trigger" drop-down arrow. Then, you can set the item to appear when a trigger is clicked in your presentation.
If you want your item to disappear when the trigger is clicked again, select the pop-up, click "Add Animation" in the Advanced Animation group, choose an Exit animation, and follow the same step to link that animation to the trigger button.
6. Add a Countdown Timer
A great way to get your audience to engage with your PPT presentation is to keep them on edge by adding a countdown timer. Whether you're leading a presentation and want to let your audience stop to discuss a topic, or running an online quiz with time-limit questions, having a countdown timer means your audience will keep their eye on your slide throughout.
To do this, you need to animate text boxes or shapes containing your countdown numbers. Choose and format a shape and type the highest number that your countdown clock will need. In our case, we're creating a 10-second timer.
Now, with your shape selected, open the "Animations" tab on the ribbon and click the animation drop-down arrow. Then, in the Exit menu, click "Disappear."
Open the Animation Pane, and click the drop-down arrow next to the animation you've just added. From there, choose "Timing."
Make sure "On Click" is selected in the Start menu, and change the Delay option to "1 second," before clicking "OK."
Then, with this shape still selected, press Ctrl+C (copy), and then Ctrl+V (paste). In the second box, type 9 . With the Animation Pane still open and this second shape selected, click the drop-down arrow and choose "Timing" again. Change the Start option to "After Previous," and make sure the Delay option is 1 second. Then, click "OK."
We can now use this second shape as our template, as when we copy and paste it again, the animations will also duplicate. With this second shape selected, press Ctrl+C and Ctrl+V, type 8 into the box, and continue to do the same until you get to 0 .
Next, remove the animations from the "0" box, as you don't want this to disappear. To do this, click the shape, and in the Animation Pane drop-down, click "Remove."
You now need to layer them in order. Right-click the box containing number 1, and click "Bring To Front." You will now see that box on the top. Do the same with the other numbers in ascending order.
Finally, you need to align the objects together. Click anywhere on your slide and press Ctrl+A. Then, in the Home tab on the ribbon, click "Arrange." First click "Align Center," and then bring the menu up again, so that you can click "Align Middle."
Press Ctrl+A again to select your timer, and you can then move your timer or copy and paste it elsewhere.
Press F5 to see the presentation in action, and when you get to the slide containing the timer, click anywhere on the slide to see your countdown timer in action!
Now that your PPT presentation is more interactive, make sure you've avoided these eight common presentational mistakes before you present your slides.
Got any suggestions?
We want to hear from you! Send us a message and help improve Slidesgo
Top searches
Trending searches

holy spirit
36 templates

39 templates

memorial day
12 templates

21 templates

ai technology
169 templates

11 templates
Problem Solving and Mathematical Reasoning
It seems that you like this template, problem solving and mathematical reasoning presentation, free google slides theme, powerpoint template, and canva presentation template.
Let's make math learning more fun, especially at early levels of education. This new template has some cute illustrations and lots of elements related to math, including backgrounds that look like blackboards. This is a great choice for teachers who want to turn their classes into a more entertaining experience for their students. Customize the slides to add your own activities or explanations!
Features of this template
- 100% editable and easy to modify
- 36 different slides to impress your audience
- Contains easy-to-edit graphics such as graphs, maps, tables, timelines and mockups
- Includes 500+ icons and Flaticon’s extension for customizing your slides
- Designed to be used in Google Slides, Canva, and Microsoft PowerPoint
- 16:9 widescreen format suitable for all types of screens
- Includes information about fonts, colors, and credits of the free resources used
How can I use the template?
Am I free to use the templates?
How to attribute?
Combines with:
This template can be combined with this other one to create the perfect presentation:

Attribution required If you are a free user, you must attribute Slidesgo by keeping the slide where the credits appear. How to attribute?
Related posts on our blog.

How to Add, Duplicate, Move, Delete or Hide Slides in Google Slides

How to Change Layouts in PowerPoint

How to Change the Slide Size in Google Slides
Related presentations.

Premium template
Unlock this template and gain unlimited access


A simple guide to slideshows
Learn what slideshows are, how they’re used, common features, and how to choose a slideshow maker. Get started creating your own slideshows today with Microsoft PowerPoint.
What is a slideshow?
What are slideshows used for.

Meetings and presentations
Slideshows are most frequently used to create professional presentations for business meetings, conferences, and educational purposes. A slideshow program allows people to organize content, include visuals, and enhance the overall impact of their message.

Visual storytelling
Because slideshows sequentially display engaging visuals, text, and other multimedia, they’re a strong way to tell a cohesive and compelling narrative from start to finish.

Content creation
Slideshows give content creators a versatile and efficient way to organize information, increase visual appeal, and communicate effectively across different contexts.

Photo and video sharing
Slideshow makers are popular for creating photo and video presentations, especially for events like weddings, birthdays, and vacations. People can add transitions, music, and captions to fully bring the photo-sharing experience to life.

Training and tutorials
Slideshows help break down complex information into digestible chunks with the support of visuals and text, making them ideal for instructional materials, tutorials, and training modules.

Collaborative projects
In collaborative settings, teams use slideshow makers to create joint presentations or reports. The best slideshow makers enable multiple contributors to add their content simultaneously, which helps ensure a cohesive and unified presentation.
What are the features of a slideshow creator?
Slideshow creators vary in what they offer but ideally include:
A library of templates, themes, and images.
If you’re not a designer, this feature is huge. Simply browse the options available in your slideshow maker library to create a polished, professionally designed presentation in a flash. Be sure to confirm that access to the library is free and the images are approved for unrestricted usage.
Audio and video compatibility.
Keeping your audience engaged is key to any successful slideshow presentation. To mix things up, being able to add a multimedia element—like a song or a video clip—will help people stay focused and interested.
Presentation tools.
Handy presenter tools go a long way toward making your slideshow experience seamless. For example, straightforward slide navigation, slideshow keyboard shortcuts, pen and highlighter markup, and adjustable resolution settings.
AI assistance.
With AI revolutionizing content creation, using a slideshow maker that has AI capabilities will enhance efficiency and innovation. Depending on the slideshow app you have, creating an entire slideshow could be as easy as a quick prompt, like “Make a presentation about the benefits of sustainable fashion that has 15 slides.”
Animations.
Like audio and video, animations give your audience a bit of sensory surprise that can capture their attention.
Slide transitions.
Add some pizzazz to how you change slides with visual effects like fading, wiping, and zooming.
Screen recording.
Being able to record your screen in a slideshow maker is helpful when giving an instructional talk, software demonstration, and other types of presentations that require visual aids.
A place to put speaker notes.
Having somewhere to jot a few notes down will help remind you of everything you want to cover as you present.
Different viewing options.
Looking at different views—for example, a presenter view, an audience view, and a high-level view of slide order—is useful when organizing your slideshow’s structure and understanding and preparing for what you’ll see versus what your audience will see.
How do I choose the right slideshow maker?
When choosing a slideshow maker, keep the following questions in mind to make sure you get the most for your money:
Is it scalable with your business?
As your organization grows and changes, it’s important to have flexible technology that adapts to new needs. Having certain features—such as cloud-based collaboration, compatibility with other work apps, and a mobile app—will help ensure that no matter how your business changes, the slideshow maker is up to the task. This also applies to pricing plans. Consider choosing a slideshow app that has a subscription plan (so the software is always up to date), volume-based pricing, or enterprise-level pricing.
Does it have a variety of visual elements?
It’s pretty much a given that a slideshow maker will allow you to add images, but think outside the JPEG box—what other visual elements are available to you? Features like preset themes, free templates, SmartArt, a built-in clip art library, shape tools, background styles, 3D models, and charts and graphs provide diverse ways to switch up how a slideshow looks without relying solely on adding your own images.
Is it easy to use?
You could have the most feature-rich slideshow maker on the market, but if it isn’t easy to use, you probably won’t use it. Or you will, but you’ll be frustrated, waste valuable time, and have difficulty convincing people you work with to use it. As you research slideshow makers, look for videos that show the apps’ interfaces in action to help you decide if they’re intuitive and will have a shorter learning curve.
Does it have collaboration and sharing options?
Because making a slideshow is often a collaborative effort, it’s worthwhile to find a slideshow creator that was designed with this in mind. Pick one that offers editing controls and commenting, as well as the ability to work on a slideshow at the same time as someone else. Having a cloud-based slideshow maker will be key here. You’ll not only save yourself time but also keep things simple by not having multiple versions of the same slideshow.
Explore more about slideshows and slideshow makers
Copilot in powerpoint.
Transform how you make slideshows with the versatile AI in Copilot for PowerPoint.
Improve your presenting skills
Practice presenting with an AI speaker coach to get feedback on body language, repetition, and pronunciation.
Six slideshow tips and tricks
Read up on tips about how to finesse your slideshows to give your most confident presentations.
Get free PowerPoint templates
Show your style with PowerPoint templates in more than 40 categories.
How to make a branded slideshow
Create a cohesive visual identity for your brand that goes beyond adding a logo to every slide.
Try a photo album template
Relive your favorite memories with photo album templates designed for all your unforgettable moments.
The benefits of visual aids in slideshows
Discover why using visual aids helps communicate ideas and messaging more effectively.
Slideshows that reach all learners
Explore the different ways that people learn and how to include all learning styles in your presentations.
Frequently asked questions
How do i make a good slideshow.
Making a good slideshow in PowerPoint is easy:
Plan what you’d like to include in your slideshow.
Launch your slideshow creator.
Choose the theme you’d like.
Import media.
Add text, music, and transitions.
Record, save, and share your slideshow.
Learn more about how to make a slideshow .
How do I add music to a slideshow?
To add music to a slideshow, first make sure that you’re using a slideshow maker with music compatibility. In PowerPoint, follow these steps:
Open your PowerPoint presentation and select the slide where you want to add music.
Click on the Insert tab in the ribbon menu.
Click on the Audio button and select Audio on My PC.
Browse to the folder on your computer where the audio file is located and select it.
Click on the Insert button.
How do I record a slideshow?
The steps for recording a slideshow in PowerPoint will vary depending on the version that you own. Get help with slideshow recording based on your version.
What types of files can I add to a slideshow?
File compatibility in PowerPoint includes the use of JPEGs, PNGs, TIFFs, GIFs, PDFs, MP3s, WAVs, MIDIs, MPEG-4 Videos, and Windows Media Videos.
How do I share my slideshow?
To share your PowerPoint slideshow, follow these steps:
Open your presentation and click Share at the top right of your screen.
If your presentation isn't already stored on OneDrive, select where to save your presentation to the cloud.
Choose a permission level, like Anyone with a link , or maybe just people in your company. You can also control if people can edit or just view the doc.
Select Apply.
Enter names and a message.
Select Send.
Follow Microsoft

IMAGES
VIDEO
COMMENTS
Select the placeholder or position the cursor in the text to insert the equation at the specified place. Unselect objects on a slide to create a new object for an equation. Thus, PowerPoint inserts a new text box in the middle of the slide. 2. On the Insert tab, in the Symbols group, click the Equation button, and choose one of the equations ...
Download the "Discrete Mathematics: Graph Theory and Networks - 12th Grade" presentation for PowerPoint or Google Slides. High school students are approaching adulthood, and therefore, this template's design reflects the mature nature of their education. Customize the well-defined sections, integrate multimedia and interactive elements and ...
How to write Mathematics formula in powerpoint.Mathematical Formula in powerpoint.For more videos on this subject click on the linkhttps://www.youtube.com/wa...
Free Math Slide Templates for an Engaging Slideshow. Make math lessons come alive with this math PowerPoint template. Perfect for teachers, students, and math enthusiasts, these templates are designed to make your presentations more engaging and dynamic. With a range of customizable slides, you can easily explain complicated concepts or analyze ...
Next Watch this:Writing Math Equations in Latex [Latex Tutorial]https://youtu.be/qfgsvlHKT7MThe Best Way to Put Math Expressions in a Powerpoint Presentation...
Select an existing slide on your presentation. Click the "Insert" tab and choose "Equation" under the "Symbol group." In the drop-down menu, click "Insert New Equation." Type your math equation using the options above in the "Structures" and the "Symbols" groups. After your new equation appears in the text box, press "Enter" once done.
I've found that the secret is (1) good tools to create equations, plus (2) liberal use of arrows and text, plus (3) animations linking the two. I've found the following two programs to be indispensable for writing talks: LateXiT for the Mac. KLaTeXFormula for a number of OSs, similar to latexit but less functional.
This video tutorial will guide you apply effects to text and shapes in PowerPoint for a better presentation. By Daniel Konin. HBG
Accessing the Equation Editor: How to Open PowerPoint Equation Editor? PowerPoint's Equation Editor is just a few clicks away in the ribbon. To access it, open PowerPoint, navigate to the Insert tab, and click on Equation. This opens a new menu that allows you to insert a variety of predefined equations or create your own from scratch.
First, we'll review how to put an equation on a PowerPoint slide. First, bring up the slide that you want to have the equation and click on the text area to highlight it. Next, click the Insert tab on the ribbon. Click on the Object icon in the Text group, which will bring up a popup window.
If you need a presentation for the classroom and you want to make it more interesting for your students, this math lesson plan template is for you. Education can be fun too, and that's why we've decided to use a colorful palette for the slides, including blue and cream. Illustrations usually have a good visual impact, so we've included ...
Free PowerPoint template and Google Slides theme. A classic Bauhaus-inspired free presentation slides. Morris is a free multi-purpose template, its geometric shapes and editable colors make it perfect for many different topics. To customize the colors to fit your topic or brand, go to Slide > Edit Theme, click on […]
Algebraic expressions may sound intimidating, but they are simply math's way of communicating with X and Y. These expressions represent mathematical relationships using letters and numbers. For example, if you know that a pizza costs $10 and you buy x amount of pizzas, the total cost can be expressed as 10x.
See also this tip in French: Comment insérer les symboles mathématiques dans la diapositive PowerPoint. Please, disable AdBlock and reload the page to continue Today, 30% of our visitors use Ad-Block to block ads.We understand your pain with ads, but without ads, we won't be able to provide you with free content soon.
Animated Math Equations For PowerPoint Presentations. Math equations might be required in PowerPoint presentations to present complex calculations before an audience. For example, this might include a class lecture from a math or statistics teacher who might require revealing various formulas and calculations in the form of PowerPoint slides.
Presentation by Krizzia. Place Value Math Lesson Presentation In Peach and Blue Fun and Abstract Style. Presentation by Carlee Guzman. Green Playful Math Quiz Presentation. Presentation by Asriningdiah. Pink Minimalist Math Class Presentation. Presentation by r_kristi studios.
About Press Copyright Contact us Creators Advertise Developers Terms Privacy Policy & Safety How YouTube works Test new features NFL Sunday Ticket Press Copyright ...
Adding a subscript in PowerPoint is similar to adding a superscript: Method 1: Use the Subscript Button on the Home tab in the Font group. Method 2: Use the Keyboard Shortcut CTRL + = (equal sign) Method 3: Use the Font Dialog Box. Method 4: Type the subscript manually using the "_" symbol.
This free math PowerPoint template has 135 different icons, editable charts, and an aspect ratio of 16:9. All the background images are included in the math-themed PowerPoint template for free download. 4. Math Board. This is a free math background for PowerPoint that mathematics teachers and professors can use.
This cheerful Math Lesson template comes in purple, blue and orange. Packed with quirky math-themed doodles and illustrations, these slides have everything you need to plan an effective lesson. Fill out the timeline and agenda, list main topics and concepts, add charts and graphs and present your main points on fully customizable slides. Keep ...
To do that, simply go up to the Home tab and click on New Slide. This inserts a new slide in your presentation right after the one you were on. You can alternatively hit Ctrl+M on your keyboard to insert a new blank slide in PowerPoint. To learn more about this shortcut, see my guide on using Ctrl+M in PowerPoint.
Math Dictation. You can dictate faster than you can write or type it, so math dictation can be handy for anyone working with math, notably on mobile devices. It can also make math more accessible. Math speech is similar to UnicodeMath, which you can use to enter equations into Word, PowerPoint, and other apps.
Hi there! In this video, i will be sharing you how to make Math Flashcard in PowerPoint Presentation. You can use this flashcard powerpoint presentation at s...
Click anywhere on your slide and press Ctrl+A. Then, in the Home tab on the ribbon, click "Arrange." First click "Align Center," and then bring the menu up again, so that you can click "Align Middle." Press Ctrl+A again to select your timer, and you can then move your timer or copy and paste it elsewhere.
Free Google Slides theme, PowerPoint template, and Canva presentation template. Let's make math learning more fun, especially at early levels of education. This new template has some cute illustrations and lots of elements related to math, including backgrounds that look like blackboards. This is a great choice for teachers who want to turn ...
Step 8: Determine Follow-Up Questions and Provide Answers. At the end of your product presentation, prospects or investors are likely to have a handful of questions about your product. Typically prospective customers ask questions to know if the product is a right fit for their organization.
To add music to a slideshow, first make sure that you're using a slideshow maker with music compatibility. In PowerPoint, follow these steps: Open your PowerPoint presentation and select the slide where you want to add music. Click on the Insert tab in the ribbon menu. Click on the Audio button and select Audio on My PC.