Sign up for our daily newsletter
- Privacy Policy
- Advertise with Us

How to Remove and Assign Drive Letters in Windows with Diskpart
Diskpart is one of the most powerful Windows command line utilities which first appeared in Windows XP. Diskpart is mainly used by Windows administrators to manage tasks like partition management, formatting, creating, re-sizing and getting a detailed information regarding the hard disk or other removable disks attached to the computer. Even though you have a built-in GUI application called Disk Management utility in Windows, Diskpart is much more flexible and works well in a server environment where you need to set up some advanced features like RAID.
Note: This post isn’t intended for beginners, and doing something wrong while using Diskpart utility may cause drive failures and data losses, so make sure that you have a good backup before continuing. You have been warned.
Assign Drive Letter Using Diskpart
Assigning a new drive letter to a partition or removable device using Diskpart is really easy. First, search for the command prompt in the Start menu, right click on it and select the option “Run as administrator.” If you are using Windows 8, press “Win + X” to open the power user menu and select the option “Command Prompt (Admin).”

The above action will open the command prompt window with administrative rights. Here enter the following command to start the Diskpart utility.

The next step is to list all the volumes in your computer so that you can clearly see all the volume numbers and drive letters of your hard disk partitions and any other removable devices. Use the command below to list all the volumes.

Once the Diskpart utility lists all the volumes, take a note of the volume number of the drive you want to assign a new drive letter. In my case, I’m trying to assign a new drive letter to the drive I:\ , so my volume number is 7 . Now execute the following command to select the volume while replacing the # symbol with an actual volume number.

Once the volume is selected, use the following command to assign a new drive letter. Don’t forget to replace the letter “V” with the drive letter you want to assign.

That’s all there is to do; you have successfully changed or re-assigned a new drive letter to a partition or a removable drive in Windows. In fact, if you open the Windows explorer, you can see that the change is reflected immediately.

Remove Drive Letter using Diskpart
Before moving any further, removing or un-assigning drive letter will effectively hide the drive or partition from plain sight, i.e. you cannot see that drive in the Windows explorer. To remove a drive letter, follow the above steps 1 through 4 and then use the below command to remove the drive letter of a drive or partition. Don’t forget to replace the letter “I” with the actual drive letter.

As soon as you have done that, Diskpart will remove the drive letter for that volume. If you list the volumes again, you will see that the drive you just interacted with will have no drive letter next to it.

Moreover, if you navigate to the Windows explorer, you will see that the drive which got un-assigned isn’t listed anymore. But again, always be careful while you are messing around with Diskpart utility; it may cause irrecoverable data loss if used incorrectly.
Hopefully that helps, and do comment below if you face any problems while following the steps or to simply share your thoughts.
Our latest tutorials delivered straight to your inbox
Vamsi is a tech and WordPress geek who enjoys writing how-to guides and messing with his computer and software in general. When not writing for MTE, he writes for he shares tips, tricks, and lifehacks on his own blog Stugon.

At the edge of tweaking
Advertisement
Change the drive letter in the command prompt
- Open an elevated command prompt .
- Type diskpart .
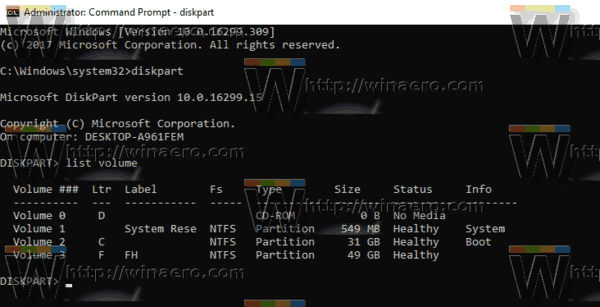
You are done. You can close the Diskpart window.
Change the drive letter in PowerShell
- Open an elevated PowerShell instance .

- Finally, type the following command: Remove-PartitionAccessPath -DiskNumber YOUR_DISK_NUMBER -PartitionNumber YOUR_PARTITION_NUMBER -Accesspath CURRENT_DRIVE_LETTER:

Winaero greatly relies on your support. You can help the site keep bringing you interesting and useful content and software by using these options:
If you like this article, please share it using the buttons below. It won't take a lot from you, but it will help us grow. Thanks for your support!
Author: Sergey Tkachenko
Sergey Tkachenko is a software developer who started Winaero back in 2011. On this blog, Sergey is writing about everything connected to Microsoft, Windows and popular software. Follow him on Telegram , Twitter , and YouTube . View all posts by Sergey Tkachenko
4 thoughts on “How to Remove a Drive Letter in Windows 10”
This topic seems to now be out-of-date. In step 3 in Disk Management, the only option available in the context menu is ‘Help’. There is no “Change Drive Letter …” option anymore.
It depends on your hardware and especially on the drive type you have installed. Also, your user account might be missing administrative account privileges.
It works… kind of…
Yes, it removes the drive letter, until I reboot. Then the drive letter is back again.
Drive letter exists, but no partition assigned to it. Windows…
Leave a Reply Cancel reply
Your email address will not be published. Required fields are marked *

Privacy Overview
How-To Geek
How to change a drive letter on windows 10 or windows 11.
You can change your drive letters in Windows 10 and 11 using the Disk Management utility.
Quick Links
What changing a drive letter does, how to change a drive letter, how to fix programs broken by changing a drive letter.
Changing the letter of a drive is easy on Windows 10 and Windows 11, but you should do it as soon as you add the drive to prevent future hassles. Find out how to change a drive letter here.
Windows assigns drive letters alphabetically --- starting with C --- when they're initialized. If you want to change a drive letter, you should do it before you install anything on the drive. Changing a drive letter after programs are installed could break them since there will be references to an installation location that is no longer there.
Windows has gotten pretty smart about updating shortcuts so that programs work after changing a drive letter. Most of your applications' shortcuts will probably be automatically corrected. Unfortunately, Windows isn't as good about updating file associations. You'll have to manually set the default apps associated with files to fix file associations if they were broken by changing the drive letter.
It is possible to change the boot drive letter to something else, but we don't recommend it. Changing C:\ to another letter is likely to result in severe issues, like a PC that cannot boot into Windows at all. Even if it were able to boot, there would be a huge number of programs that would not be able to run.
Technically speaking, while they are commonly called drive letters, each letter actually refers to a partition on a disk. If you have multiple partitions on a single disk, you will need to assign a letter to each partition to make them all accessible. If a disk has just a single partition, it will just have a single letter pointing to that partition. (However, you do not have to assign a letter to each partition. Partitions without drive letters will not appear in File Explorer and elsewhere.)
Changing a drive letter is pretty simple. Click the Start button, type "Disk Management" in the search bar, and then hit Enter.
The program name displayed in the search will not be Disk Management. It will be "Create and format hard disk partitions."
You could also hit Windows+X or right-click the Start button, and then click "Disk Management."
Identify the drive you'd like to change in the Disk Management Window. In this example, we'll change the letter of the D:\ drive to J:\. You can right-click the drive on the text list, or on the menu below. Either works.
Select "Change Drive Letter and Paths" in the right-click menu that appears.
In the window that pops up, click "Change."
Select whatever letter you want from the drop-down menu. Then click "Ok."
Two popups will warn you about changing your drive letter. Click "Yes" on both of them, and then restart your computer.
Once Windows has restarted, the drive letter should be changed.
There are a few ways you can fix a program broken by changing the drive letter.
Fix The Shortcut
If you're lucky, the only thing that is broken is the shortcut. Fix a shortcut by right-clicking the shortcut on your desktop, and then click Properties.
You need to change the target of the shortcut to the new drive letter.
For example, if GIMP was previously installed at " D :\GIMP 2\bin\gimp-2.10.exe," and you changed the D drive to J, change the target of the shortcut to " J :\GIMP 2\bin\gimp-2.10.exe."
Finalize the change by clicking "Apply" and then "Ok."
Reinstall the Program
Reinstalling the program will generate new entries in the registry, so everything on the computer will know where to look for the program. Some installers won't like reinstalling directly over existing files, so you may need to rename or delete the old installation first.
Change the Drive Letter Back
If you changed the drive letter of a drive with a lot of programs installed, it might be easier to change the drive letter back. Changing the drive letter back should automatically fix any programs and file associations that were broken.
Edit the Registry
You can break programs, or even Windows itself, by editing the registry. Be careful, and learn about how to edit the registry before you try it. Make sure you backup the Windows registry first. You should not attempt this method unless you have no other options.
Windows, and a lot of programs, track where programs are installed via the Windows registry. It is possible to manually adjust the registry to fix broken programs. Keep in mind that there could be dozens of registry entries you need to edit. A program like GIMP can have registry entries for the context menu, for the "Open With" menu, for any file associations, and for the location of its executables. Other programs may only have a few entries related to where it is installed.
If you're not deterred, here's how you do it.
First, you need to know where the program was previously installed. In this case, the program was installed to the "D:\GIMP 2" folder, and the executables were found the "D:\GIMP 2\bin" sub-folder. It is now located at "J:\GIMP 2" instead.
We need to update the registry to reflect the change in location. Click the Start button, type "regedit" into the search bar, right-click Regedit, and click "Run as administrator."
In Regedit, hit Ctrl+F to bring up a search window. Type in the old location for the program you're trying to fix --- "D:\GIMP 2" for our example --- then click "Find Next."
Once Regedit has found something with "D:\GIMP 2" as part of a path, it'll show it to you. Here is an example from the GIMP search.
To actually change them, double click the name of the registry entry you want to modify. Then change the drive letter to J, or whatever you chose. If you didn't otherwise move the folder, leave the rest of the path alone. Then click "Ok."
You'll need to repeat this multiple times. To find the next result using your search term, you can hit the F3 key. There will be a popup once you've found all of the entries.
Changing drive letters can be a simple way to customize your PC. Do it before you install anything on the drive, however. You'll prevent any problems before they occur, and probably save yourself quite a bit of troubleshooting.

How to Remove or Hide Drive Letter in Windows 10
Whenever you connect an external drive such as external hard disk or USB pen drive, Windows automatically assigns a drive letter to the connected drive. The process of assigning a drive letter is quite simple as Windows progresses through the alphabet from A to Z to assign the available drive letters to the connected device. But there are some letters which are exceptions such as A & B are reserved for floppy drives, whereas the drive letter C can only be used for the drive which has Windows installed on it. Anyway, without wasting any time, let’s see How to Remove or Hide Drive Letter in Windows 10 with the help of the below-listed tutorial.

Table of Contents
Make sure to create a restore point just in case something goes wrong.
Method 1: How to Remove Drive Letter in Disk Management
1. Press Windows Key + R then type diskmgmt.msc and hit Enter to open Disk Management.

2. Right-click on the drive for which you want to remove the drive letter and select Change Drive Letter and Paths.

3. Select the drive letter for the particular drive and click on Remove button.

4. Click Yes to confirm your actions, then close everything.

Method 2: How to Hide Drive Letters in File Explorer
1. Press Windows Key + E to open File Explorer then select this PC from the left-hand window .
2. Now from the ribbon menu, click on View, then click on Options.

3. Next, switch to the View tab then uncheck “ Show drive letter “.

4. Click Apply, followed by OK.
Method 3: How to Remove Drive Letter in Command Prompt
1. Open Command Prompt. The user can perform this step by searching for ‘cmd’ and then press Enter.

2. Type the following command into cmd and hit Enter after each one:
diskpart list volume (Note down the number of the volume for which you want to change the drive letter for) select volume # (Replace the # with the number which you noted above) remove letter=drive_letter (Replace drive_letter with actual drive letter which you want to use for example: remove letter=H)

3. Once finished, you can close the command prompt.
Method 4: How to Hide Drive Letters using Registry Editor
1. Press Windows Key + R then type regedit and hit Enter to open Registry Editor.

2. Navigate to the following registry key:
HKEY_CURRENT_USER\SOFTWARE\Microsoft\Windows\CurrentVersion\Explorer
3. Right-click on Explorer then select New > DWORD (32-bit) Value and name this DWORD as ShowDriveLettersFirst.

4. Double-click on the ShowDriveLettersFirst DWORD and change its value according to:
0 = Show drive letters 2 = Hide drive letters

5. Click OK then close the Registry Editor.
Recommended:
- 3 Ways to Change Drive Letter in Windows 10
- How to Add Let’s Encrypt SSL to MaxCDN Custom Domain
- Fix Windows 10 Taskbar Not Hiding
- How to Change Drive Icon in Windows 10
That’s it you have successfully learned How to Remove or Hide Drive Letter in Windows 10 but if you still have any queries regarding this tutorial then feel free to ask them in the comment’s section.
About The Author

Aditya Farrad
How to Color Code Calendar on Notion
How to Change Duolingo App Icon on Android
How to Use Plinky to Organize Links

How to Reset Tinder Matches
How to Uninstall Valorant from Riot Client

How to Clear Delivery Optimization Cache in Windows
Leave a comment cancel reply.
Your email address will not be published. Required fields are marked *
This browser is no longer supported.
Upgrade to Microsoft Edge to take advantage of the latest features, security updates, and technical support.
Change a drive letter
- 4 contributors
Applies To: Windows 11, Windows 10, Windows Server 2022, Windows Server 2019, and Windows Server 2016
If you want to change a drive letter assigned to a drive, or you have a drive that doesn't yet have a drive letter, use Disk Management to change it. You can also mount the drive in an empty folder so that it appears as a folder. For more information, see Mount a drive in a folder .
If you change the drive letter of a drive that already contains Windows or apps, apps might have trouble running or finding the drive. We suggest not changing the drive letter of a drive that already contains Windows or apps.
The following steps show how to change the drive letter.
Open Disk Management with administrator permissions.
In Disk Management, select and hold (or right-click) the volume on which you want to change or add a drive letter and select Change Drive Letter and Paths .

If you don't see the Change Drive Letter and Paths option or it's grayed out, the volume either isn't ready to receive a drive letter or it's unallocated and needs to be initialized . It might also be that the drive isn't accessible, which is the case with EFI system partitions and recovery partitions. If you've confirmed that your volume is formatted with a drive letter that you can access but you're still unable to change it, that's beyond the scope of this article. We suggest contacting Microsoft Support or the manufacturer of your PC for more help.
To change the drive letter, select Change . To add a drive letter if the drive doesn't already have one, select Add .

Select the new drive letter and choose OK . Then select Yes when prompted about how programs that rely on the drive letter might not run correctly.

Coming soon: Throughout 2024 we will be phasing out GitHub Issues as the feedback mechanism for content and replacing it with a new feedback system. For more information see: https://aka.ms/ContentUserFeedback .
Submit and view feedback for

Additional resources
- All about AI
- Google Gemini AI
- Inflection AI Pi Chatbot
- Anthropic Claude
- Multimodal AI
- Generative AI
- AI Image Generation
- AI VIdeo Generation
- AI Coding Assistants
- AI Regulation
- AI Research
- Large Language Models (LLM)
- Microsoft Azure
- Google Cloud
- Amazon Web Services (AWS)
- Surface Pro
- Surface Laptop
- Surface Book
- Surface Duo
- Surface Neo
- Surface Studio
- Surface Hub
- Surface Pen
- Surface Headphones
- Surface Earbuds
- About WinBuzzer
- Follow Us: PUSH, Feeds, Social
- Join our Team
- Cookie Policy and Privacy Policy
- Terms of Service

How to Assign / Change Drive Letter in Windows 10
We show you how to change the drive letter in CMD, DIsk Management, PowerShell, and Registry editor in Windows 10.

Table of Contents:
Windows 10 helpfully assigns drive letters to disks as they're added, but they aren't always the most logical choices. While we all know that C: is the system drive, it doesn't make quite as much sense to have D: as your games drive or E: as your media drive. Luckily it's quite easy to change a drive letter in Windows 10, and we're going to walk you through the process today.
How does Windows 10 drive letter assignment work?
For the most part, Windows 10 automatically assigns letters to drives as they're connected, in alphabetical order. However, there are a few exceptions to this rule that may leave some users confused.
As mentioned earlier, C: is always reserved for the system drive, but A: and B: are reserved too, for rarely used floppy drives. Because of Windows automatic assignment, you may have also noticed that Windows changes the drive letter of your USB stick if you've connected another before it.
If you want letters that are easier to identify in bios or don't want your USB letters jumping around, it's quite easy to permanently change a drive letter in Windows 10 to something of your choosing. We're going to cover a few different ways today, including how to change the drive letter in CMD.
How to Change Drive Letter in Windows 10 via Disk Management
The most user-friendly way to assign drive letters in Windows is through the Disk Management interface, which is relatively easy to use.
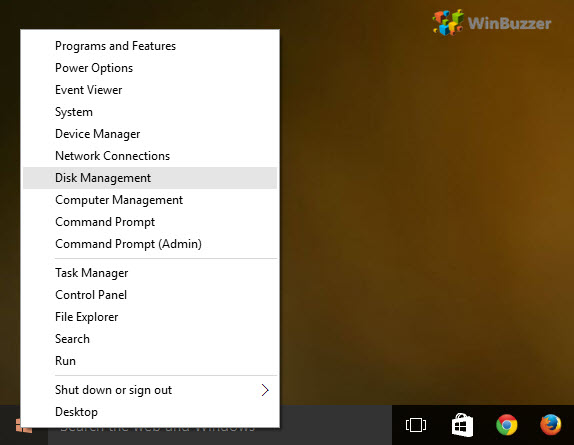
How to Change Drive Letter in CMD using a DISKPART Disk Management Command
Though it's not quite as user-friendly, it can be much faster to change a drive letter with Command Prompt.

How to Change Drive Letter in Windows 10 with a PowerShell Disk Management Command
Those more familiar with PowerShell can use this method instead to achieve the same result.
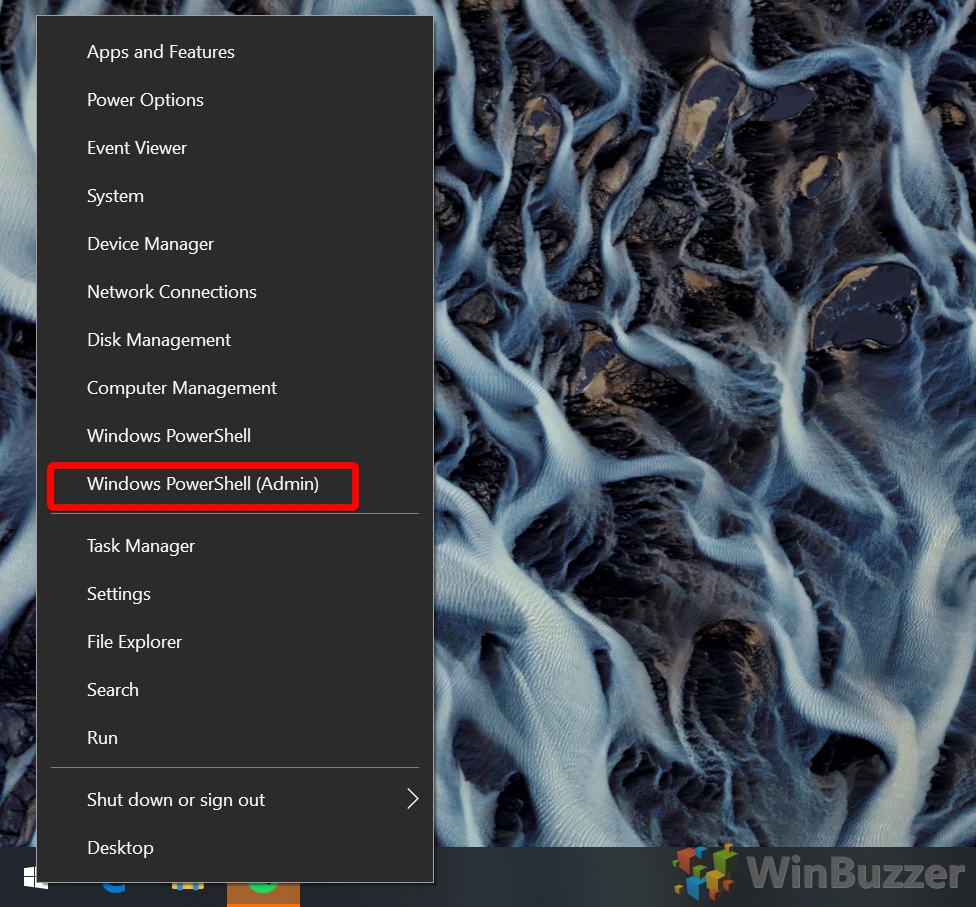
How to Change / Assign a Drive Letter via the Registry Editor
Alternatively, if none of the above methods worked or you're just feeling brave, you can modify the drive letter via the registry. Just be sure to read our safe registry editing guide first.
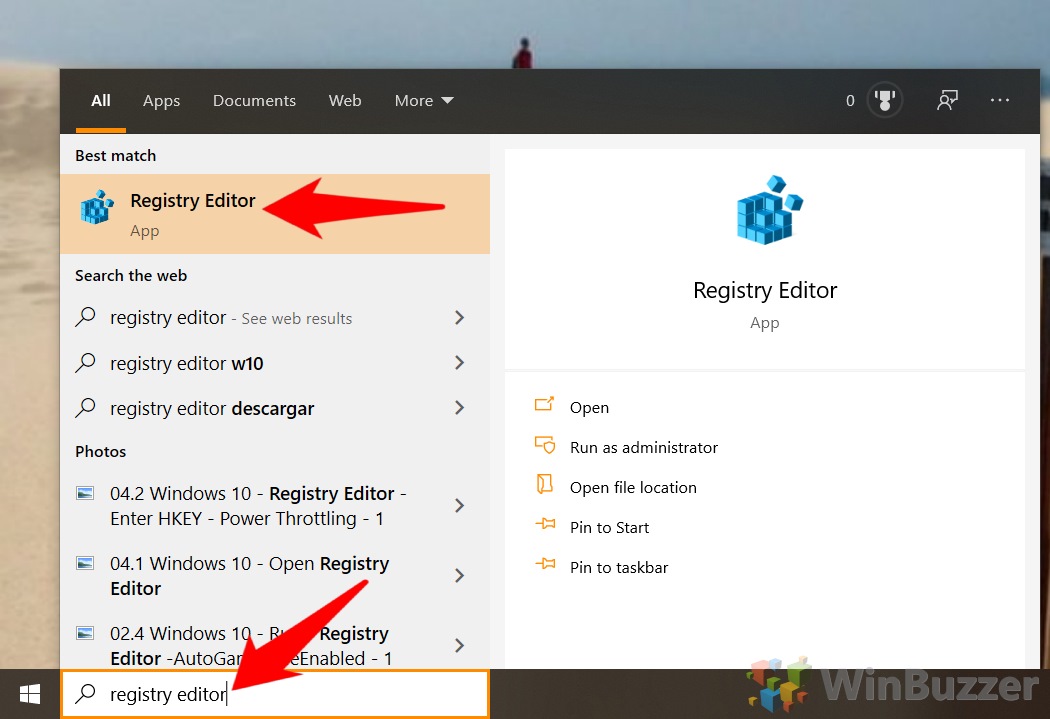
If you enjoyed this guide, you may want to consider enabling or disabling disk caching or turning on BitLocker for your newly customized drives.
- Assign drive letter
- assign drive letter windows 10
- Change boot drive letter Windows 10
- Change drive letter windows 10
- change usb drive letter Windows 10
- DIsc Management
- Disk management command
- how to change drive letter Windows 10
- powershell change drive letter
- win 10 change drive letter

Recent News

Report: Sam Altman’s $2.8 Billion Holdings Span 400+ Companies

Stable Diffusion 3 Public Preview Begins June 12, Stability AI Announces

Subscribe to WinBuzzer on Google News


- Disk & Data Manager
- Partition Wizard
- Power Data Recovery
- ShadowMaker
- Media Toolkit
- uTube Downloader
- Video Converter
- Download Partition Wizard Free Edition: Download Pro Edition: Try Demo Server Edition: Try Demo
Diskpart Unassign Drive Letter in Windows 11/10 [Full Guide]
Diskpart is a well-known Windows built-in disk partition utility used to format /create/delete partitions, online/offline disk , wipe disks, etc. However, a lot of users are unclear about how to use this utility. For example, here a user posted a question about how to change drive letter diskpart on the answers.microsoft.com forum:
Is there a way to unassign drive letter diskpart? Windows will not assign a drive letter automatically when I inserted a Windows installation media. https://answers.microsoft.com/en-us/windows/forum/all/manually-assigning-a-drive-letter-using/bbb3baf6-cda4-4d06-b431-eae9e975a5c7
How to Unassign Drive Letter Diskpart in Windows 11/10
A drive letter is a single alphabetic character from A to Z assigned by Windows to a drive or partition connected to the computer. Sometimes, you may need to change drive letter diskpart in some situations. How to let diskpart unassign letter in Windows 11/10? Here are detailed steps:
If you remove the drive letter from a partition, it will no longer show as a drive in File Explorer and the unassigned drive letter can be available to other partitions.
Step 1. Press Win + R keys to open the Run dialog box, and then type diskpart in it and press Enter . Then click on Yes to open the tool in Command Prompt.
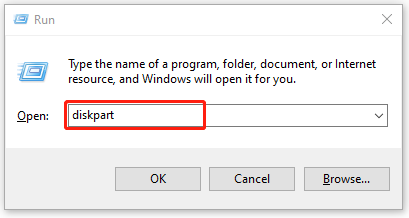
Step 2. To let diskpart unassign drive letter, type the following commands in order and press Enter after each one.
- list volume
- select volume * (replace * with the partition number you want to remove its drive letter from)
- remove letter=K (replace K with the drive letter that you want to remove)
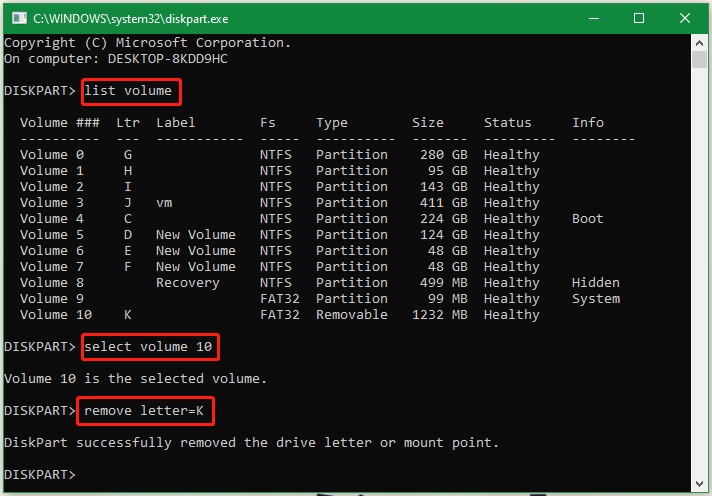
The process of diskpart assign letter is very simple and similar to removing a drive letter. To assign drive letter diskpart, you can open the Command Prompt window again as we explained above, type the following commands in order and press Enter after each one.
- select volume 10
- assign letter=k
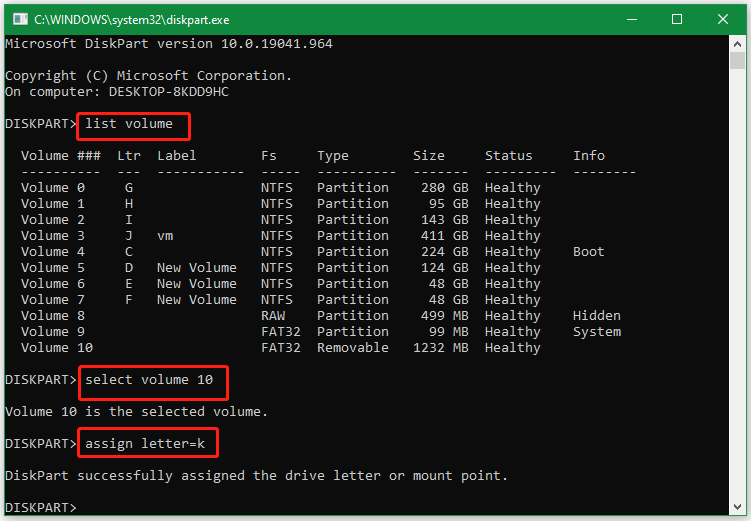
Although Diskpart is a practical partition manager in Windows, sometimes this utility can run into various errors such as “ DiskPart failed to clear disk attributes ”, “ Diskpart virtual disk service error ”, “failed to assign a drive letter”, etc. Is there an alternative to diskpart unassign drive letter? Of course, yes! Let’s keep reading.
Best Alternative to Diskpart Remove Drive Letter
If you can’t change drive letter CMD or Diskpart, MiniTool Partition Wizard is the best alternative. It is a trustworthy and comprehensive partition manager that allows you to change drive letters easily. Besides, this partition software can be used to extend/resize/hide/copy/format partitions, migrate OS , convert FTA to NTFS without data loss , change cluster size, recover lost data , and more.
MiniTool Partition Wizard Free Click to Download 100% Clean & Safe
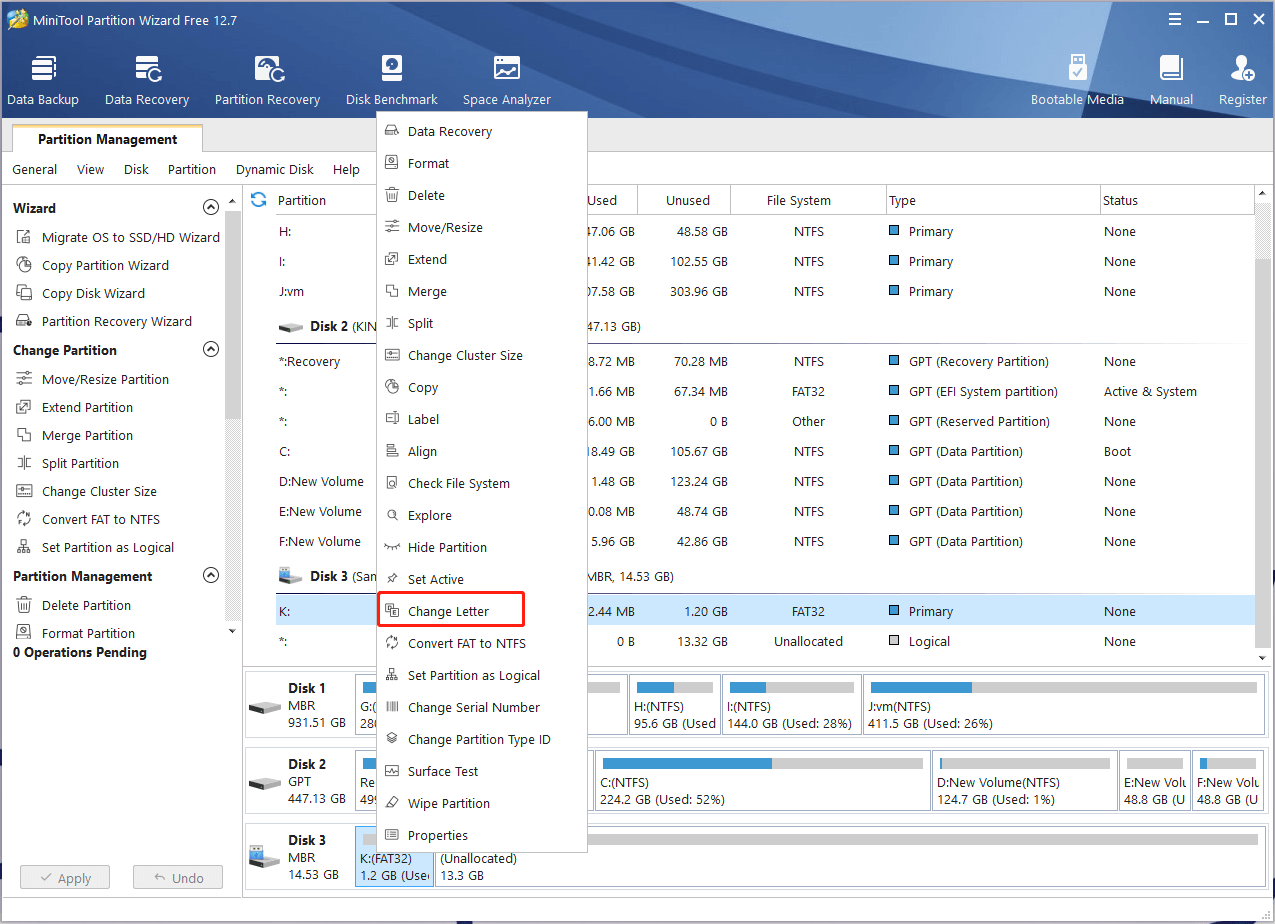
Step 1. Launch the program to enter its main interface, right-click the partition, and select Change Letter from the pop-up menu.
Step 2. If you want to remove the drive letter, select None from the New Drive Letter drop-down menu and click on OK to save the change. Alternatively, you can select a new drive letter from the drop-down menu to assign a drive letter for the partition.
Step 3. Click on Apply to execute the change.
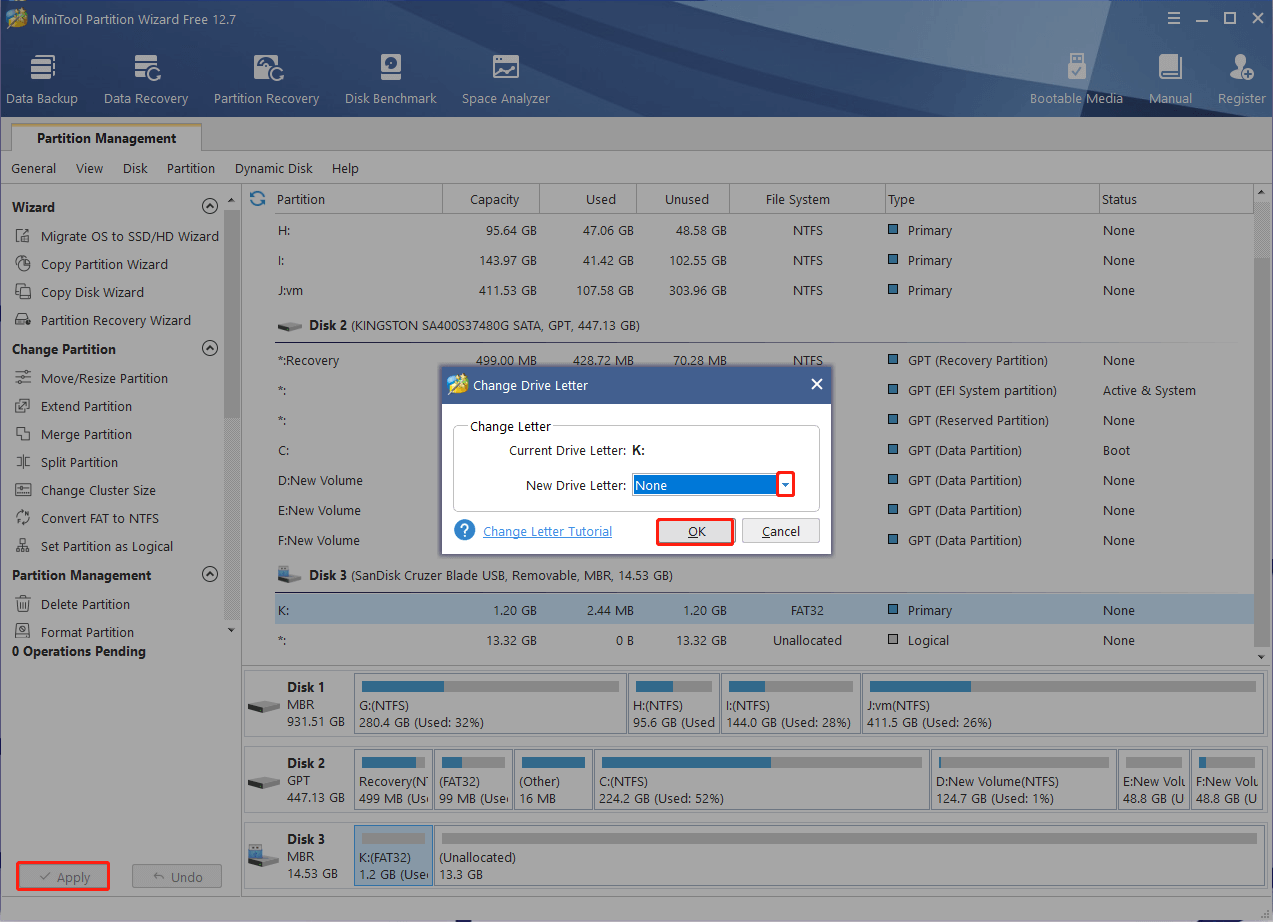
If you just want to hide the partition in File Explorer rather than remove the drive letter, you can select the partition and click Hide Partition > Apply from the left action panel.
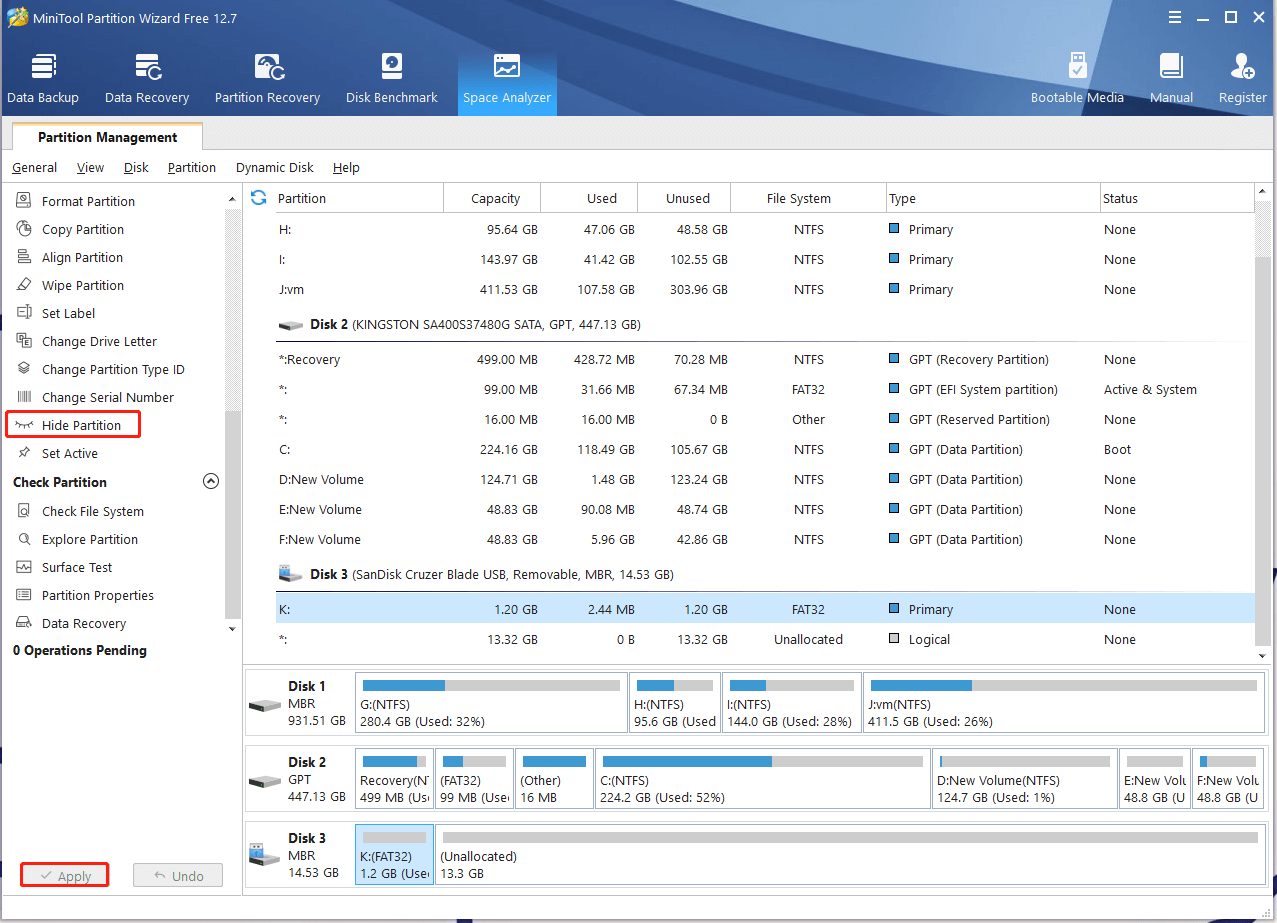
How to make diskpart remove drive letter in Windows 11/10? All detailed steps have been illustrated. Now, you can change drive letter using diskpart/CMD. If it doesn’t work, you can use a better alternative – MiniTool Partition Wizard.
About The Author
Position: Columnist
User Comments :
How to assign permanent letters to drives on Windows 10
You can assign drive letters manually, and in this guide, we show you how on Windows 10.
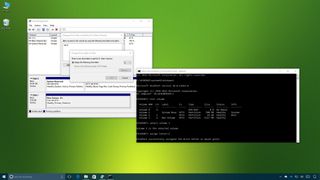
On Windows 10, when connecting a removable storage device or an internal hard drive, the system detects and assigns a drive letter automatically to make it usable. However, when reconnecting an external drive (such as a USB flash drive or SD or microSD cards), the system can end up assigning a different letter, which can be annoying.
If you want to see the same drive letter on a particular device, you can manually assign a permanent letter to any drive connected to your computer, and on Windows 10 , you can do this in at least three different ways, using Disk Management, Command Prompt, or PowerShell.
Using this approach will prevent Windows 10 from assigning a new letter or trying to set a letter already in use, which can cause conflicts. Also, it helps to select a drive letter that makes more sense to you.
In this Windows 10 guide, we walk you through several methods to manually assign a permanent letter to a drive, as long as you're connecting the drive to the same device and the letter isn't already in use.
How to assign a drive letter using Disk Management
How to assign a drive letter using command prompt, how to assign a drive letter using powershell.
To manage drive letters with the Disk Management tool, use these steps:
- Open Start .
- Search for Create and format hard disk partitions and click the top result to open the Disk Management experience.
- Right-click the drive and select the Change Drive Letter and Paths option.
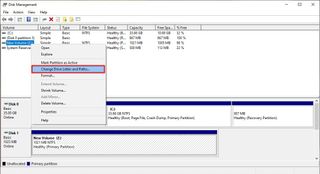
- Click the Change button.
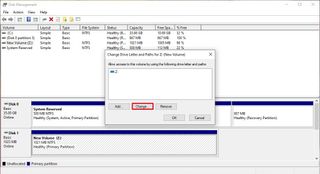
- Select the Assign the following drive letter option.
- Use the drop-down menu to assign a new drive letter. Quick tip: To avoid the system trying to assign the same letter to another drive, it's a good idea to start adding letters in backward order. For instance, instead of using D, E or F, it better to start with Z, Y or X when assigning a new letter.
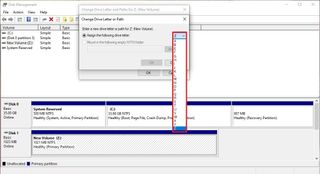
- Click the OK button.
- Click the OK button again.
Once you complete these steps, the drive will permanently retain the assigned letter, even after reconnecting it. However, if you connect the drive to another device, it may receive a different letter.
While the easiest way to assign a new drive letter is to use Disk Management, you can also use DiskPart in Command Prompt to perform the same task.
Get the Windows Central Newsletter
All the latest news, reviews, and guides for Windows and Xbox diehards.
To assign a drive letter using Command Prompt, use these steps:
- Search for Command Prompt , right-click the result, and then select the Run as administrator option.
- Type the following command to start DiskPart and press Enter : diskpart
- Type the following command to list all the available volumes and press Enter : list volume
- Type the following command to select the volume (drive) to assign a new letter and press Enter: select volume 3 In the command, make sure to change "3" to the number that represents the drive on your device.
- Type the following command to assign a new drive letter, and press Enter : assign letter=Z The command assigns the letter "Z" to the drive assuming it's available. However, you need to make sure to change the letter for the one that you want to use.
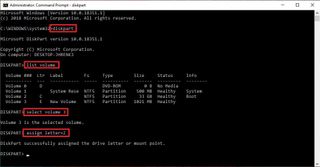
After completing these steps, similar to Disk Management, every time you reconnect the storage to the same device, Windows 10 should assign the same letter automatically.
Alternatively, you can also use PowerShell to change a drive letter on Windows 10 using these steps:
- Search for PowerShell , right-click the result, and then select the Run as administrator option.
- Type the following command to list the available drives and press Enter : Get-Disk
- Type the following command to assign a permanent letter to the drive and press Enter : Get-Partition -DiskNumber 1 | Set-Partition -NewDriveLetter Z In the command, make sure to change "1" to the number that represents the drive that you want to modify, and change "Z" for the new letter that you want to use.
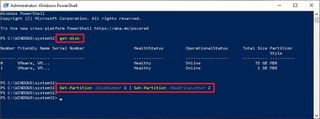
Once you complete the steps, the drive will be accessible through File Explorer using the letter that you assigned, and Windows 10 won't try to change it.
Updated March 7, 2019: We revised this guide to make sure it's current with the latest version of Windows 10.
More Windows 10 resources
For more helpful articles, coverage, and answers to common questions about Windows 10, visit the following resources:
- Windows 10 on Windows Central – All you need to know
- Windows 10 help, tips, and tricks
- Windows 10 forums on Windows Central
Mauro Huculak is technical writer for WindowsCentral.com. His primary focus is to write comprehensive how-tos to help users get the most out of Windows 10 and its many related technologies. He has an IT background with professional certifications from Microsoft, Cisco, and CompTIA, and he's a recognized member of the Microsoft MVP community.
- 2 Forget Copilot appearing like an AI genie, a new update temporarily made Windows 11's taskbar annoyingly glitchy
- 3 AMD reveals its Ryzen 9000 CPUs, with an added treat for those still on AM4
- 4 Qualcomm says the Snapdragon X Elite is going beyond laptops, which makes total sense
- 5 Microsoft might have blocked a sneaky bypass that let you setup Windows 11 without a Microsoft Account
Stack Exchange Network
Stack Exchange network consists of 183 Q&A communities including Stack Overflow , the largest, most trusted online community for developers to learn, share their knowledge, and build their careers.
Q&A for work
Connect and share knowledge within a single location that is structured and easy to search.
Remove all saved USB drive letter assignments
Is there a location in Windows that can be used to reset all of the USB assignments, and start from scratch in Server 2008 R2?
Edit: This question involves systems that I do not own, as was to resolve an issue with backup drives.
- windows-server-2008
2 Answers 2
get yourself a copy of usbdview shows all assigned usb devices, including drive letters. delete away
I have used this article with great success. The problem was that sometimes Device Manager seemed to get confused and I would have to assign drive letters manually to make USB keys work. After cleaning out "Disk Drives" and "USB Controllers" the auto detection and letter assignment would work properly again. By "clean out" I mean deleting each of the grayed out entries. This can be quite a tedious process...
http://support.microsoft.com/kb/315539
You must log in to answer this question.
Not the answer you're looking for browse other questions tagged windows usb windows-server-2008 ..
- The Overflow Blog
- Can software startups that need $$$ avoid venture capital?
- Featured on Meta
- Testing a new version of Stack Overflow Jobs
Hot Network Questions
- Quadratic with integer roots
- Grids for FindShortestPath
- Why is Trumps FEC filing case different from Hillary Clintons?
- It's About Time I Asked This Here: A Question About Presentism in Light of Relativity in Physics
- Are dual citizenship passports linked?
- 'Mice IS the scourge of the fields' <-- Plural noun - is/are - predicate noun
- Replying to an editor after plagiarism accusation and manuscript rejection
- How to practice playing "not matching" rhythms in both hands?
- Why does Egypt want Israel to withdraw from the Gazan side of the Rafah crossing?
- If multiplying real numbers with quaternions is communtative is aibj = abij valid
- What's the one digit you can fill in this Sudoku?
- Why does Heep refer to Copperfield sometimes as mister and sometimes as master?
- How can I help a PhD student who's dead-set on keeping methodologically wrong results?
- How do you determine the price at which it's better to sell this asset instead of renting it out?
- Find area of figure and volume of body
- Model ```a > 0 implies b = 1```, where a is unbounded above
- ID of this flower
- Is it ever more appropriate to use "incessant" over "constant"?
- Korsør - Nyborg train: is a bicycle with trailer possible?
- What is a building with two floors called?
- Approximation algorithms for integer convex quadratic programs over a linear subspace
- How can I keep from wobbling at slow speeds on a hybrid bike?
- What does the '!' button do?
- I installed over Windows, but I still see Microsoft logo at boot up/down

Contribute to the Windows forum! Click here to learn more 💡
May 10, 2024
Contribute to the Windows forum!
Click here to learn more 💡
Windows 10 Forum Top Contributors: Ramesh Srinivasan - neilpzz - Volume Z - franco d'esaro - _AW_ ✅
Windows 10 Forum Top Contributors:
Ramesh Srinivasan - neilpzz - Volume Z - franco d'esaro - _AW_ ✅
- Search the community and support articles
- Search Community member
Ask a new question
Unable to assign/remove drive letters using disk-management
Prior to Win10/1803 it was possible to unhide hidden partitions (e.g. the system disks recovery partition) using Control Panel => Administrative Tools => Computer Management => Disk management => right-click on the partition and choosing "Assign or change a drive letter".
I just tried that today and all the right-click menu offered was an entry "Help" - which was of no help... :(
I then started diskpart and was able to assign and remove drive letters to that partition (and other hidden ones) at will. Why is that functionality not properly working in disk-management anymore?
Report abuse
Reported content has been submitted
Replies (1)
- Microsoft Agent |
Hello mmo17,
In line with your concern, this seems to be a known issue in the build 1803 update. I'd suggest checking this thread .
In order to submit new feedback, please follow these steps:
1. On a Windows 10 device, search for Feedback Hub in Cortana search, then launch the app. 2. Navigate to Feedback in the left menu, then press + Add new feedback. 3. Select the Problem, and share any details you think are relevant, and choose an appropriate category and subcategory. 4. Important: If possible, reproduce the problem(s) after clicking Begin monitoring (or Start capture) near the end of the form; Stop monitoring when you’re done. 5. Once you’ve completed the form and monitoring, click Submit. 6. Click Continue using Feedback Hub. 7. Click My feedback at the top, then find the item you submitted (it may take a while to appear). 8. Open the item you submitted, then click Share. 9. Click Copy link, then paste the link here in your response (it will look like https://aka.ms/ link>).
Let us know if you have other concerns.
Was this reply helpful? Yes No
Sorry this didn't help.
Great! Thanks for your feedback.
How satisfied are you with this reply?
Thanks for your feedback, it helps us improve the site.
Thanks for your feedback.
Question Info
- Devices and drivers
- Norsk Bokmål
- Ελληνικά
- Русский
- עברית
- العربية
- ไทย
- 한국어
- 中文(简体)
- 中文(繁體)
- 日本語

IMAGES
VIDEO
COMMENTS
1 Open an elevated command prompt. 3 Type the command below into the elevated command prompt, and press Enter. (see screenshot below) mountvol <Drive Letter>: /d. Substitute <Drive Letter> in the command above with the actual drive letter (ex: "G") you want to remove. For example: mountvol G: /d.
29. The command to remove a drive letter - which shouldn't be needed, but hey, Win10, there are still some bugs - is mountvol <drive> /D, so for you it would be mountvol S: /D and mountvol T: /D. You can also try mountvol /R, which should remove all drive letter assignments for which there is no currently mounted drive.
Assigning a new drive letter to a partition or removable device using Diskpart is really easy. First, search for the command prompt in the Start menu, right click on it and select the option "Run as administrator.". If you are using Windows 8, press "Win + X" to open the power user menu and select the option "Command Prompt (Admin).".
select volume 3. You should see a message that the volume is now selected. At this point you can easily assign a new drive letter. Just type in this command, substituting R for the drive letter you'd like to use: assign letter=R. Make sure to hit enter once you're done, of course. Once you've made that change, your drive should show up again as ...
Let's review these methods. To remove a drive letter in Windows 10, do the following. Press the Win + X keys together. In the menu, select Disk Management. In Disk Management, right-click on the partition whose drive letter you would like to change. Select Change Drive Letter and Paths in the context menu.
Changing a drive letter is pretty simple. Click the Start button, type "Disk Management" in the search bar, and then hit Enter. The program name displayed in the search will not be Disk Management. It will be "Create and format hard disk partitions." You could also hit Windows+X or right-click the Start button, and then click "Disk Management."
1 Open an elevated command prompt. 2 Type diskpart into the elevated command prompt, and press Enter. (see screenshot below) 3 Type list volume into the elevated command prompt, and press Enter. 4 Make note of the volume number (ex: 5) for the drive letter (ex: "F") of the drive (volume) you want to change.
Press Windows Key + R then type diskmgmt.msc and hit Enter to open Disk Management. 2. Right-click on the drive for which you want to remove the drive letter and select Change Drive Letter and Paths. 3. Select the drive letter for the particular drive and click on Remove button. 4.
The following steps show how to change the drive letter. Open Disk Management with administrator permissions. In Disk Management, select and hold (or right-click) the volume on which you want to change or add a drive letter and select Change Drive Letter and Paths. Tip. If you don't see the Change Drive Letter and Paths option or it's grayed ...
Press "Ctrl+ X", and click "Disk Management". Open the Windows 10 Change Drive Letter interface. Right-click the drive that you want to change or free the letter from and click "Change ...
Press the Windows key+X choose Disk Management.In the lower pane you will see all of your drives. Right click the D: drive and choose Change Drive Letter or Paths.and choose any drive letter not being used.That will free up D: and you can now right click any other drive choose to Change Drive Letter or Paths and choose it to be D: Once you reboot, it will permanently assign the drive letters.
Remove drive letters from Disk Management by following the steps: 1. Press the Windows + X key and choose Disk Management from the menu that appears on your screen. 2. When Disk Management opens, right-click on the drive you want to remove the letter for and select Change Drive Letter and Paths option.
Press the Win + E keys to open File Explorer, then click the View tab from the ribbon toolbar and click Options. Step 2. When the Folder Options window pops up, click the View tab. Then find and uncheck Show drive letters box under the Advanced settings section. Click Apply and OK sequentially to save changes.
Here's how to assign a drive letter Windows 10: Step 1: Press the Windows + X keys on your keyboard and a menu will appear. Click on Disk Management in the menu and the utility will launch. Step 2: When the utility launches, find and right-click on the disk whose letter you want to change. Select Change Drive Letter and Paths from the context ...
Step 1. Press Win + R keys to open the Run dialog box, and then type diskpart in it and press Enter. Then click on Yes to open the tool in Command Prompt. Step 2. To let diskpart unassign drive letter, type the following commands in order and press Enter after each one. list volume.
Install the new SSD, let it auto-assign to J: Clone D: 's partition to J: Reboot into recovery mode. Use diskpart to switch drive letters for J: and D: Boot back into Windows. However when I load diskpart in recovery mode, the drive letter assignment is different to when Windows is loaded - it's defaulting to auto-assigning by-device-then ...
Use Diskpart command to remove the drive letter or use the Device Manager to uninstall the driver for the USB drive. Remove Drive Letter in Windows 10. I should have said "assigned drive letter." To me it seems "permanent" because every time I connect the drive, Windows assigns the same drive letter. The tutorial you linked to shows how to ...
Search for Create and format hard disk partitions and click the top result to open the Disk Management experience. Right-click the drive and select the Change Drive Letter and Paths option. Click ...
For each non-existent drive appearing in Disk Management, the following was performed: 1. Right Click each non-existent drive one at a time and select Properties. 2. When the Properties opened there are the General, DVD Region, Volumes, Driver, Details and Events tabs. Click the Driver tab and then select Disable.
The problem was that sometimes Device Manager seemed to get confused and I would have to assign drive letters manually to make USB keys work. After cleaning out "Disk Drives" and "USB Controllers" the auto detection and letter assignment would work properly again. By "clean out" I mean deleting each of the grayed out entries.
In order to submit new feedback, please follow these steps: 1. On a Windows 10 device, search for Feedback Hub in Cortana search, then launch the app. 2. Navigate to Feedback in the left menu, then press + Add new feedback. 3. Select the Problem, and share any details you think are relevant, and choose an appropriate category and subcategory. 4.