How to Add, Duplicate, Move, Delete, or Hide Slides in PowerPoint

Mastering the functionality of adding, duplicating, moving, deleting, or hiding slides in PowerPoint is essential for crafting polished and dynamic presentations. In this comprehensive guide, we will explore the intricacies of these operations, offering insights into their definitions, benefits, and step-by-step how-to guides. Additionally, we'll introduce the innovative Smallppt's AI PowerPoint, a transformative tool at the forefront of the presentation creation landscape.

Adding Slides:
Adding slides in PowerPoint involves inserting new blank slides into your presentation. This can be useful for expanding your content or creating a structured sequence.
Duplicating Slides:
Duplicating slides allows you to create identical copies of existing slides. This is beneficial for maintaining consistency or making variations within your presentation.
Moving Slides:
Moving slides entails rearranging their order within the presentation. This feature is valuable for organizing content logically or responding to audience feedback.
Deleting Slides:
Deleting slides removes them from the presentation. It is crucial for refining content and ensuring that only relevant information is presented.
Hiding Slides:
Hiding slides allows you to temporarily conceal specific slides during a presentation, providing flexibility in tailoring your message to different audiences.
Seamless Presentation Flow:
These functions contribute to a seamless and well-structured presentation flow, ensuring that your audience can follow your narrative without distractions or disruptions.
Content Organization:
The ability to add, duplicate, move, delete, or hide slides facilitates the effective organization of your presentation content, enhancing clarity and coherence.
Time Efficiency:
Efficiently managing slides saves time during presentation creation, enabling presenters to focus on refining content and delivering impactful messages. Making a time-efficiency effect on presentations.
Adaptability:
These features offer adaptability, allowing presenters to respond dynamically to changes, feedback, or varying presentation contexts. It gives presenters more choices to adapt the different situations.

How-to Guides
1. Click where you want to add a new slide.
2. Go to the "Home" tab.
3. Click on the "New Slide" dropdown.
4. Choose the desired layout for your new slide.
1. Select the slide you want to duplicate.
3. Click on the "Duplicate Slide" button.
1. Select the slide you want to move.
2. Drag the slide to the desired position in the slide sorter or thumbnail view.
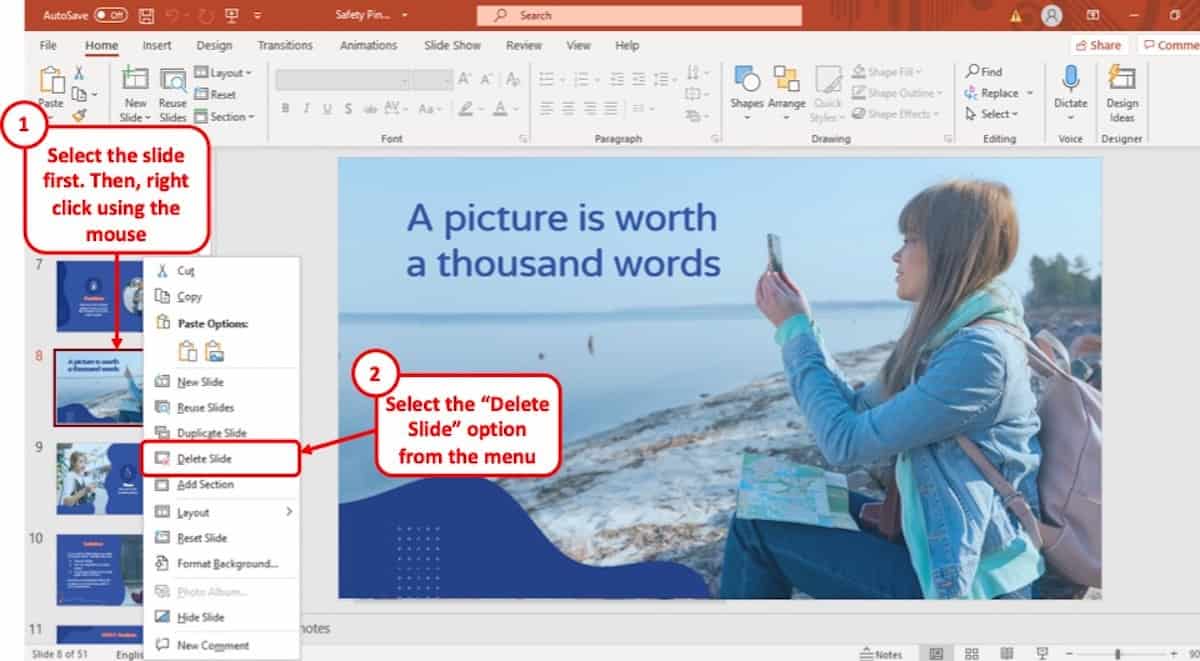
1. Select the slide you want to delete.
2. Press the "Delete" key on your keyboard or right-click and choose "Delete Slide."
1. Select the slide you want to hide.
2. Go to the "Slide Show" tab.
3. Click on "Hide Slide."
Introduction of Smallppt's AI PowerPoint
Smallppt's AI PowerPoint emerges as a game-changer, seamlessly operating as an advanced AI ppt maker and generator. This online tool, equipped with Artificial Intelligence presentation PowerPoint capabilities, redefines the landscape of presentation creation. As an AI PowerPoint slides creator, Smallppt ensures that adding, duplicating, moving, deleting, or hiding slides becomes an intuitive and efficient process.
Designed for the contemporary business ecosystem, Smallppt's PowerPoint AI tool offers a user-friendly interface, making presentation creation accessible to all skill levels. With features like the Redraw Feature for text refinement and real-time formatting recommendations, this tool exemplifies the evolution of AI for PPT. It seamlessly blends traditional design principles with the transformative capabilities of artificial intelligence, providing a glimpse into the future of presentation creation.
In conclusion, mastering the functionalities of adding, duplicating, moving, deleting, or hiding slides in PowerPoint is essential for creating compelling and well-organized presentations. The benefits of these operations extend beyond mere convenience, contributing to a seamless flow, efficient content organization, and adaptability to varying presentation scenarios.
With Smallppt's AI PowerPoint, the presentation creation experience reaches new heights. This AI PPT maker not only streamlines these essential functions but also showcases the transformative power of artificial intelligence in enhancing the overall presentation landscape. Elevate your presentations with the fusion of traditional design principles and cutting-edge AI technology, where Smallppt's AI PowerPoint stands as a beacon of innovation and efficiency.

Title / Email address / Description can not be empty!
Home Blog PowerPoint Tutorials How to Add, Delete and Re-arrange PowerPoint Slides
How to Add, Delete and Re-arrange PowerPoint Slides

PowerPoint is an easy-to-use presentation app. However, anyone who has just started using it can find it intimidating. Several basic options might need to be clarified for users new to PowerPoint. Such as when you insert a new slide, where it is placed, or how to duplicate a slide in PowerPoint.
Managing Slides in Normal, Outline, and Slide Sorter View in PowerPoint
There are different methods to add, delete, and re-arrange PowerPoint slides and the methods are similar in different viewing modes. These modes can be enabled or disabled via the View tab in PowerPoint. By default, the Normal View is active in PowerPoint. However, you can better view your slides by sorting them out via View > Slide Sorter . Similarly, the Outline View provides an easier look at the presentation outline. Other viewing options aren’t meant for making changes to the presentation, such as the Reading View for easy review of slides and the Notes Page View to see your Speaker Notes.

How to Add and Duplicate Slides in PowerPoint
Method 1: add new slide menu.
There are two easy ways of adding slides in PowerPoint, regardless of whether you’re using it in Normal View, Slide Sorter View, or Outline View mode. One of these options is to add a new slide from the Home tab via the New Slide drop-down menu. This menu also allows you to pick a specific layout, duplicate slides, add an outline from a Word, Text, or Rich text Format document, or select a PowerPoint file to reuse slides from.

Method 2: Add and Duplicate Slides via Right-Click Context Menu
You can also add or duplicate a new slide via right-click context menu. For the Normal and Outline views, you can right-click on the left sidebar. For Slide Sorter View, you can right-click anywhere to add a new slide.

Method 3: Hotkeys to Add or Duplicate Slides
You can also add and duplicate slides using hotkeys. If you’re using PowerPoint on a PC or PowerPoint for the web, the hotkey to add a new slide is CTRL+M , whereas Mac and iOS users can use Command+Shift+M to add a new slide.
Slides can be duplicated on Windows and PowerPoint for the web via the CTRL+D hotkey, whereas Mac users can use Command+D to do this.

How to Delete Slides in PowerPoint
Deleting slides in PowerPoint is as easy as adding new slides.
Method 1: Delete Slide via Right-Click Context Menu
You can delete any slide via right-click context menu. In the Normal or the Outline View, you can right-click the slide thumbnail from the left sidebar, whereas the slide can be deleted in the Slide Sorter View by right-clicking on the slide and selecting Delete .

Method 2: Delete Slide via Hotkey
You can also delete slides by selecting the slide and using the Delete hotkey on a Windows or Mac computer.

How to Hide Slide in PowerPoint.
It can be hidden if you don’t want a slide to show up during your presentation.
Method 1: Hide Slide Button
A simple method to hide your slide is to select the slide you want to hide and select Hide Slide via the Slide Show tab. To unhide the slide, click the button again.

Method 2: Hide Slide via Right-Click Context Menu
Slides can also be hidden by selecting the slide via right-click context menu, where like various other slide management options, the Hide Slide option is also available.

How to Re-arrange Slides in PowerPoint
You can re-arrange or move slides in PowerPoint via drag and drop to move slides up or down. This can be done regardless of whether you’re using the Normal View, Slide Sorter View, or Outline View. To move multiple slides simultaneously, use CTRL when using your mouse to drag and drop slides up or down.

Method 2: Move Slides and Outlines in PowerPoint
Another method to re-arrange slides is to move them by managing your outlines via View > Outline View by using the right-click menu to move slides up or down.

PowerPoint provides multiple methods for performing different tasks. Many options include using the Ribbon menu, hotkeys, or drag and drop. PowerPoint newbies often cling to the method they might find most accessible to remember, such as using the context menu or Ribbon menu options. However, hotkeys and drag-and-drop functionality can save a lot of time when making PowerPoint templates and performing simple tasks such as adding, duplicating, deleting, and rearranging slides.

Like this article? Please share
Presentation Ideas, Presentation Tips Filed under PowerPoint Tutorials
Related Articles

Filed under Presentation Ideas • June 6th, 2024
10+ Outstanding PowerPoint Presentation Examples and Templates
Looking for inspiration before approaching your next slide design? If so, take a look at our selection of PowerPoint presentation examples.

Filed under PowerPoint Tutorials • May 28th, 2024
How to Compress PowerPoint Presentations
You don’t need to end up with gigantic PowerPoint files you cannot email or distribute with ease. Instead, learn how to compress PowerPoint presentations by applying any of these 6 different methods.

Filed under Google Slides Tutorials • May 28th, 2024
How to Add a GIF to Google Slides
With this guide we teach you how to make presentations more interesting by adding GIF images to Google Slides.
Leave a Reply
- Customer Help
- X (Twitter)
How to add, duplicate, move, delete, or hide slides in PowerPoint?
When creating a presentation, it’s essential that you understand some of the basic principles of PowerPoint. It’s especially vital that you know how to control the slides. Let’s look at how to perform some of these critical functions.
Adding slides
First, you need to be able to add slides. Adding slides will allow you to expand the show. First, move to the Home tab. On the left side of the screen, you should see a New Slide function. You can click on it, which will add the default slide to the show. Alternatively, you can click on the arrow, which will activate a drop-down menu. Then, choose which type of slide you want. This slide will then be added to the show.

Duplicating slides
Next, you might want to know how to duplicate slides in PowerPoint. Duplicate slides will allow you to use the same format to create future slides. To do so, you should click on the slide that you want to duplicate. Then, move to the Home tab. On the right-hand side of your screen, you should see a Duplicate Slide option. Clicking on this option will create a new slide in the same format.

Alternatively, you can right-click on the slide you want to duplicate.

Moving slides
Relocating slides is relatively simple. On the side of your screen, you should be able to see in what order the slides are currently. Click and hold the slide, then move it into the correct position.
Deleting slides
In some cases, you might want to remove a slide from the presentation. To delete a slide in PowerPoint, right-click on it, which will bring up a menu of options. You will find one there called Delete Slide. Clicking on this option will remove that slide from the show.

Hiding slides
In some cases, you might create a slide, but don’t want to show it when you give the presentation. To not show the slide, you will need to choose Hide Slides in PowerPoint. You can do so by going to the Slideshow tab. Select the slide you want and choose the Hide Slide option.

To show a hidden slide, right-click on the current slide, which will bring up multiple options. Select the See All Slides option and choose the one you want to show. The presentation will resume with that slide on the screen. If you are using presenter view, the audience will see the hidden slide appear, but won’t know how you got it there.
Using PowerPoint can be a great tool to create a presentation. However, to do this effectively, there are a few techniques that you will need to learn, like how to add and delete slides. Hopefully, you now have the tools you need to master PowerPoint creation.
In this example we used a template for PowerPoint “Picanto”. You can download this template for free at the link .
You must be logged in to post a comment.
- Business articles (22)
- Google Slides (57)
- Keynote (27)
- PowerPoint (83)
- Support (2)
- Add and delete slides Video
- Apply or change a slide layout Video
- Apply Themes to presentations Video
- Get design ideas for slides Video
- Change slide masters Video
- Change the page orientation Video
- Add a watermark to your slides Video
- Organize slides into sections Video
- Add a logo to your slides Video

Add and delete slides

Add and delete slides to organize your presentation how you want.
Select the slide you want your new one to follow.
Select Home > New Slide .
Select a layout.
Select the text box and type.
Delete slides
Select your slide.
You can delete one or more slides at once:
Single slide - Right-click and select Delete Slide .
Multiple slides - Hold Ctrl and select the slides you want then right-click and select Delete Slide .
Sequence of slides - Hold Shift and select a sequence of slides then right-click and select Delete Slide .
Add, rearrange, duplicate, and delete slides in PowerPoint

Need more help?
Want more options.
Explore subscription benefits, browse training courses, learn how to secure your device, and more.

Microsoft 365 subscription benefits

Microsoft 365 training

Microsoft security

Accessibility center
Communities help you ask and answer questions, give feedback, and hear from experts with rich knowledge.

Ask the Microsoft Community

Microsoft Tech Community

Windows Insiders
Microsoft 365 Insiders
Was this information helpful?
Thank you for your feedback.
- Irresistible Tech Gifts for That Special Dad
- Killer Smartphone Deals We Love
Add, Delete or Change the Order of PowerPoint Slides
- Brock University
PowerPoint presentations are not always set in stone. When information changes or you want to improve your slideshow , update your presentation. Quickly modify an existing PowerPoint presentation by adding, removing, or reordering slides in the slideshow.
Instructions in this article apply to PowerPoint 2019, PowerPoint 2016, PowerPoint 2013, PowerPoint 2010, PowerPoint 2019 for Mac, PowerPoint for Mac 2011, PowerPoint for Microsoft 365, and PowerPoint Online .
Add a New Slide in PowerPoint
When you want to add more information to your PowerPoint presentation, add a new slide . Select an appropriate slide layout for the new slide and enter your information.
To add a new slide to a presentation:
Go to the slide you want a new slide to follow.
Select Home .
Select the New Slide down arrow to display a list of slide layouts.
Choose the layout you want for the new slide.
Delete a Slide
Sometimes information in a presentation isn't needed any longer. When you don't need a slide, delete it.
To delete a slide in a presentation:
Right-click on a slide in the Slide pane and choose Delete Slide .
To delete multiple slides, hold the Ctrl key ( Cmd key in Mac), select each slide you want to delete, release the Ctrl or Cmd key, right-click and select Delete Slides .
Move Slides in the Slides Pane
If you need to quickly rearrange a couple of slides in your presentation, use the Slides pane.
To move a slide in the Slides pane:
Select the slide you want to move.
Drag the slide to the new location.
A horizontal line appears as you drag the slide. When the horizontal line is in the correct location, release the slide. The slide is now in the new location.
Move Slides in Slide Sorter View
Sometimes a presentation needs a major make-over. Use Slide Sorter view to reorganize the slides in a presentation.
To use Slide Sorter view to move slides:
Select View .
Select Slide Sorter .
Select the slide you wish to move.
A vertical line appears as you drag the slide. When the vertical line is in the correct location, release the slide. The slide is now in the new location.
You can also delete slides in Slide Sorter view.
Get the Latest Tech News Delivered Every Day
- Slide Layouts in PowerPoint
- How to Select More Than One Slide in PowerPoint
- Different Ways to View Slides in PowerPoint
- How to Use the Slide Sorter View in PowerPoint
- How to Use Copilot in Powerpoint
- How to Use PowerPoint Slide Master Layouts
- The 10 Most Common PowerPoint Terms
- How to Make a PowerPoint Presentation
- How to Hide and Unhide a Slide in PowerPoint
- How to Print PowerPoint Slides
- Use PowerPoint Slide Finder
- Change the Default Font in PowerPoint Text Boxes
- Copy Slides to Another PowerPoint Presentation
- How to Use Speaker Notes in PowerPoint
- PowerPoint Master Slide
- Change Order of Animations for PowerPoint Slides

How to create or add a slide in Microsoft PowerPoint

In Microsoft PowerPoint , a presentation is made up of multiple slides. There are several ways to create or add a slide in a PowerPoint presentation. After adding slides, you can move the slides around to adjust the order or sequence, and delete slides.
For instructions on how to add, move, and delete slides in PowerPoint, click a link below and follow the steps.
- Insert new slide.
- Copy and paste existing slide.
- Insert slide from another presentation.
- Move a slide.
- Delete a slide.
Insert new slide
To insert a new, blank slide in a presentation, select your version of PowerPoint and follow the steps.
PowerPoint Online (web version)
Powerpoint desktop application.
In the slide preview pane on the left, click the slide immediately above where you want to insert a new slide. Then, right-click the highlighted slide and select New Slide in the pop-up menu. The new, blank slide is inserted into the presentation below the slide you clicked.

- In the slide preview pane on the left, click with your mouse in-between two slides where you want to insert a slide.

- In the PowerPoint Ribbon , on the Home or Insert tab, click the New Slide option.
- In the drop-down menu that opens, select the type of slide to insert from the slide layout . The new slide is inserted into the presentation where you clicked in step 1 above.

Copy and paste existing slide
To add a copy of an existing slide to a presentation, follow the steps below.
- In the slide preview pane on the left, find the existing slide you want to copy.
- Using your mouse, right-click that slide and select Copy in the pop-up menu .
- Determine where you want to add the copied slide. Right-click the slide above where you want to paste it.
Insert slide from another presentation
To add a slide from another presentation, follow the steps below.
Inserting a slide from another PowerPoint presentation is only possible in the Microsoft PowerPoint desktop application. PowerPoint Online does not support this capability.
- In the slide preview pane on the left, left-click with your mouse in-between two slides where you want to insert a slide.
- In the PowerPoint Ribbon, on the Home or Insert tab, click the New Slide option.
- In the drop-down menu that opens, click the Reuse Slides option at the bottom.

- In the Reuse Slides pane that opens on the right, click the Browse button.
- Find and select the PowerPoint presentation file with the slide you want to add to the currently open presentation, and click the Open button.
- A preview of the slides is displayed below the Browse option. Click the slide you want to insert into the currently-open presentation. A new slide is inserted, with text from the selected slide included in the new slide.
- To also apply the formatting of the selected slide to the newly-inserted slide, right-click the selected slide and select Apply Theme to Selected Slides .

Move a slide
To move a slide to another location in a PowerPoint presentation, follow the steps below.
- In the left preview pane, find the slide you want to move.
- Press and hold the left mouse button on the slide, then drag the slide up or down to where you want to move it.
- Release the left mouse button when you have dragged the slide to its new location.

Delete a slide
To delete a slide in a PowerPoint presentation, follow the steps below.
- Open the PowerPoint presentation.
- In the left preview pane, click the slide you want to delete.
- Press the Delete or Del key to delete the slide.
Related information
- How to change the background color of a slide in PowerPoint.
- How to insert a picture in Microsoft PowerPoint.
- How to add or remove slide transitions in Microsoft PowerPoint.
- How to add a video to a Microsoft PowerPoint presentation.
- How to insert a sound file into a PowerPoint presentation.
- How to start and stop a PowerPoint slide show.
- See our PowerPoint page for related links and information.
- Microsoft PowerPoint help and support.
- Computer software help and support.
- Slidesgo School
- PowerPoint Tutorials
How to Add Animations and Transitions in PowerPoint

In this tutorial, you’ll learn the basics of adding animations and transitions to your presentations in Microsoft PowerPoint. These visual effects will help you make your slides more dynamic and will keep your audience engage.
Adding an Animation to a Text, an Image, a Shape or Other Elements of a Presentation
Adding transitions to a slide.
- Select the object that you want to animate.
- Click the Animations tab.
- Select the animation that you want from the list.
- If you want to see which animations are applied to an object, click Animation Pane. You can also rearrange the animations as you see fit.
- Use the timing options to set the timing of the animation. You can choose when you want the animation to start: on click, with previous or after previous. You can also set the duration and even set a delay before the animation begins.

- Select the slide you want to apply a transition to.
- Click the Transitions tab.
- After you select any transition from the list, you’ll see a preview of the resulting effect.
- If you want to adjust the direction of the effect, among other settings, click the Effect Options drop-down arrow.

- To remove a transition, on the Transitions tab, click None.

- You can change the animations or transitions at any time. To do so, select the animated object or the slide with a transition applied to it and choose a different option from the list.
Do you find this article useful?
Related tutorials.

How to Insert Embed GIFs in a PowerPoint Presentation
Do you want to boost your presentation? One of the best ways of doing so is using GIFs! They are fun, easy to add and provide an amusing way of supporting your own information. Would you like to learn more about how to add a GIF in to your slides in PowerPoint? Keep reading!

How to Insert GIFs in a Google Slides Presentation
There are many and varied ways of captivating your audience with your presentation. One of them is using visually appealing materials so people cannot take their eyes off the slides. In fact, a clever use of GIFs and other images will help you when defining concepts in a cool and modern way. In this post we’ll teach you how to add GIFs to Google Slides themes easily.

Storyset by Freepik: Awesome illustrations for creative presentations
With inspiration and the adequate resources, a PowerPoint or Google Slides presentation can be the most creative slide deck your audience has ever been, regardless of topic. In this Slidesgo School article, we’re going to introduce Storyset, a new Freepik project where you’ll find illustrated concepts to visually reinforce the message you want to convey, turning your work into a memorable experience.

How to Add Animations and Transitions in Google Slides
In this new Slidesgo School tutorial, you’ll learn how to apply animations to the elements of a slide and how to add transitions between slides. This way, your presentation will be more dynamic and you’ll be able to impress your audience.
- PRO Courses Guides New Tech Help Pro Expert Videos About wikiHow Pro Upgrade Sign In
- EDIT Edit this Article
- EXPLORE Tech Help Pro About Us Random Article Quizzes Request a New Article Community Dashboard This Or That Game Popular Categories Arts and Entertainment Artwork Books Movies Computers and Electronics Computers Phone Skills Technology Hacks Health Men's Health Mental Health Women's Health Relationships Dating Love Relationship Issues Hobbies and Crafts Crafts Drawing Games Education & Communication Communication Skills Personal Development Studying Personal Care and Style Fashion Hair Care Personal Hygiene Youth Personal Care School Stuff Dating All Categories Arts and Entertainment Finance and Business Home and Garden Relationship Quizzes Cars & Other Vehicles Food and Entertaining Personal Care and Style Sports and Fitness Computers and Electronics Health Pets and Animals Travel Education & Communication Hobbies and Crafts Philosophy and Religion Work World Family Life Holidays and Traditions Relationships Youth
- Browse Articles
- Learn Something New
- Quizzes Hot
- This Or That Game
- Train Your Brain
- Explore More
- Support wikiHow
- About wikiHow
- Log in / Sign up
- Computers and Electronics
- Presentation Software
- PowerPoint Presentations
2 Simple Ways to Move or Delete a Slide in PowerPoint
Last Updated: April 13, 2024 Fact Checked
Using Desktop
Using mobile.
This article was co-authored by wikiHow staff writer, Rain Kengly . Rain Kengly is a wikiHow Technology Writer. As a storytelling enthusiast with a penchant for technology, they hope to create long-lasting connections with readers from all around the globe. Rain graduated from San Francisco State University with a BA in Cinema. This article has been fact-checked, ensuring the accuracy of any cited facts and confirming the authority of its sources. This article has been viewed 154,021 times. Learn more...
If you don't want a slide in your Microsoft PowerPoint presentation, you can easily take it out with your mouse or a keyboard shortcut. Here's how to delete a slide in PowerPoint using Windows, Mac, iPhone, iPad, or Android.
Removing One or Multiple PowerPoint Slides
- Open a PowerPoint presentation.
- Click a slide you want to delete, or hold Ctrl to select multiple slides.
- Right-click the slides.
- Click Delete Slide .

- PowerPoint is available to download on Windows and Mac. You can also use PowerPoint at https://www.office.com/ .

- To select multiple slides next to each other, click the first slide. Hold Shift , and then click the last side of the sequence. [1] X Trustworthy Source Microsoft Support Technical support and product information from Microsoft. Go to source
- To select multiple slides spread out, hold Ctrl and click each slide.

- The selected slide(s) will be deleted.
- You can also press Del or Backspace on your keyboard to delete slides.
- To undo this action, press Ctrl + Z (Windows) or Cmd + Z (Mac).

- You must have a Office 365 subscription to use PowerPoint. Make sure you're logged into your Microsoft account.
- If you don't already have a project open, tap one now.

- A pop-up menu will open.

- If you don't see Delete , tap the right arrow to scroll through more options.
Community Q&A
wikiHow Video: How to Delete a Slide in PowerPoint
You might also like.

- ↑ https://support.microsoft.com/en-us/office/add-and-delete-slides-in-powerpoint-8bf2b58d-df6c-4e5f-90e3-ade289a2d64d
About This Article

1. Open the presentation in PowerPoint. 2. Right-click the slide in the left column. 3. Click Delete Slide . Did this summary help you? Yes No
- Send fan mail to authors
Is this article up to date?

Featured Articles

Trending Articles

Watch Articles

- Terms of Use
- Privacy Policy
- Do Not Sell or Share My Info
- Not Selling Info
wikiHow Tech Help:
Tech troubles got you down? We've got the tips you need
3 Ways to Move Slides in PowerPoint

PowerPoint presentations often require rearranging slides to improve the flow or to customize the content for different audiences. Fortunately, there are a few easy ways to move slides in PowerPoint whether you’re using the desktop application, the online web version, or the mobile app.
Method 1: Move Slides in PowerPoint Desktop Application
The PowerPoint desktop application makes it simple to rearrange slides with drag and drop functionality. Follow these steps:
Step 1: Open Your PowerPoint Presentation
Step 2: drag and drop slides.
For example, to move Slide 1 to the end, drag its thumbnail from the top to the bottom of the pane. Release the mouse button when you see the insertion line where you want the slide moved.
Step 3: Move Multiple Slides (Optional)
Step 4: delete slides (optional), method 2: move slides in powerpoint online.
The web-based PowerPoint Online also makes reordering slides easy. Here is how to move slides using the online editor:
Step 1: Open the Presentation in PowerPoint Online
Step 2: enter slide sorter view.
In the bottom-right corner of the PowerPoint window, click the “Slide Sorter” button. This displays all slides as thumbnails.
Step 3: Click and Drag to Move Slides
To remove slides, right-click the thumbnail and choose Delete Slide.
Method 3: Move Slides in the PowerPoint Mobile App
You can also easily rearrange slides using the PowerPoint app for mobile devices. Follow these steps:
Step 1: Launch the PowerPoint App
Step 2: open the presentation.
Tap the presentation name under Recent to open a file stored in the cloud or your device. Or tap Browse to locate and open a file.
Step 3: Enter Slide Sorter View
Tap the “View” tab and choose “Slide Sorter” to display slide thumbnails.
Step 4: Drag and Drop Slides
Step 5: delete slides (optional).
Now you know how to quickly rearrange slides in PowerPoint whether you’re on a desktop, web browser, or mobile device. With drag and drop functionality, moving one or multiple slides is simple.
About The Author
Vegaslide staff, related posts, how to remove background in powerpoint, simple ways to loop in powerpoint on pc or mac, how to add, delete or change the order of powerpoint slides, adding a powerpoint callout to a slide.
How to Delete Slides in PowerPoint? A Beginner’s Guide!
By: Author Shrot Katewa

When you start using Microsoft PowerPoint, most of your effort will be spent trying to learn the various features and in creating slides for your presentation. But, what happens when you don’t like a slide design and you want to delete it? How do you delete slides in PowerPoint?
To delete a slide in PowerPoint, simply select the slide from slide preview on the left part of your screen. Then, from the options, click “Delete Slide”. You can also press the “Delete” key on your keyboard after selecting the slide from the slide navigation pane.
In this article, I will share with you not just how to delete your slides, but also how to recover slides that you may have accidentally deleted! Plus, you’ll also get to understand everything in a step-by-step manner so that you can implement this in your presentation.
So, let’s get started!
[ Please note – in this article, I will be using one of the presentation templates from Envato Elements . With Envato Elements, you get access to thousands of presentation designs with unlimited downloads so you never run out of options again. Plus, you get free previews so you know exactly what you’re getting before buying! Check out their pricing here ]
1. How to Delete a Slide in PowerPoint?
Let’s understand how to delete a in your PowerPoint presentation. This can be achieved in the following 2 easy steps mentioned below –
Step-1: “Right-click” and Select the Slide
The first step to deleting a slide on your PowerPoint presentation is to move your cursor on the slide which you want to remove and “ Right-click ” on it using the mouse of your computer.
Step-2: Click the “Delete Slide” Option
After “ Right clicking ” on the slide, click on the “ Delete Slide ” option from the drop-down menu. It is located in the middle of the menu with an icon of a square with a red ‘x’ mark on it.
1a. How to Delete Slides in PowerPoint on Mac?
Deleting a slide from a PowerPoint presentation is the same on Mac as it is on Windows. Simply follow the two steps described above from your Mac device and you will be able to delete any slide in your PowerPoint presentation.
1b. How to Delete a Slide in PowerPoint without Right-click?
Sometimes, when you have too many slides to delete from time to time, you don’t want to end up using the right-click option as this does take a bit of time. So, to delete a slide in PowerPoint without “ Right-clicking ” the mouse on your computer, you have to use the keyboard instead.
Below is a step-by-step guide of the whole process.
Step-1: Select the slide you want to delete
At first, you have to select the slide you want to delete from the “ Slide Navigation ” bar at the left of your screen. (just the way it is shown in the previous section above)
Step-2: Press the “Delete” button on your keyboard.
Keeping the slide selected in the “ Slide Navigation ” bar, hit the “ Delete ” button on the keyboard of your computer. It is located at the upper right corner of the keyboard right above the “ Backspace ” key.
Alternatively, you can press the “ Backspace ” key on your keyboard which will also delete the slide from your presentation. Furthermore, for Mac users, simply press the “Delete” key since there is no backspace key on Mac.
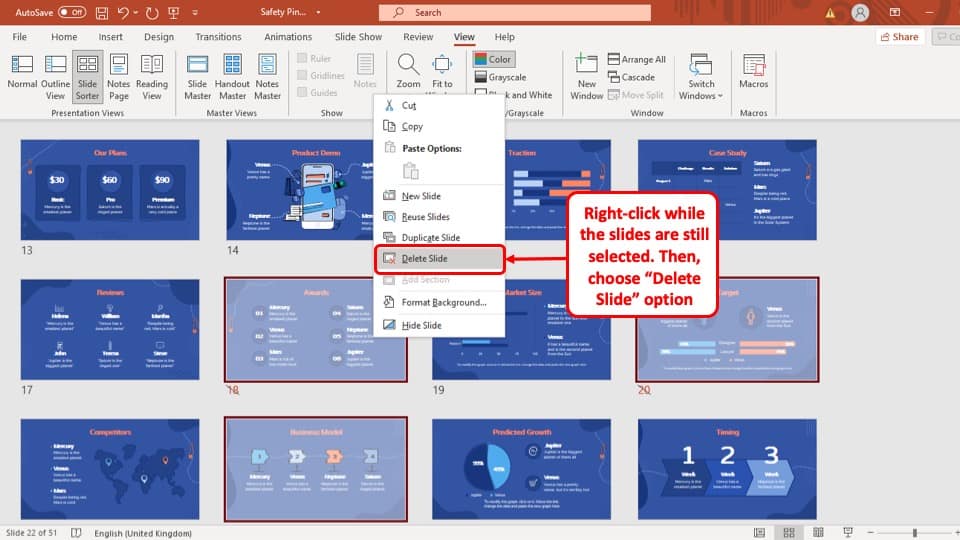
2. How to Delete Multiple Slides in PowerPoint?
To delete multiple slides in your PowerPoint presentation, you have to use the ‘ Ctrl ” key on your keyboard to select multiple slides at the same time.
Here’s the detailed process to delete multiple slides in PowerPoint –
Step-1: Hold the “Ctrl” key and select all the slides you want to delete.
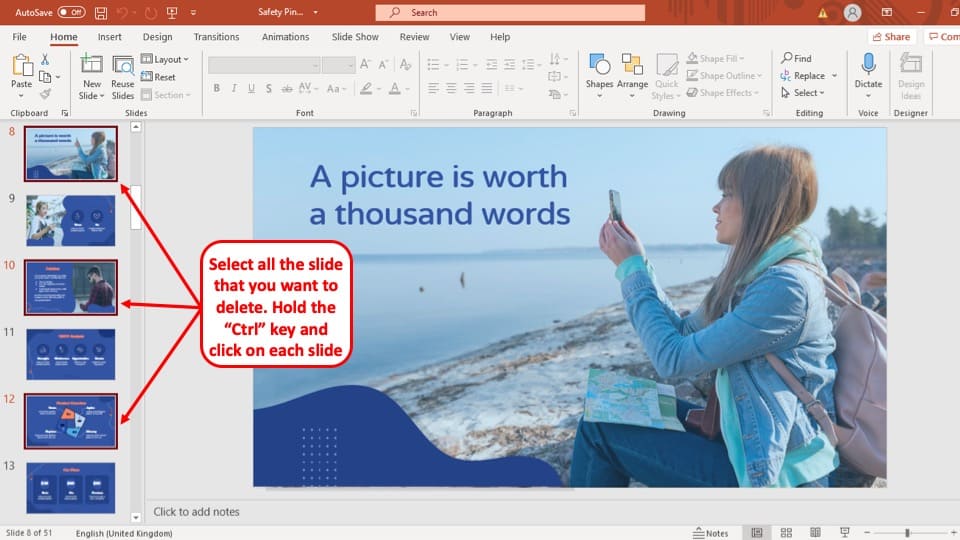
To delete multiple slides on your PowerPoint presentation, first, hold the “ Ctrl ” key on your keyboard and simply “ Left-click ” on the slides you want to delete to select them together.
Step-2: “Right-click” on one of the slides and press the “Delete Slides” option.
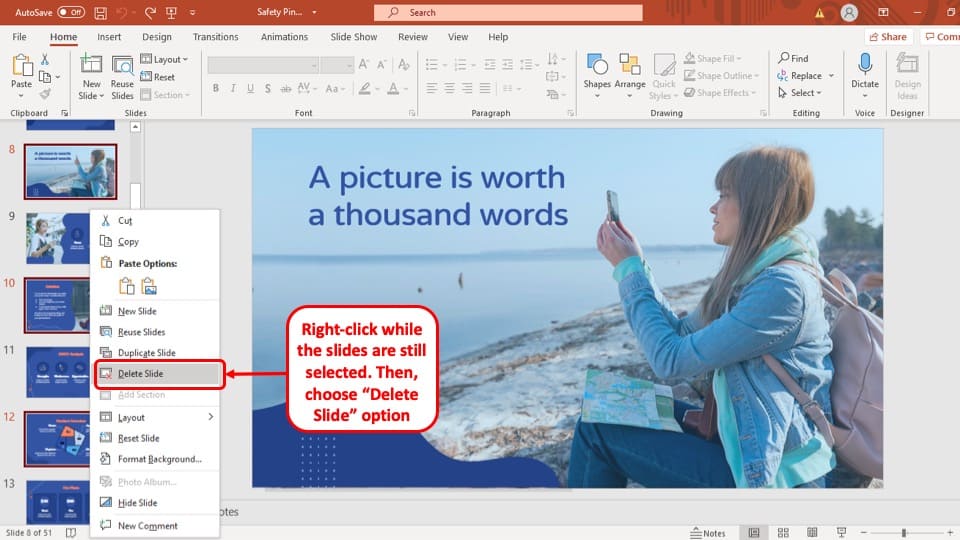
Once you have selected the slides that you want to remove from your PowerPoint presentation, “ Right-click ” on it using the mouse of your computer to open the drop-down menu and click on the “ Delete Slides ” option. However, make sure that the slides remain selected when you right-click (you will see a red border around the selected slides in the slide navigation pane)
Alternatively, you can also press the “Delete” button on your keyboard while. All the selected slides will be deleted instantly.
3. How to Delete Hidden Slides in PowerPoint?
The easiest way delete hidden slides in your PowerPoint presentation is to use the “ Slide Sorter ”. A step-by-step description of the process is given below.
Step-1: Go to the “View” tab on the ribbon.
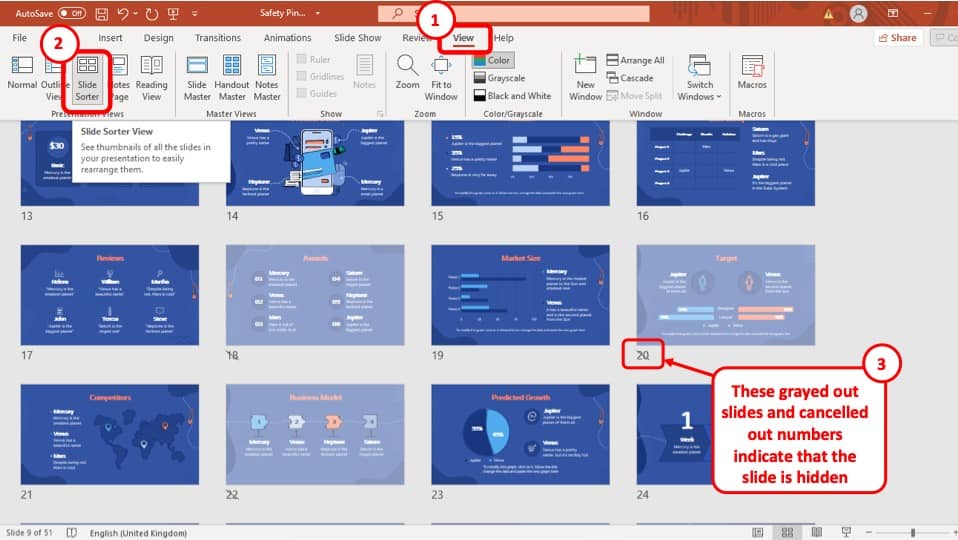
To access the “ Slide Sorter ” you have to first go to the “ View ” tab on the ribbon of your PowerPoint window. It is the second to last tab on the ribbon.
Step-2: Click on the “Slide Sorter” button
The next step to deleting hidden slides is to click on the “ Slide Sorter ” button which is the third button from the left at the “ Presentation View ” section.
Step-3: Select the hidden slides using the control key
After opening the “ Slide Sorter ” view, select the slide or multiple hidden slides that you want to delete and
Step-4: Right-click and Press the “Delete Slide” option
After you have selected all the hidden slides, simply “ Right-click ” on one of them using the mouse. Then, from the drop-down menu, simply press the “ Delete Slides ” option and all the hidden slides will be deleted from your PowerPoint presentation.
4. How to Delete Unused Master Slides in PowerPoint?
Deleting an unused master slide is quite helpful to reduce the size of you PowerPoint file if it becomes too large. Below is a step-by-step guide on how to delete unused master slides in your PowerPoint presentation:
Step-1: Go to the “View” tab in the ribbon
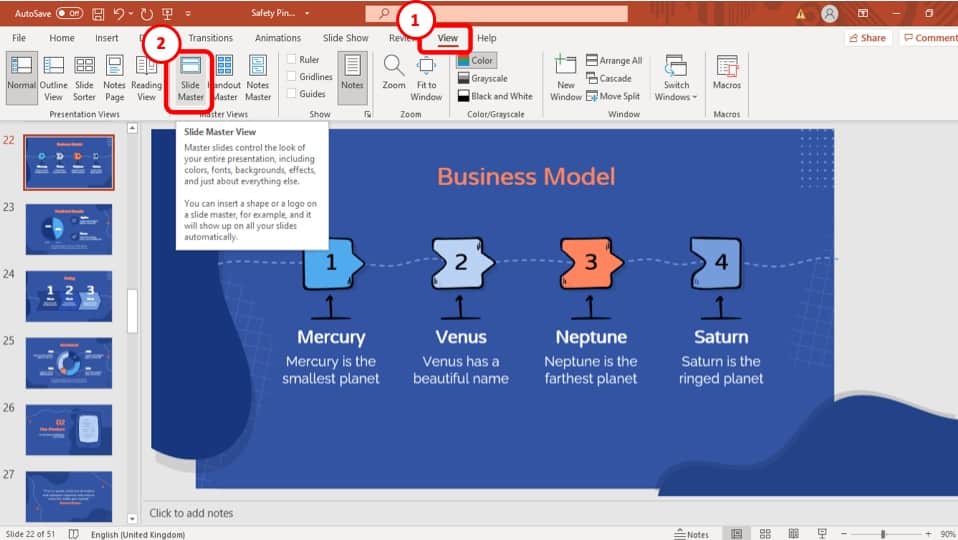
To access the “ Slide Master Navigation ” bar, at first you have to click on the “ Slide Master ” option located at the “ Master Views ” section in the “ View ” tab of the ribbon.
Step-2: Hover over the slides to see which ones are unused
To see which master slides are unused, hover your cursor over the slides to see which ones have not been used.
Step-3: Select the slide and delete it
Once you have found the master slides that you want to delete, simply “ Right-click ” on one of them and press the “ Delete ” button.
5. How to Recover Deleted Slides in PowerPoint?
To recover deleted slides in PowerPoint, you have to use the “ Undo ” button. Once you have mistakenly deleted a slide in your presentation., click on the icon that looks like a curved arrow directing to the left, which is the “ Undo ” button.
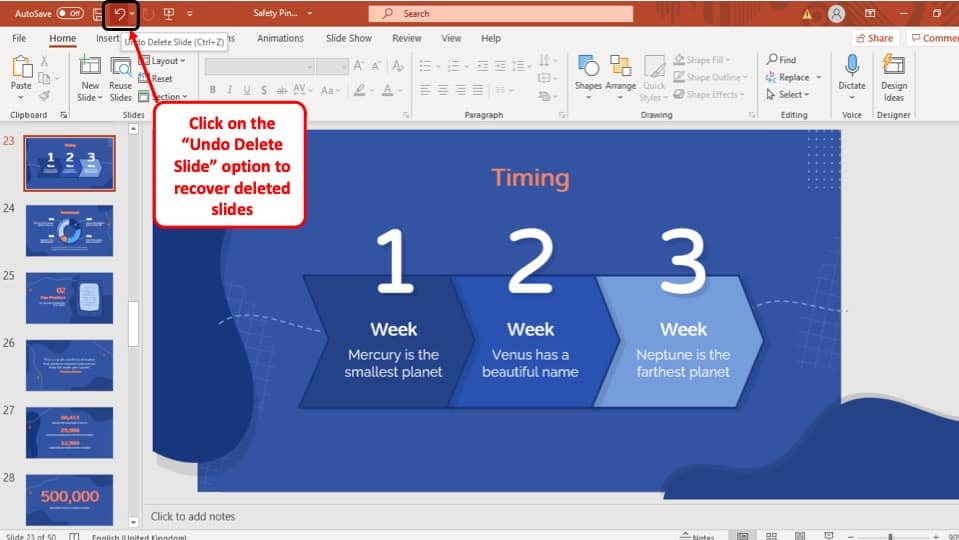
It is located at the top left corner of your PowerPoint software window. By clicking on it, your deleted PowerPoint slide will be recovered. Alternatively, you can press “ Ctrl + Z ” on your keyboard.
Another way of recovering deleted slides is to close the Microsoft PowerPoint application without saving the changes. You can do that by clicking on the ‘ x ’ icon at the top right corner of your screen and selecting the ‘Don’t Save’ option.
Now when you open your PowerPoint file again, you will find that the deleted slide is back to its place!
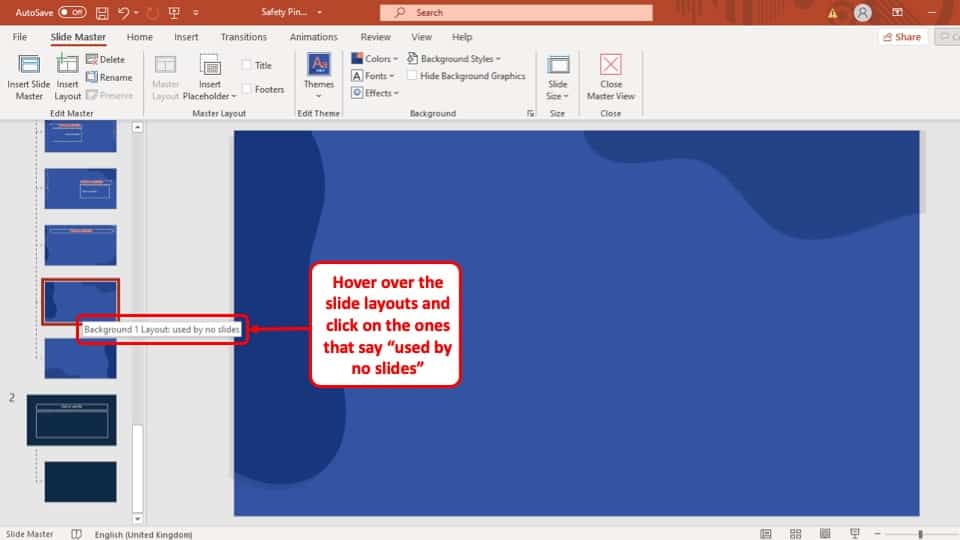
6. How to Delete a Slide Layout in PowerPoint?
Deleting a slide layout in PowerPoint is just the same as deleting unused master slides. So, you can follow the exact steps mentioned in the section 4 of this article.
However, one thing that you do need to remember is that a slide layout that is being used in one of your PowerPoint presentation slides cannot be deleted.
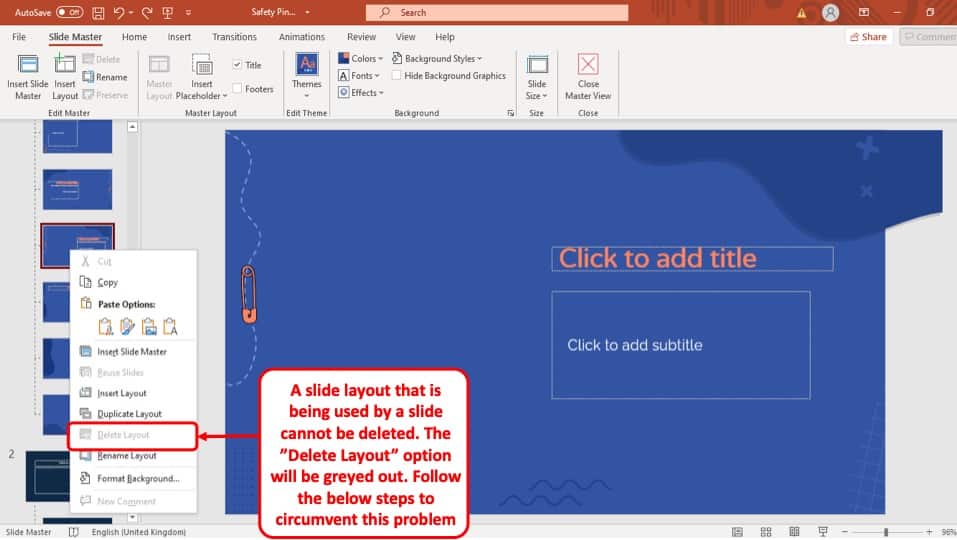
If you try to delete a layout that is being used the “ Delete Layout ” option will be greyed out indicating that it cannot be deleted (as shown in the image above).
To get around this issue, follow the 5 easy steps given below.
Step-1: Identify the slide using the layout
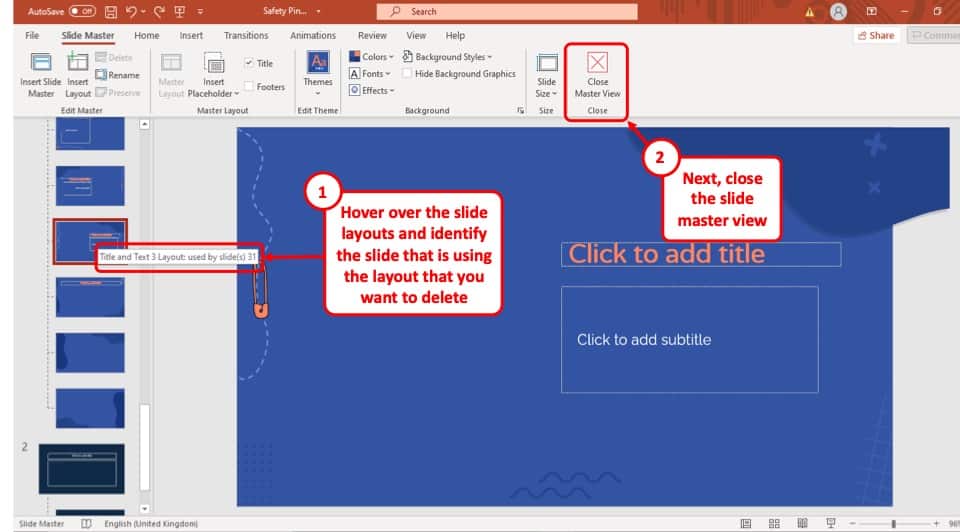
At first go to the “ Slide Master ” and hover your cursor over the layout that you want to delete. This will show you which of the slides in your PowerPoint presentation are using that layout.
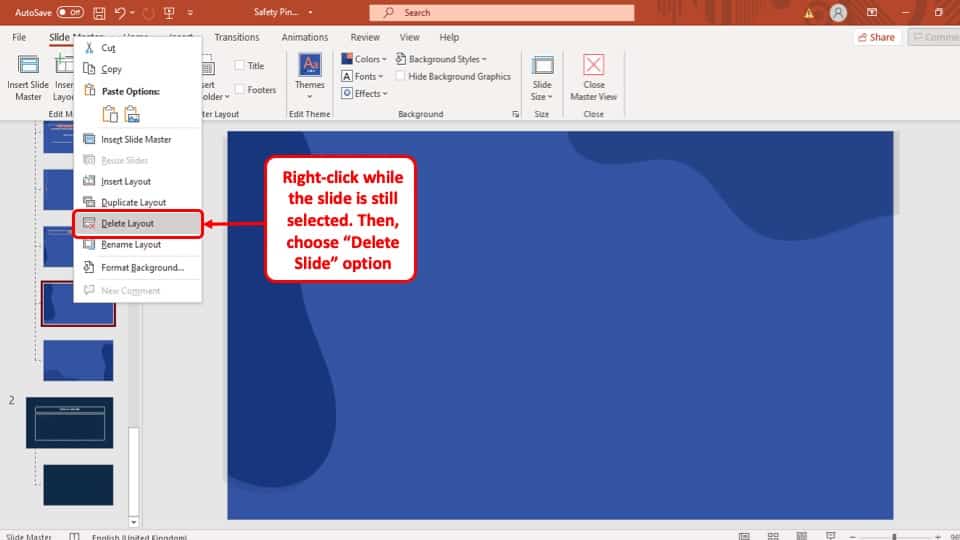
Step-2: Exit Slide Master and go to the specific slide
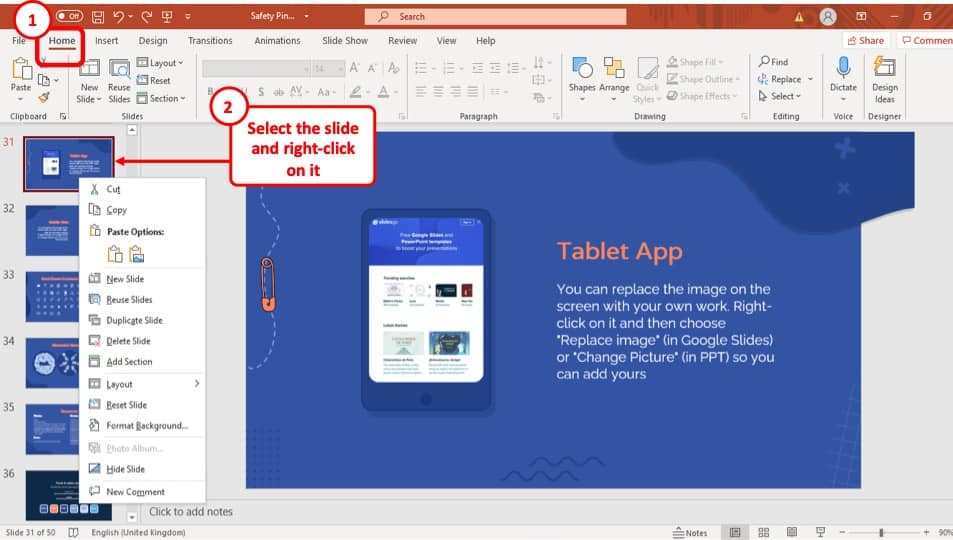
After finding out which slide is using the layout you want to delete, you have to go back to the “ Slide Navigation ” bar and “ Right-click ” on the slide to open the drop-down menu.
Step-3: Change the layout of the slide
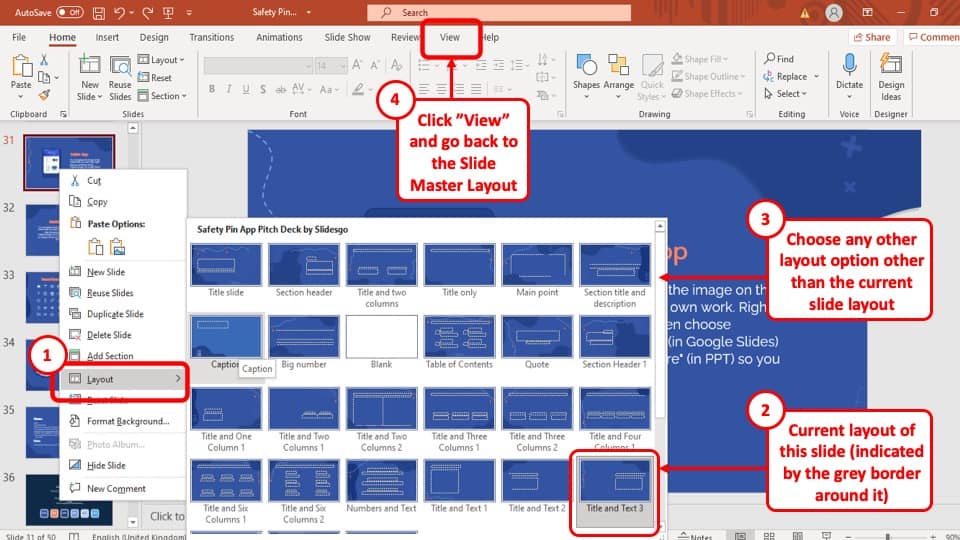
Once you have opened the drop-down menu, go to the “ Layout ” option, and change the layout of the slide to a different style. This will allow you to delete the layout that this slide was previously using.
Step-4: Go back to “Slide Master”
Once you have changed the layout of the slide that was using the layout you want to delete, go back to the “ Slide Master ” option, and “ Right-click ” on the layout. Now you will see that the “ Delete Layout ” button is no longer greyed out.
Step-5: Delete the layout
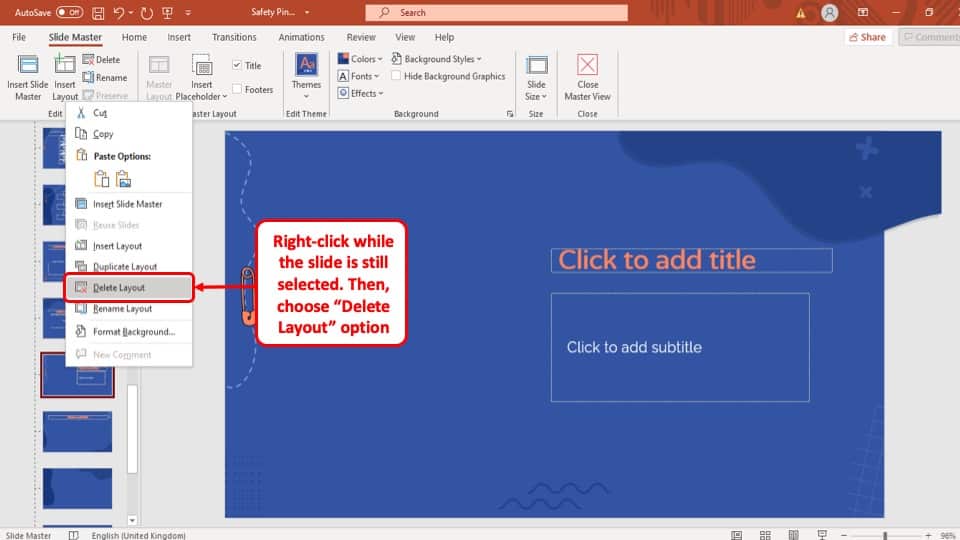
Finally, select the “ Delete Layout ” option and the layout will be removed from your PowerPoint Presentation.
7. Why Can’t I Delete Slides in PowerPoint?
On some occasions, you may not be able to delete slides. This is an extremely rare occurrence, but it can happen!
The main reason why you may not be able to delete a slide in PowerPoint is that your PowerPoint may have faulty macros in it. Perhaps you may have added a macro command that has bugs. This may create such an issue or prevent you from deleting slides even when the slide is blank with no data in it.
If you have indeed added a macro in your PowerPoint Presentation, it will be saved with a “.pptm” extension instead of a “.pptx” extension.
To solve this issue, all you have to do is save the presentation back as a ‘.pptx’ file, which will essentially kill all the macro commands. Once it is saved as a ‘ .pptx’ , opening it will allow you to delete any slide you want!
Another culprit could perhaps be an add-on that you may have recently added to your PowerPoint application. If so, try disabling or deleting the add-on, restart PowerPoint and try once again to see if you are able to delete the slide.
More PowerPoint Related Topics
- How to Crop a Picture in PowerPoint? [Complete Step-by-Step Tutorial!]
- How to Give a Presentation on Zoom? A Helpful Resource!
- How to Convert a PowerPoint to PDF? [A Simple Guide!]
- PowerPoint vs Google Slides: Which is Better? [ULTIMATE Test!]
- How to Change Bullet Style in PowerPoint? A Complete Guide
Credit to Lookstudio for the featured image (designed by Freepik) of this article
How-To Geek
How to reuse or import slides from another powerpoint presentation.
We often find ourselves creating the same sets of slides for different presentations---weekly presentations for company meetings, for example.
We often find ourselves creating the same sets of slides for different presentations---weekly presentations for company meetings, for example. Using slides from another PowerPoint presentation is a great way to save time and effort while still giving your presentation the professional appeal it requires.
Importing slides can save a ton of time. Not only does it keep all the animations and other settings when imported, but you can also have the imported slide adopt the theme of the presentation you’re working on.
First, go ahead and open the PowerPoint presentation that you’re working on---the one into which you want to import slides. Next, select the correct location on your presentation where you’d like your imported slide to appear. For example, if you want the imported slide to appear as slide number three, you’ll need to click the space between the existing slides two and three.

Next, switch to the “Home” tab and click the arrow under the “New Slide” button.

On the drop-down menu that appears, click the “Reuse Slides" command.

The Reuse Slides pane opens at the right side of your window. This is where you can browse your computer (or network) for another PowerPoint presentation. Do so by selecting either the “Browse” button or the “Open a PowerPoint File” link and navigating to the presentation that has the slides you want to import.

After selecting the file, you’ll see all of the slides from that presentation appear in Reuse Slides pane. Click any slide to insert it into your new presentation. You can't select multiple slides at once to import; you'll have to click them one at a time.

When you import a slide, it automatically takes on the theme of the current presentation. You can, however, choose to keep the original theme of the slide or even apply that theme to all of the slides by right-clicking one of the slides in the “Reuse Slide” pane and selecting “Apply theme to selected slides” or “Apply theme to all slides,” respectively.

Living Social Voucher Redemption Information
- Sign up for an account on this page .
- Stop at the billing screen since you already paid for a voucher.
- Send us a message, via the contact page , that includes the email address that you used to sign up for an account and the Living Social voucher number.
Once we have verified the voucher number, we will update your account and the 30 days of access will begin. At this time, we will send you an email update that confirms the account update.
| Email: | |
| Pass: |
| | | | | | | | | |
Add Remove Insert and Move Slides in a Presentation
| --> | Available and Tutorials -->
| Tutorial Length (mm:ss): | --> | |
| Downloadable Files: | ||
| Microsoft Office Program: | ||
| Keywords: | training powerpoint power point insert remove move slides presentation |
| Tutorial | Length (mm:ss) | Office Program |
|---|---|---|
| 10:15 | Microsoft Office PowerPoint | |
| 3:28 | Microsoft Office PowerPoint | |
| 4:18 | Microsoft Office PowerPoint | |
| 3:19 | Microsoft Office PowerPoint | |
| 1:40 | Microsoft Office PowerPoint | |
| 6:12 | Microsoft Office PowerPoint | |
| 7:00 | Microsoft Office PowerPoint | |
| 2:47 | Microsoft Office PowerPoint | |
| 9:42 | Microsoft Office PowerPoint |
Quickly Format a Presentation Add a Theme or Design
| Tutorial Length (mm:ss): | |
| Microsoft Office Program: | |
| Keywords: | training format powerpoint power point presentation theme design formatting custom |
Change Presentation Slide Order Using the Slide Sorter
| Tutorial Length (mm:ss): | |
| Microsoft Office Program: | |
| Keywords: | training power point powerpoint change slide order sorter view |
Start Presentation from Current Slide
| Tutorial Length (mm:ss): | |
| Microsoft Office Program: | |
| Keywords: | training powerpoint presentation start from current slide |
Put Pictures Photos Images into PowerPoint Slides
| Tutorial Length (mm:ss): | |
| Microsoft Office Program: | |
| Keywords: | training insert add pictures photos images to slides powerpoint power point format effects |
Add Speaker Notes to PowerPoint Slides and Presentations
| Tutorial Length (mm:ss): | |
| Microsoft Office Program: | |
| Keywords: | training speaker presentation notes page view slides print format bullet points powerpoint |
Add Bullet Points to Speaker Notes for Slides
| Tutorial Length (mm:ss): | |
| Microsoft Office Program: | |
| Keywords: | training powerpoint power point bullet points numbered list speaker user notes |
How to Run a Slide Show - In Depth Overview
| Tutorial Length (mm:ss): | |
| Microsoft Office Program: | |
| Keywords: | training powerpoint power point run slide show presentation first introduction overview beginner comprehensive |
| TeachMsOffice.com provides HD Online Video Tutorials and Training for Microsoft Office programs such as Excel , Word , and PowerPoint . We use a specialized video player interface to teach a vast list of Microsoft Office Tutorials and we add new tutorials on a weekly or monthly basis.  How to Add Animation in PowerPoint (Animate Pictures, Shapes, Text and Other Objects) Add Animation in PowerPoint to Create More Engaging Presentationsby Avantix Learning Team | Updated August 8, 2023 Applies to: Microsoft ® PowerPoint ® 2013, 2016, 2019, 2021 and 365 (Windows) You can add animation to pictures, text and other objects in PowerPoint to create more engaging presentations. Animations can be entrance, exit, emphasis or motion path and can start on click or automatically when you run a slide show. Since animations add movement, they can help to focus attention. The key is to engage, not distract, your audience. You can add animation in Normal View or Slide Master View. Recommended article: 10 Ways to Compress PowerPoint Presentations to Reduce File Size Do you want to learn more about PowerPoint? Check out our virtual classroom or in-person classroom PowerPoint courses > There are 4 types of animation in PowerPoint:
Although you can also apply transitions between slides in PowerPoint (like Morph), transitions are different from animations and occur between slides when you run a slide show. Add animation using the Animations GalleryThe easiest way to apply a single animation effect is to use the Animations Gallery on the Animations tab in the Ribbon:  The expanded Animations Gallery appears when you click the More down arrow:  Add multiple animations to an objectIf you are adding more than one animation effect to an object, you must use the Add Animation command in the Advanced Animations group, not the Animations Gallery. Add an entrance animationThe most common type of animation to add to an object is an entrance animation. Common entrance animations are Fade, Fly In or Wipe. To add an entrance animation to a picture, shape or other object:
You can also apply an entrance animation by clicking Add Animation on the Animations tab in the Advanced Animation group. The Change Entrance Effect dialog box includes several other entrance animations (some are only available in specific versions):  Add an exit animationYou can also add exit animations to objects. Common exit animations are Fade, Fly-Out or Disappear. To add an exit animation to a picture, shape or other object:
You can also apply an exit animation by clicking Add Animation on the Animations tab in the Advanced Animation group. The Change Exit Effect dialog box includes several other exit animations (some are only available in specific versions):  Add an emphasis animationYou can apply emphasis animations to some objects in PowerPoint. Emphasis animations are normally used for text, shapes or images. Common emphasis animations are Grow/Shrink, Fill Color or Font Color. Emphasis animations are enabled only for the type of object you select. For example, you can only apply Font Color to a text object. To add an emphasis animation to a picture, shape or other object:
You can also apply an emphasis animation by clicking Add Animation on the Animations tab in the Advanced Animation group. The Change Emphasis Effect dialog box includes several other emphasis animations (some are only available in specific versions and for certain types of objects):  Add a motion path animationA motion path is a path that is followed during an animation. For example, you can have an object move along a straight line path down and to the right on a slide. To add a motion path animation to a picture, shape or other object:
You can also apply a motion path animation by clicking Add Animation on the Animations tab in the Advanced Animation group. Motion paths can be used in advanced animation sequences. In this article, we are focusing on simple motion paths. To resize or redirect a motion path:
The Change Motion Path dialog box includes several other motion path animations:  Preview animation effectsAfter you add an animation effect, you can click the Preview or Play button on the Animations tab in the Ribbon to preview it. You can also preview animations by running a slide show (click the Slide Show button on the bottom right of your screen). By default, animations are set to play on click. Set Effect OptionsYou can also set different Effect Options for animations. Effect Options change depending on the animation effect you selected. For example, if you selected the Fly In entrance effect, options would include From Top, From Left, From Right and so on. To set an effect option for an animation effect:
The following Effect Options appear for the Fly In animation:  Control the way animations startAlthough animations are set by default to start on click, you can start them in other ways. To control the way an animation starts:
Note the Start setting is set by default to On Click:  Control the speed or duration of animationsWhen you apply an animation, a duration or speed is automatically set for the animation (in seconds). The default duration is different for each animation effect. The initial duration is often fast and you may want to increase the duration to slow it down. To set a speed or duration of an animation:
Note the Duration in the example below: Editing animations using the Animation PaneWhen you apply multiple animations to an object, it's best to display the Animation Pane so you can easily edit the animations. To edit animations using the Animation Pane:
The Animation Pane will display the animations you have applied. If you have applied an entrance and exit effect, two animation effects will appear in the Animation Pane. You can click the animation effect in the Animation Pane and click the arrow to the right to display a drop-down menu with options or you can select options in the Ribbon for that effect. In the Animation Pane, a green star appears beside entrance animations and a red star appears beside exit animations as follows:  Remove animationsTo remove animations from pictures, shapes or objects on a slide:
Animation can help engage your audience and focus attention and it's not difficult to use in PowerPoint presentations. Subscribe to get more articles like this oneDid you find this article helpful? If you would like to receive new articles, JOIN our email list. More resourcesHow to Insert Slide Numbers in PowerPoint How to Make an Object Appear and Disappear in PowerPoint How to Quickly Remove All Animations in PowerPoint Presentations How to Use Morph in PowerPoint to Design Engaging Presentations How to Remove the Background of an Image in PowerPoint (2 Ways) Related coursesMicrosoft PowerPoint: Intermediate / Advanced Microsoft PowerPoint: Design for Non-Designers Microsoft PowerPoint: Animations Bootcamp Microsoft Excel: Intermediate / Advanced VIEW MORE COURSES > Our instructor-led courses are delivered in virtual classroom format or at our downtown Toronto location at 18 King Street East, Suite 1400, Toronto, Ontario, Canada (some in-person classroom courses may also be delivered at an alternate downtown Toronto location). Contact us at [email protected] if you'd like to arrange custom instructor-led virtual classroom or onsite training on a date that's convenient for you. Copyright 2024 Avantix ® Learning You may also like How to Insert or Type E with an Accent Mark in PowerPoint (È, É, Ê, Ë, è, é, ê, or ë)You can insert or type e with an accent mark in PowerPoint using built-in tools or keyboard shortcuts (including Alt code shortcuts). The letter e can be inserted with an accent in both upper or lower case in text boxes or placeholders on slides, the slide master or layouts. The following are common accents in upper or lower case – È, É, Ê, Ë, è, é, ê, or ë.  How to Fade a Picture or Part of a Picture in PowerPoint (Using a Gradient)You can fade a picture in PowerPoint by drawing a rectangle shape on top of the picture and then filling the rectangle with a gradient from opaque to transparent. This technique is often used to fade an image into the background of a slide. Since the rectangle is placed on top of the image and then text may be placed on top of the rectangle, you may need to reorder the objects.  How to Lock an Image, Shape or Other Object in PowerPointYou can now lock an image, shape or other object in PowerPoint. Objects can be locked in Normal View or Slide Master View. Only PowerPoint 365 users can lock objects to prevent moving and resizing. This is helpful if you want to select and move other objects on the slide or prevent others from moving or resizing an object. You can lock items using the context menu or the Selection Pane. Microsoft, the Microsoft logo, Microsoft Office and related Microsoft applications and logos are registered trademarks of Microsoft Corporation in Canada, US and other countries. All other trademarks are the property of the registered owners. Avantix Learning |18 King Street East, Suite 1400, Toronto, Ontario, Canada M5C 1C4 | Contact us at [email protected] Our CoursesAvantix Learning courses are offered online in virtual classroom format or as in-person classroom training. Our hands-on, instructor-led courses are available both as public scheduled courses or on demand as a custom training solution. All Avantix Learning courses include a comprehensive course manual including tips, tricks and shortcuts as well as sample and exercise files. VIEW COURSES > Contact us at [email protected] for more information about any of our courses or to arrange custom training. Privacy OverviewPin it on pinterest.
Byte Bite Bit How to Delete Slide in PowerPoint: Step-by-Step GuideEver found yourself stuck with an unwanted slide in your PowerPoint presentation? Trust me; I’ve been there, fidgeting and wondering how to clean up my slide deck efficiently. Whether it’s a single rogue slide or a batch that’s ruining the flow, understanding how to promptly remove them is a lifesaver.  To delete a slide in PowerPoint, simply right-click on the unwanted slide thumbnail and select Delete Slide. This process is quick and straightforward, applicable whether you’re using Windows, macOS, or the web version. Additionally, if you’re dealing with multiple slides, the trick is to hold Ctrl (or Command on Mac) while selecting, then right-click and delete. This functionality ensures you can maintain a polished and professional presentation, free of clutter. Imagine prepping for a big meeting, deleting outdated or irrelevant slides in moments—it’s like giving your presentation a breath of fresh air. Let’s dive in deeper to tackle those slides effectively!
Creating and Organizing Slides in PowerPointPowerPoint slides can be created and arranged in various ways to improve the visual flow and overall impact of your presentation. Here’s how you can effectively add, rearrange, and visualize your slides. Adding New Slides to Your PresentationI often start by adding new slides. Head to the Home tab and click the New Slide option. This adds a slide with the same layout as the one you selected. To create a new slide quickly, use shortcuts:
You can customize the slide layout by clicking the little arrow next to New Slide and choosing a different template. Tip: Use consistent slide layouts to maintain a professional look. Rearranging Slides for Optimal FlowTo rearrange slides, head to the thumbnails pane on the left. Click and drag slides to shift their position. If you need to move a series of slides, hold the Ctrl key and select the desired slides. Release the key, right-click, and drag them to their new location. This technique keeps your presentation logical and engaging. In Normal View , moving slides can be just as easy. Use the thumbnails pane for a quick overview and adjust your slides’ order as needed. Utilizing Slide Sorter for Better VisualizationSlide Sorter View is a game-changer. Access it by clicking View tab , then Slide Sorter . It gives you a bird’s-eye view of all your slides, making it easier to spot patterns and inconsistencies. This view is perfect for a comprehensive review of your slide sequence. Directly drag and drop slides to rearrange them effortlessly. Using Slide Sorter:
Using this feature helps ensure your presentation flows seamlessly from start to finish. Efficient Slide Deletion TechniquesWhether you’re refining your presentation on Windows or Mac, these techniques ensure that deleting slides is straightforward and error-free. Learn how to quickly remove individual slides and efficiently manage multiple deletions. Deleting Individual Slides QuicklyDeleting a single slide can be done swiftly. Select the slide you want to delete in the navigation pane. Then, simply hit the Delete key on your keyboard. For Windows and Mac users alike, this step is quick and intuitive. You can also delete slides by right-clicking on the selected slide. A context menu will appear; choose Delete Slide from this menu. This method is particularly useful if you prefer using the mouse instead of keyboard shortcuts. For those who enjoy shortcuts, pressing Ctrl+Z will undo any accidental deletions. This immediate rollback is a lifesaver if you change your mind. Removing Multiple Slides at OnceRemoving multiple slides can save valuable time. Hold down the Ctrl key (or Command key on Mac) and click on each slide you want to delete. This allows for selective, non-contiguous selection. To delete a series of slides, click the first slide in the sequence, press and hold the Shift key, then click the last slide. This selects all slides between the two. Right-click on any of the selected slides and choose Delete Slide . Alternatively, just press the Delete key on your keyboard. If working with several slides, using the Outline View can help frame your presentation and make the editing process cleaner and more logical. Leveraging PowerPoint’s Features and ToolsBy tapping into various features and tools provided by PowerPoint, users can enhance their presentations significantly. From utilizing subscription benefits to joining training courses and communities, there are numerous ways to leverage PowerPoint effectively. Exploring Subscription BenefitsWhen you subscribe to Microsoft 365, you gain access to several advanced PowerPoint features. These not only make presentations more dynamic but also simplify complex tasks. For instance, Designer and Ideas offer smart design suggestions and layout options, saving time and effort. Real-time collaboration through OneDrive allows multiple users to edit a presentation simultaneously. This tool has transformed how teams work on projects remotely. Subscribers also receive regular updates with new features and security patches, ensuring that they always have access to the latest tools. AI-driven tools like Presenter Coach help improve public speaking skills by providing feedback on pacing, filler words, and more. These features are designed to improve the quality of presentations while fostering a more engaging experience for the audience. Accessing Training Courses and CommunitiesPowerPoint offers a host of officially curated training courses that cater to beginners and advanced users alike. These courses, often available on the Microsoft website or through LinkedIn Learning, cover a wide array of topics from basic slide creation to advanced animation techniques. Engaging in these training sessions can significantly improve proficiency. I find online communities, such as forums and social media groups, equally beneficial. These communities are filled with experienced users who provide tips , solve problems, and share best practices . Interacting with peers can offer new perspectives and creative solutions. By joining these networks, users stay updated with the latest trends and tools, sharing insights in real-time. This ecosystem supports ongoing learning and helps maintain enthusiasm for creating professional and polished presentations. Related posts:
Leave a Comment Cancel replySave my name, email, and website in this browser for the next time I comment. Free PowerPoint Templates Unlock the full potential of your presentations with our vast collection of free PowerPoint templates from FPPT, all tailored to be fully compatible with Microsoft PowerPoint. Browse through thousands of free slide templates, from business and finance themes to creative and modern designs, ensuring you find the perfect match for your presentation's tone and style. Featured Free Presentation Templates Artificial Intelligence PowerPoint Template Behavioral Psychology PowerPoint TemplateCommon benefits of using free powerpoint templates & pre-made slide design for presentation.
Our free PowerPoint backgrounds and presentation templates are very easy to customize and edit for your presentation needs. Using Microsoft PowerPoint (but now also in Google Slides), you can easily create engaging presentations with our free PowerPoint templates & slideshow templates.  Free Biotecnology PowerPoint Template Free Influencer PowerPoint Template Free Business PowerPoint TemplateUnder this section, you can get immediate access to some of the free PPT templates for PowerPoint available in our catalog. Alternatively, you can browse the entire design templates collection using the top menu or search by keyword. Serious presenters often want to keep their presentations minimalist in terms of design, but this catalog has a variety of free presentation templates and backgrounds available. Get access to thousands of modern presentation templates, backgrounds and free PPT templates, and creative slide templates with abstract designs. If you need help finding a suitable PPT template for your presentation project, contact us and we will help you. Our PPT slides are 100% free for commercial and education presentations, but if you are looking for professionally-designed free slides templates, ready for business presentations, check out these visually appealing PowerPoint templates for PowerPoint and Google Slides. Best Free PowerPoint templates & Presentation Slides Free Logistics PowerPoint Template Workplan Timeline Template for PowerPoint Blue & Brown PowerPoint Template Blue Corporate PowerPoint Template Free Focus PowerPoint TemplateWe will send you our curated collections to your email weekly. No spam, promise! Top 8 Fixes for PowerPoint Not Displaying Pictures on Windows Pankil is a Civil Engineer turned freelance writer. Since his arrival at Guiding Tech in 2021, he delves into the world of how-tos, and troubleshooting guides for Android, iOS, and Windows. Besides his new-found love for mechanical keyboards, he's a disciplined footfall fan and loves international travel with his wife. Microsoft PowerPoint can be frustrating when it fails to display pictures in your presentation on your Windows 10 or 11 PC. You may see errors like ‘This picture can’t be displayed’ along with a red X sign in place of the image. Whether the issue only affects specific slides or an entire presentation, you can fix that error with little troubleshooting and save yourself from embarrassment.  There can be several reasons for such an error, like corrupted image files , misconfigured settings, or a corrupt PowerPoint installation. In this guide, we’ve listed a few effective solutions to make Microsoft PowerPoint load images again. 1. Remove and Add the Picture AgainMicrosoft PowerPoint may fail to load an image if it is not added completely to the presentation file. Additionally, if you have added a picture link and the image file is moved to a different location before you saved the presentation, PowerPoint will not be able to find it. You can add the image(s) again to fix such issues. Step 1: Open Microsoft PowerPoint on your PC. Right-click on the image that is not loading and select Cut.  Step 2: Switch to the Insert tab, click on Pictures, and select This Device.  Step 3: Locate and select the picture you want to add from your computer and click the Insert button.  Alternatively, you can also select the Stock Images or Online Pictures option in to add images from online sources.  Browse through various categories or use the search bar to locate the images you want to add, select them, and click the Insert button at the bottom.  2. Save the File in a Different LocationIf Microsoft PowerPoint is unable to load images even after you reinsert them, try saving the file in a different location and see if that helps. Open your PowerPoint presentation and press F12 to bring up the Save As dialog box. Select a different location for your file and click Save.  Close the PowerPoint presentation and reopen it to check if the pictures load properly. 3. Disable Image CompressionMicrosoft PowerPoint allows you to compress images in your presentation to reduce the overall file size. While this makes it easier to share presentations with others via email, it can also end up breaking some of the images in your presentation. To avoid this, you need to prevent PowerPoint from compressing images in your file by following the steps below. Step 1: Open Microsoft PowerPoint and click the File menu at the top-left corner.  Step 2: Click on Options in the bottom left corner.  Step 3: Select the Advanced tab from the left sidebar. Scroll down to the ‘Image Size and Quality’ section and tick the ‘Do not compress images in file’ option. Then, click OK.  4. Allow PowerPoint to Download Online ContentDo you face problems with the stock or online images in PowerPoint? That could happen if you have prevented PowerPoint from downloading online content, causing the Stock Images and Online Pictures options to appear grayed out. Here’s how to fix that. Step 2: Select Options from the left pane. Step 3: In the PowerPoint Options window, click the General tab. Then, click the Privacy Settings button in the right pane.  Step 4: Tick the checkboxes that read ‘Turn on experiences that download online content’ and ‘Turn on all connected experiences.’ Then, click OK.  Restart PowerPoint to apply the above changes and check if the issue occurs after that. 5. Turn Off Hardware AccelerationWhen you enable hardware acceleration in PowerPoint, it offloads some of the graphical processing tasks from your CPU to the GPU to achieve better performance. However, if this feature malfunctions, PowerPoint may have trouble loading images. You can try disabling this feature to see if that helps. Step 1: Open PowerPoint and click the File menu at the top-left corner. Step 2: Click on Options at the bottom-left corner. Step 3: In the Advanced tab, clear the checkbox that reads ‘Disable Slide Show hardware graphics acceleration.’ Then, click OK.  6. Repair the Problematic FileIf Microsoft PowerPoint does not display pictures only in a specific presentation, the file may be corrupt. You can try using the built-in file repair option in PowerPoint to fix the presentation. Step 1: Open PowerPoint and press the Control + O keyboard shortcut. In the Open tab, click the Browse option.  Step 2: Locate and select your PowerPoint file. Then, click the downward arrow next to Open to select Open and Repair.  After PowerPoint repairs the presentation, the images should load fine. 7. Make Sure PowerPoint is UpdatedUsing an outdated version of Microsoft PowerPoint can also lead to such problems. This can happen if you have disabled automatic updates for Office apps on your Windows PC . Here’s how you can check for updates manually in PowerPoint. Step 2: Navigate to the Account tab. Click Update Options and select Update Now.  8. Run the Office Repair ToolIf PowerPoint does not display pictures even after you update it, there may be a problem with its installation on your Windows PC. Fortunately, Microsoft includes an Office repair tool that can automatically fix such issues with Microsoft PowerPoint . Here’s how to run it. Step 1: Press the Windows + R keyboard shortcut to open the Run dialog box. Type appwiz.cpl in the box and press Enter.  Step 2: In the Programs and Features window, select the Microsoft Office product on the list and click the Change button at the top.  Step 3: Select the Quick Repair option and click Repair.  If the issue remains, repeat the above steps and select the Online Repair option to conduct a thorough repair operation.  Enjoy Picture-Perfect PresentationsEye-catching images are essential for making your PowerPoint presentations stand out. Additionally, they can also be useful for conveying information at a glance. Applying the above tips should solve your problem and get Microsoft PowerPoint to display pictures as expected on your Windows 10 or 11 PC. Was this helpful?Last updated on 05 September, 2023 The above article may contain affiliate links which help support Guiding Tech. However, it does not affect our editorial integrity. The content remains unbiased and authentic. Leave a Reply Cancel replyYour email address will not be published. Required fields are marked *  The article above may contain affiliate links which help support Guiding Tech. The content remains unbiased and authentic and will never affect our editorial integrity. DID YOU KNOW Pankil ShahMore in windows.  How to Disable Network Adapters in Windows 11: 5 Best Ways How to Uninstall Microsoft Teams on Windows 10 CorrectlyJoin the newsletter. Get Guiding Tech articles delivered to your inbox. How to Create an Underline Animation on Text in PowerPointDo you want to make your PowerPoint presentation more attractive and professional? One way to do this is to use underline animation on text. Underline animation is an effect that makes text underline move from left to right or vice versa, highlighting the text you want to emphasize. These animations can add dynamism and focus to your presentation, as well as make it easier for the audience to follow your key points. However, how to animate underline on text in PowerPoint? Do you have to use external tools or special code? As it turns out, you can create underline animations easily and quickly using PowerPoint’s built-in features. In this article, I’ll show you the steps to animate underlines on text in PowerPoint, as well as provide some tips and tricks to improve the result.  Step 1: Add Text and UnderlineThe first step to creating an underline animation is to add the text and underline you want to animate. You can use any text you want, be it headings, subheadings, lists, or paragraphs. You can also use different fonts , sizes, colors, and text styles according to your preferences. To add text, you can use text boxes or text placeholders available in PowerPoint. You can drag and adjust the text box size according to your need, and then type the text as you want. You can also copy and paste text from other sources if you want. To add an underline, you can use one of two ways:
Step 2: Add an Underline AnimationThe second step to creating an underlined animation is to add the underlined animation you want. You can use different types of animations available in PowerPoint, such as Entrance , Emphasis , Exit , or Motion Paths . You can also combine several animations to create more complex and interesting effects. To add an animation, you have to select the object you want to animate, be it a text box or a line. You can then select the Animations tab, and then click the Add Animation button in the Advanced Animation group. You can select the animation you want from the animation gallery, or click More Entrance Effects , More Emphasis Effects , More Exit Effects , or More Motion Paths to see more options. You can also adjust animation settings by using the Animations tab. You can change the Start , Duration , and Delay animations by using the number boxes in the Timing group. You can also change the Effect Options animation by using the drop-down buttons in the Animation group. You can choose the direction, speed, size, color, or shape of the animation according to your preference. Step 3: Review and Refine the Underscore AnimationThe third step to creating an underlined animation is to review and refine the underlined animation you created. You can preview the animation by using the Preview button on the Animations tab, or by running your presentation. You can check if the animation runs smoothly, matches the text, and matches your purpose. If you want to fix or change the animation, you can use the Animation Pane feature found in the Animations tab. You can select the Animation Pane button in the Advanced Animation group, and then see a list of animations that you added to your slides. You can select the animation that you want to change, and then use the Animations tab to change the animation settings or effects. You can also delete, copy, paste, sort, or group animations by using the right-click menu on Animation Pane . Other Interesting Articles
Tips and Tricks to Create Better Underscore AnimationsTo create a better underline animation, you can follow some of these tips and tricks:
Underline animation is one way to make your PowerPoint presentation more engaging and professional. You can create underline animations easily and quickly using PowerPoint’s built-in features. You can also customize the underline animation to the theme and purpose of your presentation. You can also coordinate underline animations with animations of text or other objects. You should also review and refine your underscore animations before you present your presentation. By using underline animations sparingly and strategically, you can add dynamism and focus to your presentation, as well as make it easier for the audience to follow your key points. Hope this article was helpful and helped you make better PowerPoint presentations. Thanks for reading. RELATED ARTICLESHow to add, rearrange, duplicate, and delete slides in powerpoint, latest articles, merge multiple hard drives into one volume in windows 11 with windows storage spaces, how to move text in microsoft word quickly and easily, how to check spelling and punctuation in microsoft word, how to stop “sign in with google” pop-ups in browser, how to create an attractive page layout design with microsoft word. |
IMAGES
VIDEO
COMMENTS
Right-click the slide in the thumbnail pane on the left, then select Delete Slide. Press and hold Ctrl, and in the thumbnail pane on the left, select the slides. Release the Ctrl key. Then right-click the selection and choose Delete Slide. Press and hold Shift, and in the thumbnail pane on the left, select the first and last slides in the sequence.
Select any slide and press Ctrl + M in Windows, or Cmd + M in Mac. A new slide will be created with the same design as the selected slide. Right-click on any slide and choose New Slide. A new slide will be created below the selected slide. Go to the Slides section of the Home tab and click on New Slide (if you click on the little arrow, you ...
Right-click and select "New Slide.". The slide template will be the same as the slide directly above where you're inserting the new one. Deleting a slide is just as easy. In the Slide Preview pane, right-click the slide you want to delete and then click "Delete Slide.". Alternatively, you could select the desired slide to be deleted and ...
3. Click on the "Duplicate Slide" button. Moving Slides: 1. Select the slide you want to move. 2. Drag the slide to the desired position in the slide sorter or thumbnail view. Deleting Slides: 1. Select the slide you want to delete. 2. Press the "Delete" key on your keyboard or right-click and choose "Delete Slide." Hiding Slides: 1.
Method 2: Add and Duplicate Slides via Right-Click Context Menu. You can also add or duplicate a new slide via right-click context menu. For the Normal and Outline views, you can right-click on the left sidebar. For Slide Sorter View, you can right-click anywhere to add a new slide.
Demonstration of how to add, delete, and move slides in PowerPoint.
To do so, you should click on the slide that you want to duplicate. Then, move to the Home tab. On the right-hand side of your screen, you should see a Duplicate Slide option. Clicking on this option will create a new slide in the same format. Using the Duplicate Slide option. Alternatively, you can right-click on the slide you want to duplicate.
Select your slide. You can delete one or more slides at once: Single slide - Right-click and select Delete Slide. Multiple slides - Hold Ctrl and select the slides you want then right-click and select Delete Slide. Sequence of slides - Hold Shift and select a sequence of slides then right-click and select Delete Slide.
How to add, move and delete slides in PowerPoint. How to add, move and delete slides in PowerPoint.
To move a slide from the first position, for example, to the 5th position, just drag and drop that slide from its current position to where you want it to be. 3. Press and hold Ctrl (Windows) or ⌘ Cmd (Mac) if you want to select multiple slides. They will move in a group and not individually, however.
Select View . Select Slide Sorter . Select the slide you wish to move. Drag the slide to the new location. A vertical line appears as you drag the slide. When the vertical line is in the correct location, release the slide. The slide is now in the new location. You can also delete slides in Slide Sorter view.
In this video, we'll show you how to move and delete slides in PowerPoint. This is a helpful video if you're a beginner or if you're having trouble moving or...
In the slide preview pane on the left, left-click with your mouse in-between two slides where you want to insert a slide. In the PowerPoint Ribbon, on the Home or Insert tab, click the New Slide option. In the drop-down menu that opens, click the Reuse Slides option at the bottom. In the Reuse Slides pane that opens on the right, click the ...
Adding Transitions to a Slide. Adding an Animation to a Text, an Image, a Shape or Other Elements of a Presentation. Select the object that you want to animate. Click the Animations tab. Animations tab in PowerPoint. Select the animation that you want from the list. If you want to see which animations are applied to an object, click Animation Pane.
3. Right-click the slide (s) and click Delete Slide. This is in the pop-up menu, underneath Duplicate Slide. On Mac, use a control-click . The selected slide (s) will be deleted. You can also press Del or Backspace on your keyboard to delete slides. To undo this action, press Ctrl + Z (Windows) or Cmd + Z (Mac).
Step 2: Drag and Drop Slides. In the left pane, you'll see thumbnails of all your slides. Click and drag slides to rearrange them in any order you like. For example, to move Slide 1 to the end, drag its thumbnail from the top to the bottom of the pane. Release the mouse button when you see the insertion line where you want the slide moved.
Step-1: Hold the "Ctrl" key and select all the slides you want to delete. To delete multiple slides on your PowerPoint presentation, first, hold the " Ctrl " key on your keyboard and simply " Left-click " on the slides you want to delete to select them together. Step-2: "Right-click" on one of the slides and press the "Delete ...
Next, switch to the "Home" tab and click the arrow under the "New Slide" button. On the drop-down menu that appears, click the "Reuse Slides" command. The Reuse Slides pane opens at the right side of your window. This is where you can browse your computer (or network) for another PowerPoint presentation. Do so by selecting either the ...
PowerPoint Training - Add Remove Insert and Move Slides in a Presentation. HD Video Tutorial for Microsoft Office. ... Learn how to change the PowerPoint slide order or presentation order using the Slide Sorter. The Slide Sorter view allows you to quickly arrange a large number of slides in a presentation. You will also learn how to change the ...
You can add animation to pictures, text and other objects in PowerPoint to create more engaging presentations. Animations can be entrance, exit, emphasis or motion path and can start on click or automatically when you run a slide show. Since animations add movement, they can help to focus attention. The key is to engage, not distract, your audience. You can add animation in Normal View or ...
For copying entire slides from another presentation, open both presentations in the PowerPoint desktop app. In the source presentation, right-click on the slide thumbnail and select Copy Slide. Then, paste the slide in the destination presentation. This process ensures the formatting and design elements remain intact.
To delete a series of slides, click the first slide in the sequence, press and hold the Shift key, then click the last slide. This selects all slides between the two. Right-click on any of the selected slides and choose Delete Slide. Alternatively, just press the Delete key on your keyboard.
Easily convert your PowerPoint slides to Google Slides, Keynote and OpenOffice. Impress your audience with catchy slides & photos and PowerPoint themes with great backgrounds. Our free PowerPoint backgrounds and presentation templates are very easy to customize and edit for your presentation needs.
I'm sorry to hear that you accidentally deleted your PowerPoint slides and saved the changes. If you haven't saved a backup copy of your presentation or if you didn't save it to OneDrive or SharePoint, it may not be possible to recover the deleted slides. (If you saved presentation in OneDrive or SharePoint, you may try the Version History ...
You can try using the built-in file repair option in PowerPoint to fix the presentation. Step 1: Open PowerPoint and press the Control + O keyboard shortcut. In the Open tab, click the Browse option.
To add an underline, you can use one of two ways: The first way is to use the text underline feature found in the Home tab. You can select the text that you want to underline, and then click the U button in the Font group. You can also use the keyboard shortcut Ctrl+U.This method is easy and fast, but it has some limitations.
For question slide placeholders, double-click the placeholder slide to insert a question slide. Note: For more information and to download a sample template, refer Dr. Allen Partridge's blog in the community portal.
For Presentations: Select Open in Full Screen mode check box. For the Navigation tab, select Page Only. For Page layout, select Single Page. Set Open to page to the page where you want to start the presentation. Select Ok. Save and reopen the file to view the effects.