
How to Embed an Excel File in PowerPoint (5 Easy Ways)
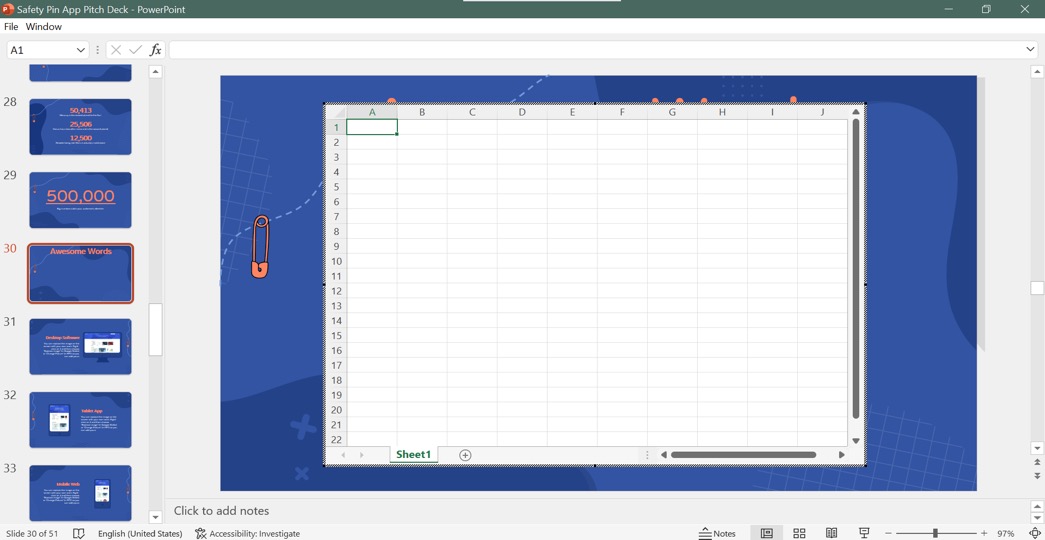
Here’s an overview of how data will be presented from Excel into PowerPoint.

How to Embed an Excel File in PowerPoint: 5 Suitable Examples
Let’s assume we have a “ Sales Data for Fruits ” dataset, which includes the Product ID , Fruits , States , and Sales amount under columns B , C , D , and E respectively.

Method 1 – Embedding an Entire Excel File in PowerPoint
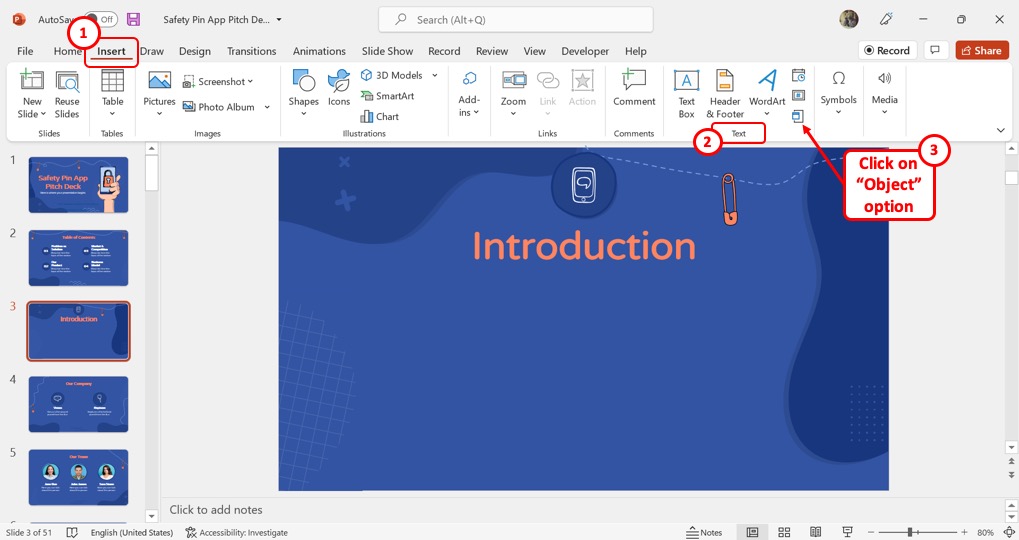
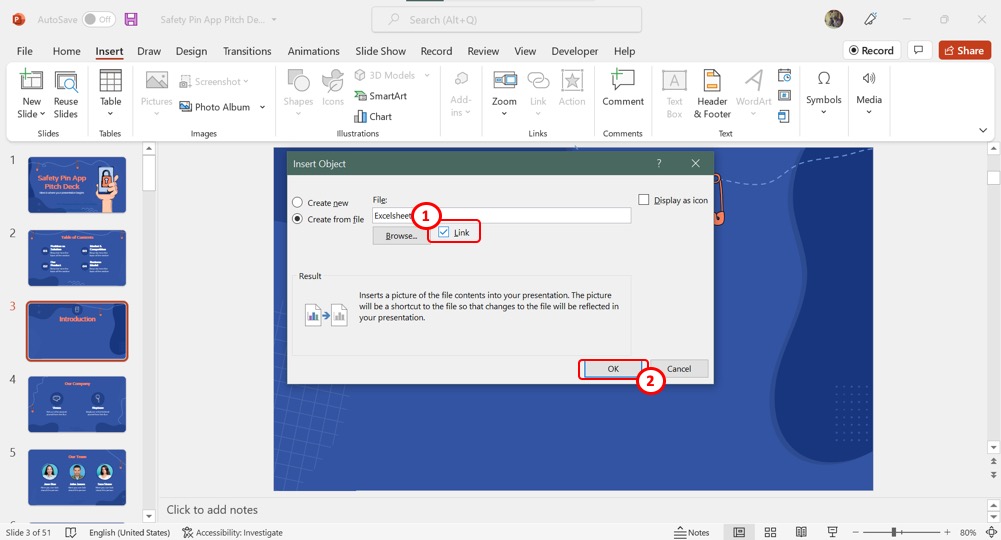
- Select the Insert tab on the Ribbon in PowerPoint.
- Click on the Object command on the Text group of commands.

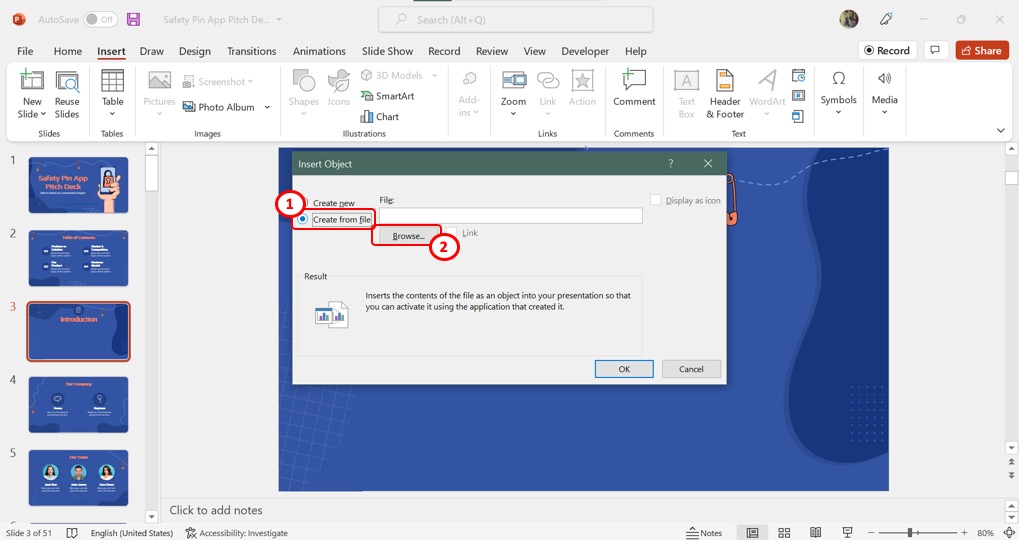
- In the Insert Object dialog box, click on the radio button of Create from file option.
- Choose the Browse… button.

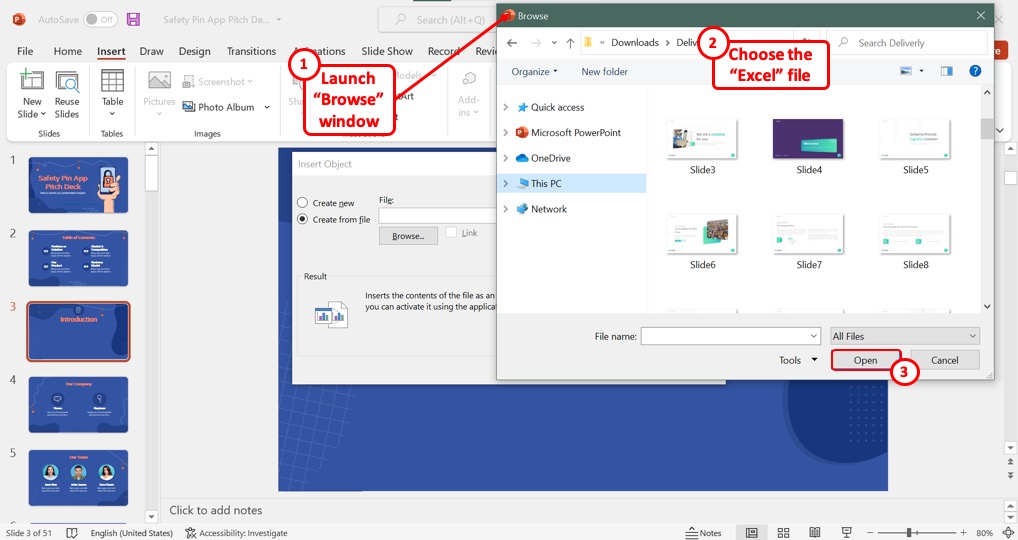
- In the Browse window, select your desired file and click OK .

- You can see your file path and name in the highlighted box. Click OK .

Note: Don’t check the box before the Link option to embed the Excel file .
Make sure to attach your intended data on the first page of the Excel file.

Read More: How to Perform Excel to PowerPoint Automation
Method 2 – Embedding a Section of Excel Data in PowerPoint File
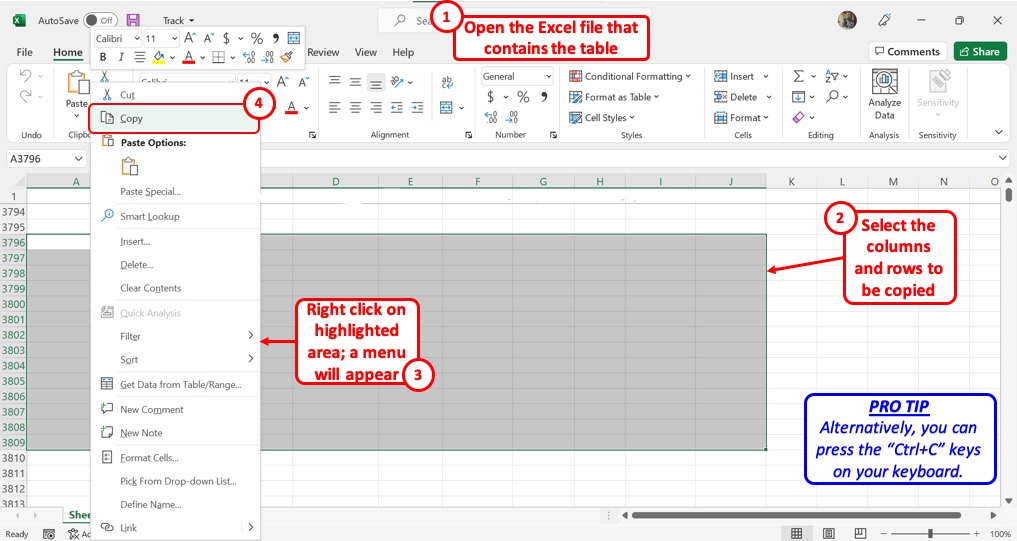
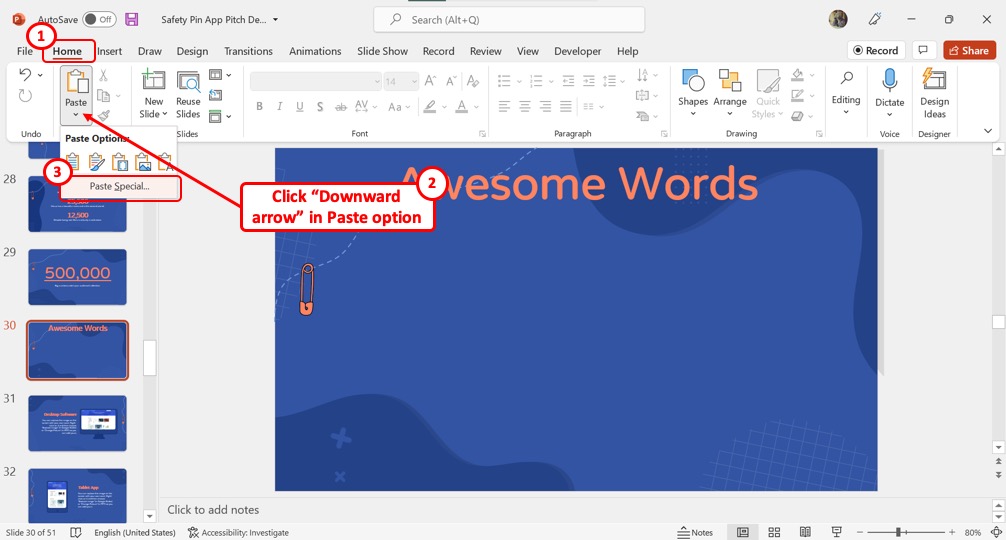
- Open the Excel file and select the range of data (e.g. C4:E14 ) you want to embed.
- Press CTRL + C on your keyboard to copy this range.

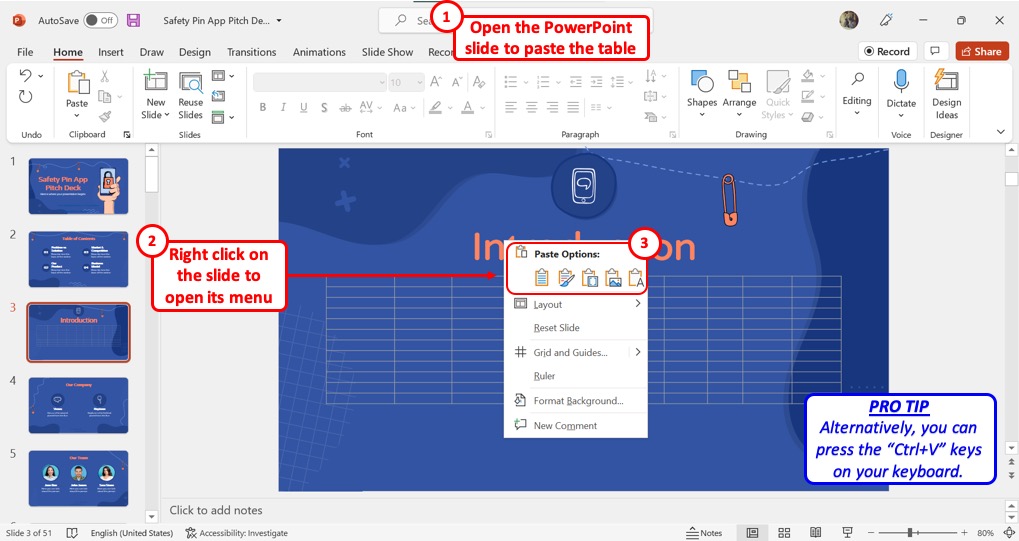
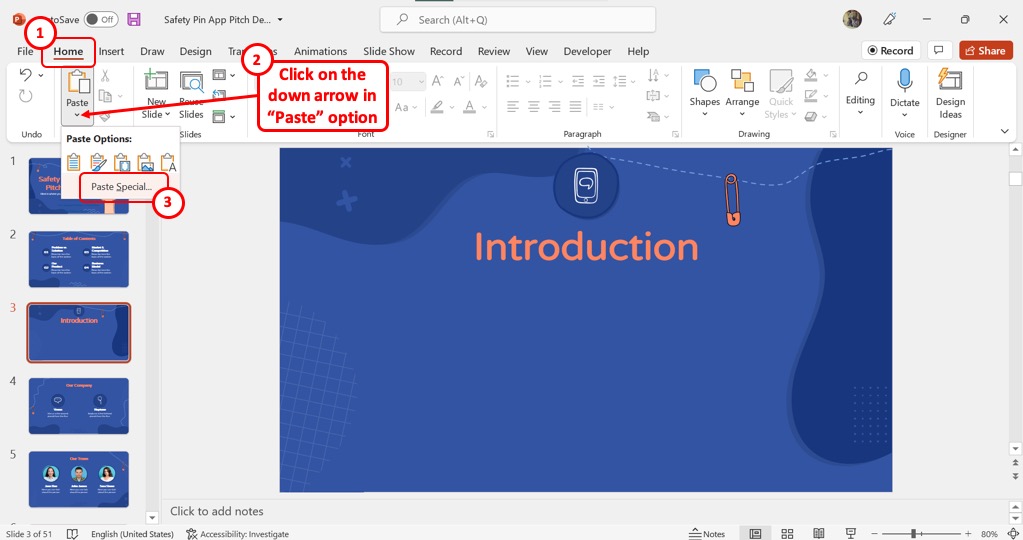
- Open your PowerPoint slide and navigate to the Home tab.
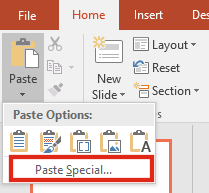
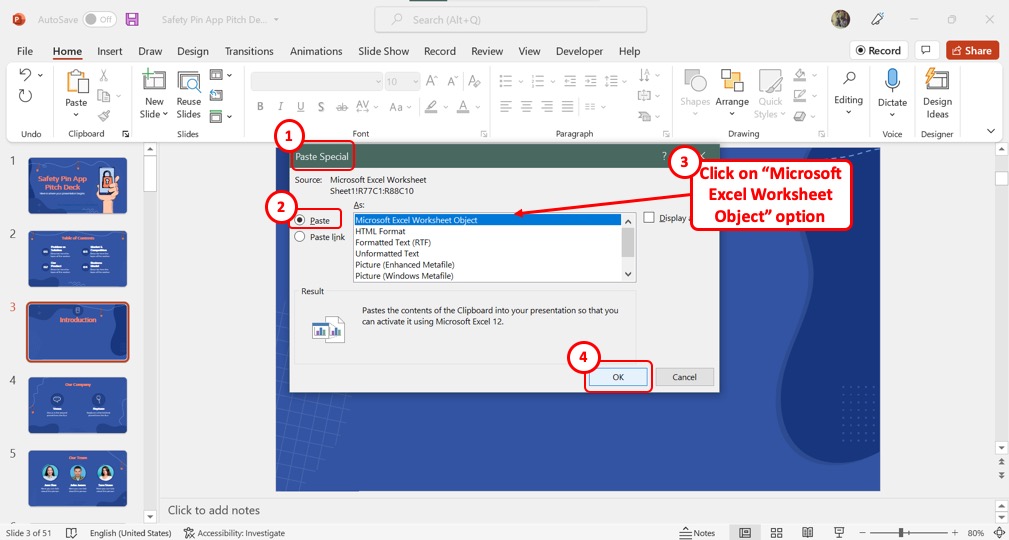
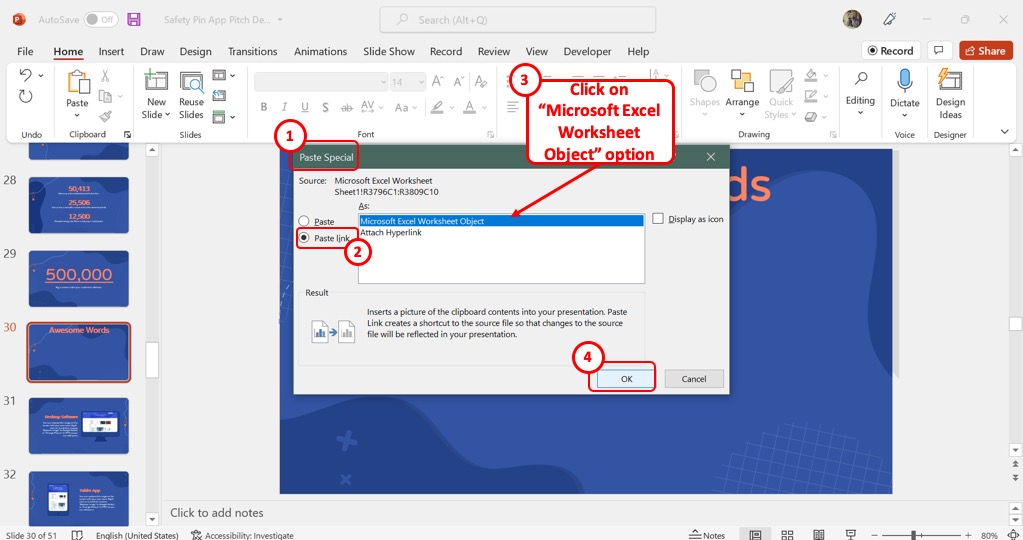
- Click on the Paste drop-down option and then click on Paste Special .

- Select Paste and click on Microsoft Excel Worksheet Object . Press OK .

- The selected range is copied to the presentation file.

Method 3 – Utilizing Embed Command to Add Unlinked Excel File
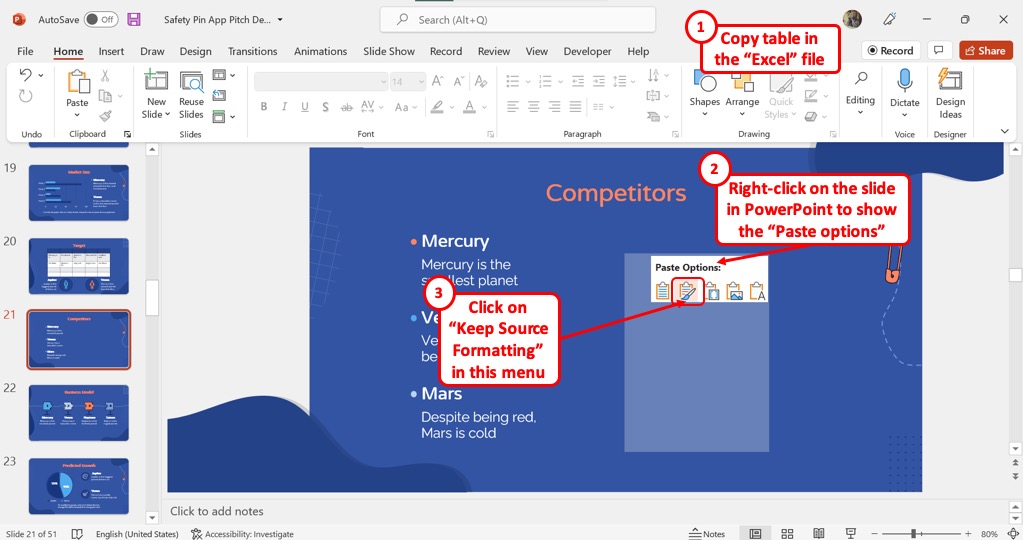
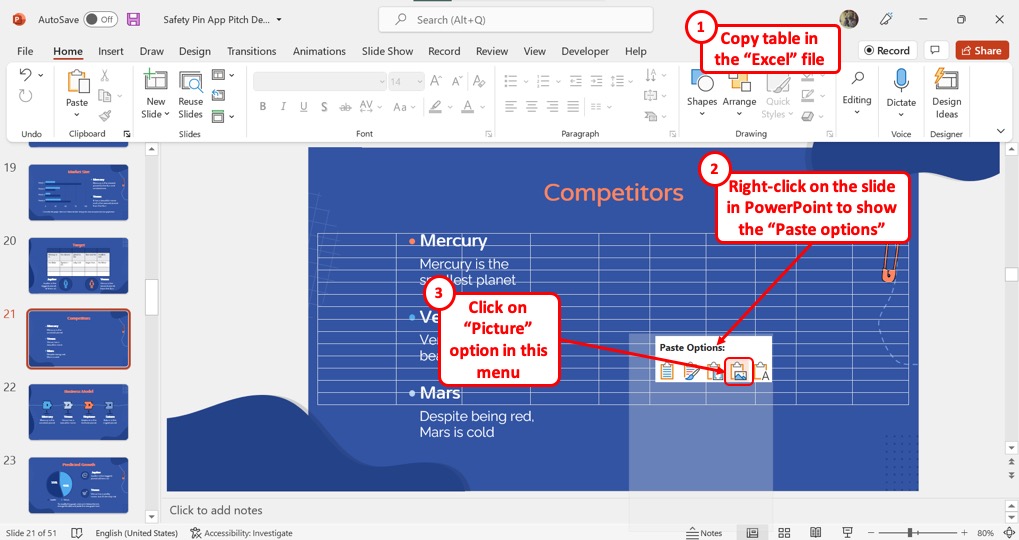
- Select the dataset (e.g. B4:E14 ) and right-click.
- Click on the Copy command from the context menu.

- Use the Paste drop-down option in PowerPoint.
- Choose Embed (E) from Paste Options .

- The output in PowerPoint is as follows.

Method 4 – Applying Camera Gadget Tool to Embed Data as Image
- Click on the triangular-shaped Customize Quick Access Toolbar icon and select More Commands .

- This will bring a dialog box as follows. Click on the drop-down icon beside the Popular Command bar to get more options. Then pick Commands Not in the Ribbon from the available options.

- To bring the Camera tool to the right side, select Camera and click the Add button in the middle.

- This will allow you to have a Camera icon in the Toolbar . Now you’re ready to take snaps of the selected area by using the Camera tool.
- Select the region you want to copy and press the Camera icon.
- Left click anywhere to get an image.

- Copy the image by selecting it and pressing Ctrl + C command.
- Paste the output in the presentation slide as follows:

- Remember that the embedded portion is an image.

Read More: How to Link Excel Data to PowerPoint Chart
Method 5 – Embedding an Excel Chart in PowerPoint File
Charts are perhaps the most commonly-used Excel format in PowerPoint.

- Copy the Excel chart with Ctrl+ C command.
- Paste the chart into the PowerPoint slide by using Keep Source Formatting & Embed Workbook , one of the Paste Options .

Finally, the output in the presentation slide is as follows:

Embed Vs. Link an Excel File in PowerPoint
When you want to add an Excel file to a PowerPoint presentation, you have two options: embedding or linking the file. Here’s a brief overview of the differences between the two:
- Embedding an Excel file in PowerPoint means that a copy of the file is saved within the PowerPoint presentation itself. This can make your presentation larger in file size, but it also means that you don’t need the original Excel file to view or present the data. Any changes made to the original Excel file won’t be reflected in the embedded copy within PowerPoint.
- Linking an Excel file to PowerPoint means that the presentation will display data from the original Excel file. This keeps the file size of the presentation smaller and ensures that any changes made to the Excel file are reflected in the PowerPoint presentation. However, if the Excel file is moved or deleted, the links will be broken and the data won’t display correctly in the presentation.
Read More: How to Link Excel Sheets to PowerPoint
How to Insert Excel File into PowerPoint as Icon
- Open a presentation file and select the intended slide to place the icon.
- Go to the Insert tab and click on the Object tool in the Text group.

- Select the Create from file option.
- Click on the Browse button to attach the Excel file that you want to place as an icon on the slide.
- Make sure to check the boxes beside Link and Display as icon options.
- Use the hooks on the icon’s corners to resize it and drag it into place on the slide.
- Double-click the icon to access the workbook’s contents and edit them.
Read More: How to Insert an Excel File into PowerPoint as an Icon
How to Link Excel File in PowerPoint That Updates Data Dynamically
- To link an Excel file in PowerPoint, do the same things as you did in Example 1 .
- You have to mark the box before the Link option.
- Press the OK button.

Now, if you make any changes in the Excel file, you’ll get the updated data in PowerPoint.
Note: If you delete the file or change the location of the file, PowerPoint will start throwing errors when trying to display data.
Read More: How to Link Powerpoint to Excel for Dynamic Data Updates
Benefits and Drawbacks of Embedding an Excel File in PowerPoint
When creating presentations, it’s useful to embed the Excel file directly into the PowerPoint file. But, it’s important to consider the benefits and drawbacks of this approach.
- Easy Access to Data: Embedding an Excel file in PowerPoint allows you to easily access and manipulate data without having to switch between programs.
- Increased Interactivity: Embedding an Excel file in PowerPoint allows you to create more interactive presentations with live data that can be manipulated and updated in real time.
- Saves Time: It can save time by eliminating the need to create separate charts and graphs from scratch.
- Better Organization: Embedding an Excel file in PowerPoint allows you to keep all your data in one place, making it easier to organize and manage your presentation.
- Consistent Formatting: Embedding ensures that your data will be presented with consistent formatting and style.
- File Size: Embedding an Excel file in PowerPoint can increase the file size of your presentation, making it more difficult to share and collaborate with others.
- Compatibility Issues: Embedding an Excel file in PowerPoint can lead to compatibility issues between different versions of PowerPoint and Excel.
- Security Risks: Embedding an Excel file in PowerPoint can pose security risks if the Excel file contains sensitive information.
- Limited Editing Capabilities: Embedding an Excel file in PowerPoint limits your editing capabilities, as you may not be able to make changes to the data directly within the PowerPoint slide.
- Refreshing Data: If the data in the embedded Excel file changes, you will need to manually refresh the data in the PowerPoint slide to ensure accuracy.
Things to Remember
- Keep file size in mind when you embed an Excel file in PowerPoint.
- Ensure compatibility with different versions of PowerPoint and Excel.
- Test your presentation to ensure that the embedded Excel file displays correctly.
- Update the presentation file with an embedded Excel file if the data changes or needs to be refreshed.
- Consider security and privacy concerns when embedding Excel files containing sensitive information.
Frequently Asked Questions
1. Will embedding an Excel file in PowerPoint increase the file size of my presentation?
Yes, it can increase, especially if the Excel file contains a lot of data. This can make it more difficult to share and collaborate on the presentation.
2. How do I ensure compatibility between different versions of PowerPoint and Excel when embedding a file?
To ensure compatibility, it’s important to save the Excel file in a format that is compatible with the version of PowerPoint you are using.
3. What security risks should I be aware of when embedding an Excel file in PowerPoint?
It’s important to ensure that any sensitive information within the embedded Excel file is appropriately protected and access is limited to authorized individuals.
Practice Section
We have provided a practice section on the right side of each sheet so you can practice yourself. Please make sure to do it yourself.
Download Practice Files
Download the following practice workbook and presentation file. It will help you to realize the topic more clearly and will help you practice yourself.
Related Articles
- [Fixed!] Problems with Embedded Excel Files in PowerPoint
- [Solved] Embedded Excel in PowerPoint Not Showing All Data
- How to Open Existing PowerPoint File from Excel VBA
<< Go Back to Excel to PowerPoint | Export Data from Excel | Learn Excel
What is ExcelDemy?
Tags: Excel to PowerPoint

Mohammad Shah Miran has a professional background spanning over a year at Softeko. Initially starting as an Excel and VBA writer, he authored more than 50 articles for the ExcelDemy project. Currently, Miran is engaged in the LinuxSimply project as a Linux content developer, completed over 40 articles. His analytical approach extends across various domains, including Excel, VBA, Bash scripting, Linux, data analysis, and Python programming. In his leisure time, Miran enjoys watching movies and series or listening... Read Full Bio
Leave a reply Cancel reply
ExcelDemy is a place where you can learn Excel, and get solutions to your Excel & Excel VBA-related problems, Data Analysis with Excel, etc. We provide tips, how to guide, provide online training, and also provide Excel solutions to your business problems.
Contact | Privacy Policy | TOS
- User Reviews
- List of Services
- Service Pricing

- Create Basic Excel Pivot Tables
- Excel Formulas and Functions
- Excel Charts and SmartArt Graphics
- Advanced Excel Training
- Data Analysis Excel for Beginners

Advanced Excel Exercises with Solutions PDF
How-To Geek
How to link or embed an excel worksheet in a powerpoint presentation.
Sometimes, you want to include the data on an Excel spreadsheet in a Microsoft PowerPoint presentation.
Quick Links
What's the difference between linking and embedding, how to link or embed an excel worksheet in microsoft powerpoint.
Sometimes, you want to include the data on an Excel spreadsheet in a Microsoft PowerPoint presentation. There are a couple of ways to do this, depending on whether or not you want to maintain a connection with the source Excel sheet. Let's take a look.
You actually have three options for including a spreadsheet in a PowerPoint presentation. The first is by simply copying that data from the spreadsheet, and then pasting it into the target document. This works okay, but all it really does is convert the data to a simple table in PowerPoint. You can use PowerPoint's basic table formatting tools on it, but you can't use any of Excel's features after the conversion.
While that can be useful sometimes, your other two options---linking and embedding---are much more powerful, and are what we're going to show you how to do in this article. Both are pretty similar, in that you end up inserting an actual Excel spreadsheet in your target presentation. It will look like an Excel sheet, and you can use Excel's tools to manipulate it. The difference comes in how these two options treat their connection to that original Excel spreadsheet:
- If you link an Excel worksheet in a presentation, the target presentation and the original Excel sheet maintain a connection. If you update the Excel file, those updates get automatically reflected in the target presentation.
- If you embed an Excel worksheet in a presentation, that connection is broken. Updating the original Excel sheet does not automatically update the data in the target presentation.
There are advantages to both methods, of course. One advantage of linking a document (other than maintaining the connection) is that it keeps your PowerPoint presentation's file size down, because the data is mostly still stored in the Excel sheet and only displayed in PowerPoint. One disadvantage is that the original spreadsheet file needs to stay in the same location. If it doesn't, you'll have to link it again. And since it relies on the link to the original spreadsheet, it's not so useful if you need to distribute the presentation to people who don't have access to that location.
Embedding that data, on the other hand, increases the size of presentation, because all that Excel data is actually embedded into the PowerPoint file. There are some distinct advantages to embedding, though. For example, if you're distributing that presentation to people who might not have access to the original Excel sheet, or if the presentation needs to show that Excel sheet at a specific point in time (rather than getting updated), embedding (and breaking the connection to the original sheet) makes more sense.
So, with all that in mind, let's take a look at how to link and embed an Excel Sheet in Microsoft PowerPoint.
Linking or embedding an Excel worksheet into a PowerPoint presentation is actually pretty straightforward, and the process for doing either is almost identical. Start by opening both the Excel worksheet and the PowerPoint presentation you want to edit at the same time.
In Excel, select the cells you want to link or embed. If you would like to link or embed the entire worksheet, click on the box at the juncture of the rows and columns in the top left-hand corner to select the whole sheet.

Copy those cells by pressing CTRL+C in Windows or Command+C in macOS. You can also right-click any selected cell, and then choose the "Copy" option on the context menu.

Now, switch to your PowerPoint presentation and click to place the insertion point where you would like the linked or embedded material to go. On Home tab of the Ribbon, click the down arrow beneath the "Paste" button, and then choose the "Paste Special" command from the dropdown menu.
This opens the Paste Special window. And it's here where you'll find the only functional different in the processes of linking or embedding a file.
If you want to embed your spreadsheet, choose the "Paste" option over on the left. If you want to link your spreadsheet, choose the "Paste Link" option instead. Seriously, that's it. This process is otherwise identical.
Whichever option you choose, you'll next select the "Microsoft Excel Worksheet Object" in the box to the right, and then click the "OK" button.

And you'll see your Excel sheet (or the cells you selected) in your PowerPoint presentation.

If you linked the Excel data, you can't edit it directly in PowerPoint, but you can double-click anywhere on it to open the original spreadsheet file. And any updates you make to that original spreadsheet are then reflected in your PowerPoint presentation.
If you embedded the Excel data, you can edit it directly in PowerPoint. Double-click anywhere in the spreadsheet and you'll stay in the same PowerPoint window, but the PowerPoint Ribbon gets replaced by the Excel Ribbon and you can access all the Excel functionality. It's kind of cool.

And when you want to stop editing the spreadsheet and go back to your PowerPoint controls, just click anywhere outside the spreadsheet.
How to Link or Embed an Excel File in PowerPoint? Quick Guide!

If you tend to work with data on a daily basis, learning how to integrate Excel data seamlessly within your PowerPoint slides is crucial .
Whether you're a business professional looking to include real-time financial data in your slides or a student preparing a data-rich project, understanding today's guide will be vital!
This tutorial teaches you how to link or embed Excel data into your PowerPoint slides . These features will not only impress your audience but save you a lot of time in the future (if you know how to apply them well!)
Today, we'll cover the following topics:
- What's the difference between Linking and Embedding Excel Files into PowerPoint?
- How do you LINK Excel Data to PowerPoint Slides?
- How do you EMBED Excel Data to PowerPoint Slides?
- Linking vs. Embedding an Excel File into PowerPoint: Which is your best option?
What’s the difference between Linking and Embedding Excel Files into PowerPoint?
Before we dive into the tutorial, I would like to highlight the differences between embedding and linking Excel files into PowerPoint .
While these terms may appear similar, their crucial differences significantly impact how Excel content is integrated into presentations.
Linking Excel Data to PowerPoint
Linking creates a dynamic connection between your PowerPoint presentation and the original Excel file .
Any changes to the Excel file are instantly reflected in the linked PowerPoint slide, ensuring real-time synchronization to display the latest data.
Embedding Excel Data into PowerPoint
Embedding involves placing a complete copy of the Excel file into the PowerPoint presentation. Think of it like taking a snapshot of your chart or graph and pasting it seamlessly into your slide .
The embedded content becomes a permanent part of your presentation, independent and unaffected by the original Excel file's location.

How do you LINK Excel Data to PowerPoint Slides? (Data is automatically updated)
If you frequently work with Excel and PowerPoint, this step-by-step guide is designed to save you time in your daily tasks significantly.
- The first step is to create the graph or chart you want in Excel. In this example, we are going to make a bar chart in Excel.
- If you want, you can customize your chart in the tabs Chart Design and Format.

- Save the Excel worksheet you want to link to PowerPoint.
- Press "Ctrl + C" to copy your Excel data.
- Open PowerPoint and go to the Home tab > Paste > Paste Special.

- A pop-up window will open, where you must check the option "Paste link as Microsoft Excel Chart Object."
- Press "OK," and you will now have Excel data inserted into PowerPoint.

How to Customize your Linked Data in PowerPoint?
If you want to explore more design options in PowerPoint, when pasting your graphic, you need to choose another type of paste:
- Go to the Home tab in PowerPoint > Paste > Paste Options.
- Click "Use Destination Theme and Link Data" or "Keep Source Formatting and Link Data." You can also use the shortcuts, the "L" and "F" keys, respectively.

- At first, the charts will have a transparent background, but you can edit the colors and layouts in the Chart Design tab.
Check the final result of our Excel file linked in PowerPoint:

Now, you know how to insert data from Excel to PowerPoint!
Let's check the second way to do it.
How do you EMBED Excel Data to PowerPoint Slides? (Data is not automatically updated)
To learn how to embed an Excel file into PowerPoint, we will use a data table as an example:
- First, build your table in Excel.
- Save the file on your computer.
- Select your table and press "Ctrl + C."
- Go to your PowerPoint file.
- Right-click on the slide to see different "Paste Options" (this is another way to paste information from Excel to PowerPoint).

- Choose the middle option: "Embed," and that's it!
- As this is a data table, you can freely edit the information in PowerPoint.

- Reminder: If you embed an Excel file into PowerPoint, the information you modify in Excel will not be reflected in PowerPoint.
How to Customize your Embedded Data in PowerPoint?
In case you want to use PowerPoint features to customize your chart, keep the following steps in mind when pasting your Excel chart:
- Right-click on the slide you want to paste your content.
- Choose either of the first two options: "Use Destination Styles" or "Keep Source Formatting." Also, you can use the shortcuts, the "S" and "K" keys, respectively.

- When you click on your chart, these tabs will be enabled: Table Design and Layout. There, you can edit the colors, line sizes, cell sizes, and more!
Here is the final result of our Excel file embedded in PowerPoint:

That's it! By following each step carefully, you will master how to insert an Excel sheet into PowerPoint.
But which option is the best for you? Let's figure it out!
Linking vs. Embedding an Excel File into PowerPoint: Which is your best option?
Which option do you need for your PowerPoint project? Still trying to figure out all their differences?
Here, we summarize the pros and cons of each inserting option:
Pros and Cons of Linking an Excel File to PowerPoint
Pros of linking an excel file to powerpoint.
- The information will be updated automatically if you edit any data in your Excel file.
- The PowerPoint file size doesn't increase since the linked content is not stored in it.
- You have access to PowerPoint features to edit your content.
Cons of Linking an Excel File to PowerPoint
- The linked content will be affected when you change the name of your Excel file or modify its location on your computer.
- If you want to share the file with more people, they can see the content in PowerPoint or Google Slides, but the Excel source file won't appear.
Pros and Cons of Embedding an Excel File into PowerPoint
Pros of embedding an excel file into powerpoint.
- If you want to share the file with more people, they can access the Excel source file without problems, both in PowerPoint and Google Slides.
Cons of Embedding an Excel File into PowerPoint
- The embedded content won't be updated automatically if you edit any data in your Excel file.
- If you add a lot of embedded content to PowerPoint, the file size can be very heavy.
- All your Excel worksheets will be accessible when you share the PowerPoint file, including the hidden sheets.

After reading this tutorial, inserting an Excel file into PowerPoint won't be complicated anymore!
There are several ways to share and present your Excel data in your slides. Just consider the pros and cons between linking and embedding content in PowerPoint, and take advantage of both software to the fullest.
At 24slides , we create world-class presentation designs and all the essential marketing collateral you need. Explore some of our creative work and book a call with us today !

You might also find this content interesting:
- PowerPoint 101: The Ultimate Guide for Beginners
- How to Make a PowerPoint Slideshow that Runs Automatically?
- How to Make a Picture Transparent in PowerPoint?
- How To Use PowerPoint Design Ideas - All Questions Answered!
Create professional presentations online
Other people also read

Tutorial: Save your PowerPoint as a Video
How To Convert Google Slides To PowerPoint and Vice Versa

How To Add Animations To PowerPoint
How to Insert an Excel Spreadsheet Into Powerpoint: A Step-by-Step Guide
Inserting an Excel spreadsheet into PowerPoint is a straightforward process. All you need to do is open your PowerPoint presentation, click on the slide where you want the spreadsheet to appear, and then use the Insert Object function to add the Excel file. Once you’ve completed these steps, your Excel spreadsheet will be embedded into your PowerPoint slide, ready for you to present.
Step by Step Tutorial: How to Insert an Excel Spreadsheet Into PowerPoint
Before we dive into the steps, let’s understand what we’re aiming to achieve. By inserting an Excel spreadsheet into PowerPoint, we’re looking to display data in a more visual and interactive manner during a presentation. It could be a sales report, a project timeline, or any kind of data that you’ve crunched in Excel and now want to share with your audience in PowerPoint.
Step 1: Open Your PowerPoint Presentation
Open the PowerPoint presentation where you want to insert the Excel spreadsheet.
Make sure you’re on the right slide where you want to insert the Excel spreadsheet. If you haven’t created a slide yet, you can easily add a new one by clicking on “New Slide” in the Home tab.
Step 2: Click the Insert Tab
Navigate to the Insert tab on PowerPoint’s ribbon.
The Insert tab is where all the magic happens when it comes to adding different types of content to your PowerPoint slides, including tables, images, and, of course, Excel spreadsheets.
Step 3: Click on Object in the Text Group
In the Text group, click on Object.
When you click on Object, a dialog box will appear, giving you the option to insert various types of content. For our purposes, we’re interested in inserting an object from a file—specifically, an Excel file.
Step 4: Choose ‘Create from file’ and Browse for Your Excel File
Select ‘Create from file’ and then click on ‘Browse’ to find the Excel file you want to insert.
Navigating to your Excel file might take a bit of digging, especially if you’ve got a lot of folders and files to sift through. But once you find the file, select it, and click ‘OK’, you’re almost done.
Step 5: Click OK to Insert the Spreadsheet
After selecting the file, click OK, and your Excel spreadsheet will be inserted into your PowerPoint slide.
Your spreadsheet won’t just be a static image; it’ll be a fully functional Excel sheet. This means you can double-click on it to make changes, and those changes will be reflected in the PowerPoint presentation.
After completing these steps, your Excel spreadsheet will be part of your PowerPoint slide. You can resize it and move it around to fit your layout. The beauty of this is that you can interact with the spreadsheet right from PowerPoint, which can be really useful if you need to make last-minute changes or highlight certain data during your presentation.
Tips: How to Insert an Excel Spreadsheet Into PowerPoint
- Always save your Excel file before inserting it into PowerPoint to ensure all changes are up-to-date.
- If your Excel file is large, consider linking to it instead of embedding it to avoid making your PowerPoint file too heavy.
- Resize the Excel object in PowerPoint to ensure that the text is readable and the data is visible.
- Use the ‘Format Object’ options in PowerPoint to add a border or shadow to your Excel spreadsheet, making it stand out on the slide.
- Remember that if you update the original Excel file, you will need to reinsert it into PowerPoint for the changes to take effect unless you’ve linked to the file.
Frequently Asked Questions
How do i edit an excel spreadsheet after inserting it into powerpoint.
You can double-click on the inserted Excel spreadsheet, and it will open in Excel for editing. Once you save the changes in Excel, they will be updated in PowerPoint.
Can I link to an Excel spreadsheet instead of embedding it?
Yes, when inserting the Excel file, choose ‘Link’ instead of ‘Insert’, which will create a link to the file instead of embedding it. This way, any updates to the Excel file will automatically reflect in PowerPoint.
What if I only want to insert a part of the Excel spreadsheet?
You can copy the specific range of cells in Excel that you want to display and then paste it into PowerPoint as an embedded object.
Can I insert multiple Excel spreadsheets into one PowerPoint slide?
You can, but it might make the slide look cluttered. It’s best to insert one spreadsheet per slide for clarity.
Will my Excel formulas work in PowerPoint?
The formulas in your Excel spreadsheet will remain functional when you embed the spreadsheet into PowerPoint. However, if you paste the cells as an image, the formulas will not be active.
- Open your PowerPoint presentation and select the slide for insertion.
- Click the Insert tab on PowerPoint’s ribbon.
- Click on Object in the Text group.
- Choose ‘Create from file’ and Browse for your Excel file.
- Click OK to insert the spreadsheet.
Inserting an Excel spreadsheet into a PowerPoint presentation can add a whole new level of detail and professionalism to your work. Whether you’re presenting financial results, project timelines, or any other data-heavy information, having the ability to display and interact with Excel data directly in PowerPoint is a game-changer. It ensures that your audience can see the exact figures and calculations that you’re discussing, which can help to clarify points and answer questions on the spot.
Just remember to keep your slides uncluttered, make sure any inserted data is relevant to your presentation, and always double-check that the data you’re showing is accurate and up-to-date. With these tips in mind, you’ll be well on your way to delivering a powerful and informative presentation that leverages the best of both Excel and PowerPoint.

Matt Jacobs has been working as an IT consultant for small businesses since receiving his Master’s degree in 2003. While he still does some consulting work, his primary focus now is on creating technology support content for SupportYourTech.com.
His work can be found on many websites and focuses on topics such as Microsoft Office, Apple devices, Android devices, Photoshop, and more.
Share this:
- Click to share on Twitter (Opens in new window)
- Click to share on Facebook (Opens in new window)
Related Posts
- How to Rotate a Powerpoint Slide Presentation
- How to Download a Google Slides Presentation as a Powerpoint File
- How to End Powerpoint on Last Slide in Powerpoint 2010: A Step-by-Step Guide
- How to Delete a Slide in Powerpoint 2010: Step-by-Step Guide
- How to Mirror Image in PPT Files (An Easy 6 Step Guide)
- How to Hide a Slide in Powerpoint 2010: A Step-by-Step Guide
- Can You Save a Powerpoint as a Video in Powerpoint 2013? Find Out Here!
- How to Duplicate a Slide in Powerpoint: A Step-by-Step Guide
- How to Create a Hyperlink in Powerpoint 2010: A Step-by-Step Guide
- How to Insert a File Into a Word 2013 Document: A Step-by-Step Guide
- How to Insert as Text in Microsoft Outlook for Office 365: A Step-by-Step Guide
- How to Remove Slide Numbers in Powerpoint 2019: Easy Steps
- How to Change Slide Size in Powerpoint 2016
- How to Insert Slides from Another Presentation: Powerpoint 2024 Guide
- How to Put Embedded Youtube Video in Powerpoint 2010: A Step-by-Step Guide
- Utilizing Motion Paths in PowerPoint on Windows 11: A Step-by-Step Guide
- Keeping Track of Word Counts in PowerPoint: Tips and Tricks
- How to Do a Powerpoint Google Slides Presentation Conversion
- How to Save Powerpoint as PDF with Notes: A Step-by-Step Guide
- How to Add a New Slide in Google Slides: A Step-by-Step Guide
Get Our Free Newsletter
How-to guides and tech deals
You may opt out at any time. Read our Privacy Policy
- PRO Courses Guides New Tech Help Pro Expert Videos About wikiHow Pro Upgrade Sign In
- EDIT Edit this Article
- EXPLORE Tech Help Pro About Us Random Article Quizzes Request a New Article Community Dashboard This Or That Game Popular Categories Arts and Entertainment Artwork Books Movies Computers and Electronics Computers Phone Skills Technology Hacks Health Men's Health Mental Health Women's Health Relationships Dating Love Relationship Issues Hobbies and Crafts Crafts Drawing Games Education & Communication Communication Skills Personal Development Studying Personal Care and Style Fashion Hair Care Personal Hygiene Youth Personal Care School Stuff Dating All Categories Arts and Entertainment Finance and Business Home and Garden Relationship Quizzes Cars & Other Vehicles Food and Entertaining Personal Care and Style Sports and Fitness Computers and Electronics Health Pets and Animals Travel Education & Communication Hobbies and Crafts Philosophy and Religion Work World Family Life Holidays and Traditions Relationships Youth
- Browse Articles
- Learn Something New
- Quizzes Hot
- This Or That Game
- Train Your Brain
- Explore More
- Support wikiHow
- About wikiHow
- Log in / Sign up
- Computers and Electronics
- Microsoft Office
How to Link Excel to PowerPoint
Last Updated: March 29, 2019
wikiHow is a “wiki,” similar to Wikipedia, which means that many of our articles are co-written by multiple authors. To create this article, volunteer authors worked to edit and improve it over time. This article has been viewed 94,354 times. Learn more...
Linking Excel files to a PowerPoint presentation lets you to present and display complex data on a much simpler form that people can understand. This is very handy when you’re conducting business or academic presentations. What’s more is that it also allows you to easily create tables on presentations and conveniently modify the table’s data without editing the presentation itself.
Opening the Files to Link

- If you choose to create a new document to link to a PowerPoint presentation, you need to save it first as an Excel file before you can do any kind of linking.

Linking the Files

- Click on Okay to finish inserting the file.
- The data table on your Excel file should now be displayed on the presentation slide. You can move it anywhere on the presentation and adjust its height and width by clicking and dragging its corner points across the slide.

Expert Q&A
- To link Excel documents to a PowerPoint presentation using older Microsoft Office suite, you need to resave the Excel file to a format that the old PowerPoint program can read. Thanks Helpful 2 Not Helpful 2
- You don’t need to save the Excel file first before the changes made are reflected on the presentation. The inserted object should mirror the change as you edit it. Thanks Helpful 0 Not Helpful 1

You Might Also Like

- http://office.microsoft.com/en-001/powerpoint-help/insert-a-linked-excel-chart-in-powerpoint-2010-HA101776651.aspx
About This Article
- Send fan mail to authors
Is this article up to date?

Featured Articles

Trending Articles

Watch Articles

- Terms of Use
- Privacy Policy
- Do Not Sell or Share My Info
- Not Selling Info
wikiHow Tech Help Pro:
Level up your tech skills and stay ahead of the curve
Byte Bite Bit
How to Link Excel Chart to PowerPoint for Seamless Data Presentation
Creating a knockout PowerPoint presentation requires not just good design but also dynamic content. Throughout my career, I’ve leaned heavily on linking Excel charts directly into my PowerPoint presentations . This method not only saves time but also ensures that any updates in the Excel file are automatically reflected in the PowerPoint slides. It’s like having a live feed of data that you can customize and style to match your presentation’s theme.

Let’s cut to the chase: Using linked charts in Microsoft PowerPoint can make your life a whole lot easier. By copying the chart in Excel via Ctrl+C and pasting it in PowerPoint with Ctrl+V , you maintain an active link to the source. This means that every time you update your data in Excel, the chart in your presentation updates too. No more scrambling at the last minute to ensure your numbers are up-to-date.
I remember a time when I was rushing to finalize a quarterly report. Had I not linked my Excel charts, I would have wasted hours manually updating each slide. This simple yet powerful technique can be a game-changer. It ensures your slides are accurate, professional, and impressively up-to-date with real-time data. So, trust me, once you start linking your Excel charts to PowerPoint, you’ll wonder how you ever managed without it!
- 1.1 Incorporating Excel Data
- 1.2 Design and Formatting Techniques
- 1.3 Working with Embedded Objects
- 2.1 Embedding Excel Charts in PowerPoint
- 2.2 Dynamic Data and Real-Time Updates
- 3.1 Utilizing Advanced Paste Options
- 3.2 Efficiency Tips and Shortcuts
Crafting Effective PowerPoint Presentations
Creating engaging and informative PowerPoint presentations involves incorporating data, employing effective design and formatting techniques, and effectively working with embedded objects. Mastering these skills ensures your audience remains captivated and understands the material presented.
Incorporating Excel Data
Including Excel data in your presentations can highlight key points. I find the use of charts particularly useful. Start by copying the chart in Excel. Press Ctrl + C or right-click and select “Copy”. Then, switch to PowerPoint, navigate to the appropriate slide, and paste using Ctrl + V .
For better results, you can link the data. This way, updates in Excel automatically reflect in PowerPoint. Right-click the chart in Excel and select “Copy” . In PowerPoint, use the “Paste Special” feature to paste as a linked object. This keeps your data current without manual updates.
Make sure the chart’s size and format match your presentation’s theme. A consistent look and feel maintains professionalism and readability.
Design and Formatting Techniques
Design and formatting are crucial for creating visually appealing slides. First, choose a clean and consistent theme. PowerPoint offers various templates, but you can also customize your own. Stick to 2-3 fonts and use them consistently to avoid a cluttered appearance.
Color choices can enhance readability. I prefer using contrasting colors for text and backgrounds. For example, dark text on a light background is easier to read. Be mindful of color-blind audiences and choose universally distinguishable shades.
When formatting charts, use the Chart Tools in PowerPoint for tailored designs. Opt for “Use Destination Theme” to ensure the chart matches your slide’s style. Adjust the chart size to fit neatly without overwhelming the slide content.
Working with Embedded Objects
Embedded objects enhance interactivity but require careful management. Embedding an Excel chart means the chart is part of your presentation file. This is useful for static presentations since the data doesn’t need to update.
To embed a chart, copy it in Excel, move to PowerPoint, choose “Home” > “Paste” > “Paste Special” , and opt for “Microsoft Excel Chart Object” . This turns the chart into an embedded object, allowing further edits within PowerPoint.
Remember to keep the size of embedded objects optimal. They can inflate the file size, making it cumbersome to share or load. Always resize and format embedded objects to fit seamlessly into your slides. Effective use of embedded objects can make your presentation more dynamic and engaging.
Linking and Updating Embedded Elements
Linking Excel charts to PowerPoint presentations ensures your data stays current, and any changes made in Excel are reflected instantly in PowerPoint. Let’s dive into embedding Excel charts and maintaining dynamic updates.
Embedding Excel Charts in PowerPoint
Embedding an Excel chart into PowerPoint requires careful steps to ensure smooth integration. First, copy your desired Excel chart. In PowerPoint, navigate to the slide where the chart will reside. Click on the Insert tab, then choose Paste Special . Opt for Microsoft Excel Chart Object .
This action inserts your chart while maintaining a link to the original Excel data. Any adjustment in Excel will be automatically mirrored in PowerPoint. This method strikes a balance between ease and functionality, giving you real-time data reflection with minimal effort.
Dynamic Data and Real-Time Updates
Maintaining dynamic data and real-time updates is crucial for accurate presentations. With linked charts, PowerPoint can fetch the most recent data from your Excel sheet. This ensures any last-minute modifications are captured without manual updates.
Use the Refresh Data option by right-clicking the embedded chart and selecting Update Link . This guarantees the chart reflects the latest data. Remember to save both the Excel sheet and the PowerPoint file to preserve these links. Keep your data fresh and your presentations spot on by leveraging these features efficiently.
Advanced PowerPoint and Excel Integration Techniques
I find the integration between PowerPoint and Excel to be incredibly powerful. This section covers advanced techniques like utilizing special paste options and sharing efficiency tips for better productivity.
Utilizing Advanced Paste Options
When working between PowerPoint and Excel, using advanced paste options can make a significant difference. For instance, when I want to keep the formatting and link data between the two programs, I use the “Keep Source Formatting & Link Data” option. This ensures that any changes in Excel are automatically updated in my PowerPoint slides.
Sometimes, I need a static picture of the chart instead of a dynamic one. In such cases, I use Paste Special to embed a static image of the chart into my presentation. This method allows me to edit the chart image directly in PowerPoint.
| Keep Source Formatting & Link Data | Links the chart and maintains original formatting from Excel |
| Paste Special | Embeds a static image of the chart into PowerPoint |
These advanced paste options give me the flexibility to decide how I want my data represented in PowerPoint.
Efficiency Tips and Shortcuts
To streamline my workflow, I rely on several efficiency tips and shortcuts. One of my favorites is using Ctrl + C and Ctrl + V for quick copy and paste tasks. This not only saves time but also reduces the chances of making errors.
I also make good use of the Insert tab in PowerPoint. Here, I can quickly embed charts and graphs directly from Excel by selecting them from the “Object” category. Additionally, I often use the Format tab to customize my charts, adding animations or adjusting the layout to make my presentation more engaging.
Tip: Use F4 to repeat your last command. This shortcut is a lifesaver when formatting multiple charts.
Lastly, keeping my software updated is crucial. This ensures that I have access to the latest features and security patches, which enhances my productivity and protects my data.
By using these advanced techniques and tips, I can integrate Excel charts into PowerPoint more efficiently and effectively.
Related posts:
- How to Embed a YouTube Video in PowerPoint: Step-by-Step Guide
- How to Do a Voice Over on PowerPoint: Easy Steps for Professionals
- How to Make an Org Chart in PowerPoint: A Step-by-Step Guide
- How to Embed Excel into PowerPoint: Simplify Data Visualization
- How Is a Chart from Microsoft Excel Added to a PowerPoint Presentation? Step-by-Step Guide
- How to Present PowerPoint in Teams: A Step-by-Step Guide for Professionals
- How to Create a Multilevel List in PowerPoint: Step-by-Step Guide
- PowerPoint Cannot Insert a Video from the Selected File: Solutions and Workarounds
- How to Make a Picture Black and White in PowerPoint: Quick Guide
- How to Remove Page Numbers in PowerPoint: Step-by-Step Guide for All Versions
- How to Make a Quiz in PowerPoint: Step-by-Step Tech Guide
- How to Star a Slide in PowerPoint: A Step-by-Step Guide
Leave a Comment Cancel reply
Save my name, email, and website in this browser for the next time I comment.
Unsupported browser
This site was designed for modern browsers and tested with Internet Explorer version 10 and later.
It may not look or work correctly on your browser.
- Presentations
How to Insert an Excel File into PowerPoint in 60 Seconds
- Bahasa Indonesia
- العربية/عربي
In today's tutorial, we learn how to insert Excel file data directly into PowerPoint.
This is a quick workflow to follow for pasting Excel spreadsheets over to PowerPoint. We review the various options you can work with, from pasting tables with existing styles, to inserting data as text, or placing them as an image.
We also have a helpful compliment to this tutorial. Download our FREE eBook: The Complete Guide to Making Great Presentations . Grab it now before you read on.

How to Insert or Embed Excel Files into PowerPoint (Quick Video)

Note : Watch this quick 60 second video or review the written tutorial instructions below.
1. Copy Your Excel Data to the Clipboard
I'm working in Excel here. I'm going to start off by copying and pasting this table over to PowerPoint.
First, I'll hit Control C to grab my data and put it on the clipboard.

2. Switch to PowerPoint to Your Insert Excel Data
Once we switch over to PowerPoint, start by Right-clicking . There are several ways to paste a table in that we can select. Each one of these thumbnails is a different way to handle the Excel data.

3. Insert Your Data Into PowerPoint With Destination Styles
The first thumbnail allows us to paste the table and use Destination Styles . This basically means that the table will look exactly like what's already in PowerPoint.

4. Work With More Options for Inserting Excel Files into PowerPoint
The second thumbnail is to keep source formatting which means that the table keeps the same style that I had in Excel.
The third thumbnail is the embed option which is similar but lets you double-click in the table to open up an embedded spreadsheet app.

The fourth option is pasting your table as a picture and finally the last thumbnail is to paste text only basically a plain tacks no style version.
5. Keep Source Formatting to Insert Your Excel Spreadsheet into PowerPoint
Let's use source formatting in this case. I'll go ahead and click on that thumbnail.

Note : In all of these cases, the data isn't connected to the Excel workbook. So if you change the Excel workbook, you'll need to replace the table.
More Quick PowerPoint Videos (60 Second Tutorials)
Learn more PowerPoint tools quickly and start stacking up your presentation knowledge. Here are additional PowerPoint tutorials here on Tuts+:

Make Great Presentations (Free PDF eBook Download)
We also have the perfect compliment to this tutorial, which will walk you through the complete presentation process. Learn how to write your presentation, design it like a pro, and prepare it to present powerfully.
Download our new eBook: The Complete Guide to Making Great Presentations . It's available for free with a subscription to the Tuts+ Business Newsletter.

Note : In today's tutorial, we used the popular Simplicity PowerPoint Template . Discover additional PowerPoint design options in our Ultimate Guide to PowerPoint Templates or browse through our best PPT themes on GraphicRiver.

Linking Excel files to PowerPoint
If you regularly create PowerPoint presentations that include information from Excel, you will know how frustrating it can be. Having to re-copy and re-paste the information every time a change is made in the original Excel documents. Have you come across the feature which enables you to link your Excel workbook directly into your PowerPoint presentation? When you use this feature, the presentation changes automatically each time your workbook changes. This is what we will be covering in this post.
Linking an Excel document to a PowerPoint presentation
The process of linking an Excel document to a PowerPoint presentation is pretty straightforward. Simply copy a range from Excel ( Home -> Copy in the Ribbon, or Ctrl+C as a shortcut). Then, in PowerPoint click Home -> Paste -> Paste Special . . .
From the Paste Special window select Paste link , click Microsoft Excel Worksheet Object , then click OK.

The pasted image will now be linked to Excel. If the Excel file and PowerPoint presentation are both open any changes will update automatically.
Update and edit links
Once the links are created in the presentation, you may need to update them at a future point. If the Excel file is not open it is possible to update links using the following methods.
Updating when opening the presentation
When opening a presentation, PowerPoint will ask if you wish to update the links. Just click the Update Links button and the presentation will be updated with the latest information.

Updating on demand
If you just want to update a single linked image you can right-click the image, then select Update Link from the menu.

This menu also gives you the option to Edit the link to the original document.
Update with the “edit links” option

The Links window will open, which provides you with various options to update, edit and break links.

My top tips
If you link Excel files to PowerPoint presentations often, you will soon find it doesn’t always behave how you might expect. Here are my top tips to get the best results:
- Use named ranges. Adding rows and columns in a worksheet will not change the link reference in PowerPoint. For example, if PowerPoint is linked to Cell A1, then you inserted a new column at the start, Cell A1 would become Cell B1. But, PowerPoint still references Cell A1. This would now be the wrong cell. A named range helps to ensure the correct range is displayed in the presentation.
- PowerPoint updates links one at a time. If you have 100 links to the same Excel workbook it will open the same Excel workbook 100 times, which can be very time consuming. If you open the Excel document first the updating process is much faster.
- PowerPoint will not know if you change the name or file path of a linked file (see point 4 below for the exception). You need to ensure the most up-to-date version of the Excel file always has the same file name and file path, so that PowerPoint can find it.
- The fastest method of changing the source of an Excel file is to have both the Excel and linked PowerPoint files open. Then save the Excel file with a new path or file name. In this circumstance, PowerPoint will update the reference to the file.
17 thoughts on “Linking Excel files to PowerPoint”
I was given a PowerPoint presentation that I’m trying to replicate. This presentation has charts that are linked to an Excel spreadsheet. The Excel file contains data only. It does NOT have a table or chart. The actual chart itself is in PowerPoint. At home on my 2007 PowerPoint I can create a presentation from scratch with links only to Excel data using the Select Data Source (Excel does NOT contain a table, chart etc.) but at work with version 2013 it will not let me do this. I can only insert an object. What am I doing wrong?
Hi Theresa,
Thank you for the question. Somebody else may be able to correct me on this, as unfortunately I do not have a copy of 2007 PowerPoint to test.
I believe you need to create the chart in Excel first. Then cut the chart (Ctrl + X) from Excel and paste into PowerPoint (Ctrl + V). If the PowerPoint and Excel files have not previously been saved, save them. Clicking File -> Edit Links (in the bottom right corner) will show you that the data is linked.
It should be possible to format the chart, change chart type, add data labels, etc. all from within PowerPoint, but the data itself is in the Excel file.
Does that answer the question? Have I understood your question correctly?
Creating the chart in Excel will let me insert it as an object but the PowerPoint I was given does not have a graph in its linked Excel file. The graphs are all created in PowerPoint. Each slide has a link to a different tab in the Excel file with data entered in rows and columns…no graphs whatsoever. I can modify the data in Excel and PowerPoint will update. The data in Excel is laid out using the columns as months with the rows containing the dollar numbers for accounts receivable (as an example). Each slide has a link to a different tab in the same Excel file. The Excel file does NOT have any tables or charts. I cannot figure out how this was accomplished but I’m required to replicate it! However I do appreciate and thank you for the response.
In PowerPoint, don’t go into Paste Special, just use a straight forward Paste. The chart in Excel can be deleted (you don’t need it), but the chart which has been copied into PowerPoint is now linked to the data.
It worked! Each presentation has approximately 19 slides but once I established the link to the first slide (and deleted the graph) I merely duplicated that slide then changed the source tab and the type of graph. Awesome! Thank you so much.
Hi, I am trying to find out how to structure a VBA (in excel or power point) to Edit links to files. In a nutshell, I have excel objects pasted special (paste link option) to 8 PPT slides. When I initially pasted them I was able to see all changes in excel projected in the PPT INSTANTLY! Once Excel and PPT saved/closed and reopened the values in the excel get updated on open. I no longer have the live/instantaneous view in PPT of what happened in the Excel. I was able to get 1 slide to work with VBA but the rest keep “static”/only update once I go through the manual update button as described above. Any help appreciated.
I have another post which may provide you with the answer, you’re looking for: https://exceloffthegrid.com/edit-links-in-powerpoint-using-vba/
Let me know how you get on. It may be necessary to change the VBA code in that post slightly to achieve exactly what you’re after.
I don’t have the edit links option in my File>Info location. I can right-click and select Update Link, but it only refreshes the link. I currently only get half of the rows and columns that I need to be linked in Powerpoint. I am using Excel and Powerpoint 2016.
Hi Chris O.
I’ve just checked in PowerPoint 2016, it is there.
The PowerPoint presentation needs to have been saved at least once – try that to see if it fixes the issue.
Hi, I have just got a new computer with Office 365 installed. Previously i had Office 2016. I am now facing a very annoying issue that every time I click on a linked object in Powerpoint it attempts to openen the source [Excel] file.
Is there a way to avoid this?
In previous versions of Powerpoint I could move and resize linked objects without opening the source file.
I wonder if it is a bug, as that would be really annoying. The best place for answers of that type is the Microsoft Answers community – https://answers.microsoft.com/en-us
I’ve made a linked Powerpoint Template and uploaded on a Sharepoint point. Every month users across different locations, download it and update with the excel data (baring generic name) of their respective location. It works for majority users. Any clues why not for some. All mentioned above is taken care of.
I’ve not heard of this as an issues. If it works for some and not others, then the most likely cause is slightly different procedures between users, which are producing slightly different results. Some factors to think about are: – The order in which files are opened and saved can have an impact. – Are all the users accessing SharePoint in the same way through the same browser? – Are some editing in Excel Online rather than a local copy? – What type of download is being performed from Share Point? – Which drives does each person have access to?
I’m having issues with moving a linked ppt and excel to a new folder. I open both files, and save the excel to the new location, then save the ppt to that location. When i go in to review my links (int he Edit links to file window in the “info” tab it looks like the links have updated correctly to the new excel location. I close out – but then when I go back into the ppt, only the links where i am directly referencing cells are now correct – any links to charts no longer include the tab location or chart number. So all of the places where i previously had my charts, the links are just defaulting to the file name alone. I have about 100 charts – so updating manually is not an option. Anyone have a solution?
You could trying editing the links with a macro. Check out this post: https://exceloffthegrid.com/edit-links-in-powerpoint-using-vba/
I’m wondering if you may be able to help me, Please could you explain how I edit the Link address to use a Named Range rather than cell specific ranges in PowerPoint. I have a Named Range already in excel which is an indirect formula that will generate the start and end cell refences as the data changes in Excel. However in PowerPoint when i go to file, info, edit link, update source it only allows me to select a file to open rather than typing in the address of what I require.
I have previously found on the internet a hotkey in PowerPoint that changes the view from the image to the file path however I am not able to find this information anymore and now I’m at a loss of how to make the updates that I need.
I think the method you’re referring to which shows the file path only works in Microsoft Word (unless anybody else knows differently)
I think the only way to use a dynamic named range would be to use a macro. (1) Create the link in the normal way with a standard (2) Edit the link to refer to a dynamic named range Check out this post for guidance: https://exceloffthegrid.com/edit-links-in-powerpoint-using-vba/
Leave a Comment Cancel reply
Insert a Table in PowerPoint from Excel? [Step-by-Step!]
By: Author Shrot Katewa
![Insert a Table in PowerPoint from Excel? [Step-by-Step!]](https://artofpresentations.com/wp-content/uploads/2022/05/Featured-Image-Insert-table-from-Excel-to-Powerpoint.jpg "how to add excel file in powerpoint presentation")
One of the conveniences that PowerPoint presentations provide is the ability to insert tables and make them dynamic in nature from any source, particularly Excel. This allows presenters to continue in the flow of their presentations without having to shuffle through multiple open windows.
To insert a table in PowerPoint from Excel, first, select and copy the table in Excel using the “Ctrl+C” shortcut. Then, open the specific slide in your presentation to paste the table. Use the shortcut “Ctrl+V” to paste the table in PowerPoint.
Does this seem too simple to imagine, doesn’t it? And, it is quite simple! However, to give you a few more options for inserting tables from Excel to PowerPoint, I have listed some methods below. Let’s get started.
1. Adding a Table from Excel to PowerPoint
The “Insert Table” feature in Microsoft PowerPoint allows you to only add new tables to your slide. However, you can add an existing table from a different source like Microsoft Excel also using the methods mentioned below.
To add a table from Excel to PowerPoint, you need to use the “Copy” and “Paste” features.
1.1 Method 1 – Using Copy and Paste (Unlinked)
Using the simple “Paste” feature in Microsoft PowerPoint, you can quickly add an Excel table to your slide without any hyperlinks. To do so, follow these steps.
Step-1: Click on the “Copy” option
The first step is to open the Microsoft Excel worksheet from where you want to copy the table. Then select the preferred columns and rows to highlight them. “Right Click” on it and click on the “Copy” option. Alternatively, you can press the “Ctrl+C” keys on your keyboard.
Step-2: Click on the “Paste” option
The next step is to “Right Click” on the PowerPoint slide where you want to add the table. In the right-click menu, click on your preferred option under “ Paste Options ” . You can alternatively press the “Ctrl+V” keys on your keyboard to paste the Excel table to your slide.
1.2 Method 2 – Using Paste Special
In Microsoft PowerPoint, the “ Paste Special ” dialog box offers options to paste the copied table in different special formats. To paste the Excel table with a hyperlink, follow these steps.
Step-1: Click on the “Paste Special” option
In the “Paste” group of the “Home” tab, click on the down arrow under the “Paste” icon that looks like a clipboard. Then click on the “Paste Special” option from the dropdown menu to launch a dialog.
Step-2: Click on the “Microsoft Excel Worksheet Object” option
In the “ Paste Special ” dialog box, click on the “Paste” option from the left column. Then in the box in the middle of the dialog box, click on the “Microsoft Excel Worksheet Object” option.
Step-3: Click on the “OK” button Now all you have to do is click on the “OK” button at the bottom of the “Paste Special” dialog box to paste the Excel table in your PowerPoint slide (shown above).
1.3 Method 3 – Using the Insert Object Option (Entire Excel Sheet)
Microsoft PowerPoint also allows you to paste the entire Excel sheet into your presentation slide. For this, you have to use the “ Insert ” tab. Follow the 4 steps below:
Step-1: Click on the “Insert” tab
In the menu ribbon located at the top of the screen, click on the “Insert” tab. Under the “Insert” tab, click on the “Object” option which is the last icon in the “Text” group.
Step-2: Click on the “Create File” option
In the left column of the “Insert Object” dialog box, click on the “Create from file” option. Now you can select an Excel sheet to add to the slide.
Step-3: Click on the “Browse” button
Click on the “Browse” button in the “Insert Object” dialog box to launch the “Browse” window. Select the Excel file and click on the “Open” button at the bottom of the “Browse” window (shown above).
Step-4: Click on the “Link” option
In the “Insert Object” dialog box, click on the “Link” option to hyperlink the Excel table. Click on the “OK” button at the bottom of the dialog box to finish the process.
2. How to Copy Tables from Excel to PowerPoint with Formatting?
When you copy a table from Excel, you can paste it into Microsoft PowerPoint in multiple different formats. For easy editing access, you can use the “Keep Source Formatting” feature.
You can also paste the table as a picture to avoid any accidental edits to the table.
2.1 Method 1 – Using Keep Source Formatting Option
To paste the Excel table as an editable object, you can use the “Keep Source Formatting” option. All you have to do is “Right Click” on the slide and select the “Keep Source Formatting” option under “Paste Options” in the right-click menu. The table in PowerPoint will retain the formatting from Excel.
2.2 Method 2 – Paste as an Image
You can paste the Excel table as an image if you do not want any edits to the table. To paste as an image, “Right Click” on the slide and click on the “Picture” option under “Paste Options” in the right-click menu.
3. How to Insert an Excel File into PowerPoint as an Icon?
Instead of pasting a table, you can add an Excel icon in Microsoft PowerPoint. Clicking on the icon during the presentation will lead you to the Excel worksheet. To insert an Excel file as an icon, follow these steps.
Step-1: Copy Table from Excel
Step-2: Click on the “Paste Special” option
In the “ Clipboard ” group of the “Home” tab, click on the down arrow under the “Paste” icon. Then click on the “Paste Special” option from the dropdown menu to launch a dialog.
Step-3: Click on the “Microsoft Excel Worksheet Object” option
Now just click on the “Microsoft Excel Worksheet Object” option in the “Paste Special” dialog box,
Step-4: Click on “Display as icon” The next step is to click on the “Display as icon” option in the right column of the “Paste Special” dialog box. A checkmark will appear beside the option. Now click on the “OK” button at the bottom to insert the Excel file as an icon (shown above).
4. How to Link Existing PowerPoint Table to Excel for Dynamic Data Updates?
In Microsoft PowerPoint 2019 and later versions, you cannot link an Excel worksheet to an existing PowerPoint table. However, any hyperlinked table from Excel in PowerPoint is automatically set for dynamic data updates.
To enable this feature, follow these steps.
In the “Home” menu, click on the down arrow under the “Paste” icon. Then select the “Paste Special” option from the dropdown menu.
Step-3: Click on “Paste Link”
In the left column of the dialog box, click on the “Paste link” option. This will link the table to its Excel source. You can edit the table in either PowerPoint or Excel and find the changes in both files.
Now click on the “Microsoft Excel Worksheet Object” option from the box in the middle of the “Paste Special” dialog box. Then click on the “OK” button to insert the table (as shown above).
5. How to Unlink Table in PowerPoint from Excel?
In PowerPoint, you can remove the hyperlink added to an Excel table. However, you must remove hyperlinks from all objects in the presentation at once. Follow the 2 quick steps.
Step-1: Click on the “File” tab
Click on the “File” tab in the menu ribbon located at the top of the screen. In the left sidebar of the “File” menu, click on the “Info” option.
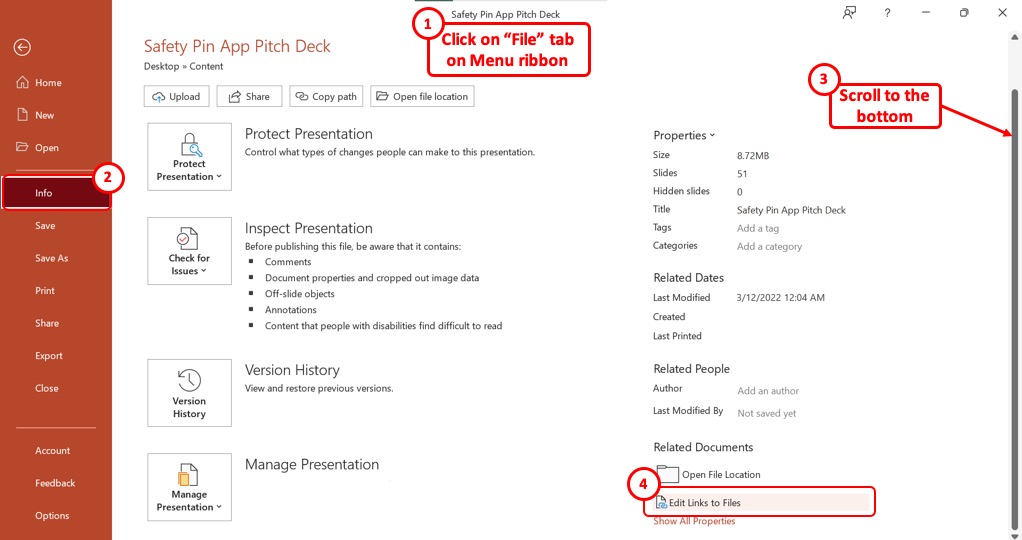
Step-2: Click on “Edit Links to Files”
Now scroll all the way down to the bottom of the “Info” screen. At the right column, click on the “Edit Links to Files” option to remove all the hyperlinks.
6. How to Embed Excel in PowerPoint?
To embed an Excel sheet into a PowerPoint slide, follow these steps.
Step-1: Click on the “Object” option
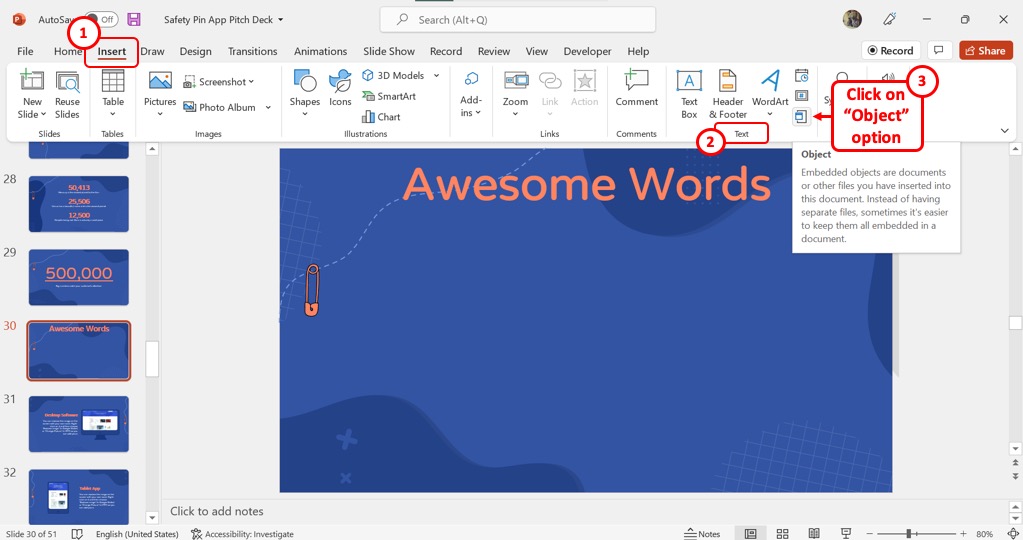
In the menu ribbon located at the top of the screen, click on the “Insert” tab. Then click on the “Object” icon from the “Text” group.
Step-2: Click on “Microsoft Excel Worksheet”
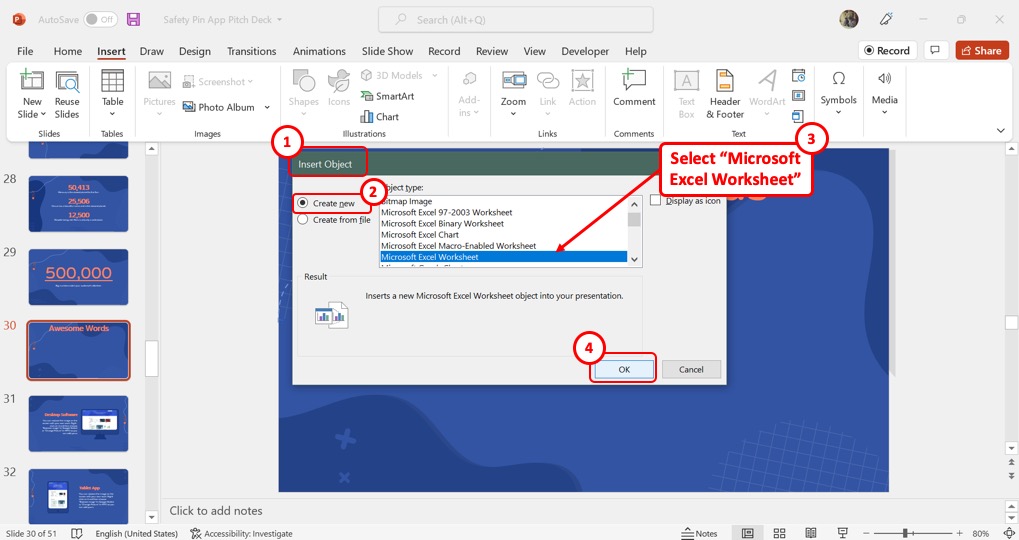
In the “Insert Object” dialog, click on the “Create New” option from the left column. Then select the “Microsoft Excel Worksheet” option from the “Object Type” list. Finally, click on the “OK” button to embed the Excel sheet.
7. How to Insert a Scrollable Table from Excel in PowerPoint?
In Microsoft PowerPoint, all the embedded Excel tables are scrollable. To insert a scrollable table from Excel into your PowerPoint presentation, follow the steps discussed in Section 6. However, to make the table scrollable for your viewers, you will need to access the “Developer” tool.
Here’s a link to a Microsoft Support group addressing what you need to do in order to make your table scrollable. Make sure you check that out.
Passper Online
Unlock all file formats online
Passper for Excel
Excel password remover
Passper for Word
Word password remover
Passper for PowerPoint
Powerpoint password remover
Passper for PDF
PDF password remover
Passper for RAR
Rar password unlocker
Passper for ZIP
Zip password unlocker
- Windows Password Recovery
How to Insert Excel Into PowerPoint (4 Easy Ways)
Microsoft Excel and PowerPoint are two of the most popular tools in today's business world. People often use them separately, but they can also be integrated to make your work more efficient and effective.
For instance, you might want to use an Excel spreadsheet in a PowerPoint presentation to show your audience some data along with your slides in a clear and concise way.
Or maybe you want to insert an Excel file into PowerPoint so that you can increase the effectiveness of your presentations.
Either way, learning how to insert Excel into PowerPoint can be a handy skill. In this article, we'll show you four different ways to insert an Excel spreadsheet into PowerPoint with step-by-step instructions.
Part1. Perfect Guide On How To Convert Excel Sheet To Powerpoint Slide
Part2. Extra Tips: How To Do If You Lost Your Excel Password
Part 1. Perfect Guide On How To Convert Excel Sheet To Powerpoint Slide
One of the best things about Microsoft Office is that it lets you combine content from different Office apps and create a single, cohesive document.
That means you won't have to go through each document individually to find the information you need; it can all be found in one place.
Similarly, If you want to take the data from your Excel spreadsheet and turn it into an eye-catching PowerPoint presentation, there are a few different ways to do so.
Solution 1: Inserting Excel into PowerPoint as an Object
Like all other Office apps, PowerPoint has a feature called "Insert Object". This feature lets you insert other types of files into your presentation, including spreadsheets, PDFs, word documents, or images.
You may also use this option to show the file as an icon or just the content of the file on your slide. That way, when you give your presentation, you can simply click the icon or content to open it in Excel.
Here's how to insert an Excel spreadsheet into PowerPoint as an object:
Step 1: Open your PowerPoint presentation and go to the slide where you want to insert the Excel spreadsheet.

Step 2: From the Insert tab in the menu above, click Object.

Step 3: In the "Object" dialogue box that appears, click the "Create from File" tab.

Step 4: Now, click the "Browse…" button and select the Excel spreadsheet you want to insert into your presentation.

Step 5: Once you've selected the file, make sure the "Link to file" and "Display as icon" options are both checked. If you wish to add the content of a file that will automatically update when you update the Excel file, you can use the "Link" option instead of "Display as icon".

Step 6: Click the Insert button.
Depending on the option you choose, your Excel spreadsheet will now be integrated into your PowerPoint presentation as an icon or as content. Simply click on it during your presentation to open it.
Solution 2: Insert Excel into PowerPoint Using 'Special Paste'
You can also insert an Excel spreadsheet into PowerPoint by using the "Special Paste" feature.
This built-in PowerPoint option allows you to link a specific section of Excel data to your presentation instead of linking the whole Excel spreadsheet, which can be very useful if you only want to show some graphs or charts with their relevant data.
Here's how to insert an Excel spreadsheet into PowerPoint using the "Special Paste" feature:
Step 1: Start by opening both your Excel spreadsheet and PowerPoint presentation.
Step 2: In Excel, select the data you want to insert into your presentation. The selected data can be a single cell, a range of cells, or even charts and related graphs.

Step 3: Once you've selected the data, press "Ctrl + C" on your keyboard to copy it.

Step 4: Now go to your PowerPoint presentation and select the slide where you want to insert the Excel data.

Step 5: On the "Home Tab" in the menu above, click on the "Paste" drop-down arrow. From the list of options that appears, click on the "Paste Special" option.

Step 6: Select the "Paste Link" option in the dialogue box that appears, then choose the "Microsoft Excel Worksheet Object" option and click OK.

Solution 3: Inserting Excel into PowerPoint as an ScreenShot
If you don't want to link excel in powerpoint or if the file is too large to insert using either of the methods above, then another option is to take a screenshot of your data and paste it into your presentation as an image.
Screenshots are ideal for inserting an image of your entire spreadsheet or just a specific section into PowerPoint. Simply choose the area you want to capture and copy it as an image to slide.
Here's how to insert an excel into powerpoint as a screenshot:
Step 1: Open your Excel document and go to the sheet of which you want to take a screenshot.

Step 2: In your Powepoint presentation, go to the slide where you want to insert the screenshot and click on the "Insert tab". Then select "Screenshot" option from the menu.

Step 3: To capture the whole screen of your opened Excel file, select it from the "Available Windows" list. To take a screenshot of only a specific region, click on "Screen Clipping".

Step 4: After selecting one of the options, a screenshot of your Excel sheet will be taken and loaded into PowerPoint, where you can further adjust and resize it.

Solution 4: Insert Excel into PowerPoint Using Drag & Drop
This solution is a little less known, but it's still quite handy. It's also easier than some of the methods we've looked at so far.
The drag and drop method allows you to insert an Excel spreadsheet into PowerPoint by simply dragging it from your Excel window into your PowerPoint presentation.
Here's are a few easy steps on how to insert excel into ppt using drag and drop:
Step 1: First of all open your PowerPoint presentation and select the slide where you want to insert your Excel data.

Step 2: Then in your Windows’ file manager, go to the location of your Excel spreadsheet.

Step 3: Now simply click on the Excel file and drag it into your PowerPoint presentation window.

Your Excel file will now be inserted into PowerPoint. You can double-click on it to select a different sheet or edit it directly from the PowerPoint interface without opening the file in Excel.
Part 2: Extra Tips: How To Do If You Lost Your Excel Password
Inserting your Excel spreadsheet into PowerPoint is an easy process, but you may encounter problems if your Excel file is password protected and you can't access it.
If you're also in the same situation and have forgotten your Excel opening password, then using the Passper for Excel is a easy way to remove password protection from your file so that you can open, edit, and insert it into PowerPoint.
It is a powerful Excel password recovery tool that can help you remove all kind of restrictions and unlock the password-protected Excel files regardless of their password length or complexity. It uses advanced AI algorithms to intelligently identify issues in Excel files, allowing for the quick removal of restrictions or cracking passwords.
The following are some of the important features of Passper for Excel:
- Four intelligent password attack modes
- One-click password & restrictions removal
- 10X faster speed with GPU acceleration
- Support all Excel versions & file formats
- High sucess rate for opening password
Here is a step-by-step guide on how to use Passper for Excel to open a password-protected Excel file:
Step 1: Download and install Passper for Excel on your computer. After that, launch the program and select "Recover Passwords" mode.

Step 2: Click on the "Add File" button and select the password-protected Excel file that you want to open.

Step 3: Now select an attack mode from the four options provided and click on the "Next" button.
Step 4: Passper for Excel will now start removing the password from your file. Once the process is finished, you will be able to open your Excel file without any password.

Next time you want to insert Excel into PowerPoint presentation, try one of the methods we've looked at in this article.
You can pick any of the solution that best suits your needs, whether it's inserting the entire spreadsheet, linking specific data, taking a screenshot, or using the drag and drop method.
And if for some reason you forget or lose your Excel file password, don't worry! You can simply take the help of Passper for Excel to recover your password in no time. So, go ahead and give it a try!
Free Download Buy Now
Related Articles:
- How to Get Passper for PowerPoint Registration Code
- What to Do If Powerpoint Shut Down without Saving
- PowerPoint won't open? 5 Simple Ways to Solve your Issue
- Best Ways to Solve Excel Document Not Saved
- 2024 Complete Solution to Fix Excel File Disappeared

By Adams Johnson to Excel
Posted on Oct 26, 2023 ( Updated: Oct 26, 2023)
Passper editor since 2015, has over 20 years’ professional technology support experience. He has contributed nearly 100 articles to the site on topics that ranger from password unlocking for MS office/Windows, Windows tips to network security.
How to Link Excel Data to Your PowerPoint Presentation
You can easily update your PowerPoint file by linking your Excel spreadsheet data to your presentation. Here's how to do it.
You always want to have the latest data available if you're making a presentation. That way, you can ensure that your slides are accurate and reflect the realities on the ground.
However, there are times when you have to create a presentation as your colleagues are still compiling data. How can you ensure that any change they make in your Excel database reflects in your PowerPoint slide?
This is where the Paste link function comes in. Here's how to use it to ensure you always have the latest database and chart info on your presentation.
Linking Your Excel Data to PowerPoint

To link your Excel table to your presentation, it first must exist. If your colleagues haven't created it yet, you can create a placeholder table you can select and copy and then have your teammates update its content. Once you've made the initial data, follow the steps outlined below.
- Select the table you want to copy over to your presentation.
- Click on Copy or press Ctrl + C ( Command + C for Mac users).
- Open Microsoft Powerpoint .
- Open the file presentation you're working on if you already have one; otherwise, click on Blank Presentation .
- On a blank slide, go to the Home menu ribbon .
- Click on the down arrow under the paste icon .
- Choose Paste Special…
- In the Paste Special window, choose the Paste link radio button.
- Choose Microsoft Excel Worksheet Object .
Once done, you'll see the table you copied from Excel appear on your PowerPoint presentation.
However, you need to access the source Excel file to edit the content or formatting of the table you added. To do so, you can open the file where you saved it; or, you could double-click the table, and it will automatically open the source file.
Related: How to Organize Your Spreadsheets in Excel
Creating a Dynamic Chart

One of the easiest ways to visualize, compare, and analyze data and trends is to use charts. However, if you want to create a chart from the linked Excel table you just created, you must do it from its source file first. Once you've made the chart, you can copy and link it to your PowerPoint file. Here's how to do it.
- Select the chart you create in Excel.
- Go to the slide where you want to place the chart you just copied.
- On the Home menu ribbon , click on the down arrow under the paste icon .
- In the Paste Options , you can either choose Use Destination Theme & Link Data (L) or Keep Source Formatting & Link Data (F) . These are the third and fourth icons, respectively. The first option lets you use the theme you're using for your presentation, while the second one retains the look and feel of your source Excel file.
- Once you've pasted your chart, you can move it around to suit your needs.
Related: How to Create Powerful Graphs and Charts in Microsoft Excel
Updating Your Chart

Unfortunately, if you need to make changes to your chart, you'll have to open its source data in Excel. If you have access to the Excel file, you can just make changes directly, and it should automatically reflect on the PowerPoint chart.
If you don't have the Excel file open, you can right-click on the PowerPoint chart, then choose Edit Data > Edit Data in Excel in the context menu. You can also select Edit Data > Edit Data to open a small window if you only need to make minor changes.
In case the changes you make don't automatically reflect on the PowerPoint chart, you can manually update it. To do so, click on your chart, go to the Chart Design menu ribbon , then click on Refresh Data . This will pull in the latest information from the linked Excel file and update the information displayed on your PowerPoint chart.
Formatting Your Excel-Linked PowerPoint Chart

Unlike your Excel data table, any changes you make to the chart design in Excel will not affect your chart in PowerPoint. For this reason, you have to finalize the design and feel of the chart you're copying from in Excel before copying it over to your presentation.
Alternatively, you can make design changes to your PowerPoint chart independently. That means you can change how your presentation chart looks without affecting the chart you copied from Excel.
To make those changes, click on your chart, then go to the Chart Design menu ribbon . You can choose how the chart feels under Chart Styles . If you think that the current chart type doesn't fit well with your presentation, you can even change it.
Click on Change Chart Type to open a new window. From there, you can pick out any chart type you like in the left column.
Related: How to Make a Line Graph in Excel
Finding Linked Files

Sometimes, you cannot remember if the tables and charts in your presentation are linked to an Excel file. Or it might be the case that you linked your PowerPoint data to a spreadsheet but can't remember where you saved it.
You can check the PowerPoint file directly if it's linked to any file and where these files are. To do so, click on File in the menu ribbon . In the full-screen menu that opens, go to Info on the left-hand column .
Under the Info window, on the right-hand column, go to Related Documents . Click on Open File Location to see where the linked files are saved.
If you moved the linked Excel files, click on Edit Links to Files . A Links window will appear showing each linked object and the file's location attached to it. The window gives you four choices:
- Update now : Update the object's data to the latest changes in the linked file.
- Open Source : Opens the linked Excel file.
- Change Source… : Opens a File Explorer window to change the linked file.
- Break Link : Removes the link from your presentation.
Always Stay Updated
This nifty feature first appeared in Microsoft Office 2010 and has since been available to all Office users. So, whenever you're making a presentation based on incomplete data, you no longer have to worry about updating it manually in the future.
By copying the Excel information and then pasting it into your presentation as a linked item, you're guaranteed to have the latest data updated into your PowerPoint file automatically.
How to Insert Excel Data into PowerPoint

There are a few ways to insert Microsoft Excel data into a PowerPoint presentation. Here’s what to do.
All Microsoft Office software allows you to combine content from other Office apps. If, for example, you have a data-heavy PowerPoint presentation, you might want to support it with further data from Microsoft Excel.
This is entirely possible, and there are a few ways to do it. For example, you can insert an entire Excel spreadsheet, similar to how you might insert PDFs into PowerPoint . You can also paste parts of a spreadsheet into a PowerPoint slide using your clipboard.
Here’s how to insert Excel data into Powerpoint using either method. These instructions should work for all recent versions of Microsoft Office, including Office 365 and Online.
Inserting an Excel Spreadsheet into PowerPoint
Using the Insert Object tool, you can insert data from your Excel spreadsheet as an object. For example, this will add the most recently accessed worksheet contents into PowerPoint for you to view.
You’ll need to make sure that the worksheet you want to use is visible and active when you next save your Excel spreadsheet.
To start, open your PowerPoint presentation and press the Insert tab on the ribbon bar.

To insert your Excel data, click the Object button. This may appear as a large or small icon, depending on your current screen resolution and the size of the PowerPoint window.

This will load the Insert Object options box. To add your Excel data, press the Create from file radio button, then press Browse to find and select your Excel spreadsheet.

If you choose the Link option, your data will continually update. Any changes you make in Excel will be reflected in PowerPoint when you next save your Excel file.
To add your data to PowerPoint, press the OK button.

The data will be inserted as an object onto your PowerPoint slide, which you can then resize and manipulate.

Double-clicking the object will load the file in Excel, allowing you to make further changes, where necessary.
Copying Excel Data into PowerPoint
The powerful copy and paste tools that Microsoft offers in its Office suite allow you to copy and paste Excel data into PowerPoint directly. This data can be formatted in different ways. For example, you can format it into a table, paste it as an image, or remove all formatting and place the data into a text box.
To do this, open your Excel spreadsheet and select the data. Then, to copy the data, press Ctrl + C or press Home > Copy .

Return to your PowerPoint presentation and select the slide where you intend to paste the data.
In the position where you’d like to place the pasted data on your slide, right-click and choose one of the Paste options.

Alternatively, press the Home tab on the ribbon bar, then press the Paste button to view the available options instead.
If you click the Use Destination Styles (1) option, this will paste the data as a table, merging it with the style of your PowerPoint theme. Choosing Keep Source Formatting (2) will also paste it as a table, but it will maintain the formatting from your Excel spreadsheet.

You can also choose the Embed (3) option, which will paste it as an object and allow you to edit the data in Excel later. You can also press Picture (4) to paste the data as an image, which won’t allow you to edit it.

Finally, if you’d prefer to remove any formatting, choose Keep Text Only . This will paste the data into a new text box.

Depending on the option you choose, your Excel data will be pasted into PowerPoint at this point. You can then edit it using the options available to you, depending on which paste method you choose.
Using PowerPoint with Other Office Apps
By inserting Excel data into PowerPoint, you’re using the full range of the Microsoft Office suite to your advantage. You can take things even further by converting a PowerPoint presentation to a Word document , for instance.
You can even think about reducing your PowerPoint file size if it gets too big to share. Let us know your tips for creating better PowerPoint presentations in the comments below.
Recommended for you


How to Insert a Linked Excel Chart or Graph into PowerPoint

Easily Insert Excel Linked Charts or Graphs onto PowerPoint Slides
by Avantix Learning Team | Updated May 16, 2022
Applies to: Microsoft ® PowerPoint ® 2013, 2016, 2019, 2021 and 365, (Windows)
It's easy to insert a linked Excel chart or graph into PowerPoint by copying and pasting. There are two common methods you can use – copy and paste to insert a linked chart or copy and paste special to insert an embedded chart with a link. If you insert a linked or embedded Excel chart, you can update the chart in PowerPoint when the Excel source file changes.
If you created a linked chart in PowerPoint by copying and pasting a chart from Excel, the chart displays in PowerPoint and you can format it, refresh it and even animate the chart elements. A linked chart can be updated by refreshing the data. If you embed an Excel chart using Paste Special and then Paste link, you will need to format the chart in Excel as it is displayed as an embedded object in PowerPoint. You can double-click an embedded chart object to open the Excel file and then edit the file.
Linked and embedded charts with a link are stored in the source Excel file. The PowerPoint presentation (destination file) stores the location of the source file.
If you add a lot embedded Excel charts with a link in a PowerPoint deck, it will increase the size of the PowerPoint file so you may want to break the links when the presentation is finalized if you need to reduce the size of your PowerPoint file. It's best to break links in a copy of the presentation.
Recommended article: How to Break, Update or Change Links to Excel Charts or Worksheets in PowerPoint
Do you want to learn more about PowerPoint? Check out our virtual classroom or in-person classroom PowerPoint courses >
Insert a linked Excel chart into PowerPoint using Copy and Paste
To insert a linked Excel chart or graph onto a PowerPoint slide by copying and pasting:
- Open the Excel workbook containing the chart you want to use.
- Save the workbook.
- Click in a blank area in the chart or on the edge of the chart.
- Press Ctrl + C. Alternatively, right-click and select Copy. You can also press Shift + F10 or press the Context button on your keyboard to display the context menu and then select Copy.
- Open the PowerPoint presentation in which you want to insert the chart.
- Go to Normal View (click the Normal button on the bottom right) and display the slide where you want to insert the chart.
- Click the Home tab in the Ribbon and in the Slides group, select the Title Only layout from the Layout drop-down menu. You can also delete the body placeholder on the slide by clicking its edge and then pressing Delete.
- Click in a blank area on the slide.
- Press Ctrl + V to paste the chart onto the slide. A Smart Tag appears on the bottom right of the chart.
- Click the Smart Tag. A drop-down menu appears.
- Select one of the options (hover over the icons to view a pop-up about each option). You can select Use Destination Theme and Embed Workbook, Keep Source Formatting & Embed Workbook, Keep Source Formatting & Link Data, Use Destination Theme & Link Data or Picture. You can also press Shift + F10 or the Context button on your keyboard to display the context menu and then select the desired option. The two Link options will create links to the original Excel file and can be managed and updated.
- If necessary, resize the chart by dragging the corner handles and move the chart by dragging it by its edge.
If you want the chart to keep the formatting from the Excel file, select Keep Source Formatting & Link Data. If you want the chart to use the formatting in the PowerPoint presentation, select Use Destination Theme & Link Data.
The following options appear when you click the Smart Tag:

If you use the same theme colors in both the Excel file and the PowerPoint deck, you should achieve more consistent chart formatting. If the chart does not format in PowerPoint using the destination theme method, the chart may have been formatted in Excel using standard colors (which override theme colors) and non-theme fonts.
Update or refresh a linked chart
If you use the copy and paste method to insert a linked chart, you will be able to refresh it using the chart tools in PowerPoint.
To update or refresh a linked chart:
- In Normal View, click the chart on the slide.
- Click the Chart Design or Chart Tools Design tab in the Ribbon.
- Click Refresh Data in the Data group.
Refresh data appears in the Ribbon in PowerPoint when you click a linked chart:

Insert an embedded Excel chart with a link into PowerPoint using Paste Special
To insert an embedded Excel chart or graph with a link onto a PowerPoint slide using Paste Special:
- Click in a blank area in the chart.
- Click the Home tab in the Ribbon and click Copy in the Clipboard group.
- Click the Home tab in the Ribbon and click Paste in the Clipboard group. A drop-down menu appears.
- Select Paste Special. A dialog box appears.
- Click Paste link and then select Microsoft Excel Chart Object. If you click Paste, not Paste link, the embedded object will not be linked to the source Excel file.
- Click on OK.
Below is the Paste Special dialog box in PowerPoint:

Excel will insert an embedded chart that is linked to the original chart. You will not be able to format the embedded chart object in PowerPoint.
Refresh or update embedded Excel charts
To update an embedded chart with a link in PowerPoint if the Excel data has changed:
- Save the PowerPoint file.
- Click the File tab in the Ribbon and then click Info.
- On the bottom right, click Edit Links. A dialog box appears.
- Click the link path you want to update and then click Update.
If both the Excel and PowerPoint files are open, embedded charts should automatically update.
Open presentations with embedded charts with links
If you have embedded charts with links in a PowerPoint presentation, each time you open the presentation, PowerPoint should prompt you to update the links or Enable Content.
Troubleshoot linked or embedded Excel charts
In order to insert a linked or embedded Excel chart with links and maintain the links, you should:
- Save the Excel workbook first before linking with PowerPoint
- Keep the Excel file in the same folder as the PowerPoint file if you can
- Ensure the Excel file is not moved to another folder or the link will break (you can fix this issue)
- Ensure the Excel file is not renamed or the link will break (you can fix this issue)
If the Excel file has been moved or renamed, you'll still be able to view the chart in PowerPoint but you won't be able to update or edit the chart unless you change the source using Edit Links.
You can double-click an embedded chart object to open the Excel source file and then edit the data in Excel. When you save the edited file and return to PowerPoint, the updated chart should appear automatically in your presentation.
Linked or embedded charts with links can present a security issue as users may be able to access the source Excel file and select other tabs in the workbook. If you email the presentation without the source Excel files, this is not an issue. You can also break links to embedded charts before sharing the PowerPoint presentation.
This article was first published on December 16, 2016 and has been updated for clarity and content.
Subscribe to get more articles like this one
Did you find this article helpful? If you would like to receive new articles, join our email list
More resources
3 Ways to Change the Font on All Slides in PowerPoint
How to Quickly Remove All Speaker Notes in PowerPoint (PC or Mac)
How to Insert Linked or Unlinked Excel Worksheet Data into PowerPoint
How to Reduce PowerPoint File Size (10 Ways to Compress PowerPoint Decks)
How to Break, Update or Change Links to Excel Charts or Worksheets in PowerPoint
Related courses
Microsoft PowerPoint: Intermediate / Advanced
Microsoft PowerPoint: Design for Non-Designers
Microsoft Excel: Intermediate / Advanced
VIEW MORE COURSES >
Our instructor-led courses are delivered in virtual classroom format or at our downtown Toronto location at 18 King Street East, Suite 1400, Toronto, Ontario, Canada (some in-person classroom courses may also be delivered at an alternate downtown Toronto location). Contact us at [email protected] if you'd like to arrange custom instructor-led virtual classroom or onsite training on a date that's convenient for you.
Copyright 2024 Avantix ® Learning
You may also like

How to Replace Zeros (0) with Blanks in Excel
There are several strategies to replace zero values (0) with blanks in Excel. If you want to replace zero values in cells with blanks, you can use the Replace command or write a formula to return blanks. However, if you simply want to display blanks instead of zeros, you have two formatting options – create a custom number format or a conditional format.

What is Power Query in Excel?
Power Query in Excel is a powerful data transformation tool that allows you to import data from many different sources and then extract, clean, and transform the data. You will then be able to load the data into Excel or Power BI and perform further data analysis. With Power Query (also known as Get & Transform), you can set up a query once and then refresh it when new data is added. Power Query can import and clean millions of rows of data.

How to Freeze Rows in Excel (One or Multiple Rows)
You can freeze one or more rows in an Excel worksheet using the Freeze Panes command. If you freeze rows containing headings, the headings will appear when you scroll down. You can freeze columns as well so when you scroll to the right columns will be frozen.
MORE POWERPOINT ARTICLES >
Microsoft, the Microsoft logo, Microsoft Office and related Microsoft applications and logos are registered trademarks of Microsoft Corporation in Canada, US and other countries. All other trademarks are the property of the registered owners.
Avantix Learning |18 King Street East, Suite 1400, Toronto, Ontario, Canada M5C 1C4 | Contact us at [email protected]
Our Courses
Avantix Learning courses are offered online in virtual classroom format or as in-person classroom training. Our hands-on, instructor-led courses are available both as public scheduled courses or on demand as a custom training solution.
All Avantix Learning courses include a comprehensive course manual including tips, tricks and shortcuts as well as sample and exercise files.
VIEW COURSES >
Contact us at [email protected] for more information about any of our courses or to arrange custom training.
Privacy Overview
Pin it on pinterest.
- Print Friendly
Stack Exchange Network
Stack Exchange network consists of 183 Q&A communities including Stack Overflow , the largest, most trusted online community for developers to learn, share their knowledge, and build their careers.
Q&A for work
Connect and share knowledge within a single location that is structured and easy to search.
Changing bounds of excel file embedded in powerpoint
When I embed an excel files into powerpoint, I'm having two issues.
- On some of the spreadsheets, empty columns are displayed on the right hand side of the powerpoint slide
- On other spreadsheets that are too large to fit, I can't adjust the bounds of what I'd like to be displayed on the slide. So, I couldn't choose a larger area to display of the excel spreadsheet and just size it down. It arbitrarily chooses where to cut off the excel spreadsheet on the slide.
Is there any way to adjust which part of the excel file is embedded?
- microsoft-excel
- microsoft-powerpoint
9 Answers 9
- Double click on the spreadsheet to "activate" it.
- Move your cursor to the black mark on the right side of the sheet, halfway between the top and bottom.
- When the cursor changes to a two-way horizontal arrow, click and hold.
- Then drag the right edge to show as many columns as you want. There is a maximum amount of column space available- once you pass a certain limit it will not show any more columns.

- 2 I don't get how to do it. I don't see any "black mark on the right side" – simpatico Apr 25, 2011 at 12:58
- 1 I do not remember, but you have to be either inside or outside the Excel editing mode. Then there will be square marks (or similar anchors) with which you can change the size of the Excel add-in in terms of the number of columns and rows (as opposed to resizing the Excel add-in as a whole, which is possible in the other editing mode; as I said, I can't remember, which is which). – robert Mar 11, 2012 at 12:07
- @simpatico, on the powerpoint slide, select the object, right click and choose Worksheet Object --> Edit – eric Apr 5, 2017 at 22:16
Same problem here, I have a workaround for some simpler cases:
- go into Edit on the embedded Excel
- Select the region you want to show
- copy it (Ctrl+C)
- go into powerpoint again
- use paste special and paste as an excel object
- delete the old object
Ugly but works in simple cases (no multiple sheets and calculations).
The question was specifically around a 'live link' (meaning the Excel file exists externally to the Word doc, and controlling the view is a complex problem not solved by any of these answers).
Answer: Using the Word Field Code parameters of LINK you can specify a named range as a Viewing Area.
Specific steps:
Excel: Select the cells (contiguous range) to be seen in Word, 'Insert Named Range' or Alt-I,N,D, Type name for region (no spaces for simplicity, e.g. " WordView "), Confirm named range exists (this step can happen before/after)
Word: Insert | Object, 'From File', (choose XLS file), check 'Link to File' (to ensure it's kept 'fresh'), OK
Word: Select the newly inserted XLS object/image. Press Shift-F9 to reveal codes. You should see something like:
{ LINK Excel.Sheet.12 "C:\\...\\YourFile.xls" \a \f 0 \p }
Word: Change the field code by adding your named range (e.g. " WordView ") as the third parameter. E.g.:
{ LINK Excel.Sheet.12 "C:\\...\\YourFile.xls" WordView \a \f 0 \p }
Word: With the field code under cursor, hit Shift-F9 again to hide. Select embedded XLS object/image and press F9 to update (or right click etc). ... You should see the view properly.
To change the 'viewing window', simply re-define or update the named range from within Excel, save, then select and F9 the object/image in Word and you should be good to go.
Cheers - Ronald
- 1 I'm not an Office user, but I assume the above is right. (Nice first post!) Still then: does this also apply to PowerPoint instead of Word? (As asked for in the question.) – Arjan May 27, 2014 at 19:53
- Couldn't get this to work. The spreadsheet didn't change length, it added extra cells still. Perhaps you could update your answer with more information? – Eoin Sep 18, 2019 at 18:25
I have the same problem, but in Word instead of Powerpoint. I haven't exactly found a true solution, but I do have a work around that may work if you need to readjust for an undersized excel chart:
- Copy the range you would like from Excel.
- Paste>Paste Special and select to paste link as excel.
- Left click to highlight the excel object, right click on it and select crop.
- Crop the extra rows/columns out of the object.
- Exit cropping function, then pull on the corners or sides of the object to resize it to fit your page/margins.
Like I said, not a true fix, but through I'd post it here in case of anyone else finds this useful.
- Found an issue with this method. Cropping seems to create issues when you convert it to PDF, where parts of the sheet gets chopped off. I am unable to test if it has any issues with normal printing, since the work computers always crashes if I try to print directly off any microsoft office program. – Chloe L Jul 1, 2014 at 21:12
- This worked well for me – Eoin Sep 18, 2019 at 18:25
Sometimes when you insert a spreadsheet as an embedded file using the Insert > Object method it goes a bit weird and refuses to adjust the size properly.
The best way I have found is to highlight the area you are copying in Excel, right click on ppt slide and page embedded object - the icon looks like a little white box in the middle of the paste special options. This will paste it with the boundaries you originally highlighted. Be careful if you need to edit though as it is pretty unstable and may reset the boundaries again.
In the 'activated' state (when clicked on), the Excel object has a border around it. Halfway on each border (top, left, right, bottom) is a small black box. If you acquire the box you can drag it to resize the visible area of the spreadsheet. Then click outside the box to return to Powerpoint.
You must double click the embedded object to edit it in Word. Cells that reflect what is currently displayed will be selected. Select the cells that you want to be displayed. Select elsewhere in the main document to stop editing in the embedded object.
This applies for MS word (2007), so I can only assume the same goes for powerpoint.
- double click the embedded worksheet to "select" it
- click the arrow in the very upper left corner, next to "A" and "1"
- now when you adjust the size of the embedded object, it will instead change how many rows/cols. instead of scaling the size.
I know this is old but I think I was having the same issue in Office 2013. When I copied a named range in excel and used paste special as "linked excel worksheet object" in ppt, I always ended up with extra columns to the right in my ppt slide. It was bugging me to death so hopefully this may help a few people.
For me, the issue was the page view in excel. If I switched to Normal view in excel, the cells show fine in ppt.
If the excel worksheet is in the "page layout" view (which is what i was using when copying the cells), it always led to extra columns shown when pasting or updating link in ppt.
If I switched to normal view, it pasted fine in ppt with the correct column numbers. If you switch back to a different page layout in excel and then update link in ppt, the extra columns will come back.
Hope this helps some people.
You must log in to answer this question.
Not the answer you're looking for browse other questions tagged microsoft-excel microsoft-powerpoint ..
- The Overflow Blog
- Introducing Staging Ground: The private space to get feedback on questions...
Hot Network Questions
- How do you keep the horror spooky when your players are a bunch of goofballs?
- Can LLMs have intention?
- Asterisk in violin sheet music
- Could a 200m diameter asteroid be put into a graveyard orbit and not be noticed by people on the ground?
- Why does David 'praise word' in both Elohim and Jehovah?
- Which ability checks are rolled for a shove attack?
- Best way to halve 12V battery voltage for 6V device, while still being able to measure the battery level?
- Is the barrier to entry for mathematics research increasing, and is it at risk of becoming less accessible in the future?
- Do we know how the SpaceX Starship stack handles engine shutdowns?
- Sum of square roots (as an algebraic number)
- What scientific evidence there is that keeping cooked meat at room temperature is unsafe past two hours?
- An application of the (100/e)% rule applied to postdocs: moving on from an academic career, perhaps
- What terminal did David connect to his IMSAI 8080?
- Under physicalism, should I still be sad if my murdered wife is replaced with a perfect clone?
- How to remind myself of important matters in the heat of running the game?
- Python matrix class
- How do I snap the edges of hex tiles together?
- ConnectFourFX.java - A Java FX GUI app for playing Connect Four against AI
- Calculation of centrifugal liquid propellant injectors
- How to make sub "array" to aligned with the outer "array" in equation in LaTeX?
- Advice on DIY Adjusting Rheem Water Heater Thermostat
- Is it rational for heterosexuals to be proud that they were born heterosexual?
- Why do airplanes sometimes turn more than 180 degrees after takeoff?
- Transformer with same size symbol meaning
- Employee quick setup
Download and install apps
- Setup and use Outlook
- Move your email, calendars, and contacts
- Setup OneDrive
- Collaborate and meet with Teams
- Create an email signature
- Security features and settings
- Create a hub for your team
- Collaborate on business documents
- Share files with my team members
- Create polls to survey employees
- Let customers book appointments
- Schedule meetings with anyone
- Save and share files with clients
- Add your clients as guests
- Manage your business finances
- Track product inventory
- Plan projects and track deadlines
- Scheduling staff shifts
- Suport resources
- Welcome to Microsoft 365 for business
- Buy Microsoft 365
- Microsoft 365 Admin Center
- Add a custom domain
- Manage payment information
- Add more users
- All about passwords
- Remote work
- File sharing and storage
- Secure your business

As you're getting your Microsoft 365 business subscription set up, you'll want to download and install your Microsoft 365 apps, like Word, Excel, Microsoft Teams, and PowerPoint, on your PC or Mac.
Go to microsoft365.com and sign in with your Microsoft 365 account.
Select Install apps.

Follow the instructions in the browser to download the installer and start your installation.
As your apps are installing you might see the User Account Control prompt pop up and ask Do you want to allow this app to make changes to your device? Select Yes .
Close the installer window after it's finished.
The first time you open an app like Word or PowerPoint you might need to sign in with your new business email address and password to activate the app.
Signing in connects the apps to the rest of Microsoft 365, letting you save files to the cloud, share files with others, and have your documents save automatically as you work.
To set up and use Outlook with your subscription, see Set up and use Outlook .
Get expert advice, dedicated support and personalized guidance from business specialists. With Business Assist, get help making Microsoft 365 products work for you and everyone in your business. Learn More
Related topics
Microsoft 365 help for small businesses on YouTube
Download and install or reinstall Microsoft 365 or Office 2021 on a PC or Mac
Set up Office apps and email on a mobile device
Small business help and learning
Need more help?
Want more options.
Explore subscription benefits, browse training courses, learn how to secure your device, and more.

Microsoft 365 subscription benefits

Microsoft 365 training

Microsoft security

Accessibility center
Communities help you ask and answer questions, give feedback, and hear from experts with rich knowledge.

Ask the Microsoft Community

Microsoft Tech Community

Windows Insiders

Microsoft 365 Insiders
Was this information helpful?
Thank you for your feedback.
Your current User-Agent string appears to be from an automated process, if this is incorrect, please click this link:
Make Creative Slides, in WPS Presentation
Wps presentation is a free powerpoint editor for effortless slide creation, editing, saving, and sharing. seamlessly handle powerpoint presentations across multiple platforms with full compatibility with microsoft office. available for pc windows, mac, linux, android, and ios devices..

See How Easy to Do with WPS Presentation
Tell best stories with pro templates, discover an extensive collection of over 100,000 professional & beautiful templates in wps office., empower yourself to deliver compelling presentations that impress and inspire your audience. step onto the stage with confidence and make your message heard.

Friendly UI, Free Alternative to Microsoft PowerPoint
Embark a seamless and intuitive presentation experience with wps presentation's user-friendly interface, carefully designed to resemble powerpoint., discover the comfort and simplicity of navigation, allowing you to effortlessly create, edit, and format your slides with absolute confidence..

Compatible with .PPT, .PPTX Files
Wps presentation is compatible with 20 file formats, including .ppt, .pptx, .pps, .pot, .pptm, .potx, .potm, and more., with wps presentation, effortlessly maintain the integrity of your slides, animations, formatting, charts, and other elements, ensuring seamless preservation throughout your work..

File Management and Sharing, Anywhere
Wps presentation smoothly synchronizes powerpoint files across a range of devices: pc windows, mac, linux, android, iphone, ipad, and multiple cloud platforms., you can share a powerpoint with others and collaborate in real-time, track edits, versions, and contributors for seamless teamwork during your presentations..

Popular Features of WPS Presentation

WPS Office's Presentation Tools offer batch font settings, custom text formats, and easy insertion of pictures to multiple slides. Create stunning and engaging presentations effortlessly with these powerful features
See What Our Users Have to Say

Rated as Leader

Editor's Rating: Excellent

Google Play
Editor's Choice&Top Developer

WPS Presentation works seamlessly! It just as fine as Microsoft Powerpoint, with changes in the document getting reflected quickly.

WPS Office is a solid office productivity suite that provides a good alternative to Microsoft Office at zero cost!

I prepare my presentations the way I want, easily convert them into pdf. I also suggest my students to use WPS and every user seems very happy using WPS.
Free All-in-One Office Suite
Wps office offers more than just the presentation feature for free powerpoint slides editing. it also provides powerful tools for word documents, excel spreadsheets, and pdf documents, allowing you to handle a wide range of file formats seamlessly on pc windows, mac, linux, android and ios devices..

What Else You May Want to Know
- Yes, you can use WPS Presentation for free. The free version of WPS Presentation covers most features and provides free templates suitable for daily presentation needs.
- However, for access to premium templates and advanced features like OCR (Optical Character Recognition) and premium templates, a premium subscription is required. The premium subscription offers additional functionality and tools to elevate your presentation creation experience.
- Yes, WPS Presentation is designed to be user-friendly and easy to adapt to. Its interface closely resembles Microsoft PowerPoint, allowing you to effortlessly edit existing presentations or create new ones. With its intuitive tools and familiar layout, WPS Presentation ensures a smooth and straightforward user experience.
- Yes, you can save your presentations and other files from WPS Presentation directly to Google Drive. WPS Presentation offers seamless integration with Google Drive, enabling you to effortlessly save and sync your files to the cloud storage service. This feature allows you to access your presentations from any device and collaborate with others efficiently.
- The primary distinctions between WPS Presentation and Microsoft PowerPoint are the cost and accessibility. WPS Presentation is available for free, while Microsoft PowerPoint often requires a costly subscription or purchase.
- WPS Presentation offers seamless cloud integration with services like Google Drive, facilitating convenient presentation storage, synchronization and collaboration.
- Additionally, WPS Presentation not only supports PC Windows, Mac, Android, and iOS devices like Microsoft PowerPoint, but also extends its compatibility to Linux, an option not covered by Microsoft PowerPoint.
- Hot Topics:
Get start with WPS Presentation to edit PowerPoint slides for free!
IMAGES
VIDEO
COMMENTS
Method 1 - Embedding an Entire Excel File in PowerPoint. Select the Insert tab on the Ribbon in PowerPoint. Click on the Object command on the Text group of commands. In the Insert Object dialog box, click on the radio button of Create from file option. Choose the Browse… button.
In PowerPoint, on the Insert tab, click or tap Object. In the Insert Object dialog box, select Create from file. Click or tap Browse, and in the Browse box, find the Excel workbook with the data you want to insert and link to. Before you close the Insert Object box, select Link, and click OK. Important: The linked object in your presentation ...
Start by opening both the Excel worksheet and the PowerPoint presentation you want to edit at the same time. In Excel, select the cells you want to link or embed. If you would like to link or embed the entire worksheet, click on the box at the juncture of the rows and columns in the top left-hand corner to select the whole sheet.
First, build your table in Excel. Save the file on your computer. Select your table and press "Ctrl + C." Go to your PowerPoint file. Right-click on the slide to see different "Paste Options" (this is another way to paste information from Excel to PowerPoint). Choose the middle option: "Embed," and that's it!
In Excel, click and drag to highlight the cells you want to copy. Right-click the copied cells and select Copy. In your PowerPoint presentation, right-click and select the Paste Options you want: Use Destination Styles - Choose to edit your copied cells like a PowerPoint table, but with PowerPoint's color scheme and fonts.
Step 1: Open Your PowerPoint Presentation. Open the PowerPoint presentation where you want to insert the Excel spreadsheet. Make sure you're on the right slide where you want to insert the Excel spreadsheet. If you haven't created a slide yet, you can easily add a new one by clicking on "New Slide" in the Home tab.
Sometimes you need to display Excel data in PowerPoint, but you don't want to update both places if data changes are required.In this hands-on tutorial, I'll...
1. Choose where you want to insert the Excel file. On the PowerPoint presentation, click on the text field you want to insert an Excel file then click on the Insert tab on the upper-left section of the window to view the Insert toolbar. 2. Click on the Object button.
Find some space on one of your slides. Then, press either Ctrl + V on your keyboard, or press the Paste button on PowerPoint's ribbon. Below, you can see that the data and amounts match when you paste. You can embed Excel in PowerPoint by pasting charts from one app to the other.
To insert an Excel file into Microsoft PowerPoint as an icon, you can use the "Insert Object" feature. Follow the 7 quick steps. Step-1: Click on the "Insert" tab. In the menu ribbon located at the top of the screen, click on the "Insert" tab to open the "Insert" menu. Step-2: Click on the "Object" option.
Learn how to embed a link directly to Excel data from within a PowerPoint (PPT) presentation. If you are using PowerPoint 2013 or a newer version, you can li...
Start by copying the chart in Excel. Press Ctrl + C or right-click and select "Copy". Then, switch to PowerPoint, navigate to the appropriate slide, and paste using Ctrl + V. For better results, you can link the data. This way, updates in Excel automatically reflect in PowerPoint. Right-click the chart in Excel and select "Copy".
1. Copy Your Excel Data to the Clipboard. I'm working in Excel here. I'm going to start off by copying and pasting this table over to PowerPoint. First, I'll hit Control C to grab my data and put it on the clipboard. Copy your selected Excel table data. 2. Switch to PowerPoint to Your Insert Excel Data.
The process of linking an Excel document to a PowerPoint presentation is pretty straightforward. Simply copy a range from Excel ( Home -> Copy in the Ribbon, or Ctrl+C as a shortcut). Then, in PowerPoint click Home -> Paste -> Paste Special . . . From the Paste Special window select Paste link, click Microsoft Excel Worksheet Object, then click OK.
This Microsoft PowerPoint 2016 tutorial shows you how to embed and link MS Excel 365 content into your PowerPoint Presentation Slides. I also show you the di...
To embed an Excel sheet into a PowerPoint slide, follow these steps. Step-1: Click on the "Object" option. In the menu ribbon located at the top of the screen, click on the "Insert" tab. Then click on the "Object" icon from the "Text" group. Step-2: Click on "Microsoft Excel Worksheet".
To see the full blog article that this video came from, go here: ️https://www.simonsezit.com/article/how-to-link-excel-to-powerpoint/In this quick Microsoft...
Step 1: Open your PowerPoint presentation and go to the slide where you want to insert the Excel spreadsheet. Step 2: From the Insert tab in the menu above, click Object. Step 3: In the "Object" dialogue box that appears, click the "Create from File" tab. Step 4: Now, click the "Browse…". button and select the Excel spreadsheet you want to ...
1. Access an Excel spreadsheet. Double-click on the Excel icon on your computer's desktop. To open an existing file, choose the "Open" option within the menu in the "File tab." Find the spreadsheet you want to retrieve the data from and pull it up in the program. 2. Select the data you want to link.
Once you've made the initial data, follow the steps outlined below. Select the table you want to copy over to your presentation. Click on Copy or press Ctrl + C ( Command + C for Mac users). Open Microsoft Powerpoint . Open the file presentation you're working on if you already have one; otherwise, click on Blank Presentation .
To start, open your PowerPoint presentation and press the Insert tab on the ribbon bar. To insert your Excel data, click the Object button. This may appear as a large or small icon, depending on ...
Here are the steps: Choose Insert (tab)> Object> From File. In the Insert Object dialog box, choose the Create from File option. Click Browse, navigate to the Excel file, and double-click it. Click OK. You now see the spreadsheet on your slide. You may see all of it or part of it, but when you show it in Slide Show view, you'll be able to pan ...
To insert a linked Excel chart or graph onto a PowerPoint slide by copying and pasting: Open the Excel workbook containing the chart you want to use. Save the workbook. Click in a blank area in the chart or on the edge of the chart. Press Ctrl + C. Alternatively, right-click and select Copy. You can also press Shift + F10 or press the Context ...
Double click on the spreadsheet to "activate" it. Move your cursor to the black mark on the right side of the sheet, halfway between the top and bottom. When the cursor changes to a two-way horizontal arrow, click and hold. Then drag the right edge to show as many columns as you want.
If I change the data in the excel file it should change in the Powerpoint (while the PP is playing over and over again). Both the excel and the PP are saved on OneDrive. Idealy I would like to have the PP running on one computer and the Excel on another. I tried this with the 'Paste Special' but I do not get it working.
Excel for the web and Excel desktop app for offline use. Up to 6 TB of cloud storage, 1 TB (1000 GB) per person. Premium desktop, web, and mobile apps. Advanced security. Ad-free experience. Works on Windows, macOS, iOS, and AndroidTM. Copilot Pro available as an add-on.
Create a new presentation in PowerPoint. Select the Copilot button in the Home tab of the ribbon. Click or type Create presentation from file. Select the document you want from the picker that appears. If you don't see the document you want, start typing any part of the filename to search for it. You can use a Word document—or, if you have a ...
Select Install apps. Follow the instructions in the browser to download the installer and start your installation. Tip. As your apps are installing you might see the User Account Control prompt pop up and ask Do you want to allow this app to make changes to your device? Select Yes. Close the installer window after it's finished.
One person. Sharing and real-time collaboration. PowerPoint for the web and PowerPoint desktop app for offline use. Premium templates, fonts, icons, and stickers with thousands of options to choose from. Dictation, voice commands, and transcription. Advanced spelling and grammar, in-app learning tips, use in 20+ languages, and more.
WPS Presentation is a free Powerpoint Editor for Effortless Slide Creation, Editing, Saving, and Sharing. Seamlessly handle PowerPoint presentations across multiple platforms with full compatibility with Microsoft Office. Available for PC Windows, Mac, Linux, Android, and iOS devices. Free Download.