
14 Best Steps on How to Make an Assignment on MS Word

Nowadays, it is very common for students to complete their assignments using Microsoft Word. Thus, they look up how to make an assignment on MS Word. Because of the numerous options provided by MS Word, it might be difficult for a beginner to handle. All you have to do is become familiar with MS Word’s options before moving on to the assignment.
Here in this blog, we will explain 14 best steps you need to follow in order to know how to make an assignment on MS word.
How to make an assignment on MS word
Table of Contents
Yes, we understand that completing an assignment is challenging for most students. Because some of them are worried about completing the task like write my paper , and even if they aren’t worried, they don’t know how to use Microsoft Word effectively, which can be disastrous for many. Similarly, we are publishing this blog to teach you how to make an assignment in Microsoft Word.
| . |
Yes, we understand that completing an assignment is challenging for most students. Because some of them are worried about completing the task, and even if they aren’t worried, they don’t know how to use Microsoft Word effectively, which can be disastrous for many. This blog is being published to teach you how to make an assignment in Microsoft Word.
1. Setting the layout of the page for your assignment
On the Toolbar, select the Page Layout tab. Likewise, Page Setup options will appear.
2. Set Margins
Set the margins as follows (Standard measure for the margin):
- Bottom: 2.5cm
- Left: 2.5cm (or 3.2cm)
- Right: 2.5cm (or 3.2cm)
3. Setting Orientation of the page
- Orientation: Portrait
4. Setting Size
- Set to A4 unless otherwise specified.
5. Setting styles
Go Back to the Home tab, You will find the Styles options in the right of the toolbar you will need to use these steps to set the headings and paragraph text for your work.
6. For Headings
Always use the first three headings (Heading 1,2 and 3)
- H1: Arial 14 pt bold
- H2: Arial 12 pt bold, italics
- H3: Arial 10.5-11 pt bold
And the text type should be Normal text
- Times New Roman 12 pt (or equivalent)
7. To set the headings styles for your work, you will have to
- Click the small Styles icon/button.
- Select/highlight the style to modify (e.g. ‘H1’), and then right-click >Modify. Likewise, the Modify Style dialog box will appear.
- Under Formatting, You can change the font style and size as per your need.
- Click OK.
8. Setting up your assignment as the one document
Also, your Work, including the title page and references ( not the Assignment Attachment form*), must be aggregated as a single word (.docx) report.
Therefore, it is simpler to make one record, embed your significant headings, and enter the content from that point. But, if you decide to make separate documents while setting up your task (for example, a different record for references), you will need to copy and paste the final contents into the one-word document and finalize the formatting there.
*The assignment attachment structure is either submitted electronically as a different document or attached to a submitted printed copy.
If you face any issues related to PowerPoint or find it difficult to complete your PowerPoint homework, use our PowerPoint PPT Homework Help by Experts .
9. Inserting section breaks, page breaks, and page numbers
The document has two sections
Section 1 Contains
- The title page
- Table of contents
Section 2 Contains
- The remainder of the assignment.
There are then page breaks within each section i.e
(e.g. between ‘Abstract’ and ‘Table of contents’; ‘Conclusion’ and ‘References’).
To insert the Section break (i.e. make two sections)
- Position your cursor at the end of the Table of contents. (Just have this as a heading; the actual table will be added at the end.)
- From the toolbar at the top of your document, open the Page Layout tab and select Breaks>Section Breaks>Next Page. Under Section break types, select ‘Next page’. This has now divided the assignment into two sections.
Now to insert the page breaks
- Place your cursor at the foot of the title (cover) page.
- Select the Page Layout tab>Breaks>Page Breaks>Page. This has now created a page break between the title page and Abstract.
- Place the cursor at the foot of the Abstract page and repeat to make the break between the Abstract and Table of contents.
- Place a page break between the Conclusion in the next section.
10. Now to add the page numbers
For section 1:.
- Place your cursor within the title page. Click on the Insert tab and then select Page Number in the Header & Footer set of options.
- Select Top of Page>Plain Number 3 (‘right’ alignment). Do not close the Header and Footer just yet.
- Check the box for Different First Page. (This will remove the page number from the title page.)
- In the Header & Footer group of options to the left of the toolbar, select Page Number>Format Page Numbers. Select i, ii, iii .. from the Number format
- Drop-down list. Under Page numbering, click the Start at the radio button (if not already activated) and select i. Click OK.
- Close the Header and Footer. [This will paginate slightly differently from the example, with Abstract on page ii. ]
For section 2:
- Go to the start of section 2 (i.e. beginning at the ‘Introduction’) and double click on the existing page number. This will open the Header settings options.
- In the Header & Footer options section on the toolbar, select Page Number>Format Page Numbers.
- Make sure the ‘Show number on the first page is selected (i.e. the box is ticked).
- Select 1, 2, 3 from the Number format drop-down list. Under Page numbering, Click on the Start at the radio button and set the start on page 1.
11. Inserting the Table of contents
- Move the cursor under the ‘Table of contents’ heading.
- Check the checkboxes for ‘Show page numbers’ and ‘Right align page numbers’.In the (last) Show levels box, set it to either just ‘1’ (i.e. list only the heading 1 level headings) or ‘2’ (to show both H1, and H2 headings).
- To update the table anytime, right-click on the table and it’s almost done.
12. The title page
Follow these steps as the model for your work:
- Assignment title: Arial 28 pt, italics, centered
- (Assignment number): Arial 18 pt, italics, centered
- Other details: Times New Roman 14 pt, left-justified; single tab spacing for items on the one line.
13. Word count
Show the word count properly for the body of your assignment, because it’s’ important.
- Place your cursor on the Introduction title, hold the Shift key down, and got to the end of the Conclusion.
- And then Tools>Word Count and record the number of words.
14. Spelling and Grammar Check
Always keep an eye on spelling and sentence structure and Before you get a printed copy of your task,
What you have to do is
- Run the word spell and sentence structure, and carefully look at your Work. (Tools>Spelling and Grammar.)
- Ensure the Dictionary Language is set to English (Australia, UK, Canada).
Get the Best Excel Assignment Help Now
6 Tips On How To Make an Assignment First Page Best
8 Best Steps On How to Write An Assignment Report
4 Tips on How to Write an Assignment Introduction
6 Tips on How to Make An Assignment For High School
To this end, now you know the 14 best steps on how to make an assignment on MS Word in detail. Many times students are worried about their assignments but we are here to assist you with all your problems. You can contact our experts anytime if you have an issue with MS Office assignment help.
As a result, Our computer science assignment help experts are available for you to provide help 24/7.
Related Posts

How to Hire someone to do my Statistics Homework for Me?
Students ask to do my statistics homework for me. Although there are many online tutors or statistics homework service providing websites available to help you…

How to Get Good Grades in Exams Tips by Experts
Here in this blog, Codeavail professional experts will help you to understand how to get good grades in Exams. Notice that not all the material…
Popular Posts
- Contact Amy ==>
HOW TO – Format papers in standard academic format (using Microsoft Word)
This guide explains how to format your documents in Microsoft Word so that they follow the standard rules for formatting academic papers as described in most MLA and APA style books for undergraduate writing. These rules apply to most of the papers you will submit in your college classes, but in some cases your professors will want you to follow specific guidelines that may differ from those below. Always clarify with your professor which set of guidelines he or she wants you to follow before you submit a paper.
Using standard formatting for academic papers shows that you understand the customs of the university community and therefore helps to boost your own credibility. Using unusual or highly distinctive formatting, on the other hand, suggests that your previous schooling did not adequately prepare you for university work. Consider the impact of unusual formatting: not only does it call attention to your paper in a way that might not be positive, professors might also see it as a sign that you’re trying to artificially inflate page length.
Note: These instructions apply to all versions of Word for Mac and for the 2003 version of Word for Windows. I haven’t yet updated them to include instructions for the 2007 version of Word for Windows, but the tools should nevertheless be easy to find if you look around on the toolbar at the top.
- 2 DOCUMENT MARGINS
- 3 INDENTATION
- 5 ALIGNMENT
- 6.1 Heading
- 6.3 Sample First Page
- 7 PAGE NUMBERS
- 8.1 Document Spacing
- 8.2 Paragraph Spacing
- 9 CREATE NEW PAGE
- 10 BLOCKED QUOTATIONS
- 11 RESOURCES
DOCUMENT MARGINS
Rule : Papers submitted for review or grading should have 1” margins all around. This should be the default for Word, but if your default setting is to have left and right margins of 1.25”, change your default. Page length requirements are based on 1” margins.
Instructions : Go to the Format menu, drag down to Document, change the margins, and the click on the Default button and accept the change to the Normal template. Make sure you leave the gutter set to 0” or you’ll mess up your document formatting.
INDENTATION
Rule : The first line of each paragraph should be automatically indented.
Instructions : This should be the default for Word, but if not, you might want to change your Normal style, as described above. To change the indentation format for a document, choose Select All from the Edit menu. Then go to the Format menu, drag down to Paragraph, look under the “Special” drop-down menu in the Indentation section, and select “First Line.” This setting automatically indents the first line of a new paragraph so that you don’t have to do it manually.
Rule : College papers should be in a standard academic font: either Times New Roman or Cambria, in 12pt size. (If you submit a paper in another font, I will change it on the file I download.)
Instructions : Times New Roman or Cambria 12pt should be the default for Word, but if yours is different then change your default. Go to the Format menu, drag down to Style, make sure “Normal” is selected from the list of styles, and click “modify.” Choose the correct font and size from the Formatting menu. Click “OK” to make the change to your default settings.
Rule : The text of your paper should be left aligned, NOT justified, as justified text is hard to read if it hasn’t been professionally typeset. The default in Word is left alignment, so don’t change it.
FIRST PAGE FORMAT
Rule : In the upper left corner of the first page of your document, type your name, the date, the course number and section (or topic), and the version of the paper (such as Paper 1 Second Draft), each on a separate line. Be sure to change the date and paper version when you submit revisions and final versions. See the sample below.
DO NOT use the “headers” feature from the header/footer menu to create this full heading as that will make it appear on every page, which is not customary in academic writing. Also do NOT use a title page unless the assignment specifically asks for one.
Rule : Skip a line after the heading and center an original title that conveys the topic of your paper. Do not use underlining or italics in the heading (unless you’re referring to the title of a book or periodical). Do not use bold text or ALL CAPS.
Sample First Page
Page numbers.
Rule : All papers should have automatically inserted page numbers that show in the upper right corner on all pages except the first. Do not insert these page numbers by hand. Instead, use Word’s Header/Footer tool.
For documents following MLA format, put your last name and page number in the upper right corner. For documents following APA format, put a short version of your title (instead of your last name) and the page number in the upper right corner.
Instructions : Go to the View menu and choose “Header and Footer.” You’ll see a header box appear at the top and a footer box at the bottom. Click in the header box, type your last name (or title), make it align to the right, and then select Page Numbers from the Insert menu.
When you’re finished, click on the “Close” tab under the Header view. Each page of your document should now display a page number at the upper right that updates automatically when you make changes to the document. It will appear as grayed out text unless you active the Header and Footer tool to make changes.
To change the setting so that page numbers do not display on the first page, go to the Format men, drag down to Document, and click on the Layout button. Then check the box next to “Different First Page.” Click OK. If necessary, remove the header that appears on the first page and insert a header on the second page, which will automatically appear on all subsequent pages as well.
Document Spacing
Rule : The entire paper should be double-spaced, including the heading and bibliography.
Instructions : Choose “Select All” from the Edit menu, go to the Format menu and drag down to Paragraph, and choose “double” from the “line spacing” menu in the Spacing section. Or you can use these keyboard shortcuts. On a Mac, use Cmd-A to select all and Cmd-2 to double-space. On a PC, use Ctrl-A to select all and Ctrl-2 to double space.
Paragraph Spacing
Rule : Papers should have no extra spacing after paragraphs. This should be the default for Word, but if your default setting is to have 10pt spacing after paragraphs, change your default.
Instructions : Go to the Format menu, drag down to Style, make sure “Normal” is selected from the list of styles, and click “modify.” In the lower left corner, select the dropdown menu that starts with “Format” and drag down to Paragraph. In the paragraph settings menu that pops up, change the settings for Spacing After to 0pt.
CREATE NEW PAGE
Instead of using a lot of returns before starting your bibliography, create a new page for it following these instructions.
Go to the Insert menu, drag down to Break, and then drag over to Page Break.
BLOCKED QUOTATIONS
Rule : If a quotation will exceed four lines within a paragraph, you should separate it out by blocking and indenting it. As with any quotation, a blocked quotation should be clearly introduced by the sentence that leads up to it and it should also be properly cited, but the rules for blocked quotations are somewhat different. The blocking take the place of quotation marks, and unlike in a regular in-paragraph quotation, the parenthetical citation goes outside of the final period instead of inside of it (given that the blocked quote might contain several sentences.)
Instructions : Type the quotation in its own paragraph, without quotation marks, and remove the indent from the first line. Type the source in parentheses after the last period of the last sentence. With your cursor, select the quotation, from the first word to the end of the parenthetical citation, and click the Increase Indent button from the Paragraph Formatting menu.
- MLA Formatting Guidelines for College Papers
- APA Formatting Guidelines for College Papers
- Search for:
WHAT IS THIS SITE? See the About tab in the top menu.
UNDER PERPETUAL REVISION : All materials on this site are subject to ongoing revision and improvement!
© 2017 - Amy Goodloe - All Rights Reserved
HELP & HOW-TO
- HOW TO: Capture & Edit Video (18)
- HOW TO: Find & Edit Images (13)
- HOW TO: Make Screen Recordings (7)
- HOW TO: Record & Edit Audio (16)
- HOW TO: Use Google Drive (19)
- HOW TO: Use iMovie (13)
- HOW TO: Use Social Media Tools for Class (3)
- HOW TO: Use the Class Blog (Wordpress) (35)
- HOW TO: Use Your WordPress.com Blog (12)
- INSPIRATIONS & FYI'S (21)
- NIFTY APPS & TOOLS (7)
- PLANNING & DRAFTING New Media Projects (23)
- RESOURCES: About New Media Writing (7)
- RESOURCES: Animations & Comics (9)
- RESOURCES: Apps for Creating New Media Projects (22)
- RESOURCES: Digital Storytelling (17)
- RESOURCES: Presentations & Information Design (6)
- RESOURCES: Storytelling Prompts (14)
- RESOURCES: Writing for the Web (4)
- TECH TIPS (28)
STUDENT SAMPLES
- SAMPLES – Academic Analyses (9)
- SAMPLES – Audio Narratives & Essays (16)
- SAMPLES – CDS-Style Digital Storytelling (30)
- SAMPLES – Educational Presentations & Web Sites (9)
- SAMPLES – Educational Visuals (14)
- SAMPLES – Graphic Storytelling (16)
- SAMPLES – Mini-Documentary (15)
- SAMPLES – Multimedia Commentary (8)
- SAMPLES – Pop Culture Artifact Analyses (13)
- SAMPLES – Turning Points & Epiphanies (7)
- SAMPLES – WRTG 3020: Rhetoric of G&S (96)
- SAMPLES – WRTG 3090: New Media Storytelling (33)
- HOW TO – Format papers in standard academic format (using Microsoft Word) 118,204 views
- HOW TO – Put your file into a shared folder on Google Drive 85,097 views
- HOW TO – Make Preview the Default PDF Reader on a Mac 52,498 views
- HOW TO – Create a Hyperlink (Turn a Word into a Link) 42,916 views
- HOW TO – Export an mp3 out of GarageBand 29,446 views
- HOW TO – Add a shortcut to a shared folder to My Drive (for easy access) 22,365 views
- Creative non-fiction writing exercises 19,160 views
- TROUBLESHOOTING – Audio problems when recording with QuickTime X 12,247 views
- TIPS – Camera Angles and Shooting Tips for Digital Storytelling 9,993 views
- HOW TO – Save a Google Docs document 9,927 views
Search for: Search Button
How to Assign Tasks in Microsoft Word
People working on a shared Word document can now assign tasks ‘To Do’ within the document, then mark a task as resolved or even reassign it. Here’s how Assign Tasks works and who gets it.
Assigning Tasks is an extension of the existing Comments feature for shared documents. When you use an @mention for someone else in your team or group, a new ‘Assign to:’ option appears like this.
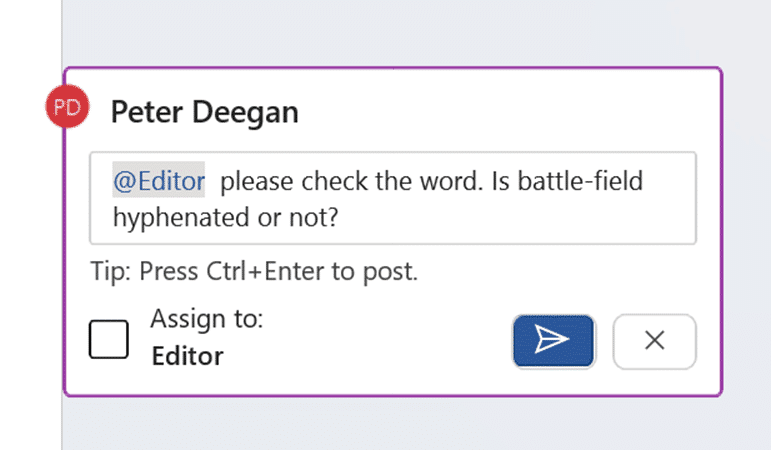
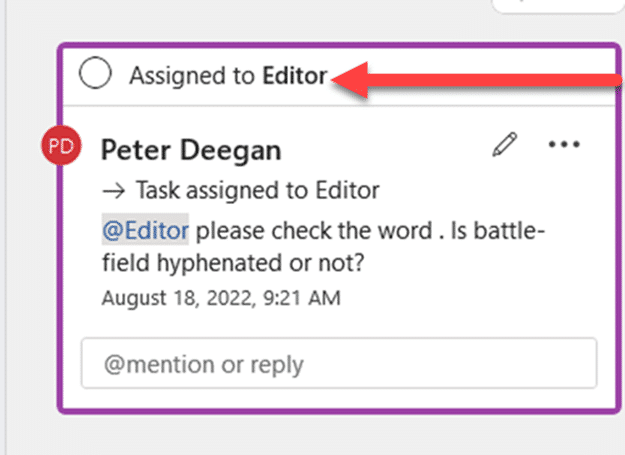
Check that box and the comment becomes a task as well, listed above the comment.
The person assigned the task gets an automatic email to notify:

Assign a task to yourself by @mentioning your own name then assigning the task.
Task is separate from the comment thread
Keep in mind that the task is separate from the comment thread, even though it doesn’t seem that way.
A Task can be marked as ‘Resolved’ while the comment messages continues.
Resolve or Complete a Task
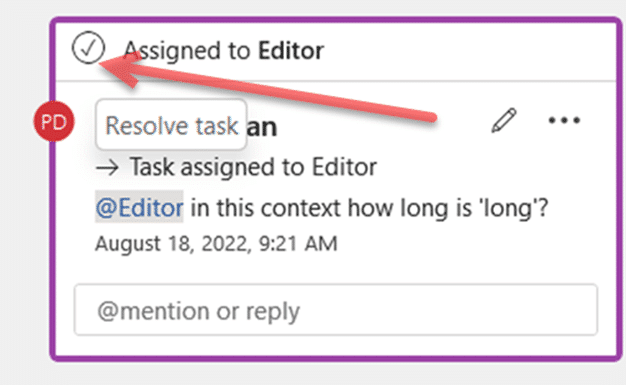
Each Task can be marked as ‘resolved’ separately from the thread itself by clicking on the circle “Assigned to”.
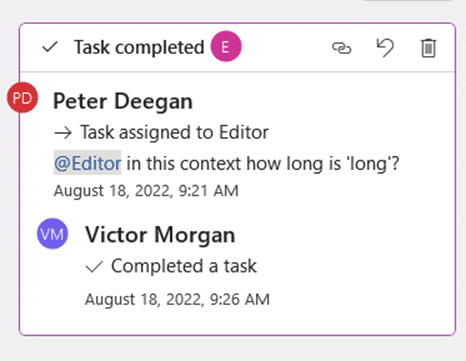
The task then shows as completed with a comment added showing who tagged ‘completed’.
Reopen or resume a Task
If the task still needs work, click the Undo button to Reopen the task.
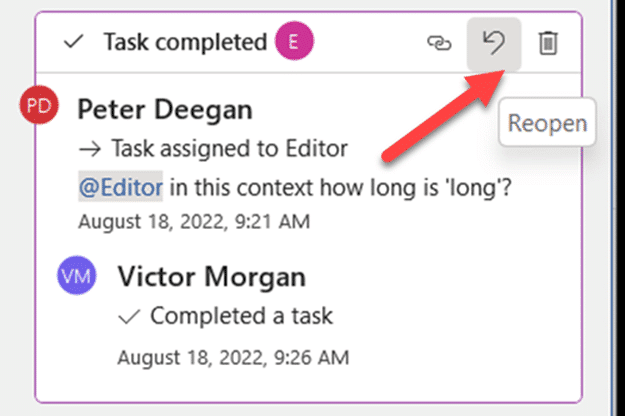
Or click the Trash Can icon to delete the task entirely.
Reassign a Task
A task can be reassigned to someone else. Add another comment with a new @mention, that will create an optional ‘Reassign to’ prompt.

More to come?
Tasks in Word docs seems like just the start of another extension of Microsoft 365 integrations.
There are already plans for Assign Tasks in upcoming Excel. PowerPoint can’t be far behind.
We were surprised that assigned tasks aren’t added to the person’s Microsoft To Do app. Or even just a link in the email to add the task to To Do. Surely that’s on Microsoft’s own development To Do list?
A summary list of assigned tasks should appear in the document. Perhaps a list of comments that can be filtered to show tasks, completed or not.
With better ‘in document’ task displays, there should be room for solo users to make their own ‘To Do’ list within a document. A great way to manage content in a long or complex doc.
Who gets it?
The Word document has to be saved on OneDrive or Sharepoint, according to Microsoft. We could only get Assign Tasks working on SharePoint, at the time of testing.
Assign Tasks is currently in Word on the web plus two beta releases
- Word 365 for Windows v2206 build 15321.10000 and later
- Word 365 for Mac, v16.66 build 22090700 and later
As usual, it’ll spread to preview and public releases in coming months.
The same feature is also in development for Excel 365 on the web plus for Windows and Mac.
One person Comments in Word Dictate your comments into a Word document Like👍button now in Word Comments
About this author

Office-Watch.com
Office 2021 - all you need to know . Facts & prices for the new Microsoft Office. Do you need it? Office LTSC is the enterprise licence version of Office 2021.
Office 2024 what's known so far plus educated guesses. Microsoft Office upcoming support end date checklist.
Latest from Office Watch
- HUGE news - Excel gets Regular Expression functions
- Surprise! Microsoft recommends Windows 11
- Goggles 🥽 emoji in Word, Excel, PowerPoint and Outlook
- Beware the unexpected when copying an image from Word/Office
- How to make a Gantt Chart in Excel
- A $125 Billion lesson in why cloud backups are vital
- How Word pastes into your document
- Make monsters and pipes with the Terantopia font
- Avoid the traps when adding Excel info into a Word document
- Circle & Sphere calculations in Excel using Pi 𝜋
- How to list all fonts in a Word document
- Face with rolling eyes 🙄 emoji in Word, Outlook, Office
- Glasses 👓 emoji in Word, Excel, PowerPoint and Outlook
- Calendar extras added to new Outlook
- Changes to PDFs made by Microsoft Office
- It's official - Calibri beats Aptos in font poll
- Vmware Workstation Pro is now free
- A quiet month of security fixes for Microsoft Office
- How Mark of the Web stops bad document infections
- Introducing Reading Coach to enhance Reading Fluency with AI
How to Create Professional Reports and Documents in Microsoft Word
This guide examines the elements of a professional report and reviews the structuring, styling, and finalizing of your document in Microsoft Word.
If Microsoft Office had been a country, it would have been the third most populous country in the world. 1.2 billion people using a single suite of apps is mind-boggling. And, they "speak" 107 languages!
But right now, you and I are speaking in English and we are going to talk about the most popular tool in the Microsoft Office arsenal -- Microsoft Word 2016 .
This document editor is used for writing a variety of documents. From a simple application to the necessary resume. From a plain bucket list to an office memo. We think we can work with Word. But it is when we sit down to write a serious professional report, we discover an important fact.
Professional report writing needs a different set of skills.
So, ask yourself this -- can you make the leap from a single document to a lengthy report? Do you know all the Microsoft Word features that will help manage this large scale document project? Can you collaborate on the work with other team members?
You may be a student, a small business owner, or an office worker...you will need to create a report or a professionally formatted document of some kind. This MakeUseOf guide will help you update your techniques and sharpen your design approach.
In this guide:
Writing a Report -- Introduction | The Report Checklist
Useful Microsoft Word Tools -- Paste Special | Researcher | Freeze Parts of Your Document
Work on the Layout & Design -- Intro | Cover Page | Table of Contents | Header and Footer | Page Numbers | Font Styling | Paragraph Styling | Page Breaks | Styles and Themes | Captions | Quick Parts | Page Borders
References and Collaboration -- Index | Bibliographies | Cross-Referencing | Comments
Finalize Your report -- Signatures | Watermarks | Read Only | Print to PDF
The Next Step -- Conclusion
Writing a Report
Report writing involves research and then publishing the outcome of that analysis. In the professional world, the "look" or appearance of what you publish is paramount. The eye-pleasing final result could burnish your reputation and enhance your personal brand.
The steps below will handhold you through the expert features in Microsoft Word 2016. Spend a lot of time on a plan. Start with these guidelines…

Step 1: Decide the Purpose
Before you begin the report, you must first know why you are writing it in the first place. Reports are of many kinds but they are either meant to inform or persuade. It can be meant for describing a technical process, sharing background information, or demonstrate progress on a project.
Ask yourself – What and Why . This will help you distill the purpose to the one main point and stick to it instead of rambling on with unnecessary details.
Step 2: Identify Your Audience
The second important consideration is to evaluate your audience. Will they be able to understand what you are talking about? Are there different levels of readers who will read the report? The reader's knowledge of the subject will greatly influence the information that you need to include.
Decide on the primary audience and then script the report at the adequate technical level. The secondary audience can be supported with supplemental information at the end of the report.
Step 3: Know Your Topic
You must know what you are talking about. So, research the topic, and include all the relevant information to prove your point. Make sure that you come to a conclusion based on facts and not personal opinion. The information must be correct, current, and well-referenced.
Also use a variety of resources such as journals, newspaper articles, books, websites, brochures, raw data, annual reports, and speeches to help support your point. Just don't stick to Wikipedia.
Step 4: Outline the Report
You have done the research. There's a ton of information that is waiting to be typed and printed. But wait! Don't drown before you enter the water. Prepare the final outline of the report which will be the chart of waypoints to help you navigate from start to finish. The outline is the blueprint. It will give you a bird's eye view of the land and also show you where you need to fill in the details.
The structure of an idea report can include the following elements:
- Executive Summary
- Table of Contents
- Introduction
- The Body of the Report
- Recommendations
- Bibliography and References
Microsoft Word's Document Outline is a powerful feature that can help you organize a document even before you start filling it with research. Take advantage of brainstorming and mind-mapping templates too.
Step 5: Write, Edit, Proofread, and Finish
Once you have structured your report, it is time to fill out the headers with content. I personally find it best to tackle a little bit of each section, and then bulk it up with information. You can do that if you want, or finish each section as you go down the report structure. Make sure you focus on presenting your ideas and using supportive evidence rather than spelling and grammar first. Outline your argument and write a few sentences that cast your main ideas. If you find something worth quoting, quote it.
Once the majority of your text is written, it is now time to read through it and make sure it flows well. Make sure you guide the reader's understanding with transition words such as "This information shows…", "In other words…", "Similarly…" and do highlight relevant and key points.
Finally, spend time to proofread, check for grammar and spelling , and double-check all relevant information and its logical flow. It is best to leave at least one day to check and proofread your work. Don't try to edit it straight after you think you have finished, as you will tend to miss read what you have written. Get some sleep, and proofread it the next day.
The Report Checklist
Before you go and submit or hand in your report that you have worked so hard on, make sure you have done the following:
- Completed the title page with the Title, Your Name, Date, Who the report is for, and a possible description of what the report is about.
- The contents page has appropriate headings and pages numbers are correct.
- Make sure the introduction covers key points, the scope of the report, and the objective it wants to meet.
- You have added captions above tables and below images/graphs.
- Does the content of the report present the information in a clear way, logical, factual, stay on topic, is to the point?
- Does the conclusion state the results, restate main idea's, and does not include any new information?
- Are the headings and sub headings clearly labeled?
- Are quotes relevant, up-to-date, and correctly referenced?
- Have you used page breaks where appropriate?
Now, let's launch Microsoft Word and take you through the features that will help piece together the draft of your report and present it as a professional document.
Useful Microsoft Word Features for Report Writing
Take these as bite-sized tips and master them one by one.
Microsoft Word is a big howitzer with many nuts and bolts. Let's focus on the key skill sets and the tools you will need to plan, prepare, and present the professional report. The Microsoft Word features we will cover below are also productivity shortcuts that will make your job easier.
Tip: Use Microsoft Word 2016's "Tell Me" assistant to learn more about new features in the Office suite.
Let's start with three preliminary tools...
Use Paste Special
For most of us, when we need to copy text or an image into Word, the CTRL+V shortcut does just fine. But sometimes we might want to paste the copied data into another format, such as Excel data as an image. With the Paste Special command you can discard or specify the format when you paste a picture, presentation data, table, or object from any other program into Word.
You will work a lot with Excel tables and charts in a professional document.
If you just copy what you want and click paste, you will notice that it will insert the data as tables. But, if it is a large area of cells you want to paste, and you do not want to edit it, you may want to paste it as an image, with the extra option to edit it.
In Microsoft Excel: Select and highlight the cells that you want to copy > Press CTRL+C.
In Microsoft Word: Go to Home > Paste > Paste Special . Select Paste Special and from the dialog select Microsoft Office Excel Worksheet Object .

You can resize the data as it was an image, and if you double click, you will be able to edit the values. You can change the table or chart and redesign it. And, if you update the data in the chart or table in Excel, you can automatically refresh the chart in Word.
Try the right-click context menu too. The Paste Special menu pops up:

There are more options to import data from Excel into Word . The Microsoft Office Support page also describes them in detail.
Use the Researcher
Yes, there is Google and Wikipedia. But constantly switching from Word to your browser can hamper your productivity. Office 2016 brings in powerful research integration to this grunt work. The Researcher can not only help you find content from within Microsoft Word but also help you quickly add citations. It uses the Bing Knowledge Graph to find the right content to support your document.
Go to Ribbon > References tab and c Choose Researcher . A pane will open on the right with the search options.
Type a keyword for the topic want to search for and press Enter.
The Results pane shows a list of sources you can use in your document. Choose a topic to explore in detail.
Add the topic to your Microsoft Word document with a click on the plus sign on the top-right. You can also click the plus sign on any result to cite the source in your research document. The cite source helps you support your research with web sources and books.
As we will see later, an annotated bibliography is one of the toughest parts of a document. The Researcher is an intelligent assistant who steps in.
Freeze Part of Your Word Document
Let's take for granted that your professional report will be a long and complex work. You can split the Word window into two panes so that you can view two different parts of a document at the same time. It is a valuable time saver when you want to copy and paste parts from one place to another or refer to one part of the document while working in another.
Go to Ribbon > View tab > Split .
To remove the split, click on Remove Split in the same tab.

The Windows group gives you several options to change the way you work with two or more documents. The features are self-explanatory.
To scroll both documents at the same time, click Synchronous Scrolling in the Window group on the View tab. You can also click on View Side by Side to put two parts of the document next to each other.
Tip: Use Split View to display two different layouts – for instance, Print and Outline. Set the split. Then, click in the pane that you want to change, and then select a different layout on the View tab.
Work on the Layout & Design
The presentation of a report is what gets someone to read a report in the first place, and that is why it is crucial that your report is well presented. If you had the choice of four reports to read, what will you choose?
- A hand written report.
- A document printed in black and white.
- A report printed on normal A4 paper in color.
- A report printed in color, with a catchy title page, neatly bounded, and slick?
You will pick up the fourth report because it will pull you towards it by the visual appearance alone.
The front cover is not the only reason. A well-designed report is easier to read. It is also easier to scan when you don't have time to read. That is why you need to spend some time on your headers and footers, and the different styles and themes. In short – the formatting of every element in the report.
Formatting may seem like a difficult chore, but it is a fun exercise that will exercise all your creative muscles. The key takeaways will be the skills you can apply to anything in Microsoft Office going forward. And the time you will save with all the productivity tips learned here.
Microsoft Word 2016 has a wealthy set of features. These are only some of the ways that your report design can stand out from the rest and be professional. So, let's break down the layout and design skills.
This section will cover these features step-by-step:
- Start with a Cover Page
- Make a Table of Contents
- Create Your Header and Footer
- Add Page Numbers
(Format the Content)
- Pick the Right Fonts
- Style the Paragraphs
- Control Page Breaks
- Use Styles and Themes
- Use Quick Parts
- Decorate with Page Borders
1. Start With a Cover Page
The first page is the first point of contact with your reader. It is also your opportunity to make a favorable impression. Don't let your lack of artistic skills be an excuse because Word takes up the job with its in-built gallery of title pages. All you have to do is marry one to the theme of the report.
Microsoft Word 2016 offers you 16 pre-formatted templates and three more on Office.com.
Go to Insert > Pages Group > Cover Page .
The cover page appears at the beginning of the document by default.
As there are only 16 "official" templates on offer, you may find that all your other peers have the same cover page. So, why not customize it, and make it a bit more unique.
You can design a title page (or cover page) in Microsoft Word that can be an original in the stack. Save it as a template or easily change the design on the fly.
2. Make a Table of Contents
Casual readers scan. Good readers scan first and then dive deep. A table of contents provides the waypoints that help both. When it is a long and complicated document, wouldn't you rather check the lay of the land before you head to the section that interests you?
Consider a Table of Contents (TOC) if your document is more than 10 pages long. You should first make sure you don't need to rearrange any pages in your document before creating the TOC.
In Microsoft Word, you don't have to write the entire TOC by hand. There's a Table of Contents automatic tool under the References tab which takes your outline and designs it for you. Also, you can easily keep it updated when you want to change something.
There are also templates you can download and fit it around the nature of the content. For instance, a TOC for a thesis will look different from that of a company's annual report.
We have a complete tutorial on how to create a table of contents page in Word .
The gist of it is this:
Create the outline and use heading styles to organize the hierarchy. Apply the automatic TOC tool to the heading styles. Word 2016 searches for those headings and then inserts the table of contents into your document. Then you can automatically update your TOC if you make changes in your document.

For more hands-on control, you can also use the Manual Table of Contents style. Word inserts placeholder text and you have to insert and format each content in the list.
3. Create Your Header and Footer
Headers and Footers are important in reports as the main purpose is to provide information about the report on every page. They are the common display areas for page numbers. The header of the document should contain the title of the report, and possibly the name of who created it. The title of the current section is helpful.
The footer, on the other hand, should include the page numbers, date of publication, and other administrative information that is required. Do note that some style guides have special guidelines for headers and footers .
Let's start with the header in your document and give it a unique look.
Select Insert , then select either Header or Footer from the group. The built-in gallery shows you several options you can choose from.
The header and footer space is inserted in your document with placeholder text or table. The Header & Footer Tools opens on the Ribbon for other formatting work like the date, time, or picture.

Enter your text and then select Close Header and Footer .
You can start with a blank header and footer. If you have the design skills, use the Header & Footer Tools to design your own. Master the header and footer space if you want to create custom letterheads for your organization. You can use brand elements like company or organization logos at the top and neatly formatted footnotes at the bottom

Let's try with and modify one of the inbuilt headers. I selected Facet from the gallery.
The final look took two minutes to put together with simple text effects and an icon sourced from the Microsoft Office icon gallery.

The header and footer are in place. But, how do you know where you are in the document? Insert page numbers as the next important signpost.
4. Add Page Numbers
Page numbers look best in the footer (unlike in the header as in the image above). You can add a basic page number from the Insert > Page Number button on the Ribbon. You can also add it from the Design tab that appears when you add the header and the footer.

You have a lot of control over page numbers. Choose from a wide range of number formats and customize them to your needs. In this case, we are adding the number to the footer, but you can put them at the top or even at the margins. In this example, I have placed the page number at the bottom left. But, I would like to change the default look and the format.
For example: Using a "Page X of XXX" makes for a better indicator on a long document.
Select the page number. Go to Insert > Quick Parts . From the drop-down menu, select Field . You can also reach the Field dialog from the Header and Footer Design tab.

Choose NumPages from the long list of field names. From the box on the right, you can pick a specific format. I selected the usual 1, 2, 3. Click OK , and the number of the number of pages will appear. Now all you have to do is add your text such as Page X of XXX, and change the look of the numbers with the usual text formatting tools available from the Home tab.
It now looks like this:

Design the look on any page number in your document and Word updates all the remaining automatically. Page numbers are the most common elements in a footer, but it can also hold any other information like the header. From the options in the Insert group, you can add the date and time, document info, pictures, and more to your header or footer.
Next, we're heading into formatting the content.
The visual draw of your professional report comes together with the "beautification" you apply to the content. Formatting is also an essential step for a document that flows well. So, you must focus a lot of energy on picking the right font, paragraph space, and the colors.
Don't worry. Even, the artistically challenged will find this part easy because Microsoft Word comes packaged with default themes and visual styles. Let's start with the most basic element of a document.
5. Pick and Style the Right Font
Your choice of font in a professional Word report not only determines how the text stands out but also how it is printed. You want both for maximum impact.
You can apply a typeface (i.e. the visual look of the font) to either an entire document or to specific parts of a document. All font choices are available from the Home tab. Go to Home > Font .

The default font in Microsoft Word 2016 is Calibri. Look beyond that as you have lots of others to choose from. If you choose Times New Roman, you may be considered lazy, if you choose Windings, well… I don't think I need to explain that. So make sure you choose a font that is easy to read and suits the report. To play it safe, pick from one of these professional-looking Google fonts ; they're available for free.
Tip: Baskerville and Georgia are good alternatives to the over-used Times New Roman
Try different font pairing for the body text and Headings (and Subheadings). Several websites like FontJoy and TypeWolf will help you experiment with font pairings. You can download and use custom fonts too. But remember the thumb-rule -- never use more than three different typefaces in a document.
For that extra bit of pizazz, try a drop cap to enhance your text .
6. Style the Paragraphs
If you want to have your lines double spaced, or single spaced, you need to change the format of the paragraphs. By changing the spacing, you can make a document easier to read or give the impression that it is longer and that you have put more work into it.

To change the paragraph for the whole document, it is best that you select each block of text; otherwise, if you are using headers in your report, they will change too. Another better option is if you customize the particular style you are using to format the paragraph.
To do this, go to Home > Styles . Right click on the style you want to change and select Modify . Click on Format > Paragraph which is at the bottom of the dialog box. Now, change the spacing, indentation, and alignment for the paragraph. Click OK to close the dialogs.

When you want to change a smaller portion of the document , select what you want to change. Right click on the highlighted text and select Paragraph . The same dialog box as above will appear.
7. Control Page Breaks
A page break -- by its very name -- splits a continuous block of text across two pages. Page breaks are important structural elements for long documents. Word automatically inserts a page break at the end of the page. But in a long document, you can place page breaks where you want them.
To insert a manual page break, click Insert > Page Break. (Keyboard shortcut: CTRL + Enter)
A page break looks like this when you click on the Show/Hide command in the Paragraph group .

But what if you want to keep a bunch of lines together on a page or column and not have them separate because of a page break? The layout is in your control. Click the tiny arrow you see in the bottom right of the Paragraph group.
In the Paragraph box, click Line and Page Breaks. Select from these four pagination options:
- Widow/Orphan control places at least two lines of a paragraph at the top or bottom of a page.
- Keep with next prevents breaks between paragraphs you want to stay together.
- Keep lines together prevents page breaks in the middle of paragraphs.
- Page break before adds a page break before a specific paragraph.
We've also shown how to remove page breaks when necessary.
8. Use Styles and Themes
Styles and themes are perhaps two of the more underused features in Microsoft Word . But I think you should use them at every opportunity to save a lot of time.
But what is the difference between a theme and a style? Microsoft says:
Themes provide a quick way to change the overall color and fonts. If you want to change text formatting quickly, Word Styles are the most effective tools.
So, as themes control the general look with color, effects, and fonts – start with a good theme for your document first. Then , use Styles to dig into the specific portions you want to change the appearance for.
For Themes: Go to the Design tab. Pick a theme from the gallery. You can see previews of what the color combination is like.
For Styles: Select the part of the text you want to change. Go to the Styles group on the Home tab. You can see previews of what they look like. Choose the Style that is suitable for your content. For instance, choose a heading style for the headings in your document. Or, a particular style for any quotes. You can also modify an existing style and create new styles from scratch.
9. Captions
Every picture, chart, or illustration needs a caption to clearly describe it. It is a single line of text, usually located below a graphic. Captions are also an important reference when you need to mention them in another place. Many documents omit this small detail.
It is easy to add a caption. Right-click the illustration you want to add a caption to. Select Add Caption .

In the dialog box, add your caption text and configure the remaining options. Captions can be automatically referenced in Word.
10. Use Quick Parts
Professional documents can get repetitive. This is why you should start using Quick Parts for boilerplate content you reuse all the time. For instance, let's say there is a contract clause you include with every document. Or, some introductory information. Instead of repeated copy-paste, save them as Quick Parts and re-use them again and again.

Quick Parts is also a type of building block . You can see the gallery of all reusable blocks of content in the Building Block Organizer .

Save and reuse your own Quick Parts in two steps:
- Select the phrase, sentence, or other portion of your document that you want to save to the gallery.
- Go to Insert > Text group > Quick Parts > Save Selection to Quick Part Gallery . Change the name and add a description if you like. Click OK .
Just as easily, you can re-use the saved snippet of content.
Place your cursor where you want to insert a selection from the Quick Parts Gallery. Go to Insert > Text group > Quick Parts . Then click the sentence, phrase, or other saved selection you want to reuse.
You will notice three other categories in the Quick Parts menu.

AutoText: Word 2016 has retained the old AutoText feature. It works like Quick Parts for any block of text that you use a great deal. Example: A note you want to use with every document.
Document Property: A set of constant properties that you can include with every document. Example: Company name or author.
Fields: These are predefined elements that update automatically. Example: Date, time, page numbers etc.
Remember, entries for document property can sometimes include information you wouldn't want to share with everyone. So, keep a close eye on these fields and remove the hidden personal data whenever required.
11. Decorate With Page Borders
Page borders look good not only on flyers and invitations. If done right, they can add a touch of class to a document. A variety of line styles and widths and art borders are available from the Design menu on the Ribbon.

Go to Design > Page Borders.
In the Borders and Shading box, use the Page Border tab to design your border.

The settings are self-explanatory. Try Shadow or 3-D with the right colors to add a subtle but elegant border. The Art styles with their clip-art borders might be too garish for professional documents.
Use the four corner buttons in the Preview window to select the sides of the page to draw borders. Click these buttons to remove or add borders, as you wish.
Place the cursor on the first page of a document if you want to put a border around only the first page. You can also put borders around certain pages in a section. Place the cursor in the section — either in the first page of that section or in a subsequent page.
References and Collaboration
A Word report can seem like an unmanageable chore. It's like organizing a million piles of hay into neat little stacks. The idea is to know precisely which stack has the pin you are looking for. These features are meant to make it easier.
1. Create an Index
When writing large documents such as a report that contains a lot of information, a contents page may not be enough. An Index should appear at the end of the document, with page numbers to keywords and information in the report. Create an index to help the reader reference the right information with just the page number.
Make an index if your document has more than 20 pages. Microsoft Word 2016 doesn't let the process overwhelm you. It basically has two parts:
- Select the words or information you want to include in the index.
- Place the index at the right place in your document.
You can scroll through the finished document and mark the words or phrases you want to include in the index or mark them as you go along. Either way, select the text you'd like to use as an index entry or click where you want to insert the entry.
1. Click References > Mark Entry .

2. Edit the text in the Mark Index Entry dialog box. You can also add a sub-entry which further defines the main word you used in the index. You can add multiple levels and each appears indented under the main entry.

3. Under Options , you can also create a cross-reference to another main entry. A reader can use this to refer related information elsewhere in the same document.
4. Use the Page number format to decide on the appearance of the page numbers in the index.
5. Click Mark to mark the index entry. To mark this text everywhere it shows up in the document, click Mark All .
6. Repeat the process for all the words and phrases you want to include in the index.
You have now built your index. Insert it at the right place towards the end of the document.
1. Click on the page where you want to insert the index.
2. Click References > Insert Index .
3. The Index dialog box is displayed. Here you can choose to format the text entries, page numbers, tabs, and leader characters.

4. Choose the appearance from the different formats in the list and check the Preview window on the right. Remember, the Preview window doesn't show you actual index. It is just a "simulation" of how it will look like.
5. Click OK . Your Index is now ready.
Sometimes, you may need to add more entries to the index after you have inserted it on the page. Mark the entry and go to References > Update index to include the new mentions.
Also, add a heading for the index because Word doesn't do it automatically.
2. Creating Bibliographies
Your document is almost done. Now, you need to credit all the other research work and ideas which you have referenced in your document. It's time for a bibliography.
A company report might not need a bibliography but an academic paper isn't finished without one. The bibliography is one of the most painstaking jobs in an academic report. You need to have all your citations in order before you sit down to frame the bibliography. Also, decide on the citation style (typically MLA, APA , or Chicago-style ) as per the guidelines of your subject.
Don't hesitate to take advantage of third-party citation and bibliography generators for constructing this section.
But, Microsoft Word 2016 has a complete toolset to make this process as painless as possible. So, go to the point in the document where you would like to place the bibliography. It's good if you have at least one citation to include, but even if you don't, Word 2016 lets you use a placeholder citation and fill in the sources later.
Click References > Bibliography .
Word offers a few bibliography styles that differ only in their heading names. Choose the appropriate style and then insert citations from the button in the Citations & Bibliography group .

The bibliography tool has a few steps to it. For the sake of brevity, I will direct you to the excellent Microsoft Office help page which is a step-by-step guide.
Some academic papers will ask you to create an annotated bibliography . It is a more fleshed out version of a bibliography with a list of citations to journals, books, articles, and other documents followed by a brief paragraph. The paragraph is a description of the source and how it supports your paper.
3. Cross-Referencing
You can use a cross-reference to help the reader navigate through a long document. At any point in a document, you can tell the reader to refer back to a heading, page number, image, chart, footnote, endnote, and paragraph. A cross-reference link is a neat way to connect related information together. The reader just has to click on the link to go that snippet of information.
Here's how you begin:
1. Select the place for the cross-reference and type the text that tells the reader about it. For instance: "Refer to Chart 3 for future trends."
2. Go to Insert > Cross-reference .
3. In the Reference type box, click the drop-down list to select what you want to link to.

4. The options in the Insert Reference to drop-down will change according to your choice above.
5. In the For Which field, go through the choices and tell Word the exact information to link to.
6. Check the Insert as hyperlink box to create the hyperlink for the referenced information.
7. Click on Insert to include the cross-reference in the document.
Remember, our mention of captions? You can make cross-references to equations, figures, graphs, and tables if you used captions below them.
Word cannot create a cross-reference for something that does not exist. Word will let you know about these errors and also update the cross-references automatically when you change the page number or text of the referenced item.
4. Using Comments
A professional report can be a solitary job or you can take the help of a team to prepare the first draft. The humble Comment is one of the most underused tools of a Word document. It is displayed as a rectangular colored balloon in the margin or in the Reviewing Pane.
You can use comments as small "stickies" or self-notes. Leave little notes to yourself in the margins as you write, edit, and revise your way through a report or a manuscript. Be creative – add extra links to other resources, use them for tips and pointers, link to different parts of a document, or set up a feedback link for your readers. And when you finalize, you can easily remove all comments in Word .
Microsoft Word 2016 is also an enhanced collaborative writing tool. Comments play a huge role in communicating feedback across a team. Here's how the comment system works...
1. Highlight the text you want to add a comment to or click at the end of a text block.
2. Go to Insert > Comment . Type your comment in the box. The comments appear in the markup area on the right. The Print Layout view is usually the best way to see the comments alongside the text.

3. Go to the Review tab and see more options for comments. This tab also shows all the controls for tracking changes and comments in a collaborative document. Use the Markup options to display or hide the comments. For instance: No Markup will hide the comments and the markup area on the right.

Finalize Your Report
Once the bulk of your report is completed and saved, it is time to finalize your report. When I say finalize, I don't mean proofread it. That should be done too. Now, you have to take the security measures to protect the report from unauthorized changes and plagiarism.
These security measures will give an extra level of authenticity to your electronic file before you share it.
This section will cover:
- Insert watermarks
- Make the document 'read only'
- Password protect your document
- Print your document to PDF
1. Signatures
You can add text signature for a personal touch to the report. But a simple text signature does not need any authentication. A digital signature is the better way to protect your document from unauthorized access. A digital signature confirms that the document came from the signer and hasn't been tampered in any way.
Let's create a signature line in Microsoft Word 2016.
In the document, place your cursor where you want to create a signature line.
1. Go to Insert > Text group > Signature Line and click Microsoft Office Signature Line .

2. The Signature Setup dialog box is displayed. Fill the fields as indicated. If you are sending the document to someone else for signing, add instructions for the signer in the field reserved for it ( Instructions to the signer ). The signer can also add give the purpose for the signing if the Allow the signer to add comments in the Sign dialog box is checked.

3. Click on OK and the document will now display a placeholder for the signature.

Enter a signature:
When you need to sign a document with a digital signature, go to the signature line and right-click on it.
You will be prompted to sign with a digital ID. If you don't have one, Microsoft will tell you to get one from a signature service partner.
If you don't have a digital ID, you can just insert a textual representation of a signature line . You can use a written signature or an image that doesn't require authentication.
2. Insert Watermarks
A Microsoft Word watermark is a "fake" but still useful visual indicator for the status of the document. For instance, you can use a watermark that says "Drafts" to differentiate it from the final version of the document. Or, use the watermark to suggest the document is "Copyrighted" or "Confidential".
The "Draft" mark is the most common. But, Microsoft Word gives you several other watermarks to choose from.
1. Go to Design > Page Background and choose Watermark . The Watermark button will be enabled in the Print view only.

2. You can choose a picture or a text watermark from the gallery. Both horizontal and diagonal versions are available. The dialog box gives you all the customization options for the final look of the watermark. Try different fonts, layouts, sizes, and colors.
3. You can type your own text in the Text field to create your custom watermark.
4. Choose OK to apply the watermark to your document. Word automatically applies the watermark to every page except the title page.
3. Make Documents "Read Only"
A professional report by its nature should not need to be edited by its readers. Converting the document to a PDF is one way. But, you can also apply a few more restrictions in Microsoft Word and prevent accidental modification or omission of any kind.
There are three ways to protect a document.
First -- Make your document "read only".
This ensures that your document can only be read or copied. It won't prevent anyone from copying the file and making changes to the copy.
1. Go to the File tab > Info > Protect Document > Mark as Final.

2. When readers open a document, a bar on top will prompt readers to treat this document as read only. But, they can click on "Edit Anyway" to open the document in Edit mode.
Second -- Password Protect Your Document.
Protect your document from unwanted edits with a password barrier.
1. Under Protect Document , choose Encrypt with Password . Type a password and click OK .

2. In the Confirm Password box, type the password again, and then click OK . The document will open with the reader prompted for a password.
Microsoft uses the AES (Advanced Encryption Standard), 128-bit key length, SHA1 (a cryptographic hashing algorithm which generates an almost unique 160-bit key to replace the plaintext), and CBC (cipher block chaining) to give a hacker a well-deserved headache.
Third -- Restrict Editing.
This control feature helps you as the author decide which parts of the document others can edit and which will be locked out. Think of it as the bouncer who lets the VIPs in but otherwise bars the door for the common folk.
1. Go to Review > Restrict Editing .

2. Under Editing restrictions , check Allow only this type of editing in the document , and make sure the list says No changes (Read only) .
No changes (Read only) is the default restriction type. For a different restriction level for the document, click the menu and select from Tracked changes, Comments, or Filling in forms.
3. To free some sections from the editing blockade, select the sections for editing without restrictions. To select more than one area, click CTRL while selecting the area using the mouse.
4. You can check Everyone under Exceptions (optional) in the Restrict Editing panel. Or, click More users … and allow only specific users to modify the sections. The allowable areas will be marked with square brackets.
5. Click Yes, Start Enforcing Protection .
Now, type a unique password in the box that opens. You have to type it again to confirm it.
The password is optional. But it ensures that no one can just click Stop Protection and edit the document. If you are still paranoid, go ahead and encrypt your Microsoft Word document as we did in the second process above.
4. Print Your Report to PDF
The Portable Document Format comes with many advantages. Not least is its cross-platform compatibility across all computers. Your document is ready and now you need to share it or send it across to be printed. Many professional reports -- for instance, a legal document -- need to retain the format as intended.
Save or convert a copy to PDF. Microsoft Word 2016 does not need any third-party add-ins.
Go to File > Export > Create PDF/XPS .

Remember, your Word document may contain sensitive information that you do not want to be included in the PDF. Remove it before you publish to PDF. In the Publish as PDF or XPS window, choose Options . Then select Document and clear Document properties . Set any other options you want and choose OK .

Browse to where you want to save the file and click on Publish .
The Next Step...
You are close to the finishing line. The report is ready to be handed over to your readers. But there's one last job left.
Turn the pages and make sure (again) that your report is reader-friendly. Approach it with the eye of the reader. Have you organized your thoughts and written persuasively? Does the information flow well with the charts and illustrations? Can they skim through and find the information quickly? Is the text readable? Use the readability score to gauge the readability level of your documents as a final step.
You also might have noticed we didn't cover some aspects of Microsoft Word. For instance, Microsoft Word Tables are an important tool for data display. Or, the power of lists in information management.
Microsoft Word is more than a quarter of a century old, and packed with little features. At MakeUseOf, we have covered every nook and cranny of this beast. So, do use our resources to learn more about this software for free. Each new feature of Microsoft Word learned will make your life easier.
Make Your Report Shine
As author Nathaniel Hawthorne said,
Easy reading is damn hard writing
Isn't this true for professional report writing too? After all, if given a choice, no one may want to read it. Writing a business report and using it to communicate are two different things. Microsoft Word is just a tool -- it's your job to engage.
For some alternatives, check out the best online word processors . And for more help with professional writing, take a look at how to apologize in an email and mean it .
What are the best practices for writing professional business reports? Tell us in the comments.
Subject Explorer
School Subjects
Math & Science
Business & Technology
Electives & Health
Board & Administration
Teaching & Learning
Audio/Video Lectures
Books & Documents
Classifieds
Jobs & Resources
Discussions
Language & Literature
Practice Projects for Microsoft Word

Word 9 Table
In this practice project for Word, students create a document with a title and table. The table has two columns that have different font alignment and incluces various fonts. …

Word 8 Formatting Text
In this practice project for Word, students create a document using a different size and color font for the title than the rest of the paragraph. …

Word 7 Bullets
In this practice project for Word, students create a document with two different types of bullets showing points and subpoints. …

Word 6 Letter
In this practice project for Word, students create a letter. Included in the letter is a heading on the right, indented paragraphs, and the closing and signiture near the middle of the document. …

Word 5 Text And Outline
In this practice project for Word, students create a document that contains several paragraphs of text and also includes an outline with key points and subpoints. …

Word 4 Modified Text
In this practice project for Word, students create a document with the heading on the right, a boldfaced, centered title, and indented paragraphs. The document is double-spaced. …
Word 3 Basic Text
In this practice project for Word, students create a document with the heading on the right, a boldfaced title that is centered, and several paragraphs that are indented. …

Word 22 Preset Headings
In this practice project for Word, students create a document using the preset headings to create a title bar. The document has different alignment and font, blanks, and a short outline. …

Word 21 Formatting Options
In this practice project for Word, students create a document that shows some different effects that can be used with the same font. …

Word 20 Numbered List
In this practice project for Word, students create a document that includes a centered title followed by a numbered list. …

Word 2 Heading 2
In this practice project for Word, students create a document that has a centered title, a heading in the upper right corner, and indented paragraphs. …

Word 19 Advanced Table
In this practice project for Word, students create a document with a table showing a school schedule. The blocks in the table are different sizes and will take individual work within the blocks to …

Word 18 Columns
In this practice project for Word, students create a document with a header and two colomns. The columns include boldfaced and italic font and different alignment. …

Word 17 Columns
In this practice project for Word, students create a document with two identical columns in landscape orientation. Included in each are indented lines and different alignment and font. …

Word 16 Lesson Notes Handout
In this practice project for Word, students create a document like a student handout. This includes an outline with several levels, blanks for students to write on, and different font. …

Word 15 Lesson Notes
In this practice project for Word, students create a document with a header and two outlines. Students are asked to use the automatic numbering and outlining features in Word. They must use different …

Word 14 Table
In this practice project for Word, students create a scoresheet using a table. Students must use different sizes, colors and styles of font, including different alignment. …

Word 13 Outline
In this practice project for Word, students create an outline using the automatic outline in Word, including many levels of subpoints. …

Word 12 Formatting
In this practice project for Word, students create a document with a centered title in all capitals, the first letter of each word slightly larger than the rest. Throughout the document the font is …

Word 11 Formatting
In this practice project for Word, students create a document similar to a test or quiz. They must include points and subpoints, blanks, boldfaced text, tabs, and spacing. …
Resource Type:
Pass it on:
Leave a Reply

Sep 21, 2022
Facilitate collaboration by assigning tasks in Word
Rubba Ashwas
- Add our blog to your RSS feed reader" href="/rss/blog.xml" data-bi-name="RSS Subscription" data-bi-id="rss_feed" data-bi-bhvr="120" data-bi-socchn="RSSSubscription" title="Microsoft 365 Insider Blog RSS" target="blank" class="d-inline-block">
Hi, Office Insiders! My name is Rubba Ashwas and I’m a Product Manager on the Word team. I’m excited to share that you can now assign tasks with @mentions in documents in Word for Windows and Word for Mac!
Assign tasks
This feature allows you and your team to conveniently create and assign tasks directly from within your Word document using @mentions in comments. The people you assign the tasks to will receive email notifications, letting them know they need to take action.
Many of you have enjoyed using the feature in Word for the web. We’re thrilled to now be bringing it to Word for Windows and Word for Mac.
How it works
- Open an existing document saved to OneDrive or SharePoint.
- Highlight the text that contains the information you want to comment on and select the New Comment button,

- Write your comment and type @ followed by the name of the team member you want to tag.
- Select the Assign to check box to convert your comment into a task.
- Click the blue arrow or press Ctrl + Enter to post your comment.
Scenarios to try
- Reassign a task: Type @ followed by the name of the team member you want to reassign the task to in the response field, select the Reassign to check box, and then click the blue arrow or press Ctrl + Enter . The person to whom you reassigned the task will be notified via email that they’ve been assigned the task.

- Resolve a task: Hover over the circle at the top of the comment and click the Resolve task button.

- Reopen a resolved task: In the right-hand margin or in Comments pane, click the comment that was closed, and then click the Reopen button.

Availability
This feature is available in Word for the Web, and to Insiders running the following Beta Channel builds:
- Windows: Version 2206 (Build 15321.10000) or later
- Mac: Version 16.66 (Build 22090700) or later
Don’t have it yet? It’s probably us, not you.
Features are released over some time to ensure things are working smoothly. We highlight features that you may not have because they’re slowly releasing to larger numbers of Insiders. Sometimes we remove elements to further improve them based on your feedback. Though this is rare, we also reserve the option to pull a feature entirely out of the product, even if you, as an Insider, have had the opportunity to try it.
We are actively working on this feature, and your feedback is key to guiding future improvements. You can submit comments by clicking Help > Feedback. Please tag your feedback with #AssignTasks so that we can easily find input about the feature.
Learn what other information you should include in your feedback to ensure its actionable and reaches the right people. We are excited to hear from you!
Sorry, JavaScript must be enabled to use this app.
- Skip to main content
- Skip to secondary menu
- Skip to primary sidebar
- Skip to footer
Erin Wright Writing
Writing-Related Software Tutorials
How to Create a Cover Page in Microsoft Word (Built-In and Custom)
By Erin Wright
This tutorial shows how to create a cover page in Microsoft Word. First, we’ll create a cover page using a built-in design. Then, we’ll create a custom cover page that can be reused. Next, we’ll delete a cover page. Plus, the bonus section at the end shows how to remove page number zero from a cover page.
Quick Links:
- How to Create a Built-In Cover Page
How to Create a Custom Cover Page
- How to Delete a Cover Page
How to Remove Page Number Zero from a Cover Page
This tutorial is also available as a YouTube video showing all the steps in real time.
Watch more than 250 other writing-related software tutorials on my YouTube channel .
The images below are from Word for Microsoft 365 on a PC. These steps will also work in Word 2021, Word 2019, Word 2016, Word 2013, and Word 2010. However, your interface may look slightly different in those older versions of the software.
How to Create a Built-In Cover Page in Microsoft Word
You can quickly create a cover page using a built-in design.
- Select the Insert tab in the ribbon.

- Select Cover Page in the Pages group.

- Choose a built-in design from the gallery in the drop-down menu. (Hover over More Cover Pages from Office.com for additional options.)

- (Optional) To insert your cover page somewhere other than the top of your document, right-click the built-in design, and then choose a location from the shortcut menu.

- Place your cursor in the sample text, and then type your information.

Pro Tip: To delete a section of sample text, right-click it, and then select Remove Content Control from the shortcut menu.

The built-in cover page should now be part of your Word document.
You can create a custom cover page that can be reused in other Word documents.
- Open a blank document. ( Pro Tip: Press Ctrl + N to open a blank document.)
- Create your cover page, including images if necessary.
- Select all the text and images that should be included in the cover page.

- Select the Insert tab in the ribbon (see figure 1).
- Select Cover Page in the Pages group (see figure 2).
- Select Save Selection to Cover Page Gallery from the drop-down menu.

- Type a unique name into the Name text box in the Create New Building Block dialog box. (Cover pages are part of Word’s building block system of reusable content.)

- (Optional) Add additional information into the Description text box, if necessary.
Important Note: I strongly recommend leaving the default settings for the other options in this dialog box.
- Select the OK button.

Your custom cover page should now be added to the Cover Page Gallery.
- Close the document used to create your custom cover page. (You don’t have to save this document.)
- Select Save in the alert box asking if you want to save changes to Building Blocks.dotx.

- Open the document to which you want to add the custom cover page.
- Select the Insert tab (see figure 1).
- Select your custom cover page from the gallery.

Your custom cover page should now be added to your current document.
Pro Tip: How to Delete a Custom Cover Page from the Cover Page Gallery
- Right-click the custom cover page in the Cover Page drop-down menu, and then select Organize and Delete from the shortcut menu.

Caution: Your custom cover page will be automatically selected when the Building Blocks Organizer dialog box opens. Take care not to select another item.
- Select the Delete button in the Building Blocks Organizer dialog box.

- Select the Yes button in the question dialog box asking if you are sure you want to delete the selected building block.

- Select the Close button in the Building Blocks Organizer dialog box.

Your custom cover page should now be removed from the Cover Page Gallery.
How to Delete a Cover Page in Microsoft Word
The following steps show how to remove a cover page from an individual document.
- Select Remove Current Cover Page from the drop-down menu.

Your cover page should be removed from your document.
If your document has page numbers, the page number zero may show up unnecessarily on the cover page. The following steps show how to remove page number zero.
- Double-click the top of any page to open the Header & Footer tab.

- Select Different First Page in the Options group.

- Select the Close Header and Footer button.

The page number zero should now be removed from your cover page.
Related Resources
How to Insert Citations in Microsoft Word
How to Create a Citation with Multiple Sources in Microsoft Word
How to Insert Footnotes and Endnotes in Microsoft Word
Updated July 02, 2023
- Microsoft Word Tutorials
- Adobe Acrobat Tutorials
- PowerPoint Tutorials
- Writing Tips
- Editing Tips
- Writing-Related Resources
Assignment Agreement Forms (12) | Samples
Create a high-quality document now!

Thank you for downloading!
How would you rate your free form.
Updated June 22, 2023
An assignment agreement transfers ownership interest from an assignor (giving party) to an assignee (receiving party). The interest usually consists of a benefit with any included liabilities. If any payment is required, it should be mentioned in the assignment.
By Type (12)

Domain Name

Intellectual Property

Lease Agreement

Real Estate Purchase Contract

Table of Contents
- Assignment Agreements: By Type (12)
Step 1 – Make a Deal
Step 2 – verify ownership, step 3 – write the agreement, step 4 – take control.
- Sample : Assignment Agreement
How to Write
How to assign (4 steps).

The assignor (seller) and the assignee (buyer) should get together to make a verbal agreement or write a letter of intent. This allows the assignee to conduct their due diligence and ensure the property is what the assignor claims to be.

In most real estate contracts, for example, a notary public is not required to sign an agreement. Therefore, it’s best to verify with the other party, the landlord or seller, that the contract is valid.

Write the assignment agreement including the property details and sales price. Include any other agreed-upon terms and conditions.

No matter the type of property (real, personal, etc.) after an agreement is signed, the property should be delivered to the assignee’s possession.
Sample Assignment Agreement
Download: PDF , MS Word , OpenDocument
ASSIGNMENT AGREEMENT
I. THE PARTIES. This Assignment Agreement (“Agreement”) is made on [DATE] , (“Effective Date”) by and between:
Assignor: [ASSIGNOR’S NAME] , (“Assignor”) with a mailing address of [ASSIGNOR’S MAILING ADDRESS] ,
Assignee: [ASSIGNEE’S NAME] , (“Assignee”) with a mailing address of [ASSIGNEE’S MAILING ADDRESS] .
The above-referenced Assignor and Assignee may each be referred to as a “Party” and collectively referred to herein as the “Parties.”
II. THE ASSIGNMENT. The Parties agree that under this Agreement, the Assignor shall assign, convey, and transfer all their interest in the following to the Assignee: [DESCRIBE WHAT IS BEING ASSIGNED]
Hereinafter known as the “Assignment.”
III. TRANSFER. The Parties agree that the Assignor is transferring the Assignment for the following:
☐ – Fixed Payment of $ [PAYMENT AMOUNT] (“Payment Amount”). The Assignment is to be transferred in exchange for the Assignee paying the Assignor the Payment Amount within [ # ] days of the Effective Date.
☐ – No Payment. The Assignor is transferring the Assignment to the Assignee for no payment or compensation. The Assignee’s consideration shall be recognized as the undertaking of any liabilities or obligations in the Assignment.
☐ – Gift. The Assignor is granting the Assignment as a gift to the Assignee.
☐ – Other. [ DESCRIBE ]
IV. LIABILITIES. The Assignor hereby claims and warranties to hold the interest described in the Assignment and that the: (check one)
☐ – Assignment is Free of Liens, Claims, or Encumbrances. The Assignor is transferring an interest in the Assignment and warranties it to be free of liens, claims, or encumbrances of any kind.
☐ – Assignment is Holds the following Liens, Claims, or Encumbrances: [DESCRIBE]
V. 3RD PARTY APPROVAL. For this Agreement to be in effect: (check one)
☐ – It is REQUIRED for [3RD PARTY’S NAME] (“3rd Party”) to approve this Agreement within [#] days of the Effective Date. If the 3rd Party does not approve this Agreement or fails to sign, this Agreement shall be considered void.
☐ – It is NOT REQUIRED a 3rd Party to approve this Agreement. Upon the execution by both Parties, this Agreement shall be in full force and effect.
VI. ASSUMPTION. The Assignee acknowledges and agrees to assume the transfer and ownership of all liabilities, obligations, and claims that currently exist or may in the future regarding the Assignment. As of the Effective Date, the Assignee agrees to comply with all terms, make all payments, and perform all the conditions, covenants, and any other duties as part of the Assignment.
VII. PARTIES’ REPRESENTATIONS. The Assignee acknowledges that they have a full understanding of the Assignment and the terms of this Agreement. The Assignor further warrants that they own the rights transferred in the Assignment and understand the terms of this Agreement. Both Parties agree to provide and complete any obligations under this Agreement or the Assignment.
VIII. SEVERABILITY. If any term, covenant, condition, or provision of this Agreement is held by a court of competent jurisdiction to be invalid, void, or unenforceable, the remainder of the provisions shall remain in full force and effect and shall in no way be affected, impaired, or invalidated.
IX. GOVERNING LAW. This Agreement shall be governed under the laws located in the State of [ STATE OF GOVERNING LAW ].
X. WAIVER. The failure of either Party to enforce any provision of this Agreement shall not be deemed a waiver or limitation of that Party’s right to subsequently enforce and compel strict compliance with every provision of this Agreement.
XI. ADDITIONAL TERMS. [ADDITIONAL TERMS]
XII. ENTIRE AGREEMENT. This Agreement constitutes the entire agreement between the Parties. No modification or amendment of this Agreement shall be effective unless in writing and signed by both Parties.
Assignor Signature: ____________________________ Date: ______________
Assignee Signature: ____________________________ Date: ______________
3rd Party Signature (if any): ____________________ Date: ______________
Section I. The Parties
(1) Effective Date Of Assignment. The date when this agreement becomes active must be established. Deliver the calendar date when its effect first obligates the signature Parties to its conditions and terms.

(2) Name Of Assignor. The full name of the Party who intends to release his or her interest or claim must be presented. This Party whether it is an Individual or Business Entity will be known as the Assignor of the claim, interest, and/or property this paperwork discusses.
(3) Mailing Address Of Assignor. Produce a record of the address needed to contact the Assignor by mail. This should be a regularly monitored address that can be considered reliable.

(4) Assignee Name. The Party that wishes to assume the same right to claim or the same interest that the Assignor enjoys with the discussed property and will gain such interest through this paperwork is the Assignee and should be identified by name.
(5) Assignee Mailing Address. The address required to reach the Assignee by mail so that he or she may receive notices and other correspondence required by this agreement should be presented.

Section II. The Assignment
(6) Details Of Assignment. The assignment being released from the Assignor and being designated to the Assignee must be described. This agreement is versatile allowing nearly any type of assignment of property, a claim on property, a share of the property, or any other interest that may be transferred from one Entity to another however, the type of assignment and the level of interest that will be granted or made available to the Assignee must be documented.

Section III. Transfer
(7) Fixed Payment. The Assignor’s designation or release of property or interest may be contingent upon the receipt of a predetermined payment amount. If so, then this must be declared. Include this condition by marking the first checkbox statement then documenting the amount that the Assignee must pay to the Assignor. Once done, define the maximum number of days from the effective date when this payment must be received.
(8) No Payment. If the Assignor will release interest or property without payment from the Assignee then select the second checkbox option in Section III.

(9) Gift . If the assignment being made is considered a gift of the Assignor to the Assignee then select the third checkbox statement.
(10) Other . There are quite a few other conditions or requirements that can be imposed on the Assignee as well as other reasons for this assignment. If none of the three previous statements are adequate descriptions of such reasons or obligations then select the “Other” checkbox and furnish this information to the space available.

Section IV. Liabilities
(11) Assignment Is Free Of Liens. If the assignment this agreement shall enable will not include an obligation to pay a debt or satisfy an encumbrance then the first statement made in Section IV should be selected by marking the available checkbox.
(12) Assignment Not Free Of Liens. If the concerned assignment has a lien, encumbrance, or debt imposed upon it or there is a claim that must be paid for this assignment to be completed and the Assignee will assume some or all of these obligations with the assignment then select the second checkbox and provide a detailed description of such claims and/or encumbrances.

Section V. 3rd Party Approval
(13) Required Approval. A Third Party (such as a Financial Institution) may need to approve this assignment for it to proceed accordingly. If this is the case, then the “It Is Required” statement should be selected. This status statement must be satisfied with the name of the Third Party whose approval must be obtained and the number of days after the effective date allotted to gain such approval.
(14) No Approval Needed. The second statement in Section V will free both the Assignee and Assignor from seeking a Third Party’s approval to this agreement’s execution. If no approval is required other than the authorizing signature of the Assignor and Assignee then select the second statement.

Section IX. Governing Law
(15) State. The State laws that will be applied to this paperwork must be established. Identify the State whose courts shall enforce this document.

Section XI. Additional Terms
(16) Additional Terms. If there are additional requirements or circumstances that relate to this agreement and obligate or restrict either Party, then discuss them in Section XI.

Section XII Entire Agreement
(17) Assignor Signature. The Assignor who is making this assignment must sign this paperwork once it has been completed with the information it requests.
(18) Assignor Signature Date .
(19) Assignee Signature. The Assignee should review all the definitions supplied to this agreement. If he or she will accept the responsibilities and conditions in this document then the Assignee must provide his or her signature.
(20) Assignee Signature Date.

(21) Third Party Signature. If it has been indicated that a Third Party must approve this assignment by signature then the third signature area must be completed by this Party. If this is a Business then a Signature Representative that has been appointed by the Approving Entity must deliver his or her signature on behalf of the concerned Third Party.
(22) Signature Date Of Third Party.

How to Create Columns in Microsoft Word

Parth Shah is an evergreen freelance writer covering how-tos, app guides, comparisons, listicles, and troubleshooting guides on Android, iOS, Windows, Mac, and smart TV platforms. He has over five years of experience and has covered 1,500+ articles on GuidingTech and Android Police. In his free time, you will see him binge-watching Netflix shows, reading books, and traveling.
When you write newsletters, journals, or work for newspapers or magazines, you need to use column format to improve the document organization and overall readability. Microsoft Word, the most popular word-processing software, has several options for creating and managing columns. Here’s how to make columns in Microsoft Word on Windows and Mac.

You can add one, two, or three columns to neatly break down your document for a specific document or a report. You can also add custom column breaks to your preference. Without further ado, let’s get started.
Create Columns in Microsoft Word on Windows
Microsoft offers feature-rich Office apps on Windows and Mac. The company uses an identical user interface on both platforms. We will use Word for Windows in the screenshots below. You can follow the same on Microsoft Word for Mac to create columns.
Step 1: Open any document on Microsoft Word for Windows or Mac.
Step 2: The default layout uses a single column for your document. Click Layout on the menu bar.
Step 3: Expand Columns. Select One, Two, Three, Left, or Right.

Microsoft Word quickly divides your document into relevant columns.

Customize Columns in Microsoft Word
If you don’t prefer the default columns width and spacing in Microsoft Word, you can create a custom one based on your preference. Here’s what you need to do.
Step 1: Open a document in Microsoft Word and select Columns in the Layout menu (check the steps above).
Step 2: Select More Columns.

Step 3: Check Presets at the top. Enter the number of columns.

Step 4: You can change width and spacing and apply custom changes to specific pages only. Click Ok and check your columns in action.
Add Column Breaks in Microsoft Word
Some writers prefer to apply manual column breaks for a better reading experience. The trick above doesn’t give you control over column brakes. Here’s what you need to do.
Step 1: Open a Word document and keep your cursor where you want to create a column.
Step 2: Select Layout at the top. Expand Breaks.
Step 3: Select Column and create a column where you want. You can check the screenshot below for reference.

Remove Columns in Microsoft Word
If you don’t like columns view in Microsoft Word, you can always revert to the standard page style. You can quickly press Ctrl + Z keyboard shortcut to undo the column or use the steps below.
Step 1: Open your Word Document. Select Layout at the top of your the document.
Step 2: Expand Columns and select One.

Microsoft Word reverts to the normal document style.
Enable Text Boundaries
This is another useful feature while printing documents in Microsoft Word. When you enable the ‘Text boundaries’ in Word, you see dotted lines appearing in the document to limit the text elements. You can check dotted lines around your text, headers, footers, and footnotes.
If you often with the ‘Print Layout View,’ enable the text boundaries feature.
Step 1: Open Microsoft Word and click File in the top left corner.

Step 2: Select Options.

Step 3: Open Advanced and scroll to ‘Show document content.’ Enable the ‘Show text boundaries’ toggle.

You can check the screenshot below to check it in action.

Create Columns in Microsoft Word for Tablet
The ability to create columns in Microsoft Word is available on mobile and tablet. The experience and the features aren’t as extensive as the desktop version, though. It’s useful for someone who is always on the go and wants to make some last-minute changes to the document. We will use Microsoft Word for iPad in the screenshots below.
Step 1: Download Microsoft 365 app on your tablet. Open the app and sign in with your Microsoft account details.
Step 2: Open a document and select Layout at the top.

Step 3: Expand Columns and select One, Two, or Three.

Download Microsoft 365 on iPad
Can You Create Columns in Microsoft Word Web Version
Unfortunately, you can’t create columns in Microsoft Word’s web version. You need to use the native apps on the desktop or tablet to get the job done.
Craft Your Perfect Document on Microsoft Word
Not everyone prefers the default page settings on Microsoft Word. You can also change the default page layout in Microsoft Word . How do you plan to use columns in Word? Share your preference in the comments below.
Was this helpful?
Last updated on 26 June, 2023
The above article may contain affiliate links which help support Guiding Tech. However, it does not affect our editorial integrity. The content remains unbiased and authentic.
Leave a Reply Cancel reply
Your email address will not be published. Required fields are marked *

The article above may contain affiliate links which help support Guiding Tech. The content remains unbiased and authentic and will never affect our editorial integrity.
DID YOU KNOW

More in Windows
Fix: Folder Icons Showing Black Background in Windows 11

Top 6 Fixes for ‘We Couldn’t Create a New Partition’ Windows Installation Error
Join the newsletter.
Get Guiding Tech articles delivered to your inbox.
28+ Best Free Assignment Cover Page Formats for MS Word
What is an assignment cover page, key elements for a comprehensive front page.
- Institution Details: Begin by prominently featuring the name of your school, college, or institute. This establishes credibility and provides context for your assignment.
- Personal Information: Include your own name to indicate authorship and ownership of the assignment. This adds a personal touch and facilitates easy identification.
- Assignment Title: Clearly state the title of your assignment, conveying its purpose and focus. A concise and informative title sets the tone for your work.
- Course Information: Specify the relevant course title or code to indicate the academic context in which your assignment was completed. This assists in proper categorization and organization.
- Instructor’s Name: Acknowledge the teacher or professor who will be evaluating your assignment by including their name. This demonstrates respect and professionalism.
- Due Date: Clearly indicate the deadline or due date for the assignment submission. This ensures timely assessment and helps you stay organized.
What are the basic tips?
- Font style : It is always in the best interest to use bold, simple, and clear text instead of using fancy text fonts and styles. This helps the reader understand things in a better way. Moreover, the usage of pictures behind texts must be avoided as it creates poor visibility for the reader when reading the text printed on it.
- Presentation: Presentation plays an important role in expressing what you need to convey to someone and how you need to communicate it. Presenting the title page in the most effective manner is essential as this leaves an impression on the teacher reading the assignment. It also acts as a decisive tool for the teacher whether or not he/ she interestingly goes through the whole document.
- Spell Check: Before handing over the assignment, one should take a brief review of all the spelling and also look for any grammatical errors.
- Avoid plagiarism: A student must always be honest in what he writes. He should avoid copying material or texts from anywhere.
- Personal detail: One should never forget to mention his/her name. The font size used for writing the name must be bigger so that it makes the name visible to the teacher.
Advantages of an Impressive Assignment Cover Page
- Showcasing Professionalism: By meticulously designing your cover page, you demonstrate a strong commitment to professionalism. This attention to detail reflects positively on your work ethic and sets you apart as a dedicated student.
- Creating a Positive Impression: A well-crafted front page sets the tone for your assignment, capturing the attention of your teacher or professor. It establishes a positive first impression, arousing their interest and encouraging them to delve further into your work.
- Enhancing Visual Appeal: A visually appealing cover page enhances the overall presentation of your assignment. With carefully chosen fonts, colors, and layouts, you create an engaging and aesthetically pleasing introduction that captivates the reader’s attention.
- Communicating Pertinent Information: It provides a concise summary of essential details, such as the assignment title, your name, and the due date. This ensures clarity and facilitates seamless identification and organization of your work.
- Reflecting a Professional Attitude: By dedicating time and effort to creating an impressive cover page, you exemplify a professional attitude towards your academic pursuits. This level of dedication and care leaves a lasting impression on your teacher or professor.
Download Free Cover Page Templates
#1 – best format.

#2 – Assignment Cover Page for Case Study

#3 – Best Design for Critical Review

#4 – For Any Kind of Educational Assignment

Video Tutorial
#5 – essay assignment.

#6 – Syllabus Assignment

#7 – Cover Page For University Assignments

#14 – Cover Page for Business Assignment

#16 – Academic

#17 – Generic Cover Page for any Assignment

#18 – Biology Assignment

#19 – For Chemistry Projects

#20 – Cover Page for Computer Projects

#21 – For Engineering-Related Assignments

#22 – For English Assignment

#23 – For Geography Projects

#24 – Mathematics

#25 – Physics

#26 – Cover Page for School Assignments

#27 – Best for Science Projects

#28 – For Social Study Assignment

Versatile Designs and Layouts for Every Purpose
- Assignment Types: Our templates are designed specifically for different types of assignments, such as case studies, critical reviews, essays, syllabi, and business projects. Each template is tailored to suit the requirements and objectives of its respective assignment type.
- Academic Disciplines: Our collection includes templates suitable for various academic disciplines like biology, chemistry, computer science, engineering, English, geography, mathematics, physics, and social studies. Each template aligns with the themes and aesthetics of its corresponding discipline.
- Purposes: Whether you are a student, educator, or professional, our templates serve multiple purposes. They can be used for university assignments, school projects, research papers, or any academic or professional endeavor that requires a polished cover page.
- Designs, Layouts, and Styles: Our templates offer a diverse range of designs, from minimalistic and clean to visually captivating and sophisticated. You can choose from different layouts that creatively arrange text, images, and graphics. Our templates cater to a variety of styles, ensuring there is something for everyone’s preferences.
User-Friendly Customization: Make It Your Own
- Easy Modifications: We believe in keeping things simple. With just a few clicks, you can effortlessly modify our templates to suit your specific requirements. Change colors, fonts, and layouts with ease, and watch your cover page transform before your eyes.
- Colors and Themes: Infuse it with the perfect color scheme and themes that truly represent your assignment. Our templates offer a wide range of options, so you can find the ideal palette and theme that resonate with your content.
- Font Selection: The right font can make all the difference. Choose from our diverse selection of fonts to enhance the visual appeal and readability. From elegant and professional to modern and bold, we have fonts to suit every style.
- Layout Flexibility: It should reflect your unique presentation style. With our templates, you have the freedom to experiment with different layouts, arranging titles, subtitles, images, and text blocks in a way that best suits your assignment.
Benefits of Using Professionally Designed Templates: Make an Impact with Ease
- Time and Effort Saving: Our professionally designed templates eliminate the need to start from scratch. With pre-designed layouts, styles, and graphics, you can save valuable time and effort in creating visually appealing front pages. Simply customize the template to suit your assignment’s requirements, and you’re ready to impress.
- Consistency and Professionalism: Using our templates ensures consistency in your assignment submissions. The standardized design elements and formatting guidelines help maintain a professional appearance throughout your work. Presenting your assignments with a polished title page enhances the overall quality and credibility of your content.
- Visual Appeal: A visually appealing title page grabs attention and sets the tone for your assignment. Our templates are thoughtfully crafted by design professionals, incorporating aesthetically pleasing elements, color schemes, and typography. By leveraging these designs, you can effortlessly create eye-catching cover pages that captivate your professors or readers.
- Positive Impression: First impressions matter, and a well-designed cover page leaves a positive impact on professors and readers alike. Showcasing your assignment in a professional and visually appealing manner demonstrates your dedication and attention to detail. It sets the stage for an engaging reading experience, encouraging your audience to delve deeper into your work.
- User-Friendly Customization: Our templates are designed to be easily customizable, allowing you to add your personal touch without technical expertise. You can modify text, colors, images, and other elements to align with your assignment’s theme and requirements. This flexibility ensures that your cover page reflects your unique style while maintaining a professional look.
Tips for Maximizing the Impact: Make Your Cover Page Stand Out
- Choose Colors Wisely: Select colors that complement your assignment’s theme and evoke the desired emotions. Vibrant colors can grab attention, while muted tones create a sense of elegance. Maintain consistency with your assignment’s overall design and avoid using too many colors that may distract from the main message.
- Opt for Legible Fonts: Use clear and readable fonts to enhance the accessibility and professionalism of your cover page. Avoid overly decorative or complex fonts that may hinder readability. Opt for fonts that align with your assignment’s tone and maintain consistency throughout the document.
- Incorporate Relevant Graphics: Graphics can enhance the visual appeal of your cover page and reinforce the assignment’s subject matter. Choose images or icons that are directly related to the topic or convey the assignment’s main concept. Ensure that the graphics are high-quality and appropriately sized to maintain clarity.
- Organize Information Effectively: Arrange the information in a logical and visually appealing manner. Use headings, subheadings, and bullet points to break down content and make it easier to read. Highlight key details such as the assignment title, your name, course information, and submission date.
- Maintain Simplicity: While it’s important to make it visually appealing, avoid cluttering it with excessive elements. Keep the design clean and uncluttered, allowing the key information to stand out. Remember, simplicity often has a greater impact than complexity.
- Preview and Proofread: Before finalizing, preview it to ensure that all elements are properly aligned and visually balanced. Proofread the content to eliminate any spelling or grammatical errors. A polished and error-free cover demonstrates your attention to detail and professionalism.
← Previous Article
Next Article →
You may also like

- Doctor Prescription Pad Formats
- Printable ID Cards
- Creative Resume Formats for Freshers
- Modern Resume Templates
- Best Cover Page Formats
- Printable Report Cards
- Business Proposal Templates
- 22 Raffle Ticket Templates
- Free Certificate Templates
Search the database of 10,000+ templates, designs & formats for Microsoft Office.
- Say Goodbye with Style: Free Impactful Resignation Letter Templates
- Share Your Appreciation: Free Memorial Day Card Templates
- Crafted with Love: Free Mother’s Day Cards to Warm Mom’s Heart
- Stand Out from the Crowd: 6+ Free Fact Sheet Templates
- Make Your Mark: Free Printable Dog Name Tags for Every Tail-Wagger!
- 7+ Free Stunning Easter Templates for Joyful Celebrations
- 9+ Free Admit-One Ticket Templates: Flexible and Easy to Edit
- Get Cooking with Style: 8+ Free Customizable Recipe Card Templates
- 11+ Free Mortgage Flyer Templates to Elevate Your Marketing
- Enhance Your Events with 20+ Unique and Free Ticket Voucher Templates
- Relaxation Redefined: Explore Free 8+ Spa Voucher Templates
- 24+ Free Employment Verification Letter Templates
- Certificates
- Cover Pages
- Educational
- Event Templates
- Invoices & Receipts
- Letterheads
- Office Related
- Personal Use
- 137+ Professional Reports – MS Word & Excel
- 70+ Printable & Editable ID Card Designs
- 59+ Proposal Formats
- 31+ Best Flyer Designs & Formats
- 100+ Cover Page Templates
- 22+ Free Letterhead Designs and Formats
- 24+ Free Resume Designs & for Freshers and Professionals
- 136+ Printable Certificate Templates
- 55+ Quotations & Invoices
- Create FREE PDF Calendar Online
- More from M-W
- To save this word, you'll need to log in. Log In
Definition of assignment
task , duty , job , chore , stint , assignment mean a piece of work to be done.
task implies work imposed by a person in authority or an employer or by circumstance.
duty implies an obligation to perform or responsibility for performance.
job applies to a piece of work voluntarily performed; it may sometimes suggest difficulty or importance.
chore implies a minor routine activity necessary for maintaining a household or farm.
stint implies a carefully allotted or measured quantity of assigned work or service.
assignment implies a definite limited task assigned by one in authority.
Examples of assignment in a Sentence
These examples are programmatically compiled from various online sources to illustrate current usage of the word 'assignment.' Any opinions expressed in the examples do not represent those of Merriam-Webster or its editors. Send us feedback about these examples.
Word History
see assign entry 1
14th century, in the meaning defined at sense 1
Phrases Containing assignment
- self - assignment
Dictionary Entries Near assignment
Cite this entry.
“Assignment.” Merriam-Webster.com Dictionary , Merriam-Webster, https://www.merriam-webster.com/dictionary/assignment. Accessed 10 Jun. 2024.
Legal Definition
Legal definition of assignment, more from merriam-webster on assignment.
Nglish: Translation of assignment for Spanish Speakers
Britannica English: Translation of assignment for Arabic Speakers
Subscribe to America's largest dictionary and get thousands more definitions and advanced search—ad free!

Can you solve 4 words at once?
Word of the day.
See Definitions and Examples »
Get Word of the Day daily email!
Popular in Grammar & Usage
What's the difference between 'fascism' and 'socialism', more commonly misspelled words, commonly misspelled words, how to use em dashes (—), en dashes (–) , and hyphens (-), absent letters that are heard anyway, popular in wordplay, the words of the week - june 7, 8 words for lesser-known musical instruments, 9 superb owl words, 10 words for lesser-known games and sports, your favorite band is in the dictionary, games & quizzes.

Free AI Presentation Maker for Generating Projects in Minutes
- Generate ready-to-use presentations from a text prompt.
- Select a style and Visme’s AI Presentation Maker will generate text, images, and icon.
- Customize your presentation with a library of royalty-free photos, videos, & graphics.
Generate a presentation with AI

Brought to you by Visme
A leading visual communication platform empowering 27,500,000 users and top brands.

Presentations Engineered With Visme’s AI Presentation Maker
Ai presentation prompt 1.
Craft a presentation outlining a leading company’s cutting-edge innovations in AI-powered hardware, emphasizing their impact on enhancing workplace productivity and efficiency.
AI Presentation Prompt 2
Generate a comprehensive presentation highlighting the latest digital marketing trends, focusing on strategies for enhancing brand visibility and customer engagement across diverse platforms.
AI Presentation Prompt 3
Create a detailed presentation elucidating a company’s diversified investment portfolio, emphasizing its robust performance, risk mitigation strategies, and the potential for sustainable long-term growth.
AI Presentation Prompt 4
Develop a compelling presentation showcasing a company’s groundbreaking medical devices and software solutions, emphasizing their role in revolutionizing patient care, treatment efficacy, and healthcare accessibility worldwide.

How it works
How to generate AI presentations with Visme
Save time and create beautiful designs quickly with Visme AI Designer. Available inside the Visme template library, this generator tool is ready to receive your prompts and generate stunning ready-to-use presentations in minutes.

- Log in to the Visme dashboard, and open the template library by clicking on Create New button -> Project -> Presentations. Inside the template library, scroll down and click on the Generate with AI option.
- In the popup that opens, type in a prompt and describe in detail what aspects your presentation should feature. If you don’t provide enough information, chatbot will ask you follow-up questions.
- Visme Chatbot will suggest template styles; choose the most relevant for your presentation, and wait for the AI to create the design. Preview, regenerate or open your project in the Visme editor.
- Customize your project in Visme: Pick a color theme or create your own, edit text, and use assets from Visme’s royalty-free library of photos, videos, and graphics, or create your own with AI tools.
Features of the AI Presentations Maker
Ready-to-use presentations in minutes.
Starting is often the hardest part of a project. Visme’s free AI presentation maker helps you overcome this block and generates results within minutes. It gives you a headstart and a good first draft that is ready-to-use with minimal or no customization.

Customize every part of your presentation
Visme editor is easy to use and offers you an array of customization options. Change the color theme of your presentation, text, fonts, add images, videos and graphics from Visme royalty-free library of assets or generate new ones with AI image generator, AI image touchup tools, or add your own. For more advanced customization, add data visualizations, connect them to live data, or create your own visuals.

Add your branding
Stay on-brand even with AI-generated presentations. Quickly and easily set up your brand kit using AI-powered Visme Brand Wizard or set it up manually. Use your brand colors and fonts in AI-generated presentations. Add your logo and upload your brand assets to make a presentation match your company’s branding.

Download, share or schedule your presentation
Share your presentations generated with Visme AI Designer in many ways. Download them in various formats, including PPTX, PDF and HTML5, present online, share on social media or schedule them to be published as posts on your social media channels. Additionally, you can share your presentations as private projects with a password entry.

More than just an AI Presentation Maker

Beautify your content
Unique Elements & Graphics
Browse through our library of customizable, one-of-a-kind graphics, widgets and design assets like icons, shapes, illustrations and more to accompany your AI-generated presentations.

Visualize your data
Charts & Graphs
Choose from different chart types and create pie charts, bar charts, donut charts, pyramid charts, Mekko charts, radar charts and much more.

Make it engaging
Interactivity
Share AI-generated presentations online with animated and interactive elements to grab your audience’s attention and promote your business.
More AI tools in Visme
Ai image generator.
The Visme AI Image generator will automatically create any image or graphic. All you need to do is write a prompt and let AI magic do the rest.

Visme AI Writer helps you write, proofread, summarize and tone switch any type of text. If you’re missing content for a project, let AI Writer help you generate it.

Save yourself hours of work with AI Resize. This feature resizes your project canvas and adjusts all content to fit the new size within seconds.

AI TouchUp Tools
The Visme AI TouchUp Tools are a set of four image editing features that will help you change the appearance of your images inside any Visme project. Erase and replace objects that you don’t want in your photos.

The Brand Wizard
The AI-based Visme Brand Wizard populates your brand fonts and styles across a beautiful set of templates.

Make the most of Visme’s features
Choose the perfect visual from our extensive photo and video library . Search and find the ideal image or video using keywords relevant to the project. Drag and drop in your project and adjust as needed.
Incorporate 3D illustrations and icons into all sorts of content types to create amazing content for your business communication strategies. You won’t see these 3D designs anywhere else as they’re made by Visme designers.
When you share your Visme projects, they’ll display with a flipbook effect . Viewers can go from page to page by flipping the page like a digital magazine. If you don’t want the flipbook effect, you can disable it and share as a standard project.
Remove the background from an image to create a cutout and layer it over something else, maybe an AI-generated background. Erase elements of the image and swap them for other objects with AI-powered Erase & Replace feature.
Create scroll-stopping video and animation posts for social media and email communication. Embed projects with video and animation into your website landing page or create digital documents with multimedia resources.
With Visme, you can make, create and design hundreds of content types . We have templates for digital documents, infographics, social media graphics, posters, banners, wireframes, whiteboards, flowcharts.
Design and brainstorm collaboratively with your team on the Visme whiteboard . Build mind maps and flowcharts easily during online planning and strategy sessions. Save whiteboards as meeting minutes and ongoing notes for projects.
Edit your images , photos, and AI image-generated graphics with our integrated editing tools. On top of the regular editing features like saturation and blur, we have 3 AI-based editing features. With these tools, you can unblur an image, expand it without losing quality and erase an object from it.
Frequently Asked Questions (FAQs)
How can i get better results with the ai presentations maker.
Like any AI generator from a text tool, the prompt is everything. To get better results with the AI Presentation maker, you need better prompts. Write the prompt to be as detailed as possible. Include all the content topics you want the presentation to cover. As for style elements, there’s no need to include it in the prompt. Focus on choosing the style that you like from the Chatbot suggestions. Try to select the style that already features the color palette and shapes that you like. AI will change icons and photos based on text it generates.
How many AI Presentations can I generate?
Visme AI Presentation maker is available in all plans with higher credits/usage available in Premium plans. Note: AI credits are spread amongst all AI features. So if you use other AI features, your credits will be deducted.
Is the Visme AI Designer a third-party API?
No, Visme AI Presentation maker was developed in-house and is a unique tool. However, it does use third-party APIs: ChatGPT and Unsplash.
This website uses cookies to improve the user experience. By using our website you consent to all cookies in accordance with our cookie policies included in our privacy policy.
- How to Login
- Use Teams on the web
- Join a meeting in Teams
- Join without a Teams account
- Join on a second device
- Join as a view-only attendee
- Join a breakout room
- Join from Google
Schedule a meeting in Teams
- Schedule from Outlook
- Schedule from Google
- Schedule with registration
- Instant meeting
- Add a dial-in number
- See all your meetings
- Invite people
- Meeting roles
- Add co-organizers
- Hide attendee names
- Tips for large Teams meeting
- Lock a meeting
- End a meeting
- Manage your calendar
- Meeting controls
- Prepare in a green room
- Share content
- Share slides
- Share sound
- Apply video filters
- Mute and unmute
- Spotlight a video
- Multitasking
- Raise your hand
- Live reactions
- Take meeting notes
- Customize your view
- Laser pointer
- Cast from a desktop
- Use a green screen
- Join as an avatar
- Customize your avatar
- Use emotes, gestures, and more
- Get started with immersive spaces
- Use in-meeting controls
- Spatial audio
- Overview of Microsoft Teams Premium
- Intelligent productivity
- Advanced meeting protection
- Engaging event experiences
- Change your background
- Meeting themes
- Audio settings
- Manage attendee audio and video
- Reduce background noise
- Voice isolation in Teams
- Mute notifications
- Use breakout rooms
- Live transcription
- Language interpretation
- Live captions
- End-to-end encryption
- Presenter modes
- Call and meeting quality
- Meeting attendance reports
- Using the lobby
- Meeting options
- Record a meeting
- Meeting recap
- Play and share a meeting recording
- Delete a recording
- Edit or delete a transcript
- Switch to town halls
- Get started
- Schedule a live event
- Invite attendees
- organizer checklist
- For tier 1 events
- Produce a live event
- Produce a live event with Teams Encoder
- Best practices
- Moderate a Q&A
- Allow anonymous presenters
- Attendee engagement report
- Recording and reports
- Attend a live event in Teams
- Participate in a Q&A
- Use live captions
- Schedule a webinar
- Customize a webinar
- Publicize a webinar
- Manage webinar registration
- Manage what attendees see
- Change webinar details
- Manage webinar emails
- Cancel a webinar
- Manage webinar recordings
- Webinar attendance report
- Get started with town hall
- Attend a town hall
- Schedule a town hall
- Customize a town hall
- Host a town hall
- Use RTMP-In
- Town hall insights
- Manage town hall recordings
- Cancel a town hall
- Can't join a meeting
- Camera isn't working
- Microphone isn't working
- My speaker isn’t working
- Breakout rooms issues
- Immersive spaces issues
- Meetings keep dropping

Add co-organizers to a meeting in Microsoft Teams
After you've invited people to your meeting, you can add up to 10 co-organizers to help manage your meeting. Co-organizers are displayed as additional organizers in the meeting participant list and have most of the capabilities of the meeting organizer.
Co-organizer capabilities
|
|
|
|---|---|
| Access and change meeting options | Manage the meeting recording |
| Manage breakout rooms | Remove or change the meeting organizer's role |
| Bypass the lobby | |
| Admit people from the lobby during a meeting | |
| Lock the meeting | |
| Present content | |
| Change another participant’s meeting role | |
| Change meeting options during a channel meeting* | |
| |
To allow co-organizers to change meeting options in a channel meeting, they must be directly invited in the channel meeting invitation.
External users can't be made co-organizers.
To allow co-organizers to manage breakout rooms, they must be from the same organization as the meeting organizer.
Add co-organizers to a meeting
To add co-organizers to a meeting:
Open a meeting in your Teams Calendar.
Make sure the people you want to add as co-organizers have already been added as required attendees.

In Choose co-organizers , select their names from the dropdown menu.
Select Save .
Note: Co-organizers must be in the same organization as the meeting organizer, or be using a guest account in the same org.
Want to learn more? See Overview of meetings in Teams .
Related topics
Invite people to a meeting in Teams

Need more help?
Want more options.
Explore subscription benefits, browse training courses, learn how to secure your device, and more.

Microsoft 365 subscription benefits

Microsoft 365 training

Microsoft security

Accessibility center
Communities help you ask and answer questions, give feedback, and hear from experts with rich knowledge.

Ask the Microsoft Community

Microsoft Tech Community

Windows Insiders
Microsoft 365 Insiders
Was this information helpful?
Thank you for your feedback.
IMAGES
VIDEO
COMMENTS
Are you a student or a teacher struggling with creating assignments in MS Word? Look no further! In this video, we'll provide you with a comprehensive guide ...
How to make an assignment on MS Word on PC or Laptop easily.To make an assignment attractive, good & acceptable you must have to follow these simple steps.1....
Learn how to set up your assignment formatting in Microsoft Word. Includes: margins, font style and size, line spacing, line indents, header, headings and r...
13. Word count. Show the word count properly for the body of your assignment, because it's' important. Place your cursor on the Introduction title, hold the Shift key down, and got to the end of the Conclusion. And then Tools>Word Count and record the number of words. 14. Spelling and Grammar Check.
Select Blank document to start a new document. (Alternatively, select Open if you want to open an existing Word document.) Figure 1. Blank document and Open buttons. When the new document opens, you will be in the Home tab in the ribbon, and your cursor will automatically be placed towards the top, left-hand corner of the page, ready to type.
From keyboard shortcuts to simple, built-in features such as Find and Replace and the automatic table of contents, here are several tips you can use to edit and format your college assignment more efficiently in Microsoft Word. 1. Leave Paragraph Spacing as Your Last Step. Let's first start on the right track.
To select a word, double-click it. Word will select to the left and right of the cursor, until it encounters a space character. Triple-click A triple-click selects the current paragraph. Margin+click To select an entire line, move the cursor into the left margin. When you see the insertion pointer turn into an arrow pointer, click.
Create a new document. On the File tab, select New. Select Blank document, or double-click a template image or type the kind of document into the Search for online templates box and press Enter. Tip: For practice using Word features, try a learning guide like Welcome to Word or Insert your first table of contents. Add and format text.
Switch to Editing view: click Edit Document > Edit in Word for the web. Type and format text, add pictures, adjust the layout of the page, and more. For more advanced editing, click Open in Word. Work together on the same doc. To work together in Word for the web, you edit a document as you normally would.
Instructions: Go to the Format menu, drag down to Style, make sure "Normal" is selected from the list of styles, and click "modify.". In the lower left corner, select the dropdown menu that starts with "Format" and drag down to Paragraph. In the paragraph settings menu that pops up, change the settings for Spacing After to 0pt.
Tasks help track things you need to do. You can assign tasks to other people as well. On the navigation bar, click Tasks, and then click New Task, or open an existing task. Keyboard shortcut To create a task, press Ctrl+Shift+K. Click Assign Task. In the To box, enter a name or an email address. Enter Subject, Start date, and Due date.
When you use an @mention for someone else in your team or group, a new 'Assign to:' option appears like this. Check that box and the comment becomes a task as well, listed above the comment. The person assigned the task gets an automatic email to notify: Assign a task to yourself by @mentioning your own name then assigning the task.
In Microsoft Word: Go to Home > Paste > Paste Special. Select Paste Special and from the dialog select Microsoft Office Excel Worksheet Object . You can resize the data as it was an image, and if you double click, you will be able to edit the values. You can change the table or chart and redesign it.
In this video, we're going to show you the steps on how to format your university assignment/ report on Microsoft Word. In this example, we have a dissertati...
APA requires that your papers have a title page and page numbers in the header of each page. To make a title page and page numbers, follow these instructions: How to Make the Page Numbers in the Header. Within a Microsoft Word document: 1. Click on the INSERT tab at the top of the page. 2. Click on the "Page Number" tool to open a menu of ...
Word 12 Formatting. ★★★☆☆. Kendall Myers November 15, 2017. In this practice project for Word, students create a document with a centered title in all capitals, the first letter of each word slightly larger than the rest. Throughout the document the font is ….
How it works. Open an existing document saved to OneDrive or SharePoint. Write your comment and type @ followed by the name of the team member you want to tag. Select the Assign to check box to convert your comment into a task. Click the blue arrow or press Ctrl + Enter to post your comment.
Who this book is for. Microsoft Word Step by Step (Microsoft 365 and Office 2021) is designed for use as a learning and reference resource by people who want to use Word to create and edit documents, and who want to make use of the many features that help users achieve an attractive and professional result.
You can quickly create a cover page using a built-in design. Select the Insert tab in the ribbon. Figure 1. Insert tab. Select Cover Page in the Pages group. Figure 2. Cover Page button. Choose a built-in design from the gallery in the drop-down menu. (Hover over More Cover Pages from Office.com for additional options.)
How to Write. Download: PDF, MS Word, OpenDocument Section I. The Parties (1) Effective Date Of Assignment. The date when this agreement becomes active must be established. Deliver the calendar date when its effect first obligates the signature Parties to its conditions and terms.
View and navigate your assignments (educator) Manage assignments on a mobile device. Grade, return, and reassign assignments. Delete an assignment in Microsoft Teams. Learn how to create, edit, and turn in assignments using the Assignments app in Microsoft Teams for Education. Tips for due dates, grading rubrics, and adding files, too.
Step 1: Open any document on Microsoft Word for Windows or Mac. Step 2: The default layout uses a single column for your document. Click Layout on the menu bar. Step 3: Expand Columns. Select One ...
Download Free Cover Page Templates. Explore our collection of 23 beautifully designed cover page templates in Microsoft Word format. These templates feature captivating colors and layouts that are sure to make a lasting impression. Simply click on the preview image of each template and download it for free.
السلام عليكمIn this video I've completely tried to show that how can we use MS Word and how to make assignments in MS Word in very easy way. If you are a beg...
The meaning of ASSIGNMENT is the act of assigning something. How to use assignment in a sentence. Synonym Discussion of Assignment. the act of assigning something; a position, post, or office to which one is assigned… See the full definition. Games & Quizzes; Games & Quizzes; Word of the Day; Grammar; Wordplay; Word Finder ...
Free AI Presentation Maker for Generating Projects in Minutes. Generate ready-to-use presentations from a text prompt. Select a style and Visme's AI Presentation Maker will generate text, images, and icon. Customize your presentation with a library of royalty-free photos, videos, & graphics. Generate a presentation with AI.
In this video we will learn about how we can use ms word for university assignments and how to make assignments in ms word in perfect and easy way to get exc...
How to make Assignment in MS Word || Format document in MS Word || HOW TO WORK ON MS WORD.
Sound comes in at 31 minutes May 26, 2024 When I Don't Feel Like Praying Pastor Dwayne Petty
Open a meeting in your Teams Calendar. Make sure the people you want to add as co-organizers have already been added as required attendees. Select Options > More options. Select Roles . In Choose co-organizers, select their names from the dropdown menu. Select Save.