

Create an assignment in Microsoft Teams
Create assignments for your students in Microsoft Teams for Education . Manage assignment timelines, add instructions, create resources to turn in, and more.
Note: Assignments is only available in class teams . You can assign assignments to classes of up to 1000 students. Classes larger than 300 can't use a Class Notebook or Makecode.
In this article
Create a new assignment, title and category, instructions and attachments.
Points, rubrics, and grading
Assigning to students or groups
Due dates and scheduling, assign, save, or discard, classwork modules.
Navigating the Grades tab
Navigate to the desired class team, then select Assignments .
Select Create > New Assignment .

At a minimum, you must give the assignment a title. This is required. You can optionally add a tag, which will make this assignment easier to search for in the future.

Assignments only supports the following image file types: .png, .jpeg, and .gif.
On mobile, Images will resize to the screen.
On desktop, you can use sizing handles on images to resize them.
You can also attach existing files, links, or assignment integrations and create and name a new file right from here for students to turn in.
Note: You can add up to five files for students to edit. The total number of resources you can add to an assignment is 10, whether editable or non-editable. Read-only reference files can be up to 500 MB in size. Files for students to edit can be up to 50 MB in size.
Select Attach to attach resources to the assignment. Choose a file from your OneDrive, upload a file from your device, or choose one of the other options set by your admin, such as MakeCode.
Note: If you're assigning a Class Notebook page, check what version of OneNote your students are using to ensure that their assignment pages will lock after the assignment due date passes.
Select +New to create a blank Word (.docx), Excel (.xlsx), PowerPoint (.pptx), or Whiteboard document, or a new video recording to hand out to your students.
Select Apps to attach content from an app to the assignment. Admins can manage Teams apps in the Microsoft Teams admin center .
Select Learning Accelerators to add Reading Progress , Search Progress and other Learning Accelerators to the Assignment.
By default, Students can't edit attached documents, meaning the document is read-only. This is a great option for reference materials.

Note: If you have older documents with the file extension .doc, .xls, or .ppt, students won't be able to edit them. You can either attach them as read-only reference material or create a new file in Teams, copy in the old content, and save it. All new files you create in Teams or other Microsoft 365 apps will have the correct extension.

The Assign to field is where you choose the class for this assignment. By default, the class team you are in will be selected.

Multiclass Publish
Multiclass publish allows educators to create an assignment for multiple classes with the same due date.
Do this by navigating to the Assign to field and check the boxes for classes the assignment will be published to.

Points and rubrics
You can select which grading scheme, grading categories , and points the assignment is worth.
If you have configured the class to use Grading Categories, you need to select a Grading Category for assignment with points.
Select the amount of points this assignment is worth, if any. You can use points on any number-based scale including whole numbers of 100 and set your own denominator. Examples: 88/100 or decimals 3.7/4.0.
Select Add rubric to create a rubric .
Select Manage grading categories to create or edit the grading categories for the class.
Setting up Grading Schemes
Letter grading and grading categories must be set as a Grading Scheme in the Grade settings section to display these options.

2. Navigate down to Grade settings .
3. Choose Add Schemes or Manage schemes .
Note: If no other grading schemes other than "Points" have been set, this link will read Add Schemes . Once you have gone through the steps to add a new scheme, the link will change to Manage schemes.

5. Set the grading levels. Letter grades will be the normal A, B, C, D, F, scheme. Ensure that there are enough levels to cover the entire 0-100 percent range.
6. Select the Save button when complete.
Finish by choosing the Done button.

Choose multiple classes, individual students, or groups of students in one class to assign to.
By default, only students who are in your class now will receive this assignment. Change this by selecting an option from the dropdown menu.
Note: If you choose a close date, any student who joins will receive this assignment until the close date.

Select a time and date for the assignment to be due. To schedule an assignment, next to Assignment will post immediately with late turn-ins allowed select Edit assignment timeline . Here, you can customize when your assignment will be posted to students and when it will close for turn-ins. By default, no close date will be selected, which allows students to turn in assignments late.
Note: If you choose multiple classes to publish the assignment to, you can select Set due date per class to set individual schedule , due and close date for each class

You can choose whether to add this assignment to your calendar on Outlook, students' calendars, and other educators or staff in your class team. Set this preference for all assignments in Assignments Settings .
Next to Add assignment to calendars , select the dropdown and pick one of the following options:
Students only adds the assignment to just student calendars.
Students and me adds the assignment to both student calendars and your calendar.
Students and team owners to adds the assignment to both student and other educators or staff in the class team calendars.

Choose the channel where you'd like notifications for this assignment to post. This allows you to keep student work and discussion organized by unit, topic, or subject. By default, assignments will be posted in the General channel or your selection in Assignments Settings.
To choose a channel to post in, next to Post assignment notifications to: select the down arrow for a list of available channels.
Pick the channel you’d like this assignment notification to post in, your selection will be applied immediately.
To post assignment notifications to a channel, make sure bot posting is enabled. You can check that here or ask your IT Admin for help.
Assignments will post to channels that are visible to all students. Private channels will not appear during this step.
If you have selected multiple classes, select Set per Class to set which channel to use or just use the General channel. Assignments to individual students do not post to channels.
When you're ready, you can finish the process of creating your new assignment by assigning it to students.
Note: If your school uses Turnitin, you can sync assignment turn-ins to Turnitin .
Assign will immediately publish the assignment and your students will be notified of the new assignment on the day you specified and the notification linking to this assignment will post in the channel you selected. They'll also have an entry on their Teams and Outlooks calendars if you've selected that option.
Save will save a draft of the assignment. Students will not receive any notification, and nothing will be added to any calendar.
Discard will delete the draft of the assignment. Students will not receive any notification, and nothing will be added to any calendar.

Create a New Module
1. Navigate to the desired Class Team, then select Classwork.
2. Select Add module.

3. Enter a title for the new module.
4. Optionally, enter a description.
5. Select Save to save the module as a draft.

Note: Draft modules are only visible to Team owners (teachers) until published. All new modules are created in draft states.
Learn more about managing classwork modules in Microsoft Teams.
Navigate the Grades tab
To open the Grades tab, navigate to your desired class team and select Grades .

You'll see that students appear in a column, with their assignments in a row next to their name. Assignments are listed in order by due date with the nearest date at the beginning.
Learn more about the Grades tab.
Create a group assignment
Edit an assignment
Save an assignment as a draft
Grade, return, and reassign assignments
Additional resources for educators
Ask the community

Need more help?
Want more options.
Explore subscription benefits, browse training courses, learn how to secure your device, and more.

Microsoft 365 subscription benefits

Microsoft 365 training

Microsoft security

Accessibility center
Communities help you ask and answer questions, give feedback, and hear from experts with rich knowledge.

Ask the Microsoft Community

Microsoft Tech Community

Windows Insiders
Microsoft 365 Insiders
Was this information helpful?
Thank you for your feedback.
for Education
- Google Classroom
- Google Workspace Admin
- Google Cloud
Easily distribute, analyze, and grade student work with Assignments for your LMS
Assignments is an application for your learning management system (LMS). It helps educators save time grading and guides students to turn in their best work with originality reports — all through the collaborative power of Google Workspace for Education.
- Get started
- Explore originality reports

Bring your favorite tools together within your LMS
Make Google Docs and Google Drive compatible with your LMS
Simplify assignment management with user-friendly Google Workspace productivity tools
Built with the latest Learning Tools Interoperability (LTI) standards for robust security and easy installation in your LMS
Save time distributing and grading classwork
Distribute personalized copies of Google Drive templates and worksheets to students
Grade consistently and transparently with rubrics integrated into student work
Add rich feedback faster using the customizable comment bank
Examine student work to ensure authenticity
Compare student work against hundreds of billions of web pages and over 40 million books with originality reports
Make student-to-student comparisons on your domain-owned repository of past submissions when you sign up for the Teaching and Learning Upgrade or Google Workspace for Education Plus
Allow students to scan their own work for recommended citations up to three times
Trust in high security standards
Protect student privacy — data is owned and managed solely by you and your students
Provide an ad-free experience for all your users
Compatible with LTI version 1.1 or higher and meets rigorous compliance standards

Product demos
Experience google workspace for education in action. explore premium features in detail via step-by-step demos to get a feel for how they work in the classroom..
“Assignments enable faculty to save time on the mundane parts of grading and...spend more time on providing more personalized and relevant feedback to students.” Benjamin Hommerding , Technology Innovationist, St. Norbert College

Classroom users get the best of Assignments built-in
Find all of the same features of Assignments in your existing Classroom environment
- Learn more about Classroom
Explore resources to get up and running
Discover helpful resources to get up to speed on using Assignments and find answers to commonly asked questions.
- Visit Help Center

Get a quick overview of Assignments to help Educators learn how they can use it in their classrooms.
- Download overview

Get started guide
Start using Assignments in your courses with this step-by-step guide for instructors.
- Download guide

Teacher Center Assignments resources
Find educator tools and resources to get started with Assignments.
- Visit Teacher Center

How to use Assignments within your LMS
Watch this brief video on how Educators can use Assignments.
- Watch video
Turn on Assignments in your LMS
Contact your institution’s administrator to turn on Assignments within your LMS.
- Admin setup

Explore a suite of tools for your classroom with Google Workspace for Education
You're now viewing content for a different region..
For content more relevant to your region, we suggest:
Sign up here for updates, insights, resources, and more.

- Get started with computers
- Learn Microsoft Office
- Apply for a job
- Improve my work skills
- Design nice-looking docs
- Getting Started
- Smartphones & Tablets
- Typing Tutorial
- Online Learning
- Basic Internet Skills
- Online Safety
- Social Media
- Zoom Basics
- Google Docs
- Google Sheets
- Career Planning
- Resume Writing
- Cover Letters
- Job Search and Networking
- Business Communication
- Entrepreneurship 101
- Careers without College
- Job Hunt for Today
- 3D Printing
- Freelancing 101
- Personal Finance
- Sharing Economy
- Decision-Making
- Graphic Design
- Photography
- Image Editing
- Learning WordPress
- Language Learning
- Critical Thinking
- For Educators
- Translations
- Staff Picks
- English expand_more expand_less
Google Classroom - Creating Assignments and Materials
Google classroom -, creating assignments and materials, google classroom creating assignments and materials.

Google Classroom: Creating Assignments and Materials
Lesson 2: creating assignments and materials.
/en/google-classroom/getting-started-with-google-classroom/content/
Creating assignments and materials
Google Classroom gives you the ability to create and assign work for your students, all without having to print anything. Questions , essays , worksheets , and readings can all be distributed online and made easily available to your class. If you haven't created a class already, check out our Getting Started with Google Classroom lesson.
Watch the video below to learn more about creating assignments and materials in Google Classroom.
Creating an assignment
Whenever you want to create new assignments, questions, or material, you'll need to navigate to the Classwork tab.

In this tab, you can create assignments and view all current and past assignments. To create an assignment, click the Create button, then select Assignment . You can also select Question if you'd like to pose a single question to your students, or Material if you simply want to post a reading, visual, or other supplementary material.

This will bring up the Assignment form. Google Classroom offers considerable flexibility and options when creating assignments.
Click the buttons in the interactive below to become familiar with the Assignment form.

This is where you'll type the title of the assignment you're creating.
Instructions
If you'd like to include instructions with your assignment, you can type them here.
Here, you can decide how many points an assignment is worth by typing the number in the form. You can also click the drop-down arrow to select Ungraded if you don't want to grade an assignment.
You can select a due date for an assignment by clicking this arrow and selecting a date from the calendar that appears. Students will have until then to submit their work.
In Google Classroom, you can sort your assignments and materials into topics. This menu allows you to select an existing topic or create a new one to place an assignment under.
Attachments
You can attach files from your computer , files from Google Drive , URLs , and YouTube videos to your assignments.
Google Classroom gives you the option of sending assignments to all students or a select number .
Once you're happy with the assignment you've created, click Assign . The drop-down menu also gives you the option to Schedule an assignment if you'd like it to post it at a later date.
You can attach a rubric to help students know your expectations for the assignment and to give them feedback.
Once you've completed the form and clicked Assign , your students will receive an email notification letting them know about the assignment.
Google Classroom takes all of your assignments and automatically adds them to your Google Calendar. From the Classwork tab, you can click Google Calendar to pull this up and get a better overall view of the timeline for your assignments' due dates.

Using Google Docs with assignments
When creating an assignment, there may often be times when you want to attach a document from Google Docs. These can be helpful when providing lengthy instructions, study guides, and other material.
When attaching these types of files, you'll want to make sure to choose the correct setting for how your students can interact with it . After attaching one to an assignment, you'll find a drop-down menu with three options.

Let's take a look at when you might want to use each of these:
- Students can view file : Use this option if the file is simply something you want your students to view but not make any changes to.
- Students can edit file : This option can be helpful if you're providing a document you want your students to collaborate on or fill out collectively.
- Make a copy for each student : If you're creating a worksheet or document that you want each student to complete individually, this option will create a separate copy of the same document for every student.
Using topics
On the Classwork tab, you can use topics to sort and group your assignments and material. To create a topic, click the Create button, then select Topic .

Topics can be helpful for organizing your content into the various units you teach throughout the year. You could also use it to separate your content by type , splitting it into homework, classwork, readings, and other topic areas.

In our next lesson , we'll explore how to create quizzes and worksheets with Google Forms, further expanding how you can use Google Classroom with your students.
/en/google-classroom/using-forms-with-google-classroom/content/
- Help Center
- Privacy Policy
- Terms of Service
- Submit feedback
- Announcements
- Organize and communicate with your class
- Create assignments
Create an assignment
This article is for teachers.
When you create an assignment, you can post it immediately, save a draft, or schedule it to post at a later date. After students complete and turn in their work, you can grade and return it to the students.
Create & post assignments
- Post to one or more classes
Post to individual students
- Add a grade category
Add a grading period
Change the point value, add a due date or time, add a topic, add attachments, add a rubric.
- Turn on originality reports
- Enter a title and any instructions.
Post to additional classes
- Create an assignment (details above).
- Follow the steps above to add material.
- If "All students" is selected, to deselect the option, tap All students .
- Tap the student names you want to post an assignment to.
Add a grade category
- Next to Grade category , tap No category .
- Select a category.
To organize assignments and grades into your school or district’s grading structure, create grading periods, such as quarters or semesters.
- From the menu, select a grading period.
Tip: Before adding a grading period to an assignment, create a grading period for the class first. Learn how to create or edit grading periods .
- Next to Points , tap the value.
- Enter a new point value or tap Ungraded .
- To create a topic, tap New topic, then enter a topic name.
- To select a topic in the list, tap the topic name.
- To confirm, tap Done .
- Google Drive files
- YouTube videos
- On a computer, in an assignment, you can add interactive questions to YouTube attachments. Learn how to add interactive questions to YouTube video attachments .
- Upload photos from a camera roll or with the scan option.
- View-only for students
- Editable by co-teachers
| Attachment type | Directions |
|---|---|
| Tap Add from Drive . | |
| . | |
| . |
- If you see a message that you don’t have permission to attach a file, tap Copy . Classroom makes a copy of the file to attach to the assignment and saves the copy to the class Drive folder.
- Students can view file : All students can read the file, but not edit it.
- Students can edit file : All students share the same file and can make changes to it.
- This option is only available before you post an assignment.
Attach Drive files with earlier versions of Android
| Android version | Instructions |
|---|---|
| Android 4.4 KitKat | : You won't see the Drive icon |
| Android 4.1–4.3 Jelly Bean | . |
Post an assignment
Schedule an assignment to post later
- Create an assignment (details above). Tip : You can only schedule assignments for a single class.
- At Schedule for date , tap the date, select a date, and tap OK .
- At Schedule for time , tap the time, select a time, and tap OK .
- Tap Schedule . The assignment will automatically post at the scheduled date and time.
- To schedule the assignment in another class, schedule it first for one class and then reuse the post for the other class .
Save an assignment as a draft
Edit a posted assignment
- Enter your changes and tap Save .
Edit a scheduled assignment
- Enter your changes and tap Schedule .
Edit a draft assignment
- Tap the assignment and enter your changes. Changes are automatically saved.
- Assign it immediately (details above).
- Schedule it to post at a specific date and time (details above).
- At the top, tap Instructions .
- Tap Add class comment .
- Enter your comment.
- To confirm, tap Delete .
Related articles
- Create or reuse a rubric for an assignment
- Create a quiz assignment
- Create a question
- Use add-ons in Classroom
- Create, edit, delete, or share a practice set
- Learn about interactive questions for YouTube videos in Google Classroom
Was this helpful?
Need more help, try these next steps:.
- Norsk (Bokmål)
- Português, Brasil
Create and Edit Assignments
You are viewing Original Course View content
Your institution controls which tools are available in the Original Course View . Assignments are always available to instructors in the Ultra Course View .
You can create assignments alongside other content.
With assignments, you can create coursework and manage the grades and feedback for each student separately. You can create assignments in content areas, learning modules, lesson plans, and folders.

When you create an assignment, a Grade Center column is created automatically. From the Grade Center or Needs Grading page, you can see who has submitted their work and start grading. Students access their grades from their My Grades pages or the assignment's Review Submission History page.
You can also create a group assignment and release it to one or more groups in your course. Each group submits one collaborative assignment and all members receive the same grade. You can create a single assignment and assign it to all groups, or create several unique assignments and assign them to individual groups.
More on group assignments
Create an assignment
You can create assignments in content areas, learning modules, lesson plans, and folders.
In the Blackboard mobile app, assignment instructions for Original courses show after students begin an attempt.
Drag files from your computer to the "hot spot" in the Attach Files area. If your browser allows, you can also drag a folder of files. The files will upload individually. If the browser doesn't allow you to submit your assignment after you upload a folder, select Do not attach in the folder's row to remove it. You can drag the files individually and submit again.
You won't be able to drag files to upload if your institution uses an older version of Blackboard Learn.
You can use the file name or provide another name for the file.

- Optionally, select a Due Date . Assignments with due dates automatically show in the course calendar and in the To Do module. Submissions are accepted after this date but are marked late. If you don’t want students to access an assignment after the due date, choose the appropriate display dates.
If you set the points possible to a non-whole number, letter grades may not be assigned correctly.
- Optionally, add a rubric . Expand the sections to make selections such as anonymous grading, how the grade is displayed, and the number of attempts. You can allow more than one attempt on an assignment.
- Make the assignment available when you're ready for students to access it. Select the appropriate options for availability, tracking, and display dates. Display dates don't affect an assignment's availability, only when it appears.
- Select Submit .
More on assignment grade settings
More on adding files in the editor
More on Course Files vs. the Content Collection
Video: Create an Assignment
Watch a video about creating an assignment.
The following narrated video provides a visual and auditory representation of some of the information included on this page. For a detailed description of what is portrayed in the video, open the video on YouTube , navigate to More actions , and select Open transcript .
Video: Create an assignment explains how to create an assignment.
Late assignments
When you assign a due date for an assignment, students can still submit attempts after the date passes. Submissions after the due date are marked late. If you penalize late submissions, inform students in the assignment instructions.
You can view the late label in these areas:
- Student's submission page in the grade panel
- Student's Grade Details page
- Needs Grading page

From the Grade Center, you can also view a list of all submissions with the Assignment File Download option in an assignment's menu. View who has submitted, submission dates, and the grading statuses. You can sort by date to easily see who submitted after the due date.

If you don’t want students to access an assignment after the due date, choose the appropriate display dates. Inform students that you won’t accept submissions after the due date and the assignment will no longer be available.
Students see the late label after they make a submission after the due date.

Student assignment submission confirmations
When students submit assignments successfully, the Review Submission History page appears with information about their submitted assignments and a success message with a confirmation number. Students can copy and save this number as proof of their submissions and evidence for academic disputes. For assignments with multiple attempts, students receive a different number for each submission. If your institution has enabled email notifications for submission receipts, students will also receive an email with a confirmation number and other details for each submission.
You and your students won't be able to view confirmation numbers if your institution uses Blackboard Learn 9.1 Q4 2016 or earlier. Student email notifications and student access to receipt history were introduced in Blackboard Learn 9.1 Q2 2017.

You and your administrators have a retrievable record in the system even if an attempt, assignment, or student is later deleted. These records are maintained in the course and also retrievable after the archive and restore process.
You can access all of your students' confirmation numbers from the Grade Center. Open the Reports menu and select Submission Receipts .

On the Submission Receipts page, you can view information for each assignment, such as who submitted and when. Group assignments are also logged and the Submitter column lists who submitted for the group. In the Submission column, view if a student submitted a file or wrote the submission in the assignment's editor.
Use the menus at the top of the page to filter the items. In the second menu, select Not blank and leave the search box empty to show all of the submission receipts. Select a column heading to sort the items.
Edit, reorder, and delete assignments
You can edit, reorder, and delete your assignments. Change the order of assignments with the drag-and-drop function or the keyboard accessible reordering tool. For example, reorder the assignments to keep the current one at the top.

From an assignment's menu, select on option:
- Move an assignment to another location in your course. When you move an assignment, it's removed from its original location. You can't copy an assignment.
- Edit an assignment. If you change the instructions, students who have already made submissions will see the new instructions only on subsequent attempts.
- Apply release criteria, tracking, metadata, and review status.
More on options you can apply
Delete assignments
You can delete an assignment from a course area and if no student submissions exist, the Grade Center column is also deleted.
When you delete an assignment that has student submissions, you also delete all the submissions. You have two options:
- Preserve the scores in the Grade Center, but delete the assignment and all submissions. Though the scores remain in the Grade Center, you can't access the students' submissions again. The action is irreversible.
- Delete the assignment, the Grade Center column, all assigned grades, and all submissions. The action is irreversible.
Alternatively, make the gradable item unavailable in your course to preserve the submissions and the scores in the Grade Center.
Learn - instructor
Need more help with learn .
Contact your institution's support desk
- Watch videos for instructors
- Join the Community
- Instructor Documentation (Higher Ed)
- Welcome to the Higher Education Instructor Knowledge Base
- Log In to Brightspace
- Change your personal settings in Brightspace
- Welcome to Brightspace
- Course setup
- Start the term
- Activate your course
- About course administration
- Navigate Brightspace and find your course
- Best practices for creating a Course Homepage
- Customize your course navbar
- Automatically customize course content using replace strings
- Brightspace Virtual Assistant
- View your course using a different role
- Create accessible content in Brightspace
- Accessibility
- Adding an accessible template package to your course files
- Meeting web content accessibility standards
- Setting clear course expectations
- Making flexible time limits and deadlines
- Providing alternative learning materials
- Accessibility considerations
- Compliance to accessibility standards in HTML-authored content
- Scenarios for creating release conditions to increase accessibility in courses
- Access course content using the ReadSpeaker docReader integration
- Directing learners to accessibility resources
- How assistive technology interacts with the inline grading experience
- About Announcements
- Announcements
- Create a welcome message using the Announcements widget
- About Assignments
- Assignments
Create an assignment
- Set availability and due dates for an assignment
- Set release conditions and special access in Assignments
- Copy an existing assignment
- Copy assignments to other courses
- Add and Edit categories to manage assignments
- Reorder, edit, and delete assignments and categories
- Hide draft assignments and content
- Align learning outcomes to assignments
- Preview assignments in Evaluation mode
- About anonymous marking
- Restricted File Extensions
- Assignments and Turnitin
- Evaluate assignments using the Assignments tool
- Evaluate assignment activities
- Evaluate assignment submissions from Content
- File types supported by Annotations
- About Attendance
- Assess assignments with grade schemes
- Create and manage attendance registers
- Create and manage attendance sessions
- About Awards
- Create and manage awards
- Create a blog
- About Brightspace Editor
- Brightspace Editor
- Insert and edit images with Brightspace Editor
- Insert and edit equations with Equation Editor
- About Calendar
- Manage course events with the Calendar tool
- Create a checklist
- About Class Progress
- Class Progress
- Track course progress with the Class Progress tool
- View course progress against Standards
- Accessing Class Progress data in the Brightspace Data Platform
- Change and reorder Main Indicators in Class Progress
- View assessment details on the Outcomes Progress details page
- About Classlist
- Review your Classlist
- Auditors and Bulk Auditor Management
- About Competencies
- Competencies
- Manage Competencies
- Create a learning objective
- Add a learning objective to a content topic
- Content experiences
- About course content organization
- What types of files can I use for course content?
- Use HTML templates in Content
- Improve navigation in multi-page content topics
- Notify learners about updated course content
- Add existing activities with Google Drive
- Add existing activities with OneDrive
- Create and integrate form templates in Content
- Using Virtual Classrooms and Video Assignments by Bongo
- View user progress in Content
- Change content display settings
- Add and organize learning materials in the Classic Content experience
- Fix broken links in Content
- Add and organize learning materials in the New Content Experience (Lessons)
- Hide Content topics, modules, and downloads
- ReadSpeaker integrations for Lessons
- Add availability and due dates in Content
- Add a Release Condition to Content
- Set a course timeframe
- Classic Content Experience
- View course content statistics
- Content statistics and completion tracking
- Track content completion and participation
- About Course Builder
- Course Builder
- Create a course with Course Builder
- New Content Experience (Lessons)
- Manage course waitlists
- Course Catalog
- Manage courses and programs
- Manage participants
- About Brightspace Creator+
- Using the Creator+ features of Brightspace Editor
- Create a presentation with the Capture App
- Create a presentation with Capture Web
- Manage learner self-enrollment with Discover
- About Discussions
- Create discussion forums and topics
- Discussions
- Create group work areas for learners
- Restrict a forum or topic to specific groups or sections
- Create a group thread in an existing topic
- Set up a quicklink to a discussion topic or forum within an existing Content topic
- Evaluate discussions
- Manage discussion forums and topics
- Email others using the Email tool
- Disable your course address book
- About Brightspace ePortfolio
- Enable Brightspace ePortfolio reflections from Content
- About certified Brightspace artifacts
- About Form Templates
- Create FAQ questions and categories
- About Game Based Learning (GBL)
- Create and manage Game Maps
- Game Based Learning (GBL)
- About Grades
- Grading systems types
- Create a grading system
- Grading systems
- About exemptions
- Grade exemptions
- How grade exemptions affect calculations
- Final Grades that include exemptions
- Create Grading Schemes using the Grades tool
- Set up your Grade book
- Create and delete grade categories and items
- Import grade items
- Delete grade items or categories
- Drop the lowest grade
- Importing grades
- Gradebook icons and notifications
- About automatic transfer of overall score to a learner's grade
- Managing event logs in grade book
- Banner Grades
- Grade book Mastery View
- Setting up and configuring the Grade book Mastery view
- Mastery View
- Setting up Outcomes for use with Grade book Mastery View
- Overall Achievement Calculation Settings
- Viewing Grade book Mastery View
- Publishing and retracting achievement evaluations in Mastery View
- Best practices for using Grade book Mastery View
- Manually overriding achievement levels in Mastery View
- Define Settings in the Grades tool
- Enter grades in the Grades tool
- Evaluate with the Grades tool
- Manage Grades in the Grades tool
- Set release conditions for grades
- Navigating in the inline grading experience
- About Groups and Sections
- Create categories and groups
- Groups and Sections
- Create a section
- About Import/Export/Copy Components
- Import, export, or copy course components
- Import/Export/Copy Components
- Integrity Advocate Remote Proctoring in D2L Brightspace
- Integrity Advocate
- View and Override Proctoring activity
- About Intelligent Agents
- Intelligent Agents
- Set up Intelligent Agents
- Run Intelligent Agents
- Using the Brightspace LeaP wizard
- Setting up learning paths
- Update learning paths
- Add a learning path link to Content in 10.3 or higher
- Using the Content Report
- Using the Progress Report
- Using the Outcomes Report
- Using the Activity Report
- Grading with LeaP
- About Brightspace Learning Object Repository
- Browse the Brightspace Learning Repository
- Learning Object Repository (LOR)
- Publish (add) objects to Brightspace Learning Repository
- Retrieve learning objects
- Manage learning objects and collections
- RSS feeds in Brightspace Learning Repository
- Review learning objects
- Create and delete a link or link category
- Manage locations
- About Manage Dates
- Bulk edit dates in Manage Dates
- Manage Dates
- About Manage Files
- Create a Content topic in Manage Files
- Manage Files
- Apply content permissions to folders in Manage Files
- About Media Library
- Manage audio-video content with Media Library
- Media Library
- Upload, edit, and play audio-video content with Media Player
- Media Player
- View and download audio-video transcripts
- Gain personalized insight about individual learners
- Learner Engagement Dashboard
- Performance+
- About predictive charts
- Interpreting the Assessments predictive chart
- Interpreting the Social Learning predictive chart
- Interpreting the Success Index predictive charts
- How does Brightspace Student Success System work?
- Student Success System (s3)
- Make predictions about learner success and risk levels
- Brightspace Student Success System areas
- Brightspace Student Success System domains
- Monitor weekly success and risk in your class
- Interpreting the win-loss chart
- Troubleshooting: I can't access Brightspace Student Success System
- Using the Students at Risk widget
- Students at Risk widget
- Class Engagement interface overview
- Easily access analytics about learners and your course
- About Portfolio
- Define Portfolio class settings
- Student at Risk widget
- Using Brightspace Portfolio for higher education and corporate learning
- Review and assess submitted Portfolio evidence
- Archive evidence
- Course Overview widget
- Grade with Quick Eval
- About Quizzes
- Create and configure a quiz
- Manage quiz questions
- Manage questions in the Quiz Builder
- Applying Respondus LockDown Browser to a quiz
- Manage quizzes with learner attempts
- Retake incorrect quiz questions in subsequent attempts
- View quiz statistics and attempt logs
- Evaluate quizzes
- Quizzes FAQ: Hot tips and workarounds
- About Question Library
- Import questions into the Question Library
- Question Library
- Creating Question Library questions
- Managing questions in Question Library
- Quizzes and Question Library
- Delete and copy questions from Question Library in a quiz
- About Release Conditions
- Attach Release Conditions
- Release Conditions
- About Rubrics
- Create a rubric using the Rubrics tool
- Evaluate assignments using the Rubrics tool
- Manage Rubrics through the Quicklinks menu
- Import and manage SCORM
- Track activity and user progress on SCORM objects
- Create and manage seating charts
- Associate course content with Standards
- Seating Charts
- Set up Surveys
- Standards (Also known as Learning Outcomes, Expectations, Competencies, or Objectives)
- Track survey progress and results
- Create and insert a video note in Brightspace Editor
- Add subtitles to video topics
- Manage widgets on your homepage
- Set up the Activity Feed widget and post
- Post assignments using the Activity Feed widget
- Activity Feed widget
- Control commenting on Activity Feed posts
- About the Create Course widget
- Create a course in the Create Course widget
- Create Course widget
- Homepage Widget Expansion Pack
- Using the My Org Units widget
- Using the Photo Banner Widget
- Using the Slim Announcements Widget
- Using the Visual Table of Contents (TOC) Widget
- Using the Welcome Window Widget
- Create a widget-based homepage
- Displaying course grouping tabs in the My Courses widget
- Review learner course assignments with the Work To Do widget
- Change personal settings with the My Settings widget
- Glossary of Terms
- My Courses widget
- Glossary of Icons
- Documentation changes for higher ed instructors
Provide more efficient, timely, and meaningful grading and feedback. Create and edit assignments, see submission details, view submissions, associate assignments to rubrics and competencies, and return submissions with grades and feedback. On paper and observed in person assignment formats are also available.
The Create and Edit Assignments page has a fully immersive page layout. This layout is consistent with other areas of Brightspace including Assignments, Content, and Lessons, where you can upload and create a new assignment.
Access the new Assignment page
There are several different starting points to create assignments.
To create an assignment in the Classic Content Experience
- In Content , select the module where you want to create an assignment.
- Click Upload/Create .

Video: Create an assignment
To create an assignment from the New Content Experience
- From your course homepage, navigate to Content .
- In your desired module, click Create New .

Video: The New Assignments Creation Experience
To create an assignment from the Assignments tool
- Navigate to Assignments .
- Click New Assignment .
Fill in assignment details
When creating a new assignment, start by entering basic details such as name, grade scheme, due date, and description.
To fill in assignment details

- For Grade Out Of , enter the number of points for the assignment.
| You can also create grade items and categories from the Grades tool. Refer to for more information. |
- Add to Grade Book
- Enter the Due Date for your assignment.
| You can click the icons to upload any files, link to any existing activities or external weblinks, attach any files from Google Drive or OneDrive, and record and/or upload any audio or video files. |
- If you do not wish to configure your assignment further, toggle the assignment to Visible and click Save and Close .
The new assignment is created and available to learners.
Set a start and end date for your assignment
You can further customize your assignment by setting availability dates.
To set a start date and end date

- Set a Start Date and an End Date .
- Visible with access restricted
- Visible with submission restricted

The new assignment is created with specified start and end dates.
| You can also click the link below the start and end date fields to change the default settings for availability dates. When you collapse , the summary text displays the selected start and end date information. The default time for an assignment start date is set to 12:00 AM. The default end date time is set to 11:59 PM. |
Create a new release condition for your assignment
You can add release conditions to your assignment. Release conditions are conditions that must be met for an assignment to be made visible to learners. For example, you can set your assignment to only be available to learners when they achieve a specified score on a quiz.
To create a new release condition

- Under Condition Type , select the condition that must be met.
- Under Assignment Submission Folder , select the assignment submission folder in which this condition must be met.
- Click Create .
A new release condition is added to your assignment.
Attach an existing release condition to your assignment
You can also attach an existing release condition to your assignment.
To attach an existing release condition

| Use the drop-down menu to filter the existing release conditions. |
An existing release condition is added to your assignment.
Make your assignment only available to a select group
You can Manage Special Access for your assignment. This enables you to make your assignments available only to a select group of users or to add individualized due dates for certain users.
To make your assignment available to a select group

- Allow users with special access to submit outside the normal availability dates for this folder.
- Allow only users with special access to see this folder.
- To add users, click Add Users to Special Access .
- Specify the Due Date and the Availability start and end dates for selected users.
- Select the check box alongside the users who you want to grant this special access to.
- Click Save and then click Save and Close .
Your assignment is configured to give special access to specific users or groups.
Customize Submission Type & Completion settings
You can also customize what type of assignment you are creating, and what file types you will accept from learners submitting their assignments.
To customize submission type and completion settings

| You must have groups set up in your course to set an assignment as a group assignment. |
| You can edit the name of an existing category from the page. On the page, click . |
- For File Submissions , set the number of Files Allowed Per Submission and the Submissions rules.
- For Text submissions , set the Submission rules.
- For On paper submissions , set Marked as completed to one of the available options: Manually by learners , Automatically on evaluation , or Automatically on due date .
| When you collapse , the summary text displays your selection. |
- From the Allowable File Extensions drop-down menu, select an option to restrict file extensions on submissions for the assignment.
| This field is only available when the assignment is set to or . |
The assignment type and acceptable file type for submission is set.
Customize Evaluation & Feedback settings
Add rubrics, associate learning objectives, display annotations, and enable integrations such as Turnitin.
To customize evaluation & feedback settings
| If you are attaching multiple rubrics, from the drop-down list select the rubric to be used by default when scoring. |
- Click Manage Learning Objectives .
- Click Associate Learning Objectives .
- Select the learning objective you want to add and then click Add Selected .
- On the context menu of the associated learning objective, select Add Assessment .
- Select an existing rubric or create a new rubric.
- Select the rubric criteria and specify if the assessment activity is required to complete the learning objective.
- Click Save .
- Click Close .
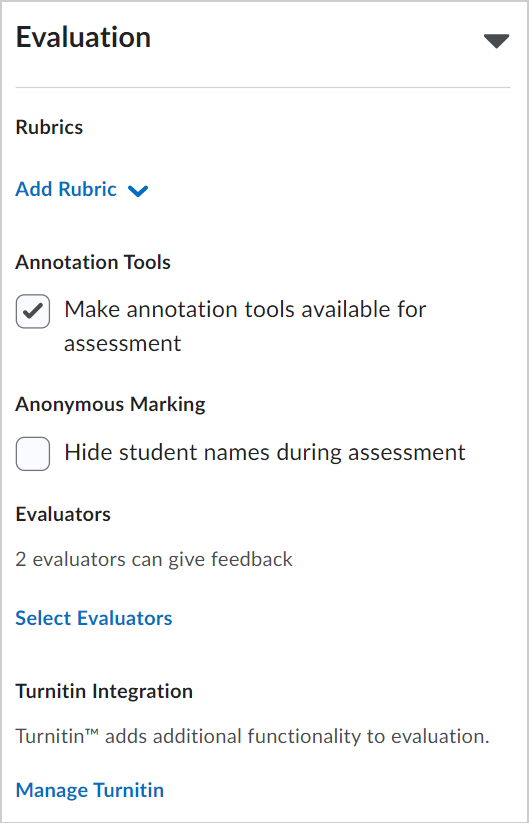
- To display annotation tools in the document viewer, under Annotation Tools , select the Make annotation tools available for assessment check box.
- To enable anonymous marking, under Anonymous Marking , select the Hide student names during assessment check box.
- Under Publishers , select the option for who can publish evaluations. If you choose Manually select publishers , click Select Publishers to choose who can publish evaluations.
- Click Manage Allocations if you want to allocate learners to specific evaluators.
- If you selected more than one evaluator, under Coordinate Multiple Evaluators , select either One shared evaluation or Multiple individual evaluations to choose how the evaluation process works.
- Enable the Turnitin integration and click Save .
| If this Visibility is not turned on when creating the assignment, the assignment is hidden from learners by default. |
- Click Save and Close .
| only appears when the tool is enabled and the course is not using the tool. If your course is using learning standards (Learning Outcomes tool), and if you have , you can assess submissions against standards for individual and group assignments. |
Add a rubric to an assignment

| You can add more than one rubric to an assignment. |

Preview an assignment submission
There are often situations where you would like to see the end-to-end flow of submitting an assignment you created. This can easily be accomplished by leveraging the Preview function within the Assignments tool. You can go through the process of viewing and submitting an assignment and have your preview submission available in the evaluation workflow.
| Your preview submissions will not impact the statistics for your course. |
To preview an assignment submission

- Select the assignment you want to preview.
- Select Allow this preview submission to be available in the folder .
- Click Add a File to submit a test assignment.

- On the Review Assignment Submission page, click Exit Preview .
- If you want to view the evaluation workflow for your assignment submission, click on the assignment where you just made the submission.
- Click Show Search Options .

- Click Apply and find your assignment submission.
You now have access to the to the evaluation screen for your assignment submission.
Colour My Learning is supported by our readers. As an Amazon Associate we earn from qualifying purchases and display ads. When you purchase through links on our site, we may earn an affiliate commission. Learn more
Google Classroom: When to Use the Different Assignments & How to Assign Work
Samuel J Tan Classroom Technology , Learning , Popular , Technology , Tutorials , VLEs 0
Here is a guide to set the different assignments under the Classwork tab in Google Classroom. This brief tutorial shows the different options; assignment, quiz assignment, question and material, when and how to assign them.
Table of Contents
The object of this tutorial is to give you an overview of what you can achieve with the different assignments supported on Google Classroom. You will need to first head over to the Classwork tab, second after Stream on the top once you are inside your classroom. This tutorial assumes that you have created your first classroom. You can see how to start your own virtual classroom in under 2 minutes for help. We will cover the following:
- create assignments and questions
- use topics to organise classworks into modules or units
- order work by dragging them up or down in Classwork page
Types of Assignment
There are four types of assignments you can create on Google Classroom. They are as follows:
- Assignment (points awarded, good for final assignment with manual marking and use of Rubric)
- Quiz assignment (points awarded, good for automatic marking and grading)
- Question (no points awarded, good for single question quick survey, short answer, multiple choice)
- Material (no points awarded, good for reading assignment or lesson preparations)
Apart from the above, you have the ability to reuse existing post and create topic header. The former lets you reuse posts you have published on Stream in this or other Classes. The latter is topic header you can add to organise the classwork by modules or units. Let’s start looking at each of these different classwork, when to use them and how to create them.
A. Assignment
Probably the most commonly used classwork is the assignment. Here you can pick one of the following top options when creating an assignment. Beyond filling in the title and instruction, choose to:
- Add an existing resource: Google Drive , Link , File or YouTube
- Create a new document: create a new Google Docs , Slides , Sheets , Drawings or Forms
The first option allows you to add a Google Drive, Link to web resources, upload or choose an online file to add to Classroom’s Google Drive. You can use this to assign work like “access the work files or resources in Google Drive”, “revise or research using this link”, “download, open and read the document attached” and “watch this video tutorial or recorded seminar”.
The second option lets you create online documents. This can be a word document, slide presentation file, spreadsheet, drawing or forms. There is no need to upload a document. Here is where your assignment is created and marked totally online. Use the option to assigning a copy to each student and marking them separately with in-line feedback, grade and comments.
As you can see Assignment covers a lot of grounds in terms of resources and online document format supported.
Step by Step Guide on How to Create an Assignment using Google Docs
Here is how to create an online assignment using Google Docs. [number correspond to image in gallery below]
- Open your class
- Click on the second tab, Classwork
- Click “ + Create ” button and choose Assignment
- In the pop up window, add Title and Instructions
- Click “ + Create ” button and choose Docs [4]
- A new tab will open to show the new Google Docs [5]
- Change the title of the document by clicking on Untitled document (top left corner)
- Enter the instruction for assignment into the body, look for All changes saved in Drive status in top bar then close tab and return to previous Assignment tab [5]
- Don’t worry if the document still says Untitled document, next to this click drop down menu and choose Make a copy for each student . [6]
- Complete the options in the right side bar (for course, all or select students, grade points, due date, topic and marking rubric (optional) then click Assign button. [7]
NOTE: You can also choose to Schedule the assignment, save or discard draft by clicking on the drop down arrow next to the Assign button.
You will then be returned to the Classwork page where you can see the assignment you have just created, click on it to open a summary card. [8]
B. Quiz Assignment
Based on Google Forms, the quiz is the other assignment you can create as classwork. This is great to gauge the students understanding of the subject. Like any questionnaire or form, you can use different field types when designing your form.
Step by Step Guide on How to Create an Quiz Assignment
- Click “ + Create ” button and choose Quiz Assignment
- A new pop-up window will appear, enter the Title and Instructions for this quiz
- Click on the Blank Quiz link to open the Google Forms file. Click on the title Blank Quiz to change this and start editing the quiz by completing and adding more questions including answers and points for automatic marking.
- Once you have completed your editing, look for All changes saved in Drive , close the tab and return to previous Assignment tab.
- Complete the options in the right side bar (for course, all or select students, grade points, due date, topic and marking rubric (optional) then click Assign button.
You will then be returned to the Classwork page where you can see the assignment you have just created, click on it to open a summary card.
C. Question
The third type of assignment is Question. This is more of a simple single question survey with option to choose between a short answer or multiple choice answer. Nothing more beyond that. It is probably the quickest to set up and least complicated. This is useful to get quick answers from the group. Students can be allowed to see everyones answers and change their answer. No points can be awarded for this assignment.
Step by Step Guide on How to Create Question as Assignment
- Click “ + Create ” button and choose Question
- A new pop-up window will appear, enter the Question and Instructions for this question
- Choose from drop down menu to select Short answer or Multiple choice .
- Here you can also add resources or create online files in Google Drive.
- Complete the options in the right side bar; class(es) the Question is for, assign to All or specific students, Points, Due date and Topic. Also choose if other students can reply to each other and edit their answer if Short answer is chosen. Or, choose if students can see class summary if Multiple choice is chosen.
- Click the Ask button when ready.
D. Material
The last and final assignment is the Material. Here you can assign learning materials for students to study and prepare. As before, you can upload a resource or create online file as material. Like Questions assignment type, no points can be awarded for Material assignment type.
Step by Step Guide on How to Create Material as Assignment
- Click “ + Create ” button and choose Material
- In the pop-up window, complete Title and Description field
- Choose to add a resource or + create online document
- Then configure the assignment using right sidebar, pick to assign to All students or select individuals and pick the Topic this comes under.
- When ready click the Post button.
Featured Products
Interested in the product(s) featured here, use the links below to check the price , availability and offers . As an affiliate, we may earn a commission from qualifying purchases.
Links to visit major online retailers
Related Posts
Tablets , Technology
Which Big iPad to Choose? Apple iPad Air 13 M2 (2024), iPad Pro 12.9 M2 (2022) or iPad Pro 13 M4 (2024)
Xiaomi redmi pad se 11-inch tablet quick review & alternatives.
Monitors , Technology
MacBook Air with M3 Now Supports Two(2) External Monitors with a Caveat
Hardware , Monitors , Technology
Maximum Displays Supported by Apple M3, M3 Pro and M3 Max Systems
Laptops , Technology
Affordable MacBook Air and Pro Choices for Students
Smartphones , Technology , Tutorials
How to Tell Siri to Shoot or Record a Video
Classroom Technology , Tablets , Technology
Essential Accessories for the Google Pixel Tablet for Productivity
Software & Web Apps , Technology
The Role of Social Media in Education: Collaboration, Communication & Beyond
Education , Learning , Technology
The Internet of Things (IoT) in Education: Shaping the connected learning environments
Share your thoughts cancel reply.
This site uses Akismet to reduce spam. Learn how your comment data is processed .
Discover more from Colour My Learning
Subscribe now to keep reading and get access to the full archive.
Type your email…
Continue reading

Understanding Assignments
What this handout is about.
The first step in any successful college writing venture is reading the assignment. While this sounds like a simple task, it can be a tough one. This handout will help you unravel your assignment and begin to craft an effective response. Much of the following advice will involve translating typical assignment terms and practices into meaningful clues to the type of writing your instructor expects. See our short video for more tips.
Basic beginnings
Regardless of the assignment, department, or instructor, adopting these two habits will serve you well :
- Read the assignment carefully as soon as you receive it. Do not put this task off—reading the assignment at the beginning will save you time, stress, and problems later. An assignment can look pretty straightforward at first, particularly if the instructor has provided lots of information. That does not mean it will not take time and effort to complete; you may even have to learn a new skill to complete the assignment.
- Ask the instructor about anything you do not understand. Do not hesitate to approach your instructor. Instructors would prefer to set you straight before you hand the paper in. That’s also when you will find their feedback most useful.
Assignment formats
Many assignments follow a basic format. Assignments often begin with an overview of the topic, include a central verb or verbs that describe the task, and offer some additional suggestions, questions, or prompts to get you started.
An Overview of Some Kind
The instructor might set the stage with some general discussion of the subject of the assignment, introduce the topic, or remind you of something pertinent that you have discussed in class. For example:
“Throughout history, gerbils have played a key role in politics,” or “In the last few weeks of class, we have focused on the evening wear of the housefly …”
The Task of the Assignment
Pay attention; this part tells you what to do when you write the paper. Look for the key verb or verbs in the sentence. Words like analyze, summarize, or compare direct you to think about your topic in a certain way. Also pay attention to words such as how, what, when, where, and why; these words guide your attention toward specific information. (See the section in this handout titled “Key Terms” for more information.)
“Analyze the effect that gerbils had on the Russian Revolution”, or “Suggest an interpretation of housefly undergarments that differs from Darwin’s.”
Additional Material to Think about
Here you will find some questions to use as springboards as you begin to think about the topic. Instructors usually include these questions as suggestions rather than requirements. Do not feel compelled to answer every question unless the instructor asks you to do so. Pay attention to the order of the questions. Sometimes they suggest the thinking process your instructor imagines you will need to follow to begin thinking about the topic.
“You may wish to consider the differing views held by Communist gerbils vs. Monarchist gerbils, or Can there be such a thing as ‘the housefly garment industry’ or is it just a home-based craft?”
These are the instructor’s comments about writing expectations:
“Be concise”, “Write effectively”, or “Argue furiously.”
Technical Details
These instructions usually indicate format rules or guidelines.
“Your paper must be typed in Palatino font on gray paper and must not exceed 600 pages. It is due on the anniversary of Mao Tse-tung’s death.”
The assignment’s parts may not appear in exactly this order, and each part may be very long or really short. Nonetheless, being aware of this standard pattern can help you understand what your instructor wants you to do.
Interpreting the assignment
Ask yourself a few basic questions as you read and jot down the answers on the assignment sheet:
Why did your instructor ask you to do this particular task?
Who is your audience.
- What kind of evidence do you need to support your ideas?
What kind of writing style is acceptable?
- What are the absolute rules of the paper?
Try to look at the question from the point of view of the instructor. Recognize that your instructor has a reason for giving you this assignment and for giving it to you at a particular point in the semester. In every assignment, the instructor has a challenge for you. This challenge could be anything from demonstrating an ability to think clearly to demonstrating an ability to use the library. See the assignment not as a vague suggestion of what to do but as an opportunity to show that you can handle the course material as directed. Paper assignments give you more than a topic to discuss—they ask you to do something with the topic. Keep reminding yourself of that. Be careful to avoid the other extreme as well: do not read more into the assignment than what is there.
Of course, your instructor has given you an assignment so that they will be able to assess your understanding of the course material and give you an appropriate grade. But there is more to it than that. Your instructor has tried to design a learning experience of some kind. Your instructor wants you to think about something in a particular way for a particular reason. If you read the course description at the beginning of your syllabus, review the assigned readings, and consider the assignment itself, you may begin to see the plan, purpose, or approach to the subject matter that your instructor has created for you. If you still aren’t sure of the assignment’s goals, try asking the instructor. For help with this, see our handout on getting feedback .
Given your instructor’s efforts, it helps to answer the question: What is my purpose in completing this assignment? Is it to gather research from a variety of outside sources and present a coherent picture? Is it to take material I have been learning in class and apply it to a new situation? Is it to prove a point one way or another? Key words from the assignment can help you figure this out. Look for key terms in the form of active verbs that tell you what to do.
Key Terms: Finding Those Active Verbs
Here are some common key words and definitions to help you think about assignment terms:
Information words Ask you to demonstrate what you know about the subject, such as who, what, when, where, how, and why.
- define —give the subject’s meaning (according to someone or something). Sometimes you have to give more than one view on the subject’s meaning
- describe —provide details about the subject by answering question words (such as who, what, when, where, how, and why); you might also give details related to the five senses (what you see, hear, feel, taste, and smell)
- explain —give reasons why or examples of how something happened
- illustrate —give descriptive examples of the subject and show how each is connected with the subject
- summarize —briefly list the important ideas you learned about the subject
- trace —outline how something has changed or developed from an earlier time to its current form
- research —gather material from outside sources about the subject, often with the implication or requirement that you will analyze what you have found
Relation words Ask you to demonstrate how things are connected.
- compare —show how two or more things are similar (and, sometimes, different)
- contrast —show how two or more things are dissimilar
- apply—use details that you’ve been given to demonstrate how an idea, theory, or concept works in a particular situation
- cause —show how one event or series of events made something else happen
- relate —show or describe the connections between things
Interpretation words Ask you to defend ideas of your own about the subject. Do not see these words as requesting opinion alone (unless the assignment specifically says so), but as requiring opinion that is supported by concrete evidence. Remember examples, principles, definitions, or concepts from class or research and use them in your interpretation.
- assess —summarize your opinion of the subject and measure it against something
- prove, justify —give reasons or examples to demonstrate how or why something is the truth
- evaluate, respond —state your opinion of the subject as good, bad, or some combination of the two, with examples and reasons
- support —give reasons or evidence for something you believe (be sure to state clearly what it is that you believe)
- synthesize —put two or more things together that have not been put together in class or in your readings before; do not just summarize one and then the other and say that they are similar or different—you must provide a reason for putting them together that runs all the way through the paper
- analyze —determine how individual parts create or relate to the whole, figure out how something works, what it might mean, or why it is important
- argue —take a side and defend it with evidence against the other side
More Clues to Your Purpose As you read the assignment, think about what the teacher does in class:
- What kinds of textbooks or coursepack did your instructor choose for the course—ones that provide background information, explain theories or perspectives, or argue a point of view?
- In lecture, does your instructor ask your opinion, try to prove their point of view, or use keywords that show up again in the assignment?
- What kinds of assignments are typical in this discipline? Social science classes often expect more research. Humanities classes thrive on interpretation and analysis.
- How do the assignments, readings, and lectures work together in the course? Instructors spend time designing courses, sometimes even arguing with their peers about the most effective course materials. Figuring out the overall design to the course will help you understand what each assignment is meant to achieve.
Now, what about your reader? Most undergraduates think of their audience as the instructor. True, your instructor is a good person to keep in mind as you write. But for the purposes of a good paper, think of your audience as someone like your roommate: smart enough to understand a clear, logical argument, but not someone who already knows exactly what is going on in your particular paper. Remember, even if the instructor knows everything there is to know about your paper topic, they still have to read your paper and assess your understanding. In other words, teach the material to your reader.
Aiming a paper at your audience happens in two ways: you make decisions about the tone and the level of information you want to convey.
- Tone means the “voice” of your paper. Should you be chatty, formal, or objective? Usually you will find some happy medium—you do not want to alienate your reader by sounding condescending or superior, but you do not want to, um, like, totally wig on the man, you know? Eschew ostentatious erudition: some students think the way to sound academic is to use big words. Be careful—you can sound ridiculous, especially if you use the wrong big words.
- The level of information you use depends on who you think your audience is. If you imagine your audience as your instructor and they already know everything you have to say, you may find yourself leaving out key information that can cause your argument to be unconvincing and illogical. But you do not have to explain every single word or issue. If you are telling your roommate what happened on your favorite science fiction TV show last night, you do not say, “First a dark-haired white man of average height, wearing a suit and carrying a flashlight, walked into the room. Then a purple alien with fifteen arms and at least three eyes turned around. Then the man smiled slightly. In the background, you could hear a clock ticking. The room was fairly dark and had at least two windows that I saw.” You also do not say, “This guy found some aliens. The end.” Find some balance of useful details that support your main point.
You’ll find a much more detailed discussion of these concepts in our handout on audience .
The Grim Truth
With a few exceptions (including some lab and ethnography reports), you are probably being asked to make an argument. You must convince your audience. It is easy to forget this aim when you are researching and writing; as you become involved in your subject matter, you may become enmeshed in the details and focus on learning or simply telling the information you have found. You need to do more than just repeat what you have read. Your writing should have a point, and you should be able to say it in a sentence. Sometimes instructors call this sentence a “thesis” or a “claim.”
So, if your instructor tells you to write about some aspect of oral hygiene, you do not want to just list: “First, you brush your teeth with a soft brush and some peanut butter. Then, you floss with unwaxed, bologna-flavored string. Finally, gargle with bourbon.” Instead, you could say, “Of all the oral cleaning methods, sandblasting removes the most plaque. Therefore it should be recommended by the American Dental Association.” Or, “From an aesthetic perspective, moldy teeth can be quite charming. However, their joys are short-lived.”
Convincing the reader of your argument is the goal of academic writing. It doesn’t have to say “argument” anywhere in the assignment for you to need one. Look at the assignment and think about what kind of argument you could make about it instead of just seeing it as a checklist of information you have to present. For help with understanding the role of argument in academic writing, see our handout on argument .
What kind of evidence do you need?
There are many kinds of evidence, and what type of evidence will work for your assignment can depend on several factors–the discipline, the parameters of the assignment, and your instructor’s preference. Should you use statistics? Historical examples? Do you need to conduct your own experiment? Can you rely on personal experience? See our handout on evidence for suggestions on how to use evidence appropriately.
Make sure you are clear about this part of the assignment, because your use of evidence will be crucial in writing a successful paper. You are not just learning how to argue; you are learning how to argue with specific types of materials and ideas. Ask your instructor what counts as acceptable evidence. You can also ask a librarian for help. No matter what kind of evidence you use, be sure to cite it correctly—see the UNC Libraries citation tutorial .
You cannot always tell from the assignment just what sort of writing style your instructor expects. The instructor may be really laid back in class but still expect you to sound formal in writing. Or the instructor may be fairly formal in class and ask you to write a reflection paper where you need to use “I” and speak from your own experience.
Try to avoid false associations of a particular field with a style (“art historians like wacky creativity,” or “political scientists are boring and just give facts”) and look instead to the types of readings you have been given in class. No one expects you to write like Plato—just use the readings as a guide for what is standard or preferable to your instructor. When in doubt, ask your instructor about the level of formality they expect.
No matter what field you are writing for or what facts you are including, if you do not write so that your reader can understand your main idea, you have wasted your time. So make clarity your main goal. For specific help with style, see our handout on style .
Technical details about the assignment
The technical information you are given in an assignment always seems like the easy part. This section can actually give you lots of little hints about approaching the task. Find out if elements such as page length and citation format (see the UNC Libraries citation tutorial ) are negotiable. Some professors do not have strong preferences as long as you are consistent and fully answer the assignment. Some professors are very specific and will deduct big points for deviations.
Usually, the page length tells you something important: The instructor thinks the size of the paper is appropriate to the assignment’s parameters. In plain English, your instructor is telling you how many pages it should take for you to answer the question as fully as you are expected to. So if an assignment is two pages long, you cannot pad your paper with examples or reword your main idea several times. Hit your one point early, defend it with the clearest example, and finish quickly. If an assignment is ten pages long, you can be more complex in your main points and examples—and if you can only produce five pages for that assignment, you need to see someone for help—as soon as possible.
Tricks that don’t work
Your instructors are not fooled when you:
- spend more time on the cover page than the essay —graphics, cool binders, and cute titles are no replacement for a well-written paper.
- use huge fonts, wide margins, or extra spacing to pad the page length —these tricks are immediately obvious to the eye. Most instructors use the same word processor you do. They know what’s possible. Such tactics are especially damning when the instructor has a stack of 60 papers to grade and yours is the only one that low-flying airplane pilots could read.
- use a paper from another class that covered “sort of similar” material . Again, the instructor has a particular task for you to fulfill in the assignment that usually relates to course material and lectures. Your other paper may not cover this material, and turning in the same paper for more than one course may constitute an Honor Code violation . Ask the instructor—it can’t hurt.
- get all wacky and “creative” before you answer the question . Showing that you are able to think beyond the boundaries of a simple assignment can be good, but you must do what the assignment calls for first. Again, check with your instructor. A humorous tone can be refreshing for someone grading a stack of papers, but it will not get you a good grade if you have not fulfilled the task.
Critical reading of assignments leads to skills in other types of reading and writing. If you get good at figuring out what the real goals of assignments are, you are going to be better at understanding the goals of all of your classes and fields of study.
You may reproduce it for non-commercial use if you use the entire handout and attribute the source: The Writing Center, University of North Carolina at Chapel Hill
Make a Gift
Create a New Assignment
You can create assignments for entire audiences and/or individual learners. Audiences are comprised of learners who have a defined set of user attributes . When you assign user attribute values to learners, they are automatically added to one or more audiences if the assigned values match the audience definition.
Site Admins can create assignments for any audience or learner in Percipio. Learning Admins (and Managers with Assignment privileges) can create assignments for their audiences and the learners within their audiences.
To create a new assignment
- From the Admin menu, select LEARNING > Assignments . The Assignments page displays.
- Select New Assignment . The Create assignment workflow displays with five steps.
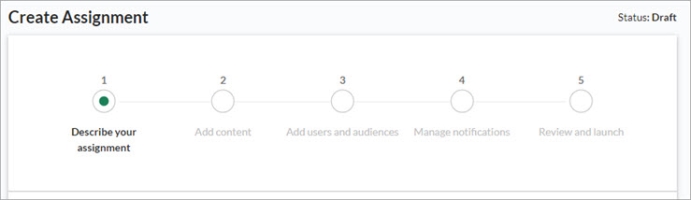
Enter all the details describing your assignment.
- Assignment name: Use a convention that makes sense to learners and that is easy for you to find in the Assignment list.
- Cost control: Formal and informal efforts made by managers to monitor, evaluate, and reduce expenditures.
- Customer satisfaction: Efforts focused on increasing the number of customers whose reported experience with a firm, its products, or its services exceeds specified satisfaction goals.
- Employee engagement: Quality and quantity of discretionary effort employees are willing to apply to the organization and its goals.
- Revenue Growth: Efforts designed to increase the revenue an organization derives from its products and services to customers.
- Innovation: The creation and capture of new value in the marketplace, including new products and services
- Operational effectiveness: Practices that enable the organization to better utilize its operations resources and better implement its processes and procedures
- Quality: Improvement in the quality of products and services produced and delivered by the organization
- Workforce productivity: Amount and impact of work delivered by an employee or group of employees in a specific period of time.
- Legal compliance and risk mitigation: Effort to remain compliant with legal requirements.
- Workplace safety and health compliance: Effort to remain compliant with safety and health regulations.
- Assigned by: This is the name your learners see as the person who made the assignment. By default your name is selected. Select the other radio button and enter another name if they should see something else like perhaps a department or a leader's name.
- Certification: Use when the goal is to help learners earn a certification.
- Compliance: Use when the goal is focused on compliance.
- Cultural: Use when the goal is to promote or inform learners about company culture.
- Leadership: Use when the goal is to advance and encourage growth for managers and leaders.
- Onboarding: Use when the goal is to facilitate new employe training and orientation.
- Upskilling: Use when the goal is to help learners acquire or advance a skill set.
- Other: Use when none of the other available types apply.
- Assignment description: This displays to your learners in the assignment details. This also helps other admins understand why the assignment was made.
If you add a user or audience to this assignment while it is in an In Progress status, those learners must complete the assignment by the specified End date. If you want all users to have the same number of days to complete an assignment, regardless of when you add them to it, use the Number of days option.
Start and end dates are in GMT.
- Enter a Start date .
- Enter an End date .
If you add a user to an assignment (or if you add a user to an audience with the assignment), they receive the assignment with a relative due date. See the note in step b.
- Enter the number of Days to complete .
- Cancel: closes the new assignment without saving changes.
- Save as draft: closes the new assignment, saves your changes into a Draft status, and returns you to the Assignments page. You can modify this assignment later.
- Next: Add content: saves your current changes and takes you to the next step.
- Content items must be completed in the display order specified: To enforce a specific order of content, select this option. When you select this option, learners cannot access content out of the specified order. They must complete each piece of content before the next, in accordance with the set completion criteria. See Completion Settings for more information about setting course completion criteria. See Complete your Content for each asset type's specific completion criteria requirements.
- This setting does not apply to other content types within the assignment. If learners have any progress or completions for other content types such as books or videos, the learner's previous progress or completion does count toward the assignment completion.
- If unselected, learners previous course completions do count toward assignment completion.
- You cannot change this setting after you launch the assignment.
- Add your content by selecting Add content . Note: When choosing content to add to an assignment, you can choose content from all license pools installed on your site. If your users do not have access to a content item because their audience is not associated with the appropriate license pool , they see the item in the assignment and cannot launch it. They also cannot complete the assignment.
- Repeat these steps until you've added all the content. You can add a maximum of 100 total items. Note: You can add instructor-led training (live course) to an assignment. The learner must register for the class that best meets their schedule, attend the class, and achieve a passing score to achieve completion.
- Select Add Content .
- Drag and drop the content into the order you want it presented to the learner. Alternatively, use the arrow buttons to move content up or down the list.
If you selected the Content items must be completed in the display order specified option, learners must complete each item in the order presented here.
- Cancel: closes the new assignment without saving any changes up to this point.
- Next: Add users and audiences: saves your current changes and takes you to the next step.
Site and learning admins can add users in one of two ways, by selecting them or via a bulk add using a CSV file. Learning admins can only bulk add users to assignments who are in audiences that they own. Managers can only select users or audiences, not bulk add them.
To select users or audiences:
- Select Add users and audiences .
- In the search field, enter the name of an audience or individual learner.
- Repeat these steps until you've added all users and/or audiences.
- Select Done . Note: If you remove a learner from an audience that has an assignment and the learner has not completed the assignment, the assignment no longer displays for the learner in their assignment list and they no longer show in assignment reports. If you remove a learner from an audience that has an assignment and the learner has completed the assignment, the assignment remains in their assignment list and their completion remains in assignment reports.
To bulk add individual users using a CSV file:
- Select Bulk add individual users .
- email : the email of the user as specified in the Percipio user record.
- loginName : the Login Name of the user as specified in the Percipio user record.
- externalUserId : The User ID used to identify a user inside Percipio.
- Include user data in one of the three columns and remove the other two unused columns.
- Save and select the one-column CSV file for import.
If a learning admin attempts to add a user who is not in one of their owned audiences or who does not have a Percipio user account, they see an error message: User unavailable for bulk add .
- Next: Manage emails: saves your current changes and takes you to the next step.
This is where you specify how you want to notify learners about the assignment. You can choose a notification and reminder emails. You can also customize all emails that go prior to the assignment due date.
From the Manage emails tab, select and configure the frequency of the two types of emails you want to send.
- When you first launch an assignment, you can choose when the system sends this email by specifying a date and time. The day and time you specify is in your time zone, not the learners. There may be a delay from when the system sends the email and when the learners receive it depending on network traffic and when the email lands in the email queue. These emails get sent every 30 minutes at the top and bottom of the hour.
- If learners get added after the initial launch, they automatically get sent this email within 30 minutes of being added to the assignment. Depending on network traffic, the learner may not receive it within 30 minutes.
- Turn off this setting if you don't want to send the notification email.
- This email uses the Assignment coming due email template .
- You can add a custom subject, header text and an introductory message to this email.
- The default setting for reminder emails is set from the Default email reminders setting if enabled. You can override the default reminders.
- If the reminders are off and you want them on, select On .
- If the reminders are on and you want them off, select Off .
- If the assignment is on and you want to modify any default settings, make any adjustments to the three segments of reminders: Initial, Due date approaching, After due date. If you make changes that you don't like, you can select Restore to defaults to go back to the recommended frequencies.
- Changes you make to reminders are saved independent of the default email reminders. Any changes to the default email reminder schedule does not impact your saved schedule changes for this assignment.
- If you make schedule changes to an in-progress assignment, reminders follow the criteria you set and only go to users who haven't completed the assignment
- Learners get the reminders until either they complete the assignment, you turn the reminders off, or you cancel the assignment.
- Based on criteria set, reminder emails trigger daily for sending at 12:01 a.m. GMT. Network traffic determines when the learner actually receives it on that day.
From the Customize and preview emails tab, you can:
- By default, learners receive the same email for all notifications and reminders sent before the assignment due date, and a different email for all reminders sent after the due date. For email template details, see assignment emails .
- If you add customizations, they are also used in the one-off email reminders .
- Add a custom Subject , Header text , and Introductory text and see how it displays to learners.
- To edit email text for reminders coming due, see edit assignments .
- At this time you cannot edit emails that go out for assignments that are past due.
- If you send one-off email reminders after the assignment due date, learners receive this template.
- Next: Review and launch: saves your current changes and takes you to the next step.
Step 5: Review all your settings for this assignment. Edit anything that looks amiss.
When you are ready, select one of the following options:
- Launch assignment: Places the assignment into one of the following statuses:
- If the Start date is today, the assignment is placed in an In Progress status and the assignment is immediately available to your learners. The email with the assignment details sends at the date and time you specified in step 9. Modifications to the assignment content cannot be made, but you can add a user to the assignment .
- If the Start date is in the future, the assignment is placed in a Scheduled status and the email, if enabled, sends at the date and time you specified in step 9. You can make modifications to all aspects of the assignment until the Start date .
Assignments with the same due date are listed by when the assignment is launched, in ascending order, on a learner's assignments page and on the home page.
Ohio State nav bar
The Ohio State University
- BuckeyeLink
- Find People
- Search Ohio State
Creating and Adapting Assignments for Online Courses

Online teaching requires a deliberate shift in how we communicate, deliver information, and offer feedback to our students. How do you effectively design and modify your assignments to accommodate this shift? The ways you introduce students to new assignments, keep them on track, identify and remedy confusion, and provide feedback after an assignment is due must be altered to fit the online setting. Intentional planning can help you ensure assignments are optimally designed for an online course and expectations are clearly communicated to students.
When teaching online, it can be tempting to focus on the differences from in-person instruction in terms of adjustments, or what you need to make up for. However, there are many affordances of online assignments that can deepen learning and student engagement. Students gain new channels of interaction, flexibility in when and where they access assignments, more immediate feedback, and a student-centered experience (Gayten and McEwen, 2007; Ragupathi, 2020; Robles and Braathen, 2002). Meanwhile, ample research has uncovered that online assignments benefit instructors through automatic grading, better measurement of learning, greater student involvement, and the storing and reuse of assignments.
In Practice
While the purpose and planning of online assignments remain the same as their in-person counterparts, certain adjustments can make them more effective. The strategies outlined below will help you design online assignments that support student success while leveraging the benefits of the online environment.
Align assignments to learning outcomes.
All assignments work best when they align with your learning outcomes. Each online assignment should advance students' achievement of one or more of your specific outcomes. You may be familiar with Bloom's Taxonomy, a well-known framework that organizes and classifies learning objectives based on the actions students take to demonstrate their learning. Online assignments have the added advantage of flexing students' digital skills, and Bloom's has been revamped for the digital age to incorporate technology-based tasks into its categories. For example, students might search for definitions online as they learn and remember course materials, tweet their understanding of a concept, mind map an analysis, or create a podcast.
See a complete description of Bloom's Digital Taxonomy for further ideas.
Provide authentic assessments.
Authentic assessments call for relevant, purposeful actions that mimic the real-life tasks students may encounter in their lives and careers beyond the university. They represent a shift away from infrequent high-stakes assessments that tend to evaluate the acquisition of knowledge over application and understanding. Authentic assessments allow students to see the connection between what they're learning and how that learning is used and contextualized outside the virtual walls of the learning management system, thereby increasing their motivation and engagement.
There are many ways to incorporate authenticity into an assignment, but three main strategies are to use authentic audiences, content, and formats . A student might, for example, compose a business plan for an audience of potential investors, create a patient care plan that translates medical jargon into lay language, or propose a safe storage process for a museum collection.
Authentic assessments in online courses can easily incorporate the internet or digital tools as part of an authentic format. Blogs, podcasts, social media posts, and multimedia artifacts such as infographics and videos represent authentic formats that leverage the online context.
Learn more about authentic assessments in Designing Assessments of Student Learning .
Design for inclusivity and accessibility.

Adopting universal design principles at the outset of course creation will ensure your material is accessible to all students. As you plan your assignments, it's important to keep in mind barriers to access in terms of tools, technology, and cost. Consider which tools achieve your learning outcomes with the fewest barriers.
Offering a variety of assignment formats is one way to ensure students can demonstrate learning in a manner that works best for them. You can provide options within an individual assignment, such as allowing students to submit either written text or an audio recording or to choose from several technologies or platforms when completing a project.
Be mindful of how you frame and describe an assignment to ensure it doesn't disregard populations through exclusionary language or use culturally specific references that some students may not understand. Inclusive language for all genders and racial or ethnic backgrounds can foster a sense of belonging that fully invests students in the learning community.
Learn more about Universal Design of Learning and Shaping a Positive Learning Environment .
Design to promote academic integrity online.
Much like incorporating universal design principles at the outset of course creation, you can take a proactive approach to academic integrity online. Design assignments that limit the possibilities for students to use the work of others or receive prohibited outside assistance.
Provide authentic assessments that are more difficult to plagiarize because they incorporate recent events or unique contexts and formats.
Scaffold assignments so that students can work their way up to a final product by submitting smaller portions and receiving feedback along the way.
Lower the stakes by providing more frequent formative assessments in place of high-stakes, high-stress assessments.
In addition to proactively creating assignments that deter cheating, there are several university-supported tools at your disposal to help identify and prevent cheating.
Learn more about these tools in Strategies and Tools for Academic Integrity in Online Environments .
Communicate detailed instructions and clarify expectations.
When teaching in-person, you likely dedicate class time to introducing and explaining an assignment; students can ask questions or linger after class for further clarification. In an online class, especially in asynchronous online classes, you must anticipate where students' questions might arise and account for them in the assignment instructions.
The Carmen course template addresses some of students' common questions when completing an assignment. The template offers places to explain the assignment's purpose, list out steps students should take when completing it, provide helpful resources, and detail academic integrity considerations.
Providing a rubric will clarify for students how you will evaluate their work, as well as make your grading more efficient. Sharing examples of previous student work (both good and bad) can further help students see how everything should come together in their completed products.
Technology Tip
Enter all assignments and due dates in your Carmen course to increase transparency. When assignments are entered in Carmen, they also populate to Calendar, Syllabus, and Grades areas so students can easily track their upcoming work. Carmen also allows you to develop rubrics for every assignment in your course.
Promote interaction and collaboration.

Frequent student-student interaction in any course, but particularly in online courses, is integral to developing a healthy learning community that engages students with course material and contributes to academic achievement. Online education has the inherent benefit of offering multiple channels of interaction through which this can be accomplished.
Carmen Discussions are a versatile platform for students to converse about and analyze course materials, connect socially, review each other's work, and communicate asynchronously during group projects.
Peer review can be enabled in Carmen Assignments and Discussions . Rubrics can be attached to an assignment or a discussion that has peer review enabled, and students can use these rubrics as explicit criteria for their evaluation. Alternatively, peer review can occur within the comments of a discussion board if all students will benefit from seeing each other's responses.
Group projects can be carried out asynchronously through Carmen Discussions or Groups , or synchronously through Carmen's Chat function or CarmenZoom . Students (and instructors) may have apprehensions about group projects, but well-designed group work can help students learn from each other and draw on their peers’ strengths. Be explicit about your expectations for student interaction and offer ample support resources to ensure success on group assignments.
Learn more about Student Interaction Online .
Choose technology wisely.
The internet is a vast and wondrous place, full of technology and tools that do amazing things. These tools can give students greater flexibility in approaching an assignment or deepen their learning through interactive elements. That said, it's important to be selective when integrating external tools into your online course.
Look first to your learning outcomes and, if you are considering an external tool, determine whether the technology will help students achieve these learning outcomes. Unless one of your outcomes is for students to master new technology, the cognitive effort of using an unfamiliar tool may distract from your learning outcomes.
Carmen should ultimately be the foundation of your course where you centralize all materials and assignments. Thoughtfully selected external tools can be useful in certain circumstances.
Explore supported tools
There are many university-supported tools and resources already available to Ohio State users. Before looking to external tools, you should explore the available options to see if you can accomplish your instructional goals with supported systems, including the eLearning toolset , approved CarmenCanvas integrations , and the Microsoft365 suite .
If a tool is not university-supported, keep in mind the security and accessibility implications, the learning curve required to use the tool, and the need for additional support resources. If you choose to use a new tool, provide links to relevant help guides on the assignment page or post a video tutorial. Include explicit instructions on how students can get technical support should they encounter technical difficulties with the tool.
Adjustments to your assignment design can guide students toward academic success while leveraging the benefits of the online environment.
Effective assignments in online courses are:
Aligned to course learning outcomes
Authentic and reflect real-life tasks
Accessible and inclusive for all learners
Designed to encourage academic integrity
Transparent with clearly communicated expectations
Designed to promote student interaction and collaboration
Supported with intentional technology tools
- Cheating Lessons: Learning from Academic Dishonesty (e-book)
- Making Your Course Accessible for All Learners (workshop reccording)
- Writing Multiple Choice Questions that Demand Critical Thinking (article)
Learning Opportunities
Conrad, D., & Openo, J. (2018). Assessment strategies for online learning: Engagement and authenticity . AU Press. Retrieved from https://library.ohio-state.edu/record=b8475002~S7
Gaytan, J., & McEwen, B. C. (2007). Effective online instructional and assessment strategies. American Journal of Distance Education , 21 (3), 117–132. https://doi.org/10.1080/08923640701341653
Mayer, R. E. (2001). Multimedia learning . New York: Cambridge University Press.
Ragupathi, K. (2020). Designing Effective Online Assessments Resource Guide . National University of Singapore. Retrieved from https://www.nus.edu.sg/cdtl/docs/default-source/professional-development-docs/resources/designing-online-assessments.pdf
Robles, M., & Braathen, S. (2002). Online assessment techniques. Delta Pi Epsilon Journal , 44 (1), 39–49. https://proxy.lib.ohio-state.edu/login?url=https://search.ebscohost.com/login.aspx?direct=true&db=eft&AN=507795215&site=eds-live&scope=site
Swan, K., Shen, J., & Hiltz, S. R. (2006). Assessment and collaboration in online learning. Journal of Asynchronous Learning Networks , 10 (1), 45.
TILT Higher Ed. (n.d.). TILT Examples and Resources . Retrieved from https://tilthighered.com/tiltexamplesandresources
Tallent-Runnels, M. K., Thomas, J. A., Lan, W. Y., Cooper, S., Ahern, T. C., Shaw, S. M., & Liu, X. (2006). Teaching Courses Online: A Review of the Research. Review of Educational Research , 76 (1), 93–135. https://www-jstor-org.proxy.lib.ohio-state.edu/stable/3700584
Walvoord, B. & Anderson, V.J. (2010). Effective Grading : A Tool for Learning and Assessment in College: Vol. 2nd ed . Jossey-Bass. https://library.ohio-state.edu/record=b8585181~S7
Related Teaching Topics
Designing assessments of student learning, strategies and tools for academic integrity in online environments, student interaction online, universal design for learning: planning with all students in mind, related toolsets, carmencanvas, search for resources.
- PRO Courses Guides New Tech Help Pro Expert Videos About wikiHow Pro Upgrade Sign In
- EDIT Edit this Article
- EXPLORE Tech Help Pro About Us Random Article Quizzes Request a New Article Community Dashboard This Or That Game Popular Categories Arts and Entertainment Artwork Books Movies Computers and Electronics Computers Phone Skills Technology Hacks Health Men's Health Mental Health Women's Health Relationships Dating Love Relationship Issues Hobbies and Crafts Crafts Drawing Games Education & Communication Communication Skills Personal Development Studying Personal Care and Style Fashion Hair Care Personal Hygiene Youth Personal Care School Stuff Dating All Categories Arts and Entertainment Finance and Business Home and Garden Relationship Quizzes Cars & Other Vehicles Food and Entertaining Personal Care and Style Sports and Fitness Computers and Electronics Health Pets and Animals Travel Education & Communication Hobbies and Crafts Philosophy and Religion Work World Family Life Holidays and Traditions Relationships Youth
- Browse Articles
- Learn Something New
- Quizzes Hot
- This Or That Game
- Train Your Brain
- Explore More
- Support wikiHow
- About wikiHow
- Log in / Sign up
- Education and Communications
- Study Skills
How to Start an Assignment
Last Updated: January 29, 2024 Fact Checked
This article was co-authored by Michelle Golden, PhD . Michelle Golden is an English teacher in Athens, Georgia. She received her MA in Language Arts Teacher Education in 2008 and received her PhD in English from Georgia State University in 2015. There are 8 references cited in this article, which can be found at the bottom of the page. This article has been fact-checked, ensuring the accuracy of any cited facts and confirming the authority of its sources. This article has been viewed 108,692 times.
Getting started on an assignment or homework can often times be the hardest step. Putting off the assignment can make the problem worse, reducing the time you have to complete the task and increasing stress. By learning how to get started and overcome the urge to procrastinate, you can get your assignments done on schedule and with less stress, opening up more free time.
Restructuring Your Assignment

- For example, you might research areas of a report that you find most interesting before moving on to other areas.
- If your math assignment has different types of questions, try doing those that you enjoy the most before moving on to the others.
- You might also try tackling smaller or easier tasks first so you can cross a few items off your list. Seeing that you've already made progress may help you feel motivated to continue.

- Promise yourself that you will meet your goal of working for five minutes on the assignment.
- Once you get started, you may find that you don't want to stop working. Otherwise, you can take a break and come back to the assignment, knowing you're at least five minutes closer to finishing than you were before.

- Try to set reasonable periods of time that you know you can meet. For example, you might set aside two hours on a Friday to dedicate to your assignment. If you don't have that much time all at once, try to carve out a few 20- or 30-minute blocks.
- You may or may not wish to continue working after your time limit has gone by.
- Have a realistic understanding of how fast you can write and plan your schedule accordingly.

- It can help to read the assignment as soon as you get it and then ask any questions you might have.
- If you're not sure if you understand the assignment, try rewriting it in your own words or explaining it to someone else. If you find you can't or have a lot of questions, you may need more information.
- You should have an overview of the assignment, understand the main task, and understand the technical and stylistic requirements.
- Look for important words in the instructions to understand the assignment. These words might include define, explain, compare, relate, or prove.
- Keep your audience in mind and write a paper that would best deliver information to them.

- Goals that are too big or not well defined can be difficult to start working towards.
- Smaller and well defined goals can seem easier to achieve than larger ones.
- For example, you could break a research paper down into several smaller tasks: 1) do preliminary research, 2) write an outline, 3) draft an introduction, 4) draft body paragraphs, 5) write conclusion, 6) revise. Each of these is much more do-able on its own.
Changing Your Focus

- You might want to go for a quick walk after working for a set amount of time.
- Try reading a website or book that you enjoy for a few minutes after working.
- Alternatively, try a quick burst of exercise before setting to work. Exercise releases feel-good chemicals called endorphins and can also help boost your memory. [8] X Research source

- Instead of dreading your work, focus on how good it will feel to make progress. You won't have it hanging over your head. You can actually enjoy the weekend instead of feeling guilty.
- Keeping your eye on long-term rewards can help you stay motivated to finish your assignment.

- Avoid moving your workspace constantly.
- Don't get lost on tangential research.
- Don't take constant breaks to get a snack.

- For every hour you waste procrastinating, you can limit how much television you watch that night.
- If you waste too much time procrastinating, you might deny yourself a favorite snack later on.

Community Q&A
You Might Also Like

- ↑ https://www.psychologytoday.com/blog/solving-unsolvable-problems/201408/4-steps-stop-procrastinating
- ↑ https://www.psychologytoday.com/blog/friendship-20/201405/the-surefire-first-step-stop-procrastinating
- ↑ http://writingcenter.unc.edu/handouts/procrastination/
- ↑ https://kidshealth.org/en/teens/homework.html
- ↑ http://writingcenter.unc.edu/handouts/understanding-assignments/
- ↑ https://open.alberta.ca/dataset/ab22ff64-3358-4387-9761-8c58878a6b84/resource/3ee38320-17e4-46f9-b24f-c95f9f345eb9/download/ipp7.pdf
- ↑ http://well.blogs.nytimes.com/2013/08/07/how-exercise-can-help-us-learn/
- ↑ https://kidshealth.org/en/teens/happy-life.html
About This Article

To start an assignment, try working on the most enjoyable or easiest parts of the assignment first to get the ball rolling. Even if no part of the assignment seems enjoyable or easy, set a timer and try to make yourself work for at least 5 minutes, which is usually enough time to build momentum and overcome procrastination. You can also try breaking your assignment up into smaller, more manageable tasks and scheduling yourself regular breaks so it doesn't seem as overwhelming. To learn how to stay positive and avoid procrastination while working on your homework, scroll down! Did this summary help you? Yes No
- Send fan mail to authors
Reader Success Stories
Faith Wanjiku
Dec 7, 2018
Did this article help you?
Winnie Wong
May 18, 2016
Turab Ahamad
Oct 23, 2016
Sofia Madrid
Sep 5, 2016
Doha Elabbasi
Sep 27, 2016

Featured Articles

Trending Articles

Watch Articles

- Terms of Use
- Privacy Policy
- Do Not Sell or Share My Info
- Not Selling Info
Get all the best how-tos!
Sign up for wikiHow's weekly email newsletter
432-695-6542

Tips for Starting a New Work Assignment
Promotions and new assignments are exciting and nerve-wracking..
You just landed your dream promotion, and you’re moving in two weeks to start your new job assignment. Part of you is excited, but another part of you is terrified. Because, let’s face it, new jobs are scary. While no amount of advice can erase the learning curve, there are some easy ways to set yourself up for success in a brand-new position. Just at least remember to be on time.
Manage your expectations.
If it’s a new job you’re starting, research your new employer and have a good understanding of the company or employer. A significant factor in work-related unhappiness comes from setting unreasonable expectations for yourself or having unreasonable expectations about your job, especially in the beginning. Don’t expect your first day of work to go swimmingly, because it rarely does. The first day of anything is always nerve-wracking, and introductions are usually awkward. If you have an uneasy first day at work, don’t take it as a sign that you’re doomed. Instead, go back the next day, ready to try again.
Be ready for information overload.
The first few weeks of your job will be a whirlwind, so prepare yourself. On your plane trip to your new location, read up on as much as you can about your new position, and write down any questions you have. Then, starting on your first day, brace yourself. You will feel overwhelmed by training, getting to know your co-workers, and trying to understand the workplace culture. First off, don’t panic. Instead, keep a notepad on you and do your best to write everything down and ask questions as you go.
Embrace learning.
Don’t go into a new assignment thinking you’ve got it in the bag or that you know everything. Instead, embrace the learning curve you’ll have to conquer. Reach out to other staff members to help you get the lay of the land. It’s better to admit what you don’t know and learn it than to make bad decisions based on incomplete information. Do not fear judgment; communicate your challenges and progress to your superior.
Build your team.
When starting a new assignment, it’s wise to make a concerted effort to get to know the people working with you. It will make the transition much smoother if you and your co-workers have some common ground.
If you’re starting a new job and want an affordable short-term living solution, contact The Hennessey Group online or call 888-543-5890.
Related Posts

Why Corporate Housing is the Perfect Student Housing Solution for Interns

Unlocking The Effective Work Environment: How Corporate Housing Can Boost Employee Productivity
Creating a home away from home: the comforts and convenience of corporate housing.

- Our Company
- Sustainability Approach
- Access to Medicines
- Sustainability Disclosures
- Transparency Disclosures
- Corporate Giving
- Governance Strategy
- Governance Structure
- Charters and Reports
- Areas of Focus
- Research and Development
- Our Products
- Manufacturing
- Clinical Trials
- Our Stories
- Press Releases
- Media Resources
- Financial Results
- Investor Events
- Investor Contact
Takeda Announces New Assignments of Directors
OSAKA, Japan, June 26, 2024 – Takeda (TSE:4502/NYSE:TAK) has announced new assignments of directors, determined at the Board of Directors meeting and at the Audit and Supervisory Committee meeting, following the 148th Ordinary Meeting of Shareholders, held in Osaka today.
Takeda's Board of Directors has 11 members serving as external directors out of a total of 14 members, helping to ensure transparency and objectivity. An external director will continue to chair the Board of Directors. The Audit and Supervisory Committee, the Nomination Committee and the Compensation Committee will be composed solely of external directors including their chairs.
Takeda highly values strong, independent governance and its Board of Directors helps to ensure that all decisions and actions are in the best interests of global stakeholders and aligned with the company’s values. This robust corporate governance model has been, and will continue to be, critical to Takeda's success.
Details of the new assignments are as follows:
1. New Assignment of Directors Who Are Not Audit and Supervisory Committee Members (Effective June 26, 2024)
| Name | Category | Role |
|---|---|---|
| Christophe Weber | Internal / Existing | Representative Director, President & Chief Executive Officer |
| Milano Furuta | Internal / New | Director, Chief Financial Officer |
| Andrew Plump | Internal / Existing | Director, President, Research & Development |
| Masami Iijima | External / Existing | External Director, Chair of the Board Meeting |
| Ian Clark | External / Existing | External Director |
| Steven Gillis | External / Existing | External Director |
| Emiko Higashi | External / New | External Director |
| John Maraganore | External / Existing | External Director |
| Michel Orsinger | External / Existing | External Director |
| Miki Tsusaka | External / Existing | External Director |
2. Directors Who Are Audit and Supervisory Committee Members
| Name | Category | Role |
|---|---|---|
| Koji Hatsukawa | External / Existing | External Director, Head of Audit and Supervisory Committee |
| Jean-Luc Butel | External / New | External Director, Audit and Supervisory Committee Member |
| Yoshiaki Fujimori | External / Existing | External Director, Audit and Supervisory Committee Member |
| Kimberly A. Reed | External / Existing | External Director, Audit and Supervisory Committee Member |
3. New Assignment of Nomination Committee and Compensation Committee Members (Effective June 26, 2024)
Nomination committee:.
Masami Iijima (Chairperson), Jean-Luc Butel, Steven Gillis, Michel Orsinger, and Yoshiaki Fujimori
(Observer: Christophe Weber)
Compensation committee:
Emiko Higashi (Chairperson), John Maraganore, Michel Orsinger, and Kimberly A. Reed
About Takeda
Takeda is focused on creating better health for people and a brighter future for the world. We aim to discover and deliver life-transforming treatments in our core therapeutic and business areas, including gastrointestinal and inflammation, rare diseases, plasma-derived therapies, oncology, neuroscience and vaccines. Together with our partners, we aim to improve the patient experience and advance a new frontier of treatment options through our dynamic and diverse pipeline. As a leading values-based, R&D-driven biopharmaceutical company headquartered in Japan, we are guided by our commitment to patients, our people and the planet. Our employees in approximately 80 countries and regions are driven by our purpose and are grounded in the values that have defined us for more than two centuries. For more information, visit www.takeda.com .
Media Contacts:
Japanese media.
Shoko Honda [email protected] +81 (0) 70-2687-3620
U.S. and International Media
Brendan Jennings [email protected] +81 (0) 80-2705-8259
Important Notice
For the purposes of this notice, “press release” means this document, any oral presentation, any question and answer session and any written or oral material discussed or distributed by Takeda Pharmaceutical Company Limited (“Takeda”) regarding this press release. This press release (including any oral briefing and any question-and-answer in connection with it) is not intended to, and does not constitute, represent or form part of any offer, invitation or solicitation of any offer to purchase, otherwise acquire, subscribe for, exchange, sell or otherwise dispose of, any securities or the solicitation of any vote or approval in any jurisdiction. No shares or other securities are being offered to the public by means of this press release. No offering of securities shall be made in the United States except pursuant to registration under the U.S. Securities Act of 1933, as amended, or an exemption therefrom. This press release is being given (together with any further information which may be provided to the recipient) on the condition that it is for use by the recipient for information purposes only (and not for the evaluation of any investment, acquisition, disposal or any other transaction). Any failure to comply with these restrictions may constitute a violation of applicable securities laws. The companies in which Takeda directly and indirectly owns investments are separate entities. In this press release, “Takeda” is sometimes used for convenience where references are made to Takeda and its subsidiaries in general. Likewise, the words “we”, “us” and “our” are also used to refer to subsidiaries in general or to those who work for them. These expressions are also used where no useful purpose is served by identifying the particular company or companies.
Forward-Looking Statements
This press release and any materials distributed in connection with this press release may contain forward-looking statements, beliefs or opinions regarding Takeda’s future business, future position and results of operations, including estimates, forecasts, targets and plans for Takeda. Without limitation, forward-looking statements often include words such as “targets”, “plans”, “believes”, “hopes”, “continues”, “expects”, “aims”, “intends”, “ensures”, “will”, “may”, “should”, “would”, “could”, “anticipates”, “estimates”, “projects”, “forecasts”, “outlook” or similar expressions or the negative thereof. These forward-looking statements are based on assumptions about many important factors, including the following, which could cause actual results to differ materially from those expressed or implied by the forward-looking statements: the economic circumstances surrounding Takeda’s global business, including general economic conditions in Japan and the United States; competitive pressures and developments; changes to applicable laws and regulations; challenges inherent in new product development, including uncertainty of clinical success and decisions of regulatory authorities and the timing thereof; uncertainty of commercial success for new and existing products; manufacturing difficulties or delays; fluctuations in interest and currency exchange rates; claims or concerns regarding the safety or efficacy of marketed products or product candidates; the impact of health crises, like the novel coronavirus pandemic; the success of our environmental sustainability efforts, in enabling us to reduce our greenhouse gas emissions or meet our other environmental goals; the extent to which our efforts to increase efficiency, productivity or cost-savings, such as the integration of digital technologies, including artificial intelligence, in our business or other initiatives to restructure our operations will lead to the expected benefits; and other factors identified in Takeda’s most recent Annual Report on Form 20-F and Takeda’s other reports filed with the U.S. Securities and Exchange Commission, available on Takeda’s website at: https://www.takeda.com/investors/sec-filings-and-security-reports/ or at www.sec.gov Go to http://www.sec.gov . Takeda does not undertake to update any of the forward-looking statements contained in this press release or any other forward-looking statements it may make, except as required by law or stock exchange rule. Past performance is not an indicator of future results and the results or statements of Takeda in this press release may not be indicative of, and are not an estimate, forecast, guarantee or projection of Takeda’s future results.
- Student Support
- StudentInfo
- Announcements
- Fall 2024 Room Assignments and Move-in Information
Fall 2024 Room Assignments and Move-in Information June 26, 2024
Fall 2024 room assignments are starting to go out, so be sure to check your UNM email . Plus, applications for early arrival and regular move-in are available on your Residence Dashboard.
Please note your room assignment will not post on your Housing Dashboard until after July 3, as this ensures proper billing and assignments of all incoming residents.
The early arrival move-in dates are August 9-10, and there is a flat charge of $175 . The regular move-in dates for Fall 2024 are August 15-17, 2024, and there is no fee . Please log in to your housing Dashboard to submit your move in application.
Please view The Fall 2024 Move In Guide, here!

© The University of New Mexico Albuquerque, NM 87131, (505) 277-0111 New Mexico's Flagship University
- UNM on Facebook
- UNM on Instagram
- UNM on Twitter
- UNM on YouTube
more at social.unm.edu
- Accessibility
- Contact UNM
- Consumer Information
- New Mexico Higher Education Dashboard
- Election 2024
- Entertainment
- Newsletters
- Photography
- Personal Finance
- AP Investigations
- AP Buyline Personal Finance
- AP Buyline Shopping
- Press Releases
- Israel-Hamas War
- Russia-Ukraine War
- Global elections
- Asia Pacific
- Latin America
- Middle East
- Election Results
- Delegate Tracker
- AP & Elections
- Auto Racing
- 2024 Paris Olympic Games
- Movie reviews
- Book reviews
- Financial Markets
- Business Highlights
- Financial wellness
- Artificial Intelligence
- Social Media
Orlando Cepeda dies
Cubs sign veteran catcher Tomás Nido, designate Yan Gomes for assignment
New York Mets pitcher Reed Garrett, right, celebrates with catcher Tomás Nido, left, after a baseball game against the Arizona Diamondbacks, Friday, May 31, 2024, in New York. (AP Photo/Frank Franklin II)
Chicago Cubs catcher Yan Gomes, left, celebrates with relief pitcher Keegan Thompson after the Cubs defeated the San Francisco Giants in a baseball game in Chicago, Tuesday, June 18, 2024. (AP Photo/Nam Y. Huh)
- Copy Link copied
CHICAGO (AP) — The Chicago Cubs signed veteran catcher Tomás Nido and designated Yan Gomes for assignment on Wednesday.
The 30-year-old Nido was released by the New York Mets on Monday after being designated for assignment last week. He was hitting .229 with three home runs and eight RBIs.
Nido was drafted by New York in 2012 and was the second longest-tenured player on the team behind Brandon Nimmo. The 30-year-old catcher, who remained with the organization after being designated for assignment last June, thanked the Mets with a heart emoji on the social media platform X.
Gomes, a 13-year veteran, is batting a career-low .154 with two home runs and seven RBIs in 34 games this season. Miguel Amaya has been getting most of the starts at catcher.
The 36-year-old Gomes spent 2 1/2 seasons in Chicago, batting .241 with 20 homers and 101 RBIs in 236 games. He was an All-Star with Cleveland in 2018 and played on a World Series champion with Washington in 2019.
The Cubs also placed right-hander Keegan Thompson on the paternity list and recalled righty Porter Hodge. Thompson is 1-1 with one save and a 4.30 ERA in 11 games.
AP MLB: https://www.apnews.com/hub/MLB

You're signed out
Sign in to ask questions, follow content, and engage with the Community
- Canvas Instructor
- Instructor Guide
How do I create an online assignment?
- Subscribe to RSS Feed
- Printer Friendly Page
- Report Inappropriate Content
in Instructor Guide
Note: You can only embed guides in Canvas courses. Embedding on other sites is not supported.
Community Help
View our top guides and resources:.
To participate in the Instructurer Community, you need to sign up or log in:
- SI SWIMSUIT
- SI SPORTSBOOK
Mets' Longest Tenured Pitcher Likely Out For Season, Career With Team Could be Over
Pat ragazzo | 16 hours ago.
 delivers a pitch to the Texas Rangers during the ninth inning at Globe Life Field. Mandatory Credit: Jim Cowsert-USA TODAY Sports")
- New York Mets
- New York Yankees
- Chicago Cubs
This is a big blow for the New York Mets ' bullpen.
On Friday, right-handed relief pitcher Drew Smith told reporters that he will likely need season-ending Tommy John surgery. This would be the second Tommy John procedure of Smith's career, and could spell the end of his time with the Mets, as he is set to hit the free agent market after the year concludes. He is the longest tenured Mets' pitcher, making his major league debut back in 2018.
An emotional Drew Smith, who enters free agency after this season, speaks on the possibility of surgery and his future with the Mets: "This really stings... I loved my time here, I don't know if it's over obviously, but it could be, and it just sucks to see it end like this." pic.twitter.com/Oxyije5Jva — SNY (@SNYtv) June 28, 2024
Smith had to warm up quickly to replace closer Edwin Diaz, who was ejected for a sticky substance, in the ninth inning of last Sunday's game against the Chicago Cubs. He shared that he felt stiff while playing catch during the week, which prompted the Mets to send him for imaging.
Smith was placed on the 15-day injured list on Wednesday ahead of Game 2 of the Subway Series with the New York Yankees at Citi Field. The initial diagnosis was forearm tightness, but manager Carlos Mendoza made it clear that the team likely wouldn't have the final results by the start of the game that night.
The 30-year-old had a 3.06 ERA, a 1.53 WHIP and 23 strikeouts in 19 appearances across 17.2 innings this season. He already missed over a month of action earlier in the year with a shoulder issue. The Mets will now be without one of their top bullpen arms for the remainder of the year.
And Smith isn't the only big loss in the bullpen. Lefty reliever Brooks Raley underwent season-ending Tommy John surgery as well. Diaz is suspended for eight more games, but is eligible to return on July 6.

PAT RAGAZZO
Pat Ragazzo is the reporter, publisher, site manager and executive editor for the Mets and Yankees websites on Sports Illustrated. Pat was selected as The Top Reporter & Publisher of the Year 2024 by the International Association of Top Professionals (IAOTP) for outstanding leadership, dedication, and commitment to the industry. He has been seen on several major TV Network stations including: SNY, FOX5, PIX11 and NY1. And can also frequently be heard on ESPN New York FM 98.7 FM and WFAN Sports Radio 101.9 FM as a guest. You can follow him on Twitter/X: @ragazzoreport. Pat also serves as the Mets insider for the "Allow Me 2 Be Frank" podcast with Frank "The Tank" Fleming of Barstool Sports.
Follow ragazzoreport
IMAGES
VIDEO
COMMENTS
Create an assignment (details above). Under Due, click the Down arrow . Next to No due date, click the Down arrow . Click a date on the calendar. (Optional) To set a due time, click Time enter a time and specify AM or PM. Note: Work is marked Missing or Turned in late as soon as the due date and time arrive.
Select +New to create a blank Word (.docx), Excel (.xlsx), PowerPoint (.pptx), or Whiteboard document, or a new video recording to hand out to your students. Select Apps to attach content from an app to the assignment. Admins can manage Teams apps in the Microsoft Teams admin center.
If you want to create an assignment with all assignment details at the same time, click the Add Assignment button. Assignment details include fields for the assignment type, name, description, points, assignment group (if desired), grade display, and submission type, and due dates. You can also specify if the assignment is a group assignment or ...
Learn how to create an assignment in Canvas, how to assign points, due dates, and submission types. Learn two ways to build new assignments in Canvas and ho...
Easily distribute, analyze, and grade student work with Assignments for your LMS. Assignments is an application for your learning management system (LMS). It helps educators save time grading and guides students to turn in their best work with originality reports — all through the collaborative power of Google Workspace for Education. Get ...
Open the course. In the sidebar, click Assignments. Next to the assignment, click More Copy To. Under Select a Course, enter the name of the course click the course. (Optional) To copy the assignment to a specific module, under Select a module (optional), enter the name of the module click the module. Click Copy.
Creating an assignment. Whenever you want to create new assignments, questions, or material, you'll need to navigate to the Classwork tab. In this tab, you can create assignments and view all current and past assignments. To create an assignment, click the Create button, then select Assignment . You can also select Question if you'd like to ...
Create an assignment (details above). At the top, tap More Edit Topic . Choose an option: To create a topic, tap New topic, then enter a topic name. To select a topic in the list, tap the topic name. To confirm, tap Done. Tip: You can only add one topic to an assignment.
We'll show you how to create assignments in Google Classroom and share them with your students. There are a few options you can change, like the point value,...
The New Assignment page opens. You can also expand or create a folder and add an assignment. When you create an assignment, a gradebook item is created automatically. After you post assignment grades, students can view their scores on their grades pages or in the activity stream. They can also access an assignment, their submissions, your ...
Create an assignment. You can create assignments in content areas, learning modules, lesson plans, and folders. From the Assessments menu, select Assignment and provide the name, instructions, and the files students need. You can use the functions in the editor to format text and add files. You can also add files in the Assignment Files section.
There are several different starting points to create assignments. To create an assignment in the Classic Content Experience. In Content, select the module where you want to create an assignment. Click Upload/Create. Click New Assignment. Figure: The New Assignment option on the Upload/Create menu.
Creating assignments directly from the content page: To create an assignment from a specific content page please follow the below steps: Step 1: browse our library until you find material that you want your students work on. This could be a video, an article, or an exercise. Step 2: Once you are viewing a piece of Khan Academy content, click ...
Here's how: 1. Navigate to the class team you'd like to add a student to, then select More options More options button next to your class team. 2. Select Add member. 3.Select the Students tab. 4. Type in the name of the student (s) or group and select Add. 5.
Step by Step Guide on How to Create an Quiz Assignment. Open your class. Click on the second tab, Classwork. Click " + Create " button and choose Quiz Assignment. A new pop-up window will appear, enter the Title and Instructions for this quiz. Click on the Blank Quiz link to open the Google Forms file. Click on the title Blank Quiz to ...
What this handout is about. The first step in any successful college writing venture is reading the assignment. While this sounds like a simple task, it can be a tough one. This handout will help you unravel your assignment and begin to craft an effective response. Much of the following advice will involve translating typical assignment terms ...
From the Admin menu, select LEARNING > Assignments. The Assignments page displays. Select New Assignment. The Create assignment workflow displays with five steps. Note: To create an assignment in a different language, select that language from the language drop down next to My Profile. The admin interface will change to that language.
However, there are many affordances of online assignments that can deepen learning and student engagement. Students gain new channels of interaction, flexibility in when and where they access assignments, more immediate feedback, and a student-centered experience (Gayten and McEwen, 2007; Ragupathi, 2020; Robles and Braathen, 2002).
For example, you could break a research paper down into several smaller tasks: 1) do preliminary research, 2) write an outline, 3) draft an introduction, 4) draft body paragraphs, 5) write conclusion, 6) revise. Each of these is much more do-able on its own. Method 2.
When starting a new assignment, it's wise to make a concerted effort to get to know the people working with you. It will make the transition much smoother if you and your co-workers have some common ground. If you're starting a new job and want an affordable short-term living solution, contact The Hennessey Group online or call 888-543-5890.
OSAKA, Japan--(BUSINESS WIRE)-- Takeda (TOKYO:4502/NYSE:TAK) has announced new assignments of directors, determined at the Board of Directors meeting and at the Audit and Supervisory Committee meeting, following the 148th Ordinary Meeting of Shareholders, held in Osaka today.Takeda's Board of Directors has 11 members serving as external directors out of a total of 14 members, helping to ensure ...
New Assignment: A change in assignment to a new grade level, from a single class to a combination class, the addition of a new course of study at the middle school level (not including new adoptions or standards), or to a new site. New Assignment Effective Immediately (current date will be used) The assignment is effective on u0007u0003 b ...
New Assignments means the first priority general assignment over, amongst other things, the earnings, insurances and requisition compensation over each of the Vessels, each in favour of the Security Agent, in a form approved in writing by the Agent, and " New Assignment " means any one of them. Sample 1. Based on 1 documents.
OSAKA, Japan, June 26, 2024 - Takeda (TSE:4502/NYSE:TAK) has announced new assignments of directors, determined at the Board of Directors meeting and at the Audit and Supervisory Committee meeting, following the 148th Ordinary Meeting of Shareholders, held in Osaka today.. Takeda's Board of Directors has 11 members serving as external directors out of a total of 14 members, helping to ensure ...
Please note your room assignment will not post on your Housing Dashboard until after July 3, as this ensures proper billing and assignments of all incoming residents. The early arrival move-in dates are August 9-10, and there is a flat charge of $175. The regular move-in dates for Fall 2024 are August 15-17, 2024, and there is no fee. Please ...
The 30-year-old Nido was released by the New York Mets on Monday after being designated for assignment last week. He was hitting .229 with three home runs and eight RBIs. Nido was drafted by New York in 2012 and was the second longest-tenured player on the team behind Brandon Nimmo.
ARLINGTON, VA, June 24, 2024 - The Air Force and Space Force have completed the annual review of special duty assignment pay for enlisted members and established new guidelines to support a quadrennial SDAP board process. The SDAP board has transitioned to having a board every four years, rather than annually. The change is intended to stabilize the budget for Airmen and Guardians receiving ...
You can create online assignments for students to submit their assignments through Canvas. Students can submit formatted text using the Rich Content Editor, website URLs, annotated files, or uploaded files. They can also submit audio or video recordings by recording new media or uploading existing media. Files submitted to an online assignment ...
This is a big blow for the New York Mets' bullpen. On Friday, right-handed relief pitcher Drew Smith told reporters that he will likely need season-ending Tommy John surgery. This would be the ...
The roster is the first major tournament assignment for Hayes, who officially joined the team on the ground last month after the conclusion of Chelsea's Women's Super League season in England.