How to Add Transitions in Canva
Here’s a step by step guide on how to add transitions in Canva:
- Hover your mouse over a page thumbnail at the bottom of the editor, and click the ellipsis icon.
- Click 'Add transition ' to proceed.
- To preview a transition, hover your mouse cursor on it.
- To apply a transition, click on it from the options.
- Use the 'Duration (seconds)' slider to adjust the transition duration, or use the number box.
- Select the direction of your transition. These options depend on the transition style you select
- Click 'Apply between all pages' so that your presentation has a uniform transition.
- Once you're satisfied with transitions applied in your page presentations and videos, click 'Share' to save it.


How to Download Image from Canva
How to Convert Canva to Word

How to Make a Digital Planner on Canva
Maker's Aid
How to Add Transitions to Canva Videos
Life is a video, and not a still picture. If you want it to have smooth transitions from one shot to the next, you can add them in Canva.

Not everyone knows that, in Canva, you can not only create and edit videos but also insert transitions between shots.
So if you’re learning Canva and you want to know how to create videos with transitions, this tutorial will show you how—in just four steps, explained in plain English and with screenshots.
How to add transitions to your Canva videos:
Step 1: Click on the “+” icon between the two shots where you want to add a transition.
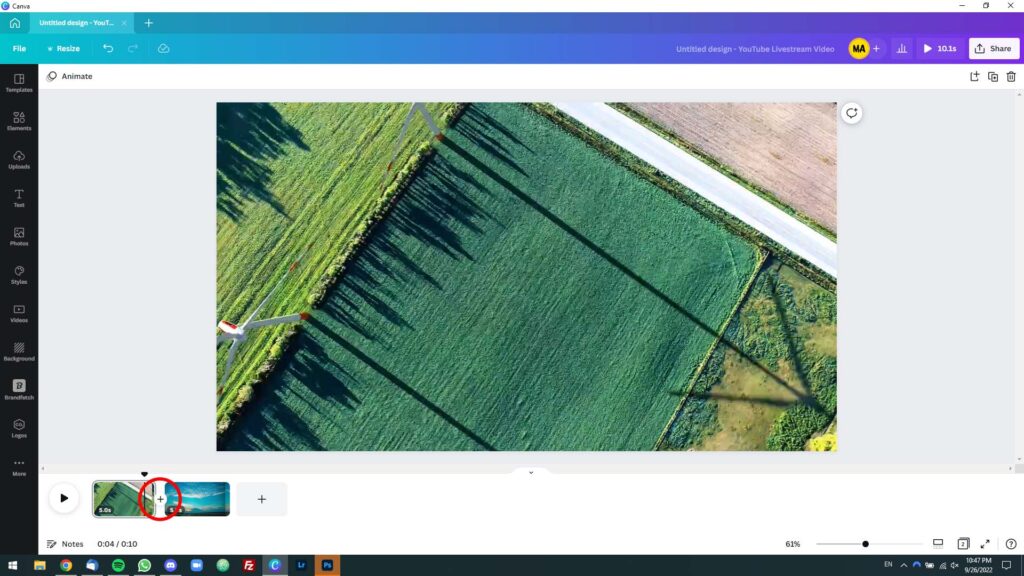
Step 2: A small menu with two options will pop up. The top option is for adding a page (or shot), and the bottom option is for adding a transition. Click on the latter.

Step 3: A list of transitions will be displayed in the left sidebar. Try different transitions until you find the one you like best.

Step 4: Configure the transition’s duration to your liking using the “Duration (seconds)” slider.
Pro tip: Do you want to add a transition between two scenes in the same page (shot)?
Move the slider to the place where you want to insert the transition, and then press S on your computer’s keyboard.
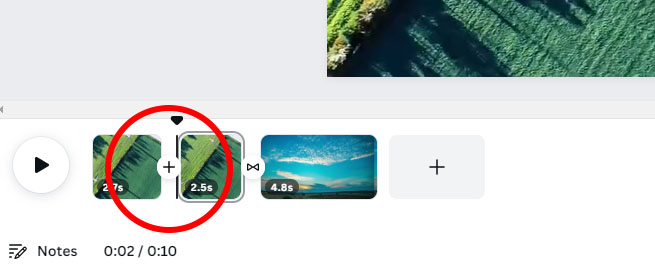
This will split the shot into two at the point where you moved the slider. Now, you can easily add a transition between them using the steps in this tutorial.

By Dim Nikov
Editor of Maker's Aid. Part programmer, part marketer. Making things on the web and helping others do the same since the 2000s. Yes, I had Friendster and Myspace.
Leave a comment Cancel reply
Your email address will not be published. Required fields are marked *
To provide the best experiences, we and our partners use technologies like cookies to store and/or access device information. Consenting to these technologies will allow us and our partners to process personal data such as browsing behavior or unique IDs on this site and show (non-) personalized ads. Not consenting or withdrawing consent, may adversely affect certain features and functions.
Click below to consent to the above or make granular choices. Your choices will be applied to this site only. You can change your settings at any time, including withdrawing your consent, by using the toggles on the Cookie Policy, or by clicking on the manage consent button at the bottom of the screen.

How Do You Add Transitions in Canva?

Adding transitions to your designs in Canva is a great way to make them more visually appealing and professional. Transitions provide smooth animations and effects that can enhance the overall user experience. In this tutorial, we will explore how you can easily add transitions to your Canva designs.
Step 1: Select Your Design
First, open Canva and select the design you want to add transitions to. It can be a presentation, social media post, or any other type of design.
Step 2: Enter Presentation Mode
To view your design with transitions, enter the presentation mode. You can do this by clicking on the "Present" button located at the top right corner of the Canva editor.
Step 3: Access Transitions
Once in presentation mode, you will notice a toolbar at the bottom of the screen. Click on the "Transitions" icon represented by a series of squares connected by lines to access the available transition options.
Step 4: Choose a Transition
A sidebar will appear with various transition options. Scroll through the list and choose a transition that suits your design best. Canva offers a range of transitions including fades, slides, and flips.
- Experiment: Try different transitions to see which one complements your design and content.
- Consistency: Stick to one or two types of transitions throughout your design for a cohesive look.
- Simplicity: Avoid excessive use of flashy transitions as they may distract from your message.
Step 5: Apply Transition
Click on the chosen transition to apply it to your design. You will see a preview of how the transition will look when you navigate through your design.
Step 6: Customize Transition
Canva allows you to customize the duration and direction of your transitions. To do this, click on the "Settings" icon next to the transition you applied. Adjust the settings according to your preference.
- Duration: Consider the length of your content and adjust the duration of each transition accordingly. Shorter transitions work well for quick-paced designs, while longer transitions can create a more dramatic effect.
- Direction: Some transitions offer direction options such as left, right, up, or down. Choose a direction that enhances the flow and readability of your design.
Step 7: Preview and Finalize
To ensure that your transitions work seamlessly, preview your design by navigating through each slide or page. Make any necessary adjustments until you are satisfied with the overall visual effect.
Congratulations! You have successfully added transitions to your Canva design. Transitions can elevate your designs by adding an element of dynamism and professionalism. Remember to use them wisely and sparingly for maximum impact.
You can now exit presentation mode by clicking on the "Exit Presentation" button at the top right corner of Canva's editor.
Start experimenting with different transitions in Canva today and take your designs to the next level!

About the author:

Related posts
How Do You Add Transitions in Canva Video? Are you looking to add some eye-catching transitions to your Canva videos? Well, you're in luck! Canva offers a range of transition effects that... October 4, 2023 canva -->
Can You Add Transitions in Canva? Canva is a popular graphic design tool that allows users to create stunning visuals for various purposes, such as social media posts, presentations,... October 4, 2023 canva -->
How Do I Add Animations in Canva? Have you ever wondered how to add animations to your designs in Canva? Animations can bring your designs to life and make them more engaging. In... October 5, 2023 canva -->
How Do You Add Columns in Canva? Adding columns to your designs in Canva can help you create visually appealing layouts that effectively organize your content. Whether you are... October 4, 2023 canva -->
How Do You Add Textures in Canva? Adding textures to your designs can bring them to life and add depth and visual interest. In Canva, you can easily incorporate textures into your... October 2, 2023 canva -->
How Do You Add an Outro in Canva? In this tutorial, we will learn how to add an outro in Canva, the popular online graphic design tool. An outro is the closing segment of a video or... October 4, 2023 canva -->
How Do You Make a Stinger Transition in Canva? Stinger transitions have become increasingly popular in video editing as they add a professional touch to your content. Canva, the versatile graphic... October 2, 2023 canva -->
How Do I Add Handwriting in Canva? Are you looking to add a personal touch to your Canva designs? Adding handwriting can give your creations a unique and authentic feel. In this... October 4, 2023 canva -->
How Do You Edit in Canva? Are you looking to enhance your design skills and create visually appealing graphics? Look no further than Canva! Canva is a user-friendly online... October 2, 2023 canva -->
How Do You Make an Animation on Canva? Creating animations can be a great way to add visual interest and engagement to your designs. Canva, the popular online graphic design tool, offers... October 2, 2023 canva -->
You haven't yet saved any bookmarks. To bookmark a post, just click .
We explain and teach technology, solve tech problems and help you make gadget buying decisions.
How to Create Presentations in Canva

Parth Shah is an evergreen freelance writer covering how-tos, app guides, comparisons, listicles, and troubleshooting guides on Android, iOS, Windows, Mac, and smart TV platforms. He has over five years of experience and has covered 1,500+ articles on GuidingTech and Android Police. In his free time, you will see him binge-watching Netflix shows, reading books, and traveling.
Canva recently introduced new tools to create docs, whiteboards, videos, websites, and presentations. As such, you no longer need to rely on traditional software solutions like Google Slides, PowerPoint, or Keynote to create an upcoming business presentation. You can easily create presentations in Canva using its familiar suite of editing tools.

Canva offers real-time collaboration, several export options, a present tool, AI add-ons, and much more to make a professional PPT. Canva also lets you make instant presentations with pre-filed slides. Without further ado, let’s get started.
Pick Up an Aspect Ratio and Template
Before you start, make sure to pick a relevant aspect ratio for your presentation. If it’s a traditional PPT, go with a 16:9 aspect ratio. If you plan to show your PPT on mobile, use the 9:16 aspect ratio.
Tablet users can start with a 4:3 aspect ratio. Canva also offers some ready-to-use templates to get started. We highly recommend starting with a template to save some time.

You can also filter templates via style, theme, feature, and color. For example, you can check company, marketing, corporate, marketing, school, and other templates. Most templates are free to use, while some may require a Canva Premium subscription.
Under templates, you also find an option to create instant presentations. You can enter a prompt and check Canva’s suggestions to get started.

Customize a Page With Editing Features
Once you pick up a template, you have the option to add all pages to your presentations. You can click ‘Apply all pages’ and check every slide at the bottom. You can always select a slide and hit delete to remove it from your presentation.

Canva lets you change every aspect of the template with different text styles, filters, and image editing tools. You can change color, tweak transparency, copy style, and more.

We suggest spending some time with editing tools to customize your Canva presentation and add some personal touches.
Add Graphics, Stickers, and Images
Your presentation will not seem as interesting without graphics, stickers, images, and videos. Unlike Google Slides or PowerPoint, you don’t need to import media files to Canva to complete your slides. You can easily add relevant elements from the sidebar.
Step 1: Open a slide in your Canva presentation.
Step 2: Select Elements from the sidebar. Add graphics, icons, stickers, tables, videos, and more.
Step 3: You can explore the AI image generator and turn your creative ideas into images and videos with a single click.

You can add simple descriptions and even turn generated images into videos. Canva also offers a long list of graphics packs in several categories. The possibilities are endless here. It’s up to you to make a compelling slide using useful tools.
Tweak Page Animation
Once you create a page, tweak its animation to make a smooth transition between pages.
Step 1: Select a slide in Canva.
Step 2: Click Animate at the top.
Step 3: Check basic, exaggerated, photo movement, and other animation types from the left sidebar.

You can also tweak the animation intensity, which is great.
Add Presenter Notes
Do you plan to present your Canva PPT on a video conference? You can add notes to each slide so they appear during the Presenter view (more on that later).
When you create a PPT, select a slide and hit Notes at the bottom. Enter your notes that you want to remember or talk about during a video meeting.

Collaborate and Edit in Real Time
Similar to Google Slides and Microsoft PowerPoint, Canva lets you share and edit a presentation in real time. You can take inputs from your colleagues and create a share-worthy presentation in no time.
Step 1: When you are done making changes to your presentation, click Share at the top.
Step 2: Enter people, groups, or your team. Expand the collaboration link menu and select Anyone with the link.
Step 3: Expand the permission menu and select Can edit.

You can also share a link with view or comment-only permission. Select the Copy link and share it with your co-workers.
Enable Presenter View
Presenter view is a thoughtful touch from Canva to give presentations over a Google Meet or Teams call.
You can open a presentation in Canva and select Present at the top. Click Presenter View and check two windows opening up on your computer.

One window shows your presentation with notes open on the sidebar. Another window displays the current slide you are sharing with others over a call.

Download and Share Your Presentation
As expected, Canva gives several options to share and export your presentation. When you complete your presentation, click Share in the top-right corner and expand Download.
You can convert a presentation to PDF, PPTX (Microsoft PowerPoint compatible), MP4, JPG, PNG and SVG formats. Check our dedicated post if you wish to print your Canva presentation .

Use Canva Like a Pro
Canva has done a solid job, granting users access to rich tools to create a convincing presentation. We can’t wait to see how the Australian startup enhances our PPT experience with AI features in the future. Speaking of which, we would love to see a feature similar to ‘Design Ideas from Microsoft PowerPoint’ on Canva. Do let us know if you use Canva for presentations in the comments below.
Was this helpful?
Last updated on 07 January, 2024
The above article may contain affiliate links which help support Guiding Tech. However, it does not affect our editorial integrity. The content remains unbiased and authentic.

The article above may contain affiliate links which help support Guiding Tech. The content remains unbiased and authentic and will never affect our editorial integrity.
DID YOU KNOW

More in Internet and Social

Why Is My Chromebook Battery Light Blinking White: 4 Ways to Fix the Issue

Top 9 Ways to Fix Filters Not Working on Snapchat
Join the newsletter.
Get Guiding Tech articles delivered to your inbox.

Jake Miller
#EduGIF Guy. Speaker. Tech Integration Specialist. Google Apps for Edu Trainer. Nerd. #EduDuctTape Podcast Host.
New Transitions and Remote Control in Canva Presentations
Canva presentations came out about a year ago, and they continue to make improvements to it. .
They’ve added a bunch of new transitions between slides, including Match and Move , which I’ll cover in detail in a moment.

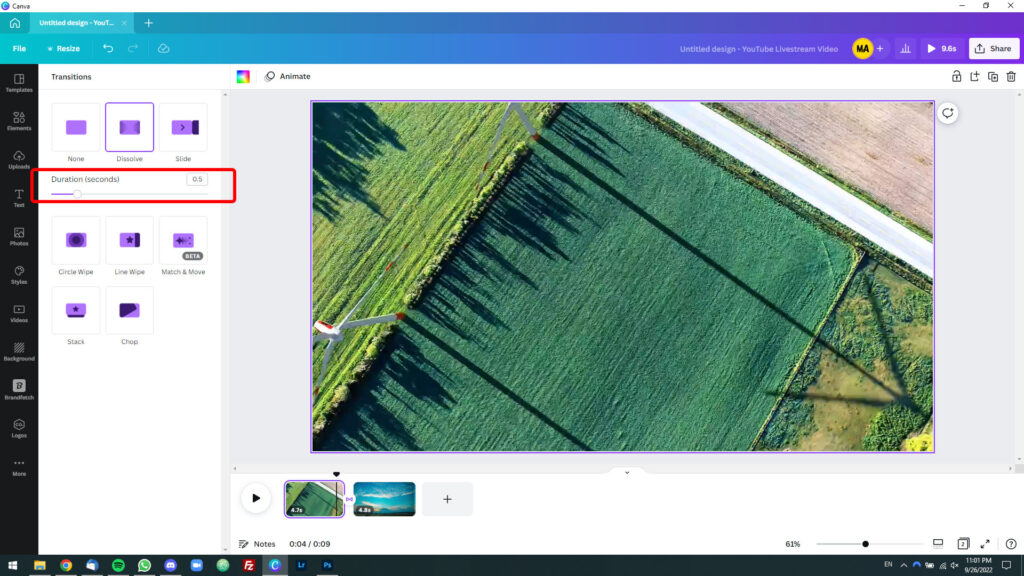
At this time, Canva Presentations have 8 different transitions: dissolve, slide, circle wipe, color wipe, line wipe, match & move, stack, and chop. Each of them can be customized so that you can choose how quickly you’d like the transition to happen or what direction you’d like it to happen in. For a color wipe, you can also choose what colors you’d like to use for the transition.
“Next Slide! Oh, sorry. lol” Canva has also added Remote Control, letting multiple presenters connect to a virtual clicker from any device to navigate and manage slides, remotely or in person. So, if you’re in a room together, both presenters can click forward a slide. Or, if you want to use multiple devices, maybe one at the front of your classroom to project, and then one at the back of the classroom to control the pace, you can do that too. And, better yet, if you’re co-presenting remotely, it no longer matters who is sharing their screen. So, if you’re not the screen sharer, you can still click the next slide button. And, you even have access to triggering their special slide effects, like the drumroll and the stage curtain.
This feature works on phones as well – so you can present from your computer but control from your phone while you’re moving around a room or a stage!
This feature is available in all Canva accounts.
[Image Source: https://www.canva.com/newsroom/news/unveiling-the-canva-visual-worksuite/ ]
Find more updates like this one by tuning into the EdTech News Brief on . . .

📲 Keep up with all things EdTech by following @jakemillertech on Instagram , Facebook , and Twitter.
Published by.

Jake is the host of the Educational Duct Tape podcast, the #EduGIF Guy, a Tech Integration Coach, speaker, Former STEM, Math & Science Teacher, and a presenter. View all posts by Jake Miller
How to Create Page Transitions in Canva
Home » Blog » How to Create Page Transitions in Canva

Founder of CanvaTemplates.com & Professional Graphic Designer
Jake Tucker
Canva Templates is reader supported. When you buy through links on our site, we may earn an affiliate commission. Learn more
Canva is an excellent design tool that allows users to create various graphic designs, including presentations, social media posts, and even websites. One of the features that make Canva stand out is its ability to add page transitions to presentations. Page transitions help create a smooth and seamless flow between slides, making presentations more engaging and visually appealing.
In this article, we will show you how to make page transitions in Canva. Whether you are creating a presentation for work or school, or simply want to add some pizzazz to your social media posts, page transitions can take your designs to the next level. With Canva’s easy-to-use interface and a variety of transition options, you can customize your designs to fit your specific needs and style.
Understanding Page Transitions in Canva
What are page transitions.
Page transitions are a way to smoothly switch from one page to another in Canva. They are commonly used in presentations and videos to create a more engaging and professional look. Canva offers a variety of transition options, including fades, dissolves, and slides. You can adjust the duration of the transition and choose from different styles to fit your design.
Why Use Page Transitions?
Using page transitions in your Canva designs can help to create a more polished and professional look. They can also make your designs more engaging and interesting to your audience. Page transitions can be particularly useful in presentations and videos, where you want to keep your audience’s attention and create a seamless flow between different sections or topics.
In addition to adding visual interest to your designs, page transitions can also help to create a more cohesive and organized look. By using consistent transitions throughout your design, you can create a more professional and polished look that will impress your audience.
Creating Page Transitions in Canva
If you want to create a more engaging presentation or video, adding page transitions to your Canva design can help you achieve that. Here’s how to create page transitions in Canva:
Step 1: Choose Your Template
First, choose a template from Canva’s library that suits your needs. You can browse templates by category or search for a specific type of template using the search bar.
Step 2: Design Your Pages
Once you’ve selected your template, it’s time to design your pages. You can add text, images, shapes, and other design elements to your pages to make them visually appealing and informative.
Step 3: Add Page Transitions
After designing your pages, it’s time to add page transitions. To do this, hover your mouse over a page thumbnail at the bottom of the editor and click the icon, or hover your mouse between page thumbnails. Click “Add transition.” To preview a transition, hover your mouse cursor on it. To apply a transition, click on it from the options. Depending on which one you choose, more transition options will appear on the side panel. Use the “Duration (seconds)” slider to adjust the transition duration, or use the default setting.
Step 4: Preview and Export Your Design
Once you’ve added page transitions, preview your design to see how it looks. If you’re happy with the result, export your design in the format you need, such as PDF or MP4. You can also share your design directly from Canva.
Customizing Page Transitions in Canva
Canva allows you to customize the page transitions in your designs to make them more engaging and professional. You can change the duration of the transition, adjust the direction of the transition, and even add sound effects to make them more interesting.
Changing the Duration of Page Transitions
To change the duration of the page transition, hover your mouse over the page thumbnail at the bottom of the editor, and click the icon. From there, select the transition you want to edit, and use the Duration (seconds) slider to adjust the transition duration. The longer the duration, the slower the transition will be.
Adjusting the Direction of Page Transitions
You can also adjust the direction of the page transition to make it more interesting. To do this, hover your mouse over the page thumbnail at the bottom of the editor, and click the icon. From there, select the transition you want to edit, and use the Direction dropdown menu to adjust the direction of the transition. You can choose from left, right, up, or down.
Adding Sound Effects to Page Transitions
To add sound effects to your page transitions, hover your mouse over the page thumbnail at the bottom of the editor, and click the icon. From there, select the transition you want to edit, and click the Sound dropdown menu. You can choose from a variety of sound effects, or you can upload your own sound effect.
Best Practices for Page Transitions in Canva
Keep it simple.
When it comes to page transitions in Canva, less is often more. Keep your transitions simple and avoid using too many different types of transitions in one design. Too many transitions can be distracting and take away from the overall message you are trying to convey. Stick to one or two types of transitions that complement your design and add a subtle touch of movement.
Be Consistent
Consistency is key when it comes to page transitions in Canva. Use the same type of transition throughout your design to create a cohesive look and feel. This will help your audience focus on the content of your design rather than being distracted by inconsistent transitions. Additionally, keep the duration of your transitions consistent to create a smooth and seamless experience for your audience.
Test Your Design
Before finalizing your design, be sure to test your page transitions to ensure they work properly and look good. Preview your design and test it on different devices to make sure your transitions are smooth and not too slow or too fast. Additionally, get feedback from others to see how they perceive your design and whether the transitions add to or detract from the overall message.
Following these best practices for page transitions in Canva will help you create professional and engaging designs that effectively communicate your message. Remember to keep it simple, be consistent, and test your design to ensure a seamless experience for your audience.
I hope you found this guide covering how to create page transitions in Canva, useful! Be sure to check out our blog for more article covering the essential tips, tricks, and advice for Canva! Also, if you haven’t already tried CanvaPro, you can try it for free for 30 days !
How Do You Add Transitions in Canva Presentation?
Last updated on September 27, 2022 @ 6:52 pm
Adding transitions to your Canva presentation can help you control the pace of your presentation and keep your audience engaged. There are a few different ways to add transitions in Canva.
First, you can add transitions between slides. To do this, click on the “Transitions” tab in the left sidebar.
Then, click on the transition you want to use between slides. You can preview your transition by clicking on the “Preview” button.
Second, you can add transitions to individual elements on a slide. To do this, click on the element you want to add a transition to.
Then, click on the “Animations” tab in the top toolbar. From here, you can choose an animation for your element.
Finally, you can add transitional effects to your entire presentation by clicking on the “Effects” tab in the left sidebar. From here, you can choose from a variety of effects, including zoom and panning effects.
7 Related Question Answers Found
How do you add text transitions in canva, how do you add transitions to videos on canva, can you do transitions on canva presentations, how do you add animations to canva presentation, how do you add music to a canva presentation, how do i add moving elements in canva, how do i add a video to my canva presentation.

Drew Clemente
Devops & Sysadmin engineer. I basically build infrastructure online.
How to do a transition on Google Slides: A Step-by-Step Guide
Transitions in Google Slides can add that extra flair to your presentation, making it more dynamic and engaging. Essentially, a transition is an effect that takes place when you move from one slide to the next. It’s a simple way to make your presentation flow and keep your audience focused. Let’s dive into how you can easily add transitions to your slides.
Step by Step Tutorial: Adding Transitions on Google Slides
Before we get into the nitty-gritty, let’s establish what we’re aiming to achieve with these steps. We want to add transitions to our slides to make our presentation smooth and visually appealing.
Step 1: Open your Google Slides presentation
Access your presentation by going to Google Drive and opening the Google Slides document you wish to add transitions to.
Once you have your presentation open, you’ll see all your slides listed on the left-hand side. This is your starting point.
Step 2: Select the slide you want to add a transition to
Click on the slide that you want to apply the transition effect to. You can add transitions to individual slides or to all slides at once.
If you want to apply the same transition to multiple slides, hold the ‘Shift’ key and click on the slides you want to include. This will allow you to add the transition effect to all selected slides at once.
Step 3: Click on "Slide" in the top menu, then "Change transition"
After selecting your slide(s), head to the top menu, click on "Slide," and you’ll see the option "Change transition." This will open the ‘Transition to this slide’ sidebar.
In the sidebar, you’ll see a variety of transition options, such as ‘Fade’, ‘Slide’, and ‘Flip’. You can click on each to see a preview of the transition effect.
Step 4: Choose your transition effect and adjust the speed
Once you’re in the transition sidebar, click on the transition you want to add. Next to the transition options, you’ll see a slider that allows you to adjust the speed of the transition.
Slower transitions can create a sense of drama or importance, while faster transitions can keep the energy of your presentation high. Play around with the speed until you find something that suits your presentation style.
Step 5: Click "Apply to all slides" if you want to use the same transition for every slide
If you’ve decided that you want to maintain consistency throughout your presentation, then you can click on "Apply to all slides" to use the same transition effect across your entire slide deck.
Remember, while consistency can be good, using different transitions for different sections of your presentation can also help to differentiate between topics or ideas.
After you’ve completed these steps, your slides will now transition with the effect you’ve chosen when you present. This can make your presentation more professional and polished.
Tips for Adding Transitions on Google Slides
- Use transitions sparingly. Too many transitions can be distracting and take away from the content of your presentation.
- Keep your audience in mind. Choose transitions that complement the tone and style of your presentation.
- Preview your transitions. Make sure to watch how your transitions look before presenting to an audience, so you can make any necessary adjustments.
- Consider the timing. Make sure the speed of your transition matches the pacing of your presentation.
- Experiment with different transitions. Google Slides offers a variety of transition options, so don’t be afraid to try out different effects.
Frequently Asked Questions
Can i add different transitions to each slide.
Yes, you can add different transitions to each slide by selecting each slide individually and choosing the desired transition.
Will the transitions work when I present in Google Slides?
Yes, the transitions will work when you enter presentation mode in Google Slides. Just make sure to save your changes.
Can I remove a transition from a slide?
Yes, you can remove a transition by selecting the slide and clicking on "No transition" in the transition sidebar.
Do all transitions have the same speed options?
Most transitions have speed options, but the range of speed may vary depending on the transition effect you choose.
Can I copy a transition from one slide and apply it to another?
Yes, you can copy a transition effect by clicking on "Copy" in the transition sidebar and then "Paste" on the other slide where you want the transition to be applied.
- Open your Google Slides presentation.
- Select the slide you want to add a transition to.
- Click on "Slide" in the top menu, then "Change transition."
- Choose your transition effect and adjust the speed.
- Click "Apply to all slides" if desired.
Adding transitions to your Google Slides presentation is a fantastic way to enhance your audience’s experience and ensure your message is delivered with impact. Remember, transitions are like the seasoning in a dish – too little and it’s bland, too much and it’s overwhelming. The key is to find the right balance that complements your presentation and keeps your audience engaged from start to finish.
Keep experimenting with different transitions and speeds to find the perfect match for your style. And don’t forget, practice makes perfect. Run through your presentation several times to ensure the transitions are seamless and contribute positively to your overall message.
In conclusion, whether you’re presenting a project at school, pitching an idea at work, or sharing a story, mastering transitions on Google Slides can elevate your presentation game to the next level. Now that you know how to do a transition on Google Slides, go ahead and give it a try!

Kermit Matthews is a freelance writer based in Philadelphia, Pennsylvania with more than a decade of experience writing technology guides. He has a Bachelor’s and Master’s degree in Computer Science and has spent much of his professional career in IT management.
He specializes in writing content about iPhones, Android devices, Microsoft Office, and many other popular applications and devices.
Read his full bio here .
Share this:
- Click to share on Twitter (Opens in new window)
- Click to share on Facebook (Opens in new window)
- Click to email a link to a friend (Opens in new window)
- Click to share on LinkedIn (Opens in new window)
- Click to share on Reddit (Opens in new window)
- Click to share on Pinterest (Opens in new window)
- Click to share on Tumblr (Opens in new window)
Related posts:
- How to Make Transitions on Google Slides: Step-by-Step Guide
- How to Hide a Slide in Google Slides
- How to Duplicate a Slide on Google Slides
- How to make Google Slides automatically transition: A step-by-step guide
- How to Do Transitions on Google Slides on iPad: A Step-by-Step Guide
- How to Change Slide Dimensions in Google Slides
- How to Delete a Slide on Google Slides
- How to Delete Multiple Slides in Google Slides
- How to Get Google Slides to Play Automatically: A Step-by-Step Guide
- How to Put Canva Slides into Google Slides: A Step-by-Step Guide
- How to Number Slides in Google Slides
- How to Import Slides in Google Slides: A Step-by-Step Guide
- How to Make a Good Presentation on Google Slides: Expert Tips and Tricks
- How to Make Google Slides Play Automatically: A Step-by-Step Guide
- How to Make Columns in Google Slides
- How to Share Google Slides in Presentation Mode Like a Pro
- How to Copy and Paste Multiple Slides in Google Slides: A Simple Guide
- Importing Keynote Presentations to Google Slides: A Step-by-Step Guide
- How to Stop Audio on a Certain Slide in Google Slides: A Guide

5 Better Alternatives To Google Slides
I f you're looking to create a compelling presentation to showcase a new idea or persuade others, Google Slides may be the first option that comes to mind. But with few built-in templates, basic themes, and a limited graphics collection, you'll likely have a hard time making your presentation stand out against others.
If you want to make your presentation truly stand out, there are several alternatives to Google Slides that offer extra perks and features to give your presentations an edge. While Google focuses on integrating Slides with its other work-based apps like Sheets and Docs, other presentation apps focus more on design elements, transitions, and themes to help you convey your brand or personal image throughout your presentation.
We've tested these Google Slide alternatives to give you an idea of other available options to deliver impactful presentations. If you're looking for a way to make boring information more fun and engaging, here are the best presentation apps to replace Google Slides.
Read more: Major Graphics Card Brands Ranked Worst To Best
Microsoft PowerPoint
There's a reason so many businesses around the globe use Microsoft PowerPoint. Building its reputation as the go-to option for delivering high-quality presentations, the software generated $100 million in annual sales only three years after its initial release in 1990.
Microsoft PowerPoint may be Google Slides' largest competitor, but there are plenty of unique features that can add an extra flourish to your slides. PowerPoint excels in its impressive library of custom animations and slide transitions, which are fairly limited in Google Slides. Another unique feature is its AI-powered Designer tool. This provides professional design schemes that mirror the words used in your slides. For instance, if your title slide is named "Basketball Team 2024," Designer will automatically suggest pictures and slide layouts associated with basketball.
As PowerPoint has been in development longer than Google Slides, it naturally offers more nuanced features if you're looking for something specific. For example, you can save individual slides as an image file (using .png or .jpeg formats) or as a separate presentation file. There's also a large library of free PowerPoint templates designed to speed up your workflow. Moreover, PowerPoint integrates seamlessly with Microsoft Teams with its PowerPoint Live function, allowing you to easily share your presentation with your co-workers.
Prezi offers an innovative approach to showing presentations with its unique canvas feature. Unlike traditional presentation software, Prezi lets you zoom and pan around a flexible canvas. The canvas may feel distant to something of a presentation program, but there is still some linear order provided thanks to the Timeline view.
Finding ways to visualize data is one of the biggest challenges when dealing with presentation software. Prezi resolves this struggle with the help of its Story Blocks: a series of infographics available in multiple designs to visually represent data. You can easily edit infographics and even add animations to individual shapes. This can help add a story to your presentation and help you emphasize key points.
To further enhance your presentation visually, Prezi offers several topic path settings, which let you change how Prezi transitions from one topic to another. These options include subtopics, which are super helpful for breaking large chunks of information down. If you're looking for a unique, modern approach to presenting information, Prezi is a top pick.
If you're looking to create a professional presentation to convince potential clients about your business idea, Slidebean is a popular choice among professionals with plenty of customization options. One of the issues with Google Slides is its fairly limited template library, which is filled mostly with basic designs. Slidebean offers a better alternative with a broad selection of innovative templates split into categories for convenience.
The app's user interface is easy to navigate so that you can create slides in less time. Each slide has a dedicated Design and Outline tab. You can use the Outline tab to quickly edit the information on each slide without being distracted by all the visual elements. Another productivity-enhancing feature is the ability to generate a presentation theme from your website. Simply enter your URL, and Slidebean will automatically apply the theming to your presentation.
Slidebean is another presentation app to take advantage of AI. Using the Auto-Design feature, you can generate recommended slide layouts based on your existing content. It also features AI text suggestions designed to suit different industries. Overall, Slidebean offers a quicker, more efficient method for creating stunning presentations compared to Google Slides.
Canva is a well-known app among graphic designers, but it's also capable of making stunning presentations. The app also has mobile editions, so you can easily create and edit presentations on your Android phone , iOS device, or tablet. As long as you have an internet connection, you can modify your designs wherever you are.
To get started, head to Canva's online presentation maker . Canva offers a vast range of templates categorized by topic, which easily surpasses the simple templates in Google Slides . While some of the templates are only available to Canva Pro members, there is an ample amount of free templates to help you get started. You'll also find a large selection of stock photos, shapes, and illustrations to create beautiful customized slides.
Because Canva is built for graphic designers, you can access several features to give your presentation consistent theming. These include color palettes, font sets, and even a brand kit that allows you to add your company's fonts (available to Pro members only). One time-saving feature is Canva's Uploads tab, which lets you access recently uploaded media files. This offers a convenient way to copy content between different presentations.
Visme is a powerful visual design tool able to create videos, infographics, and presentations. One of the perks of using Visme is the company's free educational content, which offers advice on how to create impactful content to boost your brand. After signing up, the company also asks whether you're using Visme for your business, education purposes, or personal use to offer personalized tips.
In terms of charts and graphs, Visme offers some of the most impressive features we've seen from a presentation app, so you can effortlessly convey important statistics. From the Data tab, you can access dozens of graph styles to visually represent your data. Then, simply double-click a chart inside your presentation to edit the values instantly in a simple table format.
Another area that Visme excels in is collaboration. You can either generate a link to publish your presentation on the web or share your presentation privately with others. For each team member, you can choose who can view, edit, and comment slides for a seamless workflow. There's also a Slack integration that lets you receive messages whenever changes are made to your presentation. Visme is free for all users, with limited features available in its premium plans.
Read the original article on SlashGear .

IMAGES
VIDEO
COMMENTS
In this tutorial, you'll learn how to elevate your Canva presentations with various transition effects. From the classic slide and dissolve transitions to th...
Hover your mouse over a page thumbnail at the bottom of the editor, and click the icon. Or, hover your mouse between page thumbnails. Click Add transition. To preview a transition, hover your mouse cursor on it. To apply a transition, click on it from the options. Depending on which one you choose, more transition options will appear on the ...
Canva Presentations - How to Add Transitions and PRESENT! // By the end of this tutorial you'll have learnt how to add professional transitions to your Canva...
In this video, you'll learn how to make an animated video on Canva using simple elements and motions. Best of all, you can do it all for free in Canva. WATCH...
Mobile. Click to select the page or element. On the toolbar above the editor, click on the icon. Animation options will show on the side panel. To change animations or motion effects, simply click on a different one from the options. To remove animations or motion effects, click Remove animation at the bottom of the side panel.
Here's a step by step guide on how to add transitions in Canva: Hover your mouse over a page thumbnail at the bottom of the editor, and click the ellipsis icon. Click 'Add transition ' to proceed. To preview a transition, hover your mouse cursor on it. To apply a transition, click on it from the options. Use the 'Duration (seconds)' slider to ...
To set the duration of your chosen Canva video transition, navigate to the Transitions menu. It will appear on the left sidebar after clicking the + icon between each slide/frame on the timeline. Then, select Add transitions. Once the Transitions menu appears, click the transition, and the sub-menu items like duration and direction will appear.
Step 3: Applying Animations. Now comes the fun part - adding animations! Canva offers a range of animation effects that can bring life to your presentation. To apply an animation effect: Select an element or group of elements that you want to animate. Click on the "Animate" button at the top of the screen.
Step 5: To add transitions, click on the + icon you'll find between two video slides. You'll then choose between the Add page or Add Transitions options. Select the latter. Step 6: The Transitions gallery on the left side of the editor page will then appear. From there, you can select what transitions you want to use.
Step 1: Click on the "+" icon between the two shots where you want to add a transition. The "+" icon between two shots. Step 2: A small menu with two options will pop up. The top option is for adding a page (or shot), and the bottom option is for adding a transition. Click on the latter. The "Add transition" button
First, open Canva and select the design you want to add transitions to. It can be a presentation, social media post, or any other type of design. Step 2: Enter Presentation Mode. To view your design with transitions, enter the presentation mode. You can do this by clicking on the "Present" button located at the top right corner of the Canva editor.
To add a transition in Canva, simply click on the "Transitions" tab in the left sidebar. From there, you can choose the type of transition you want to use and adjust the duration of the effect. Canva also provides the option to preview the transition before applying it to your presentation.
Canva Presentation Transitions - NEW 🤩 // In this tutorial I'll be walking you through how to use the NEW Canva presentation transitions to help you make ev...
Once you create a page, tweak its animation to make a smooth transition between pages. Step 1: Select a slide in Canva. Step 2: Click Animate at the top. Step 3: Check basic, exaggerated, photo ...
Canva Presentations came out about a year ago, and they continue to make improvements to it. They've added a bunch of new transitions between slides, including Match and Move, which I'll cover in detail in a moment. At this time, Canva Presentations have 8 different transitions: dissolve, slide, circle wipe, color wipe, line wipe, match ...
To do this, hover your mouse over a page thumbnail at the bottom of the editor and click the icon, or hover your mouse between page thumbnails. Click "Add transition.". To preview a transition, hover your mouse cursor on it. To apply a transition, click on it from the options. Depending on which one you choose, more transition options will ...
First, you can add transitions between slides. To do this, click on the "Transitions" tab in the left sidebar. Then, click on the transition you want to use between slides. You can preview your transition by clicking on the "Preview" button. PRO TIP: Canva Presentation is a great way to create presentations, but you should be careful ...
Step 10: Now, in the presentation mode, click your mouse to navigate through each slide, making the text appear on click. You can also trigger the same effect if you press your keyboard's left and right arrow keys. The right arrow key will move you forward in the presentation and the left arrow key will move you back.
Welcome to our step-by-step Canva tutorial on creating Stunning Presentation using Canva's Morph Transition, In this video, we'll guide you through the proce... Videos. Animation. Web Design. Powerpoint. Creative Powerpoint. Powerpoint Presentations. Creative Powerpoint Presentations. Canva Design. Slide. Lulu Matar. 143 followers. 1 Comment
How to use video transitions in Canva: a step by step tutorial for all of you Canva lovers! Canva now has amazing (and easy to use) transitions for your vide...
Use the same 'banner' or title font throughout your design. Have the same 'frame' or 'grid' throughout your design. Apply the same background throughout your design. Use consistent fonts. 2. Work smarter, not harder. Create a template page for your presentation to keep all the points above about consistency in line.
Slidecast is designed to help you streamline and scale your business presentations, pitches, and product demos. Efficiently deliver presentations, track presentation engagement, and send follow-ups to their Canva contacts. More than 250,000 presentations have been delivered through the platform, with 41,000 hours of attention from prospects on ...
With Canva, you get even more creative freedom: An easy drag-and-drop tool to help you add graphics; Page animation features, emojis, color palettes and font sets; Millions of professionally designed images and photos; Pre-recorded Talking Presentation tools to help you practice; A notes feature for adding talking points to your design
Start with a presentation template. Use the 20/30 rule when designing presentations. Prioritize visual appeal in design. The importance of organization. Form a brand identity. The power of color in brand identity. Emphasize data with charts, graphics and infographics. Utilize icons to add dynamics to your presentation.
Step 3: Click on "Slide" in the top menu, then "Change transition". After selecting your slide (s), head to the top menu, click on "Slide," and you'll see the option "Change transition." This will open the 'Transition to this slide' sidebar. In the sidebar, you'll see a variety of transition options, such as 'Fade', 'Slide', and ...
Overall, Slidebean offers a quicker, more efficient method for creating stunning presentations compared to Google Slides. Canva is a well-known app among graphic designers, but it's also capable ...
👍 Enjoyed this video? Hit the "Like" button to see more in your feed.🔔 Subscribe so you never miss our new videos: https://bit.ly/YTCanvaDirectSub MORE...