
Is Your PowerPoint Read-Only? Here’s How to Edit and Save it!
By: Author Shrot Katewa

Are you trying to open a PowerPoint presentation that sadly opens up as a read-only file? If the answer is yes, then you are not alone! This isn’t a pleasant situation for anyone, however, there are many complications and reasons behind why this happens. On a larger note, the solution to this problem is fairly simple.
To edit your PowerPoint read-only file, simply click on the “Edit Anyway” button on the horizontal yellow bar under the ribbon. You can also click on the “File” tab. Then, click on “Info”. Next, locate and click on “Protect Presentation”, and finally click on “Mark as Final”.
Interestingly, one of the reasons why your presentation shows as read-only is because of an in-built feature within PowerPoint! (We’ll get to the details of that in a bit). So, this is not something that you need to fear. We just need to be a bit more informed on how to fix it!
So, in this article, I will be sharing with you the details of why a PowerPoint file shows “Read-only”, and what can you do to save the file and make it editable. Let’s get started!
A Quick Note Before We Begin – if you want to make jaw-dropping presentations, I would recommend using one of these Presentation Designs . The best part is – it is only $16.5 a month, but you get to download and use as many presentation designs as you like! I personally use it from time-to-time, and it makes my task of making beautiful presentations really quick and easy!
Why is My PowerPoint Read-Only?
One of the most common reasons for PowerPoint to become a read-only file as when it has been done so intentionally. Why would anyone want to do this intentionally?
1. “Mark as Final” Feature is Enabled
Well, it turns out, PowerPoint actually provides a built-in feature known as “Mark as Final”. This feature turns the PowerPoint file into “Read-Only” mode . The “Mark as Final” feature of PowerPoint is designed to let the readers know that the version of the presentation that they are viewing is the final version and no changes are to be made to that version!
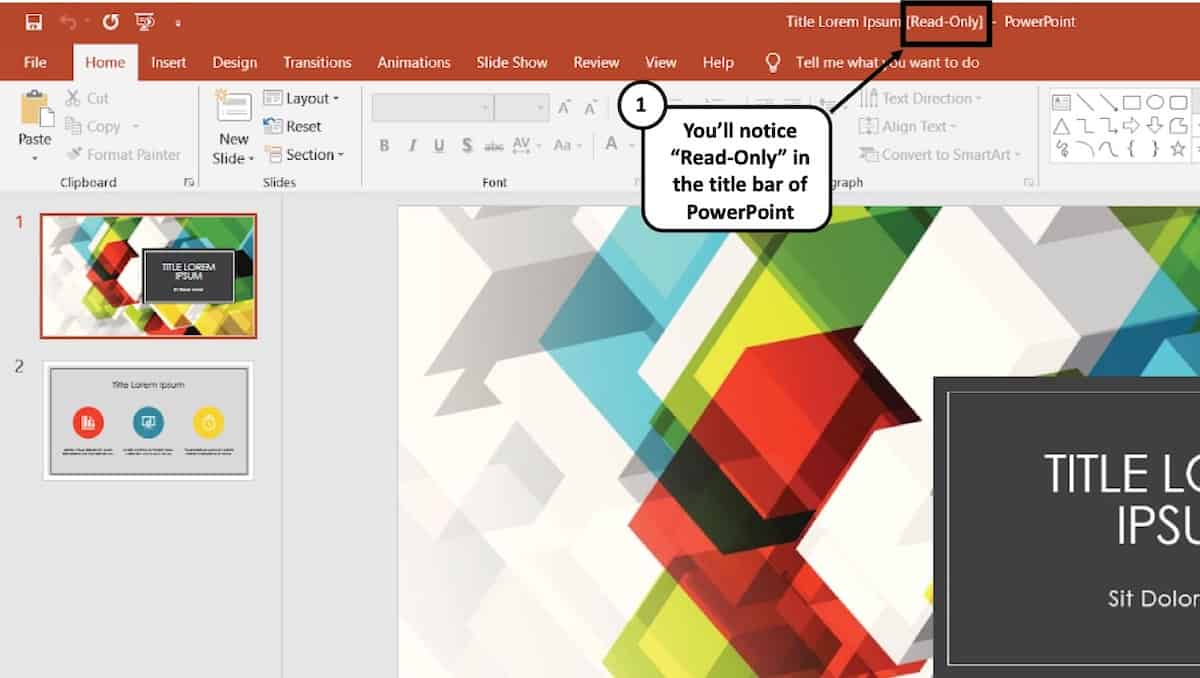
Thus, even though such a presentation can be opened by viewers, they will see a “Read-Only” prompt both at the top of the PowerPoint application where the title appears (otherwise known as the title bar), and a yellow strip just below the ribbons with a button that says “Edit Anyway”.
Obviously, there are other ways to prevent your viewers from editing your PowerPoint file which is more fool-proof. More on that later in the article.
2. PowerPoint has just Recovered from a Crash
Another common reason for PowerPoint to get into “Read-Only” mode is when your PowerPoint may have recovered from a crash . Irrespective of whether the PowerPoint application was abruptly closed intentionally or unintentionally when a presentation file was open, PowerPoint may open the file in “Read-Only” mode when restarted.
PowerPoint automatically marks the previous saved version as the final version of the file and opens it up in the read-only mode.
3. Same PPT file is Opened Twice at the Same time!
Lastly, PowerPoint may also convert a presentation into “Read-Only” mode when two presentations that have the same name are opened at the same time. Alternatively, the file may also become read-only when the same file has been opened twice by mistake.
This can happen especially when PowerPoint takes some time to respond to the user’s first request to open a presentation file leading to the user double-clicking on the same file twice. Although there are checks and balances in place to avoid this issue, nevertheless, such issues can still take place.
Furthermore, if you have perhaps saved a presentation file that has the same name in two different locations on your computer, and you open both of them together, PowerPoint can sometimes open the file that has been opened later in read-only mode.
How to Unlock Read-Only in PowerPoint?
As annoying as it may seem, it is quite easy to unlock the read-only mode from PowerPoint!
Here’s how to exit from the “Read-Only” mode in PowerPoint –
- Open the “Read-Only” PowerPoint (PPT) file.
- At the top part just below the ribbon options, you’ll see a long yellow banner.
- Hover your mouse towards the banner and click on the option “Edit Anyway”.
You will now be able to edit the PowerPoint file as you usually would.
Furthermore, make sure that you haven’t opened the same file twice by chance. If so, try to close one or both the files and re-open the presentation once again.
Why Does Read-Only Keep Coming Back in PowerPoint?
One of the key reasons why your PowerPoint file may become read-only every time you open it is because the “Mark as Final” feature has been enabled in the settings. As long as this feature has been enabled, your PowerPoint file may keep reopening as a read-only file from time to time.
Let us understand how to turn off read-only mode in PowerPoint so that you don’t have to deal with this issue.
How to Turn Off Read-Only Mode in PowerPoint?
Even though clicking on “Edit Anyway” as described above will fix the issue, however, if the presentation has been marked as final by the original author, it may continue to show the read-only mode sometimes.
In order to fix that issue, you will need to take a slightly longer route. Here’s a step-by-step process to turn off read-only mode in PowerPoint.
1. Start by opening your “read-only” PowerPoint presentation.
2. Hover to the top menu and then click on the tab named ‘File’. Then click on Info.
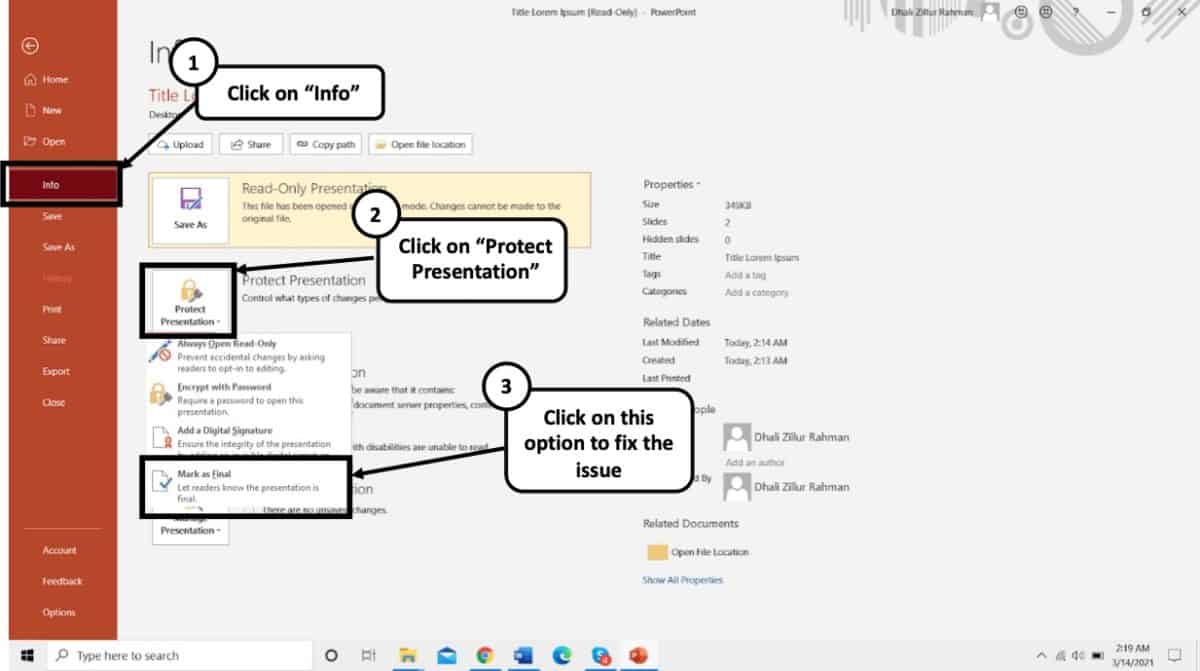
3. There will be a ‘Protect Presentation’ option in clear yellow.
4. You might come across a dialog box telling you “The presentation has been marked as final to discourage any editing.”
5. To undo this feature, simply click on Protect Presentation. A menu will appear, click on the ‘Mark as Final’ to fully unlock the desired presentation.
After doing this you will see that the Read-Only suffix from your PPT file’s name will be gone and you would be able to freely edit further.
How to Edit a Read-Only PowerPoint File?
After you have done removing the read-only feature from your PowerPoint, you can simply edit texts, add animations, images and use features with absolute free will. Just getting through the read-only barrier is the only thing that you need to know to get started with editing.
Interestingly, you can also get out of the read-only mode in PowerPoint by saving the file with a different name. This will not only allow you to get rid of the read-only mode but also allow you to save a copy of the edits that you may have made while the file was in the read-only mode.
Let’s learn how to save a read-only presentation file.
How to Save a Read-Only PowerPoint File?
Saving a PowerPoint file that is in a read-only mode is rather quite simple. Although you don’t need to enable “Edit Anyway”, doing so would be recommended. The next step is really saving a file in a different location on your computer with either the same name or under a different name.
Here’s how you can save a read-only PowerPoint presentation –
- Click on the “File” tab.
- Click on “Save As” from the option provided on the left part of your screen.
- Navigate to a folder location where you want to save the file. Feel free to change the name of the file if needed.
- Click “Save”.
- Lastly, browse to the specific folder where you saved the PowerPoint file. Open it and check to see if the “Read-Only” mode has been removed.
Why Does Every PowerPoint File Open in Read-Only Mode?
As we have learned so far, one of the key reasons for PowerPoint to open a presentation file in read-only mode is when it has been “Marked as Final” by the author of the file. By now, you’ve also learned how to get rid of this problem.
However, the “Mark as Final” feature should only restrict the specific file shared by a particular author . It typically shouldn’t make all your PowerPoint files “Read-Only”.
If this is the case for you, the problem may be slightly different. Let’s understand this a bit further.
Sometimes, t he file or the folder in which the PowerPoint presentation has been saved itself becomes read-only due to a glitch in the operating system . There are several reasons why this could happen. I won’t go into details of each of those reasons. However, it is important for us to understand how to make this file or folder editable.
Here’s what you could do to remove the read-only from a particular presentation file –
- Navigate to the folder in which the file has been saved, and locate the file.
- Right-click on the file and select “Properties” from the window the just opens up.
- A new window will open up. Click on the “General” tab. Next, clear the check-box from the “Read-Only” attribute option.
- Finally, click “OK” and save your changes.
This should solve the problem. If it still doesn’t fix the issue, you may want to check whether the folder in which the PowerPoint file has been saved has the editable rights to it and is not marked as read-only.
If the folder is also being marked as read-only, you will need to remove the “Read-Only” attributes from the folder first. Here’s an article that can help you remove the read-only attribute from a folder in Windows.
How to Prevent PowerPoint from Being Edited?
There are quite a few different ways in which you can lock a PowerPoint file or prevent it from being edited. Here are some of the options that you can choose from –
- Save a PowerPoint File as Read-Only
- Password protect your PowerPoint file.
- Convert a PowerPoint file into a PowerPoint Show File (PPSX)
- Convert a PowerPoint file into a PDF file
- Convert a PowerPoint file into a Video
Let’s look at some of these methods in detail –
Method 1 – Save a PowerPoint File as Read-Only
To get this done, simply do the opposite of turning off the read-only mode. Here’s a step-by-step process to save a PowerPoint file as Read-Only:
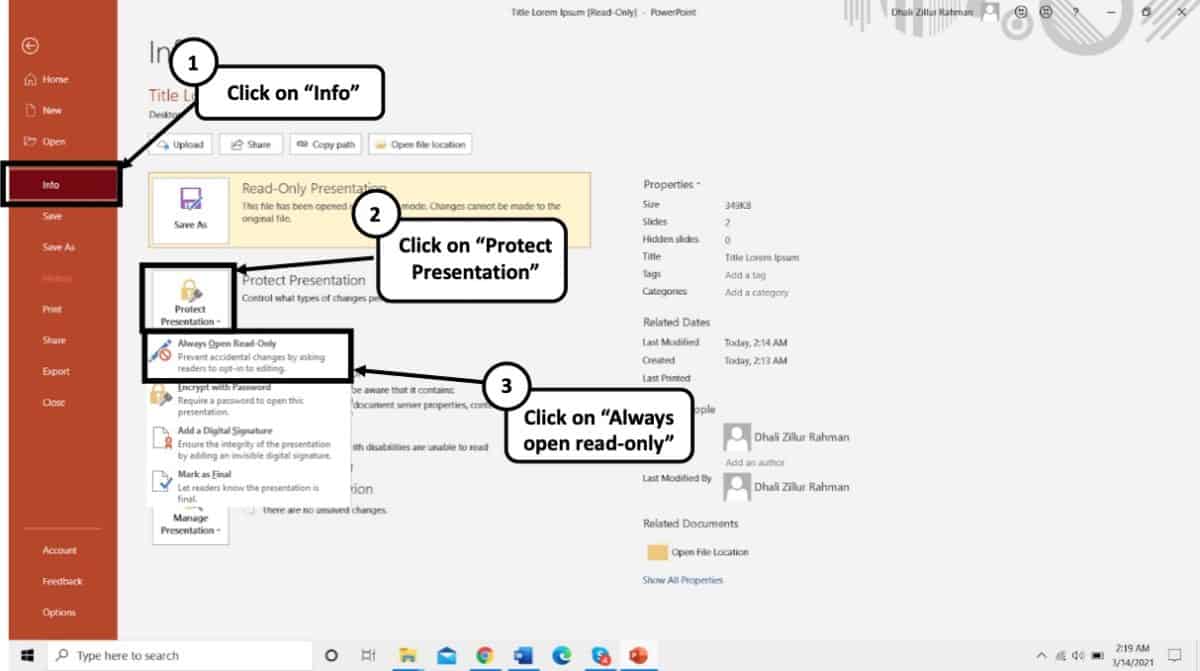
- Open the desired PowerPoint presentation, and click on the “ File ” tab.
- Next, click on the “ Info ” tab from the options presented on the left part of the screen.
- Select the “ Protect Presentation ” option.
- From the dropdown, select “ Always Open Read-Only “.
- Finally, save the file by pressing Ctrl+S.
Your presentation file will now be opened as a read-only file.
Method 2 – Password Protect your PowerPoint presentation
If your colleagues or students haven’t been very familiar with your polite way of discouraging any edits on your final PowerPoint file, then the best option for you is to simply encrypt your presentation file using a password protection feature.
Here’s what you need to do to password protect your PowerPoint presentation –
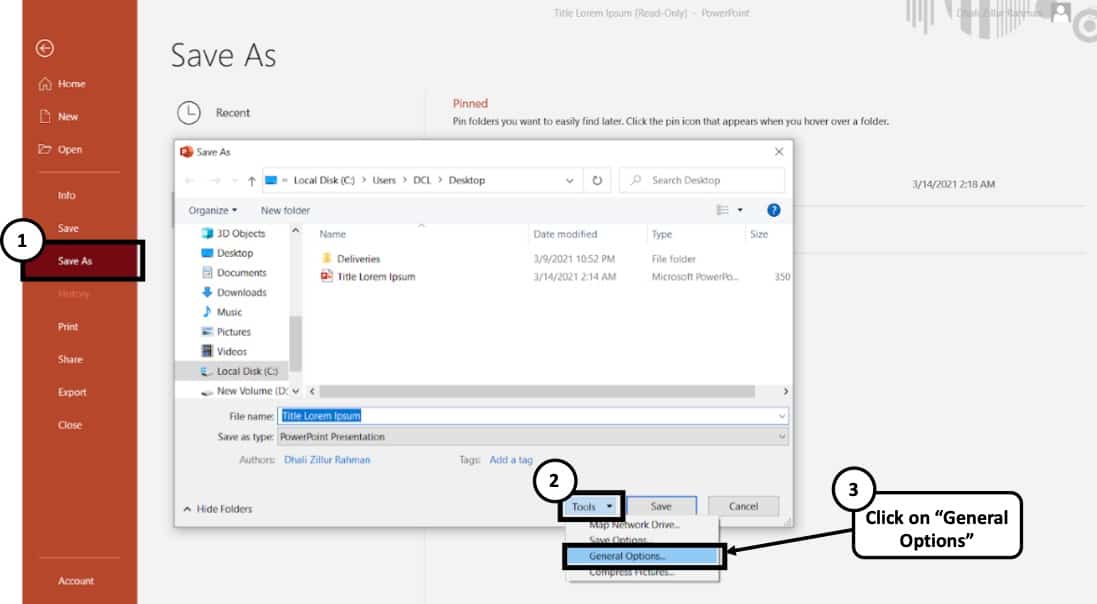
- Open your desired presentation and select the File tab and then click on “ Save As ”.
- At the bottom of the “Save As” dialogue box, a “ Tools ” option will appear.
- Click on “ General Options ”.
- The box marked as “ Password to Modify ” can be used to type in the desired password you wish to set.
- After setting up your password and re-entering it for further verification, simply click “ OK ”
Similarly, you can also enable password protection from the “ Info ” tab. To do that, click on the “ File ” tab first. Then, click the “ Info ” tab. Next, click on “ Protect Presentation “, and finally from the dropdown, click on “ Encrypt with Password “. You will then be asked to set a password. Simply re-enter the same password and click “ OK “.
While encrypting the PowerPoint file with a password, you will be presented with 2 options – either to restrict access to the PowerPoint file or to restrict modifying the presentation file. Choose the latter as this will allow your audience to at least view the presentation file without editing it.
Method 3 – Convert PowerPoint presentation as a PPSX file
Another method of preventing a PowerPoint presentation from being editing is to convert it into a PowerPoint show file or a PPSX file format. Doing so will directly open the presentation file in a PowerPoint Slide Show mode thereby restricting the editing capabilities of an individual for such a file.
Here’s how to convert a PowerPoint presentation to a PowerPoint Show file (PPSX file)
- Click on the “ File ” tab.
- Then, click on “ Save As ” from the panel on the left part of your screen.
- On the new window that pops-up, click on the “ Save As Type ” option.
- From the dropdown, scroll down and locate the “ PowerPoint Show ” file type option.
- Navigate to the desired location and rename the file if needed.
- Click on “ Save “.
Method 4 – Convert PowerPoint Presentation into a PDF File
Another alternative method is to share a PDF version of the presentation instead of the PPT file. All you need to do is convert the file to the PDF file format. To do that, you can follow the below steps –
- Then, click on “ Export ” from the panel on the left part of your screen.
- On the new window that pops-up, click on the “ Create PDF ” option.
You will now notice that there is a PDF file added to the folder in which you saved the file. Make sure that you share this PDF file instead of the PPT presentation.
Method 5 – Convert PowerPoint File into a Video
Last, but not the least, you can also convert your presentation into a video. Although the use of this method is more suited for creating videos using PowerPoint, however, you can also use this method to ensure that you are able to prevent your viewers from editing it.
Here’s how to convert a PowerPoint file into a video –
- On the new window that pops-up, click on the “ MPEG/MP4 ” option.
How to Remove Restricted Access in PowerPoint?
PowerPoint also provides you with an option to remove access restrictions that the original author may have put in place.
To remove the restricted access setting in your file, simply follow the below steps:
- Next, click on the “Info” tab.
- Then, click on “Protect Presentation” and change the permissions which have been applied.
Unselecting the previous options will remove the existing restrictions.
It is important to note that if the file is password-protected, you will need the password to change the permissions of the file. Without the original password, you won’t be able to unlock the permission protections.
More Related Topics
- Change the Style of Your Bullet Points and Stand-out from the Crowd!
- 7 EASY Tips to Always Make your Presentations Attractive! (Even if You are a Beginner)
- How to Reduce the Size of Your PowerPoint File? The Perfect Method!
- Auto Create Your PowerPoint Slides using Design Ideas Feature!
- Main Features of PowerPoint! [I bet You DIDN’T Know These]
Credit to Cookie_Studio for the featured image of this article.
How to Make a Microsoft PowerPoint Presentation Read-only

Sharing a PowerPoint presentation with others is common practice in business settings. However, you may not want recipients to edit or change your carefully crafted presentation. Making a PowerPoint presentation read-only prevents unauthorized changes while still allowing viewers to see the content.
There are a few simple ways to make a PowerPoint presentation read-only, both built into PowerPoint itself and using other Microsoft services. Read on to learn how to lock down your presentation and protect it from unwanted alterations.
Mark the Presentation as Final in PowerPoint
The easiest way to make a PowerPoint presentation read-only is to mark it as final right within PowerPoint. Here are the steps:
- Open the PowerPoint presentation you want to make read-only.
- Click on the “File” tab.
- Select “Info” on the left side of the menu.
- Click on “Protect Presentation” and choose “Mark as Final” from the drop-down menu.
Marking a presentation as final sets it to read-only mode within PowerPoint. Other users will be able to view the presentation but will be prevented from making changes.
There is also an option to select “Always Open Read-Only” which prompts users to actively choose to edit the presentation rather than opening it in editing mode by default.
The main downside of this method is users can still override the read-only status by clicking “Edit Anyway.” So it discourages edits but does not completely prevent them.
Set File Permissions in SharePoint or OneDrive
If you store your PowerPoint presentation in SharePoint or OneDrive, you can restrict editing permissions through those platforms. Here’s how:
- Upload or save your PowerPoint file to OneDrive or a SharePoint document library.
- Right click on the file and select “Manage Access.”
- For each person you share with, change their access from “Can Edit” to “Can View.”
With editing rights revoked at the platform level, users will only be able to view or download the presentation in SharePoint or OneDrive. To enable co-authoring abilities again, you can restore edit access.
Save as PDF
Another way to effectively make a PowerPoint presentation read-only is to export or save it as a PDF. PDF files are inherently non-editable documents.
Simply open your presentation in PowerPoint and select “File > Export > Create PDF/XPS.” The presentation will save as a PDF, after which you can share or distribute the new non-editable version.
If you want recipients to still be able to view the PowerPoint and its animations/transitions, you can also save it as a PowerPoint Show (.ppsx) from the “Save As” menu. This format runs the slideshow without the editing interface.
Set a Read-Only File Attribute
For Windows users, you can make a PowerPoint presentation read-only by adjusting file attributes rather than relying on PowerPoint settings.
- Locate your PowerPoint file in File Explorer.
- Right click, select “Properties”, and click the Attributes tab.
- Check the box next to “Read-only.”
- Click “OK” to save the changes.
Now Windows will treat the file as read-only system-wide, blocking any program from opening it in an editable mode. You can repeat these steps to remove the read-only status later on.
Use DRM Software
If you need to share presentations with highly sensitive information, consider using digital rights management (DRM) software. DRM tools like Microsoft Azure Rights Management let you encrypt files, set detailed usage permissions, and revoke access remotely.
While the methods above discourage or hinder editing, DRM solutions like Microsoft’s provide complete protection of intellectual property. Explore enterprise-grade DRM tools if unauthorized changes to a shared presentation could cause harm.
Preventing unintended modifications to a PowerPoint presentation ensures your original version remains intact. The techniques covered in this article, from marking as final to adjusting file attributes, make it simple to keep your presentation read-only and guarded from unwanted changes.
Choose the read-only method that aligns with your use case, whether it’s quick sharing inside your organization or distributing sensitive materials with partners. Just remember edits can still happen if recipients override some read-only settings within PowerPoint itself. For true restrictions, rely on platform permissions, file formats like PDF, or robust DRM systems.
About The Author
Vegaslide staff, related posts.

How to Narrate a PowerPoint on Mac

How to Make a YouTube Video with PowerPoint

How to Make a Flowchart in PowerPoint

How to Duplicate a Slide in PowerPoint 2010


- Password Recovery Windows Password Tuner Office Password Tuner Word Password Tuner Excel Password Tuner PowerPoint Password Tuner Access Password Tuner PDF Password Tuner Outlook Password Tuner Outlook Email Password Tuner RAR Password Tuner ZIP Password Tuner iTunes Password Tuner SQL Password Tuner WiFi Password Tuner
- Support Support Center Frequently Asked Questions Download Center Software Download Resource Center Tips & Tricks
How to Make PowerPoint Presentation Read-only

It is effective to restrict permission to your PowerPoint presentation (PPT). After reading this article you will know how to make a PowerPoint presentation read-only with simple methods. Those methods applies to different versions of PowerPoint (2003, 2007, 2010, 2016, etc.).
Way1: Restrict Permission by People
- 1. Open the PowerPoint that you want to set read-only protection.
- 2. In the ribbon, select the " File " tab. And then click the " Info " in the left of the panel.

- 3. Click the " Protection Presentation " function button, and then four options will show up. We will choose the second one " Restrict Permission by People ".
- 4. Then select " Restricted Access " to set restrict permission to this presentation.

Way2: Save PowerPoint Presentation with a Read-only Password
This method aims to create a read-only password for your PowerPoint presentation. Next time, you need to input the password to open and edit this PowerPoint Presentation. Or you can just get into read only mode. It is a very reliable way to set a password to restrict the read and write permissions of the PPT.
- 1. Open your presentation. Click the " File " in the ribbon. And then click " Save as ".

- 2. A window pops up, in which you need to click the " Tools " in the bottom of the panel.
- 3. Select " General Options ".

- 4. Create a password to modify the shared PowerPoint presentation. Then click OK .

Ater that, you can save the PowerPoint with modify password so that others can only read it if they do not know the password.
Way3: Mark PowerPoint Presentation as Final to Make it Read-only
Way-3 is to mark the PowerPoint presentation as the final version and make it read-only. But the permission can be easily removed somewhat. Choose carefully according to your personal use.
Referring to the Step-3 of Way-1 , and select the first option " Mark as Final ". After clicking it, the presentation will immediately get protected to discourage editing.

Way4: Set PowerPoint Presentation Read-only with File Lock Tuner
With Cocosenor File Lock Tuner , you can easily make PowerPoint presentations read-only so that others can not edit the content. It is also possible for you to restrict permissions of PowerPoint documents in bulk.
1. Run Cocosenor File Lock Tuner and then hit the File button to add your PowerPoint presentation.

2. Tick the checkbox of your presentation and then click Set properties option.

3. Choose Read-only option and then hit the Set button on the bottom right.

4. In seconds, the PowerPoint presentation is made to read-only.

After that, others are restricted to modify your presentations. But they can still save the content to another file name and modify the content. If you want to attach high security to the PowerPoint presentation, you can encrypt it with password by using File Lock Tuner.

Related Articles
- How to make a Word document read only - Word 2013/2016
- How to Unlock or Remove Read-only Permission from PowerPoint Presentation
- Remove password protection from PowerPoint 2013, 2016
- How to Unlock Your PowerPoint Presentation When Forgot Password
Hot Articles
- Windows 10 Forgot Login Password Reset without disk or Microsoft account
- Windows 8 Forgot Password Reset Without Disk
- Windows 7 Administrator Password Reset without CD or Disk
- How to Unlock encrypted iPhone backup without password
- How to export contacts and text messages from iPhone or iTunes backup
- More Articles >>
- Windows Password Tuner
- Office Password Tuner
- PDF Password Tuner
- RAR Password Tuner
- iTunes Password Tuner
- More Products >>
You may also like
- 3 cases to disable read only mode in Excel 2010/2013/2016
- How to disable read only to enable editing in Word 2013/2016
- Free Online Office Excel/Word/PowerPoint
- Six Practical Tips to Help You Save Power for Your Laptop
- Create Word Doc, Excel Workbook, PPT, Free Online
- How to open password protected PDF file without password
- How to Open Password Protected PPT/PPTX File without Password?
- Two Ways to Create a Windows 10 Bootable USB Drive for Free
- Download Center
- Cocosenor Store
- Excel Password Tuner
- Support Center

Copyright(C) 2013-2024 Cocosenor Studio All Rights Reserved.
Log in / Sign up
Don't have an account? Sign up --> Forgot Password? --> -->
Log in directly with a Google account, no need to register
Already have an account? Log in
Reset Password
How to Make PowerPoint Read Only: A Comprehensive Guide

In today's fast-paced digital world, PowerPoint presentations are indispensable tools for communication and collaboration. However, maintaining the integrity of your content, especially when sharing it with others, is crucial. This article explores the essential steps to make a PowerPoint presentation read-only, ensuring that your work remains unaltered and secure. Additionally, we will introduce the innovative features of Smallppt.com's AI PowerPoint Generator, enhancing your presentation experience.
1. The Significance of Read-Only Presentations
Understanding the significance of read-only presentations is fundamental. By making your PowerPoint files read-only, you preserve the original content, safeguarding it from unintended modifications, thereby ensuring the accuracy and integrity of your message.
2. How to Create a Read-Only PowerPoint Presentation
Step 1: Open Your Presentation
Begin by opening your PowerPoint file on your computer.
Step 2: Save the Presentation
Click on the "File" tab, then select "Save As." Choose the destination where you want to save your presentation. Before clicking "Save," locate the "Tools" button and click on "General Options."
Step 3: Mark as Read-Only
In the "General Options" window, check the box that says "Read-only recommended." This prompts users to open the presentation as read-only, discouraging them from making changes. Click "OK" to confirm your selection.
Step 4: Password Protection (Optional)
For an additional layer of security, you can set a password to modify the presentation. This ensures that only authorized individuals can make changes.
Step 5: Test the Read-Only Presentation
Before sharing your presentation, test it to ensure it opens as read-only. Close the file and reopen it to confirm that viewers won't be able to edit the content.

3. Introducing Smallppt.com's AI PowerPoint Generator
Smallppt.com offers a cutting-edge AI PowerPoint Generator that revolutionizes the way you create presentations. This innovative tool leverages artificial intelligence to enhance your content:
1.Automated Content Creation: Generate compelling PowerPoint slides with AI-driven content creation, saving you valuable time and effort.
2.Smart Design Templates: Access a vast library of professionally designed templates tailored to various themes and industries, ensuring visually appealing presentations.
3.Intelligent Suggestions: Receive intelligent suggestions for slide layouts, content placement, and design elements, optimizing the overall presentation flow.
4.Language Enhancement: Improve the clarity and coherence of your content with AI-powered language enhancement, making your message more impactful.
Incorporating Smallppt.com's AI PowerPoint Generator into your workflow empowers you to create impressive presentations effortlessly, enhancing your productivity and communication effectiveness.
Creating read-only PowerPoint presentations is essential for preserving your content's integrity. By following the outlined steps, you can secure your presentations from unauthorized modifications. Additionally, embracing Smallppt.com's AI PowerPoint Generator enriches your presentation creation process, ensuring your content is not only secure but also visually engaging and impactful.
Q1: Can I remove the read-only status from a presentation created with Smallppt.com's AI PowerPoint Generator?
Yes, you can remove the read-only status by accessing the presentation's settings and unchecking the "Read-only recommended" option.
Q2: Does Smallppt.com's AI PowerPoint Generator support multiple languages?
Yes, Smallppt.com's AI PowerPoint Generator supports various languages, catering to a global user base.
Q3: Can I customize the design templates provided by Smallppt.com?
Absolutely, you can customize the design templates according to your preferences, ensuring your presentations align with your brand identity.
Q4: Is the AI-generated content unique and plagiarism-free?
Yes, the content generated by Smallppt.com's AI PowerPoint Generator is unique and plagiarism-free, providing you with original and high-quality material for your presentations.
Q5: Does Smallppt.com offer customer support for technical assistance?
Yes, Smallppt.com provides dedicated customer support to assist users with any technical queries or challenges they might encounter during the presentation creation process.

Title / Email address / Description can not be empty!
- Passper WinSenior
- Passper for Excel Online Functions
- Passper for Word Online Functions
- Passper for PowerPoint
- Passper for PDF
- Passper for RAR
- Passper for ZIP
Top 5 Methods to Make PowerPoint Read Only
There are a lot of reasons why you would want to make a PowerPoint document read-only. But perhaps the most important one is to keep someone else from making changes on the document. PowerPoint presentations are often sensitive and just a small change can cause the whole presentation to lose meaning. Therefore, it would make sense to make the document read-only as soon as it is done to prevent accidental changes that can alter the whole concept of the presentation. You may also want to protect the content of the presentation and the easiest way to do that would be to make it harder to edit the presentation.
Whatever your reasons for making your PowerPoint presentation read-only, this article will share with you numerous ways you can do that. We will also take the time to share with you the easiest way to unlock a read-only PowerPoint presentation.
Part 1. How to Make PowerPoint Read Only
The following are just some of the ways you can make a PowerPoint presentation read only.
1. Set Presentations to Read Only
2. set password to modify presentation, 3. burn powerpoint to cd/dvd, 4. convert powerpoint to read-only video, 5. set restrict access.
One of the easiest ways to make your presentation read only is to mark it as "Final". This is a feature available in MS Office that is used to let other users know that you have completed all edits on the document. Here's how to do it;
Step 1: Open the document you want to protect and then click on "File".
Step 2: Click on "Info" and then select "Protect Presentation". Step 3: In the options on the drop-down menu, click on "Mark as Final".

Step 4: Click "OK" in the dialogue box that appears and click "OK" again to confirm.
The next time you open the document, you will see a yellow "Marked as Final" message at the top. If you want to edit the document, simply click on "Edit Anyway" to restore your editing privileges.

You can also choose to set a password to restrict modification of the document. Here's how to do that;
Step 1: Open the presentation and then click on "File > Save As".
Step 2: Click on "Tools" at the bottom of the "Save As" dialogue box and then click on "General Options".
Step 3: In the box marked "Password to Modify", type in the password you would like to use and then click "OK". Reenter the password and then click "OK".

Step 4: Click "Save" to save the PowerPoint presentation and the next time someone tries to edit the document, they will be required to enter the password.
Another really easy way to make a PowerPoint not read only is to burn the file onto CD/DVD. There are a lot of programs that can help you do that and since storage media like CD/DVD is read-only, you are assured of the safety of the data on the presentation. It is also much easier to playback the presentation when it is on CD/DVD.

In the same way, you can also convert your PowerPoint presentation into read-only video. This will not just make it impossible for others to edit the content on the presentation, but it will also make it easier to distribute the presentation.
There are a lot of tools that can help you convert the PowerPoint presentation to video, including screen recorders like Adobe Captivate and Camtasia Studio or Quick Time Movie and Windows Movie Maker.

You may also be able to prevent others from editing the presentation if you use the "Restrict Access" option. The following is how to do that;
Step 1: Open the document and then click on "File".
Step 2: Click on "Info > Protect Document" and from then choose "Restrict Access" from the dropdown menu.

This option will allow people to open and read the document but they will be unable to print, edit or copy any of the content on the presentation.
Part 2. How to Unlock a Read Only PowerPoint
What if you find yourself unable to edit a read only PowerPoint presentation? If someone has sent you an incomplete presentation that has restrictions, the best way to lift these restrictions and edit the document is to use Passper for PowerPoint . This is a password recovery tool that makes it very easy for you to unlock any presentation and lift any restrictions placed on the document. The following are some of the program's features;
Check 2,900,000 passwords /S: It has one of the fastest password recovery rates in the market because it can check up to 2,900,000 passwords per second.
4 Attack Modes Available: 4 different attack modes are used to make it easier to recover the password in the shortest time possible. The fact that it has a database of millions of frequently used passwords is just an added bonus.
Remove Edit Restrictions: It can remove any editing restrictions on the presentation within 2 seconds in a single click.
It is compatible with all versions of MS Office and 100% safe to use. None of the data on the program will be lost or damaged in any way during the recovery process.
Free Download Buy Now
Follow these simple steps to use Passper for PowerPoint to unlock a read-only presentation.
Step 1: Download and install Passper for PowerPoint on your computer and then launch the program. In the main window, click on "Remove Restrictions".

Step 2: Import the presentation into the program and then click on "Remove".

In a few seconds all editing restrictions will be lifted from the document, allowing you to edit the presentation any way you want.
How to Recover PowerPoint Presentation if You Can't Open the File
If you are unable to open the presentation because it is password protected and you don't have the password, Passper for PowerPoint can also help you easily recover the password and use it to open the presentation. Here's how to do that;
Step 1: Open Passper for PowerPoint and choose "Recover Passwords" in the main window.

Step 2: Add the protected presentation into the program and then select a recovery method to use. Click "Recover".

Step 3: The program will immediately begin the process of recovering the password. When the process is complete, the password will be displayed on the screen. You can use it to unlock the document.

Make PowerPoint read only is a simple, yet highly effective technique to help you prevent accidental edits on your presentation and also keep the content safe. But sometimes this well-meaning feature can keep you locked out of your own document. If you find yourself unable to access the PowerPoint presentation or unable to edit it, Passper for PowerPoint presents the best solution to help you recover the password or lift restrictions thanks to its faster recovery speeds, more attack methods and higher recovery rates.
Related Articles:
- Top 9 PowerPoint Password Recovery Software That Unlock Your PowerPoint
- 6 Free Ways to Lock PowerPoint from Editing
- [Updated] 4 Methods to Unlock Read-Only PowerPoint

By Ronnie Barnes to PowerPoint
Posted on Mar 17, 2023 ( Updated: Mar 17, 2023)
Ronnie Barnes, a blogger with more than 5-year experience in writing tips about password recovery for Windows and office files.
- PRO Courses Guides New Tech Help Pro Expert Videos About wikiHow Pro Upgrade Sign In
- EDIT Edit this Article
- EXPLORE Tech Help Pro About Us Random Article Quizzes Request a New Article Community Dashboard This Or That Game Popular Categories Arts and Entertainment Artwork Books Movies Computers and Electronics Computers Phone Skills Technology Hacks Health Men's Health Mental Health Women's Health Relationships Dating Love Relationship Issues Hobbies and Crafts Crafts Drawing Games Education & Communication Communication Skills Personal Development Studying Personal Care and Style Fashion Hair Care Personal Hygiene Youth Personal Care School Stuff Dating All Categories Arts and Entertainment Finance and Business Home and Garden Relationship Quizzes Cars & Other Vehicles Food and Entertaining Personal Care and Style Sports and Fitness Computers and Electronics Health Pets and Animals Travel Education & Communication Hobbies and Crafts Philosophy and Religion Work World Family Life Holidays and Traditions Relationships Youth
- Browse Articles
- Learn Something New
- Quizzes Hot
- This Or That Game
- Train Your Brain
- Explore More
- Support wikiHow
- About wikiHow
- Log in / Sign up
- Computers and Electronics
- Presentation Software
- PowerPoint Presentations
How to Unlock a Read Only PowerPoint Presentation (in 4 Steps)
Last Updated: December 29, 2021
This article was co-authored by wikiHow staff writer, Darlene Antonelli, MA . Darlene Antonelli is a Technology Writer and Editor for wikiHow. Darlene has experience teaching college courses, writing technology-related articles, and working hands-on in the technology field. She earned an MA in Writing from Rowan University in 2012 and wrote her thesis on online communities and the personalities curated in such communities. This article has been viewed 20,194 times. Learn more...
If you see text in a banner that warns you the file is read-only, the original author marked it as final and discourages editing. This wikiHow will teach you how to unlock a read-only PowerPoint manually. Otherwise, you can click Edit Anyway within the banner.

- A menu will drop down from the lock icon.

- The "Read-Only" text is gone from the title and the yellow banner will disappear, which means you can edit the PowerPoint. [1] X Research source
- To return the file to read-only, repeat the process to select "Mark as Final."
Expert Q&A
You might also like.

- ↑ https://www.howtogeek.com/437502/how-to-unlock-read-only-powerpoint-presentations/
About This Article

1. Open the PowerPoint project. 2. Click the File tab. 3. Click Protect Presentation. 4. Click Mark as Final . Did this summary help you? Yes No
- Send fan mail to authors
Is this article up to date?

Featured Articles

Trending Articles

Watch Articles

- Terms of Use
- Privacy Policy
- Do Not Sell or Share My Info
- Not Selling Info
Keep up with the latest tech with wikiHow's free Tech Help Newsletter
- PDFelement for Windows
- PDFelement for Mac
- PDFelement on Mac App Store
- PDF Reader for Windows
- PDFelement for iPhone/iPad
- Get from App Store
- PDFelement for Android
- Get from App Google Play
- PDF Scanner for iPhone
Cloud & SDK
- Document Cloud
- PDFelement Pro DC
- PDFelement SDK
Online PDF Tools
- PDF to Word
- Compress PDF
- Word to PDF
Educational Users
- Annotate PDF
- Combine PDF
Personal Users
- Convert PDF
- Organize PDF
Professional Users
- eSign PDFs Legally
- Extract Data from PDF
- Password Protect PDF
PDF Solutions for
- Chat with PDF
- AI PDF Summarizer
- AI PDF Translator
- AI Content Detector
- AI Rewrite PDF
- Proofread PDF
- Add Bookmarks to PDF
- Explain PDF
- Mac Software
- OCR PDF Tips
- Online PDF Tips
- Edit PDF like Word
- PDF Converter Tips
- PDF Compressor Tips
Why PDFelement
- Customer Stories
- PDF Software Comparison
- Contact Support
- PDFelement for iOS
- InstaScan for iPhone
Explore More
- Reviews See what our users say.
- Free PDF Templates Edit, print, and customize free templates.
- PDF Knowledge PDF-related information you need.
- Download Center Download the most powerful and simple PDF tools.
- Download Download Pricing Pricing
- How To Make a PowerPoint Presentation Read-Only
Learn to make PowerPoint presentations read-only, ensuring content protection.

- Embed Video in PowerPoint Mac
- Make Video from PowerPoint
- How to Print PowerPoint with Notes
- How to Make a Picture Transparent in PowerPoint
- Morph Transition
- Curved Text in PowerPoint
- Gantt Chart in PowerPoint
- Venn Diagram in PowerPoint
- PowerPoint Alternatives
- How to Embed a YouTube Video in PowerPoint
- crop images online
- print screen mac
- How to take a screenshot on a Mac
- Cropro: A must have screenshot capture tool
- windows 11 screenshot
- How to take a screen grab
- Best screenshot tools for Windows and Mac
- How to Edit a Screenshot Online
- How to Paste a Screenshot on a Mac
- How to Take a Scrolling Screenshot
- Best Solution to Sign PDF on Linux and More
- esign pdf online, esign pdf online free, esign pdf free online, online esign pdf, electronically sign pdf online
- How to Save Documents to Cloud
- How to Share Files on the Cloud to Improve Collaboration
- Best Free Document Cloud Solution - Easy to Use
- How To Use Cloud Storage - the Complete Guide
- How to eSign a Document on Cloud in Two Ways
- How to Add Signature to PDF on Linux
- How to Add an Electronic Signature to a PDF File Online Free
- How to Upload File to Cloud: Easiest Way Explained
In today's world, sharing information is key. We often use PowerPoint to do this. But, when we share these presentations, we might not want others to change them. This is where making a PowerPoint read-only comes in handy. It means others can look but can't edit. This is very important for many reasons.
For example, when you share your work with others for feedback, you might not want them to make changes. Or, when you give a presentation to a big audience, you want to ensure your message stays the same. Making your PowerPoint read-only keeps your information safe and as you intended. It's a simple step that can save much trouble later. This way, you can share your hard work with peace of mind, knowing it will stay just as you made it.
In this article
Method 1: convert ppt to pdf, method 2: set ppt in read-only mode, method 3: lock ppt for read-only, method 4: set restrict access for powerpoint read-only, method 5: record a slideshow to make powerpoint read-only, part 2. the importance of making powerpoint presentations read-only, part 1. how to make a powerpoint read only.
Making your PowerPoint read-only is a smart move. It's like putting a lock on your presentation. This stops others from making changes to it. In this part, we will show you how to do it step by step. It's an easy process that anyone can follow. Let's get started.
One way to keep your PowerPoint safe is by turning it into a PDF. This means changing it from a PPT file to a PDF file. When you do this, people can still see your presentation, but they can't change it. This is a good idea because PDFs are easy to open on all computers and phones. Plus, your slides will look just as you made them. This method is simple and doesn't need any special skills. Let's see how you can do this to protect your work and keep it just the way you want.
How to Convert PPT to PDF Using PDFelement

PDFelement is a great tool to turn your PowerPoint (PPT) into a PDF. This keeps your presentation safe from changes. Here's how to do it:
Step 1. First, open PDFelement on your computer. Finding your way around is easy because everything is clear and simple.

Step 2. Look for a " + " > " From File " button on the main screen. Click it. This lets you make a PDF from another file, like your PowerPoint.

Step 3. A window will open. Find your PowerPoint file, click the " Sample PPT ," and open it.
Step 4. After you pick your file, PDFelement changes your PPT to a PDF. It's quick. Just wait a bit until it's done.

Step 5. Your new PDF opens in PDFelement. Now, you can change it if you want. PDFelement has tools to edit text, pictures, and more. Change anything you need.

Step 6. When you're finished, go to " File " > " Save ." Pick a place on your computer, name your file, and click "Save."

Step 7. Sometimes, you might want to go back to a PowerPoint. PDFelement does this, too. Click " Convert " > " To PPT ," choose where to save, and it turns your PDF into a PPT again.

Using PDFelement for this is smart. It makes your presentation safe across different computers and phones. Your slides look just right, adding an extra layer of security. This way, sharing your work is easy and safe.

Setting your PowerPoint presentation to read-only mode is another good way to protect it. Here’s how you can do it step by step:
Step 1. First, open your PowerPoint presentation on your computer.
Step 2. Click on " File " > " Info ."
Step 3. Look for an option that says " Protect Presentation ." Click on it. A menu will appear.
Step 4. In the menu, select " Mark as Final. " This tells PowerPoint and anyone who opens it that your presentation is finished and shouldn't be changed.
By choosing "Mark as Final," you're letting others know your presentation is the final version. This doesn't lock your file with a password but adds a mark suggesting people shouldn't edit it. When someone opens your presentation, they'll see a message marked as final. This discourages editing.
However, it's important to remember that this method doesn't fully lock your presentation. If someone wants to, they can still make changes. They just need to click "Edit Anyway." So, while "Mark as Final" is a good way to suggest your work shouldn't be altered, it's not the strongest protection. It's best used when you trust the people you're sharing your presentation with to respect your wish to keep it as is.

Locking your PowerPoint for read-only with a password is a strong way to protect it. You can set two types of passwords: one to open the presentation and another to modify it. Here's how to set it up:
Step 1. Start by opening your PowerPoint presentation.
Step 2. Go to " File " > " Info ."
Step 3. Find " Protect Presentation ." Click it to see more options.
Step 4. Choose " Encrypt with Password ." Here, you can set your passwords.
When you set a password to open, anyone who wants to see the presentation must enter the password. A modified password lets people open the presentation but not change it unless they know this second password.
It's important to share these passwords safely. If you use a password to open it, make sure to send it through a secure way, like a secure email or messaging app. Remember, you can't access or change your presentation if you forget these passwords.
Using passwords is very secure, but it comes with responsibility. Ensure you keep the passwords safe and share them only with people who need to know. This method is great for keeping your presentation the way you want without worrying about unwanted changes.

Using the restrict access feature in PowerPoint is a smart way to control who can do what with your presentation. Here’s how you can make your presentation read-only for others:
Step 1. Start by opening your presentation in PowerPoint.
Step 2. Find and click on " File " at the top left corner, then select " Info " from the menu.
Step 3. Now, look for " Protect Presentation. " Click on it to see more options.
Step 4 . From the options, choose " Restrict Access. " This lets you set rules on who can read or change your presentation.
By using restricted access, you can ensure that only certain people can edit your presentation, while others can only view it. This is great when you need to share your work with a team but want to control who can make changes.
The advantage of this method is that it gives you more control. You can decide exactly who gets to edit and who doesn't. However, there are some things to keep in mind. First, everyone you're sharing with needs the right software or service to respect these restrictions. If they don't, they might be unable to open your presentation. Also, managing who has what permission can take extra work, especially if you share with many people.
Restrict access is a powerful way to protect your presentation. It helps keep your work safe while still letting others view it. Think about how it fits with how you plan to share and collaborate on your presentation.

Recording your slideshow is a creative way to share your PowerPoint while keeping it read-only. This method turns your presentation into a video, which means people can watch it but can't change any part of it. Here's how to do it:
Step 1. First, open your presentation in PowerPoint.
Step 2. Find the " Slideshow " tab at the top. Click on it, and then look for " Record Slideshow ." Choose to start recording from the beginning or a current slide.
Step 3. Press the record button. As you go through your slides, you can talk and explain them, just like you would if you were presenting live. You can also use your mouse as a pointer.
Step 4. After finishing your recording, save your presentation. Then, go to " File " > " Export " and select " Create a Video ." Choose the video quality you prefer.
Step 5. Once your video is ready, you can share it. Because it's a video, no one can edit your slides.
Recording your slideshow has many benefits. It keeps your presentation safe from changes, which is great. But it also lets you share exactly how you want your presentation to be viewed. You control the flow and timing, ensuring your audience sees and hears what you intend in the order you intend. This method works well when you can't present live but want to make an impact.
Remember, a video might be larger than a PowerPoint file, and viewers can't interact with it as they can with slides. But if keeping your content safe and controlling how it's shown are your top priorities, this could be the perfect solution.
Making your PowerPoint presentations read-only is like putting a "Do Not Alter" sign on your work. It lets you keep control when you share your presentation. This is important because if someone changes your slides, it can cause problems. For example, wrong information could be shared, or your message might not come across as intended. This could confuse or mislead people.
When your presentation is read-only, it stays just as you made it. This means your professional touch, how you arranged your slides, and the information you included are the same. It helps make sure your brand looks consistent everywhere your presentation goes. This consistency is key to keeping a strong and trustworthy image.
There are also bigger legal and ethical issues when someone changes your work without asking. If someone edits your presentation, it could be seen as them putting words in your mouth. This isn't fair and can lead to problems. Keeping your presentation read-only helps avoid these issues, ensuring your work stays safe and respected.
Making your PowerPoint read-only is a smart step to protect your work. It helps keep your presentation the way you want, safe from changes. This ensures your message stays clear and your brand remains consistent. Remember, sharing your ideas is important, but so is keeping them as you intended.
You May Also Like
- How to Print PowerPoint with Notes and PDFelement on Mac
- Highlight Text in PowerPoint
- The Easiest Way to Insert a Word Document into PowerPoint
Critical PowerPoint Shortcuts – Claim Your FREE Training Module and Get Your Time Back!
How to Make a PowerPoint Presentation (Step-by-Step)
- PowerPoint Tutorials
- Presentation Design
- January 22, 2024
In this beginner’s guide, you will learn step-by-step how to make a PowerPoint presentation from scratch.
While PowerPoint is designed to be intuitive and accessible, it can be overwhelming if you’ve never gotten any training on it before. As you progress through this guide, you’ll will learn how to move from blank slides to PowerPoint slides that look like these.

Table of Contents
Additionally, as you create your presentation, you’ll also learn tricks for working more efficiently in PowerPoint, including how to:
- Change the slide order
- Reset your layout
- Change the slide dimensions
- Use PowerPoint Designer
- Format text
- Format objects
- Play a presentation (slide show)
With this knowledge under your belt, you’ll be ready to start creating PowerPoint presentations. Moreover, you’ll have taken your skills from beginner to proficient in no time at all. I will also include links to more advanced PowerPoint topics.
Ready to start learning how to make a PowerPoint presentation?
Take your PPT skills to the next level
Start with a blank presentation.
Note: Before you open PowerPoint and start creating your presentation, make sure you’ve collected your thoughts. If you’re going to make your slides compelling, you need to spend some time brainstorming.
For help with this, see our article with tips for nailing your business presentation here .
The first thing you’ll need to do is to open PowerPoint. When you do, you are shown the Start Menu , with the Home tab open.
This is where you can choose either a blank theme (1) or a pre-built theme (2). You can also choose to open an existing presentation (3).
For now, go ahead and click on the Blank Presentation (1) thumbnail.

Doing so launches a brand new and blank presentation for you to work with. Before you start adding content to your presentation, let’s first familiarize ourselves with the PowerPoint interface.
The PowerPoint interface

Here is how the program is laid out:
- The Application Header
- The Ribbon (including the Ribbon tabs)
- The Quick Access Toolbar (either above or below the Ribbon)
- The Slides Pane (slide thumbnails)
The Slide Area
The notes pane.
- The Status Bar (including the View Buttons)
Each one of these areas has options for viewing certain parts of the PowerPoint environment and formatting your presentation.
Below are the important things to know about certain elements of the PowerPoint interface.
The PowerPoint Ribbon

The Ribbon is contextual. That means that it will adapt to what you’re doing in the program.
For example, the Font, Paragraph and Drawing options are greyed out until you select something that has text in it, as in the example below (A).

Furthermore, if you start manipulating certain objects, the Ribbon will display additional tabs, as seen above (B), with more commands and features to help you work with those objects. The following objects have their own additional tabs in the Ribbon which are hidden until you select them:
- Online Pictures
- Screenshots
- Screen Recording
The Slides Pane

This is where you can preview and rearrange all the slides in your presentation.
Right-clicking on a slide in the pane gives you additional options on the slide level that you won’t find on the Ribbon, such as Duplicate Slide , Delete Slide , and Hide Slide .

In addition, you can add sections to your presentation by right-clicking anywhere in this Pane and selecting Add Section . Sections are extremely helpful in large presentations, as they allow you to organize your slides into chunks that you can then rearrange, print or display differently from other slides.

The Slide Area (A) is where you will build out your slides. Anything within the bounds of this area will be visible when you present or print your presentation.
Anything outside of this area (B) will be hidden from view. This means that you can place things here, such as instructions for each slide, without worrying about them being shown to your audience.

The Notes Pane is the space beneath the Slide Area where you can type in the speaker notes for each slide. It’s designed as a fast way to add and edit your slides’ talking points.
To expand your knowledge and learn more about adding, printing, and exporting your PowerPoint speaker notes, read our guide here .
Your speaker notes are visible when you print your slides using the Notes Pages option and when you use the Presenter View . To expand your knowledge and learn the ins and outs of using the Presenter View , read our guide here .

You can resize the Notes Pane by clicking on its edge and dragging it up or down (A). You can also minimize or reopen it by clicking on the Notes button in the Status Bar (B).
Note: Not all text formatting displays in the Notes Pane, even though it will show up when printing your speaker notes. To learn more about printing PowerPoint with notes, read our guide here .
Now that you have a basic grasp of the PowerPoint interface at your disposal, it’s time to make your presentation.
Adding Content to Your PowerPoint Presentation
Notice that in the Slide Area , there are two rectangles with dotted outlines. These are called Placeholders and they’re set on the template in the Slide Master View .
To expand your knowledge and learn how to create a PowerPoint template of your own (which is no small task), read our guide here .

As the prompt text suggests, you can click into each placeholder and start typing text. These types of placeholder prompts are customizable too. That means that if you are using a company template, it might say something different, but the functionality is the same.

Note: For the purposes of this example, I will create a presentation based on the content in the Starbucks 2018 Global Social Impact Report, which is available to the public on their website.
If you type in more text than there is room for, PowerPoint will automatically reduce its font size. You can stop this behavior by clicking on the Autofit Options icon to the left of the placeholder and selecting Stop Fitting Text to this Placeholder .
Next, you can make formatting adjustments to your text by selecting the commands in the Font area and the Paragraph area of the Home tab of the Ribbon.

The Reset Command: If you make any changes to your title and decide you want to go back to how it was originally, you can use the Reset button up in the Home tab .

Insert More Slides into Your Presentation
Now that you have your title slide filled in, it’s time to add more slides. To do that, simply go up to the Home tab and click on New Slide . This inserts a new slide in your presentation right after the one you were on.

You can alternatively hit Ctrl+M on your keyboard to insert a new blank slide in PowerPoint. To learn more about this shortcut, see my guide on using Ctrl+M in PowerPoint .
Instead of clicking the New Slide command, you can also open the New Slide dropdown to see all the slide layouts in your PowerPoint template. Depending on who created your template, your layouts in this dropdown can be radically different.

If you insert a layout and later want to change it to a different layout, you can use the Layout dropdown instead of the New Slide dropdown.
After inserting a few different slide layouts, your presentation might look like the following picture. Don’t worry that it looks blank, next we will start adding content to your presentation.

If you want to follow along exactly with me, your five slides should be as follows:
- Title Slide
- Title and Content
- Section Header
- Two Content
- Picture with Caption
Adding Content to Your Slides
Now let’s go into each slide and start adding our content. You’ll notice some new types of placeholders.

On slide 2 we have a Content Placeholder , which allows you to add any kind of content. That includes:
- A SmartArt graphic,
- A 3D object,
- A picture from the web,
- Or an icon.
To insert text, simply type it in or hit Ctrl+C to Copy and Ctrl+V to Paste from elsewhere. To insert any of the other objects, click on the appropriate icon and follow the steps to insert it.
For my example, I’ll simply type in some text as you can see in the picture below.

Slides 3 and 4 only have text placeholders, so I’ll go ahead and add in my text into each one.

On slide 5 we have a Picture Placeholder . That means that the only elements that can go into it are:
- A picture from the web

To insert a picture into the picture placeholder, simply:
- Click on the Picture icon
- Find a picture on your computer and select it
- Click on Insert
Alternatively, if you already have a picture open somewhere else, you can select the placeholder and paste in (shortcut: Ctrl+V ) the picture. You can also drag the picture in from a file explorer window.

If you do not like the background of the picture you inserted onto your slide, you can remove the background here in PowerPoint. To see how to do this, read my guide here .
Placeholders aren’t the only way to add content to your slides. At any point, you can use the Insert tab to add elements to your slides.
You can use either the Title Only or the Blank slide layout to create slides for content that’s different. For example, a three-layout content slide, or a single picture divider slide, as shown below.

In the first example above, I’ve inserted 6 text boxes, 3 icons, and 3 circles to create this layout. In the second example, I’ve inserted a full-sized picture and then 2 shapes and 2 text boxes.
The Reset Command: Because these slides are built with shapes and text boxes (and not placeholders), hitting the Reset button up in the Home tab won’t do anything.
That is a good thing if you don’t want your layouts to adjust. However, it does mean that it falls on you to make sure everything is aligned and positioned correctly.
For more on how to add and manipulate the different objects in PowerPoint, check out our step-by-step articles here:
- Using graphics in PowerPoint
- Inserting icons onto slides
- Adding pictures to your PowerPoint
- How to embed a video in PowerPoint
- How to add music to your presentation
Using Designer to generate more layouts ideas
If you have Office 365, your version of PowerPoint comes with a new feature called Designer (or Design Ideas). This is a feature that generates slide layout ideas for you. The coolest thing about this feature is that it uses the content you already have.
To use Designer , simply navigate to the Design tab in your Ribbon, and click on Design Ideas .

NOTE: If the PowerPoint Designer is not working for you (it is grey out), see my troubleshooting guide for Designer .
Change the Overall Design (optional)
When you make a PowerPoint presentation, you’ll want to think about the overall design. Now that you have some content in your presentation, you can use the Design tab to change the look and feel of your slides.
For additional help thinking through the design of your presentation, read my guide here .
A. Picking your PowerPoint slide size
If you have PowerPoint 2013 or later, when you create a blank document in PowerPoint, you automatically start with a widescreen layout with a 16:9 ratio. These dimensions are suitable for most presentations as they match the screens of most computers and projectors.
However, you do have the option to change the dimensions.
For example, your presentation might not be presented, but instead converted into a PDF or printed and distributed. In that case, you can easily switch to the standard dimensions with a 4:3 ratio by selecting from the dropdown (A).
You can also choose a custom slide size or change the slide orientation from landscape to portrait in the Custom Slide Size dialog box (B).

To learn all about the different PowerPoint slide sizes, and some of the issues you will face when changing the slide size of a non-blank presentation, read my guide here .
B. Selecting a PowerPoint theme
The next thing you can do is change the theme of your presentation to a pre-built one. For a detailed explanation of what a PowerPoint theme is, and how to best use it, read my article here .
In the beginning of this tutorial, we started with a blank presentation, which uses the default Office theme as you can see in the picture below.

That gives you the most flexibility because it has a blank background and quite simple layouts that work for most presentations. However, it also means that it’s your responsibility to enhance the design.
If you’re comfortable with this, you can stay with the default theme or create your own custom theme ( read my guide here ). But if you would rather not have to think about design, then you can choose a pre-designed theme.
Microsoft provides 46 other pre-built themes, which include slide layouts, color variants and palettes, and fonts. Each one varies quite significantly, so make sure you look through them carefully.
To select a different theme, go to the Design tab in the Ribbon, and click on the dropdown arrow in the Themes section .

For this tutorial, let’s select the Frame theme and then choose the third Variant in the theme. Doing so changes the layout, colors, and fonts of your presentation.

Note: The theme dropdown area is also where you can import or save custom themes. To see my favorite places to find professional PowerPoint templates and themes (and recommendations for why I like them), read my guide here .
C. How to change a slide background in PowerPoint
The next thing to decide is how you want your background to look for the entire presentation. In the Variants area, you can see four background options.

For this example, we want our presentation to have a dark background, so let’s select Style 3. When you do so, you’ll notice that:
- The background color automatically changes across all slides
- The color of the text on most of the slides automatically changes to white so that it’s visible on the dark background
- The colors of the objects on slides #6 and #7 also adjust, in a way we may not want (we’ll likely have to make some manual adjustments to these slides)

Note: If you want to change the slide background for just that one slide, don’t left-click the style. Instead, right-click it and select Apply to Selected Slides .
After you change the background for your entire presentation, you can easily adjust the background for an individual slide.

Inside the Format Background pane, you can see you have the following options:
- Gradient fill
- Picture or texture fill
- Pattern fill
- Hide background
You can explore these options to find the PowerPoint background that best fits your presentation.
D. How to change your color palette in PowerPoint
Another thing you may want to adjust in your presentation, is the color scheme. In the picture below you can see the Theme Colors we are currently using for this presentation.

Each PowerPoint theme comes with its own color palette. By default, the Office theme includes the Office color palette. This affects the colors you are presented with when you format any element within your presentation (text, shapes, SmartArt, etc.).

The good news is that the colors here are easy to change. To switch color palettes, simply:
- Go to the Design tab in the Ribbon
- In the Variants area, click on the dropdown arrow and select Colors
- Select the color palette (or theme colors) you want
You can choose among the pre-built color palettes from Office, or you can customize them to create your own.
As you build your presentation, make sure you use the colors from your theme to format objects. That way, changing the color palette adjusts all the colors in your presentation automatically.
E. How to change your fonts in PowerPoint
Just as we changed the color palette, you can do the same for the fonts.

Each PowerPoint theme comes with its own font combination. By default, the Office theme includes the Office font pairing. This affects the fonts that are automatically assigned to all text in your presentation.

The good news is that the font pairings are easy to change. To switch your Theme Fonts, simply:
- Go to the Design tab in the Ribbon
- Click on the dropdown arrow in the Variants area
- Select Fonts
- Select the font pairing you want
You can choose among the pre-built fonts from Office, or you can customize them to create your own.
If you are working with PowerPoint presentations on both Mac and PC computers, make sure you choose a safe PowerPoint font. To see a list of the safest PowerPoint fonts, read our guide here .
If you receive a PowerPoint presentation and the wrong fonts were used, you can use the Replace Fonts dialog box to change the fonts across your entire presentation. For details, read our guide here .
Adding Animations & Transitions (optional)
The final step to make a PowerPoint presentation compelling, is to consider using animations and transitions. These are by no means necessary to a good presentation, but they may be helpful in your situation.
A. Adding PowerPoint animations
PowerPoint has an incredibly robust animations engine designed to power your creativity. That being said, it’s also easy to get started with basic animations.
Animations are movements that you can apply to individual objects on your slide.

To add a PowerPoint animation to an element of your slide, simply:
- Select the element
- Go to the Animations tab in the Ribbon
- Click on the dropdown arrow to view your options
- Select the animation you want
You can add animations to multiple objects at one time by selecting them all first and then applying the animation.
B. How to preview a PowerPoint animation

There are three ways to preview a PowerPoint animation:
- Click on the Preview button in the Animations tab
- Click on the little star next to the slide
- Play the slide in Slide Show Mode
To learn other ways to run your slide show, see our guide on presenting a PowerPoint slide show with shortcuts .
To adjust the settings of your animations, explore the options in the Effect Options , Advanced Animation and the Timing areas of the Animation tab .

Note: To see how to make objects appear and disappear in your slides by clicking a button, read our guide here .
C. How to manage your animations in PowerPoint

The best way to manage lots of animations on your slide is with the Animation Pane . To open it, simply:
- Navigate to the Animations tab
- Select the Animation Pane
Inside the Animation Pane, you’ll see all of the different animations that have been applied to objects on your slide, with their numbers marked as pictured above.
Note: To see examples of PowerPoint animations that can use in PowerPoint, see our list of PowerPoint animation tutorials here .
D. How to add transitions to your PowerPoint presentation
PowerPoint has an incredibly robust transition engine so that you can dictate how your slides change from one to the other. It is also extremely easy to add transitions to your slides.
In PowerPoint, transitions are the movements (or effects) you see as you move between two slides.

To add a transition to a PowerPoint slide, simply:
- Select the slide
- Go to the Transitions tab in the Ribbon
- In the Transitions to This Slide area, click on the dropdown arrow to view your options
- Select the transition you want
To adjust the settings of the transition, explore the options in the Timing area of the Transitions tab.
You can also add the same transition to multiple slides. To do that, select them in the Slides Pane and apply the transition.
E. How to preview a transition in PowerPoint

There are three ways to preview your PowerPoint transitions (just like your animations):
- Click on the Preview button in the Transitions tab
- Click on the little star beneath the slide number in the thumbnail view
Note: In 2016, PowerPoint added a cool new transition, called Morph. It operates a bit differently from other transitions. For a detailed tutorial on how to use the cool Morph transition, see our step-by-step article here .
Save Your PowerPoint Presentation
After you’ve built your presentation and made all the adjustments to your slides, you’ll want to save your presentation. YOu can do this several different ways.

To save a PowerPoint presentation using your Ribbon, simply:
- Navigate to the File tab
- Select Save As on the left
- Choose where you want to save your presentation
- Name your presentation and/or adjust your file type settings
- Click Save
You can alternatively use the Ctrl+S keyboard shortcut to save your presentation. I recommend using this shortcut frequently as you build your presentation to make sure you don’t lose any of your work.

This is the standard way to save a presentation. However, there may be a situation where you want to save your presentation as a different file type.
To learn how to save your presentation as a PDF, see our guide on converting PowerPoint to a PDF .
How to save your PowerPoint presentation as a template
Once you’ve created a presentation that you like, you may want to turn it into a template. The easiest – but not technically correct – way, is to simply create a copy of your current presentation and then change the content.
But be careful! A PowerPoint template is a special type of document and it has its own parameters and behaviors.
If you’re interested in learning about how to create your own PowerPoint template from scratch, see our guide on how to create a PowerPoint template .
Printing Your PowerPoint Presentation
After finishing your PowerPoint presentation, you may want to print it out on paper. Printing your slides is relatively easy.

To open the Print dialog box, you can either:
- Hit Ctrl+P on your keyboard
- Or go to the Ribbon and click on File and then Print

Inside the Print dialog box, you can choose from the various printing settings:
- Printer: Select a printer to use (or print to PDF or OneNote)
- Slides: Choose which slides you want to print
- Layout: Determine how many slides you want per page (this is where you can print the notes, outline, and handouts)
- Collated or uncollated (learn what collated printing means here )
- Color: Choose to print in color, grayscale or black & white
There are many more options for printing your PowerPoint presentations. Here are links to more in-depth articles:
- How to print multiple slides per page
- How to print your speaker notes in PowerPoint
- How to save PowerPoint as a picture presentation
So that’s how to create a PowerPoint presentation if you are brand new to it. We’ve also included a ton of links to helpful resources to boost your PowerPoint skills further.
When you are creating your presentation, it is critical to first focus on the content (what you are trying to say) before getting lost inserting and playing with elements. The clearer you are on what you want to present, the easier it will be to build it out in PowerPoint.
If you enjoyed this article, you can learn more about our PowerPoint training courses and other presentation resources by visiting us here .
🔒 Unlock the PowerPoint Shortcuts Trusted by Industry Leaders KKR, American Express, HSBC, and More!
Join over 114,880 professionals from diverse fields including consulting, investment banking, advertising, marketing, sales, and business development who have supercharged their PowerPoint game with our proven methods.
✅ Customize compelling presentations effortlessly.
✅ Master time-saving techniques for faster deck creation.
✅ Boost your career prospects with top-notch PowerPoint skills.
Get FREE access to the Critical PowerPoint Shortcuts module of our premium training course by entering your name and email below.
DISCLAIMER: PC Users Only!
We respect your privacy and will keep your info safe and confidential.
About The Author

Popular Tutorials
- How to Strikethrough Text (l̶i̶k̶e̶ ̶t̶h̶i̶s̶) in Word, Excel & PowerPoint
- How to Make Animated Fireworks in PowerPoint (Step-by-Step)
- Strikethrough Shortcut (l̶i̶k̶e̶ ̶t̶h̶i̶s̶) for Word, Excel & PowerPoint
- How to Create a Flash Card Memory Game in PowerPoint (Like Jeopardy)
- Keyboard Shortcuts Not Working: Solved
PowerPoint Tutorial Categories
- Strategies & Opinions
- Shortcuts & Hacks
- Pictures, Icons, Videos, Etc.
- New Features
- Miscellaneous
- Charts & Data Viz
We help busy professionals save hours and gain peace of mind, with corporate workshops, self-paced courses and tutorials for PowerPoint and Word.
Work With Us
- Corporate Training
- Presentation & Template Design
- Courses & Downloads
- PowerPoint Articles
- Word Articles
- Productivity Resources
Find a Tutorial
- Free Training
- For Businesses
We help busy office workers save hours and gain peace of mind, with tips, training and tutorials for Microsoft PowerPoint and Word.
Master Critical PowerPoint Shortcuts – Secure Your FREE Training Module and Save Valuable Time!
⌛ Master time-saving expert techniques.
🔥 Create powerful presentations.
🚀 Propel your career to new heights.
We value your privacy – we keep your info safe.
Discover PowerPoint Hacks Loved by Industry Giants - KKR, AmEx, HSBC!
Over 114,880 professionals in finance, marketing and sales have revolutionized their PPT skills with our proven methods.
Gain FREE access to a full module of our premium PowerPoint training program – Get started today!
We hate spam too and promise to keep your information safe.
You are currently viewing a placeholder content from Facebook . To access the actual content, click the button below. Please note that doing so will share data with third-party providers.
How to Turn Off Read Only in PowerPoint

If you’ve ever tried to edit a PowerPoint presentation and found that it’s in read-only mode, you know how frustrating it can be. Fortunately, there are ways to turn off read-only mode in PowerPoint so that you can edit your presentation. In this article, we’ll walk you through the process and provide tips for preventing future read-only issues.
Table of Contents
Why PowerPoint May Be in Read-Only Mode
There are several reasons why a PowerPoint presentation may be in read-only mode. The most common cause is that the presentation was saved as read-only or was sent to you as a read-only file. Another cause may be that the file is located on a network drive or shared folder that you don’t have permission to modify.
Additionally, if the PowerPoint presentation contains macros or add-ins that are not enabled, it may also be in read-only mode. This is a security feature in PowerPoint to prevent potentially harmful code from running. To enable macros and add-ins, you will need to adjust your PowerPoint settings and ensure that the file is from a trusted source.
Understanding the Read-Only Mode in PowerPoint
Read-only mode in PowerPoint is a security feature that prevents unauthorized people from making changes to a presentation. When a presentation is in read-only mode, you can view it, but you can’t edit it unless you turn off the read-only feature.
Read-only mode is particularly useful when you want to share a presentation with others, but you don’t want them to accidentally make changes to it. This feature is also helpful when you’re presenting in front of an audience, as it ensures that your presentation remains unchanged throughout the presentation.
It’s important to note that read-only mode doesn’t prevent someone from copying the content of your presentation. If you want to protect your presentation from being copied, you should consider using password protection or other security measures.
Steps to Turn Off Read-Only Mode in PowerPoint
To turn off read-only mode in PowerPoint, follow these steps:
- Locate the PowerPoint presentation file in Windows Explorer.
- Right-click on the file and select “Properties” from the context menu.
- In the Properties window, under the “General” tab, uncheck the “Read-only” attribute at the bottom.
- Click “Apply” and then “OK” to save the changes.
- Open the PowerPoint presentation, and you should now be able to edit it.
If the presentation is still in read-only mode, it may be because it’s password-protected or stored on a read-only device. In such cases, you may need to contact the owner of the presentation or the IT department for assistance.
How to Modify a Read-Only PowerPoint Presentation
If you need to make changes to a read-only PowerPoint presentation but don’t want to turn off the read-only mode permanently, you can save a copy of the presentation. Follow these steps:
- Open the read-only PowerPoint presentation.
- Click on “File” in the top-left corner of the screen.
- Select “Save As.”
- Choose a new name for the presentation and select a different location to save it.
- Save the presentation, which will not have the read-only attribute.
It’s recommended to make a backup copy of the original read-only presentation before making any modifications. Additionally, if the presentation is read-only due to security or permission settings, consult with the appropriate parties before making changes.
Common Reasons Why a PowerPoint Presentation is Read-Only
Besides the factors mentioned above, there may be other reasons why a PowerPoint presentation is in read-only mode. Some common causes are:
- The presentation was created in an earlier version of PowerPoint.
- The presentation was password-protected.
- The presentation was damaged or corrupted.
Another reason why a PowerPoint presentation may be in read-only mode is if it is being accessed from a network location that has restricted access permissions. In such cases, the user may need to contact the network administrator to obtain the necessary permissions to edit the presentation.
Troubleshooting Methods to Fix Read-Only Issues in PowerPoint
If your PowerPoint presentation is in read-only mode and none of the above solutions work, you can try troubleshooting the issue using these methods:
- Check the properties of the file to ensure that it’s not set to read-only.
- Copy the presentation to a different location and try to edit it there.
- Scan the presentation for viruses or malware that may be interfering.
- Try opening the presentation in Compatibility Mode and then saving it as a new file.
It’s important to note that read-only mode can also occur if the file is being accessed by multiple users simultaneously. In this case, you may need to coordinate with your colleagues to ensure that only one person is editing the file at a time. Additionally, if the file is stored on a network drive, you may need to check the permissions settings to ensure that you have the necessary access to edit the file.
How to Unlock a Read-Only PowerPoint Presentation for Editing
If you receive a read-only PowerPoint presentation from someone else and need to unlock it for editing, you can request that the person send you an editable copy of the file. Alternatively, if you have the necessary permissions, you can follow the steps outlined in the “Steps to Turn Off Read-Only Mode in PowerPoint” section to remove the read-only attribute.
It is important to note that attempting to unlock a read-only PowerPoint presentation without permission from the owner may be a violation of copyright laws. Always ensure that you have the necessary permissions before attempting to edit someone else’s work.
If you frequently receive read-only PowerPoint presentations and need to edit them, consider investing in a subscription to Microsoft Office 365. This service allows you to collaborate on documents in real-time and provides access to all of the latest versions of Microsoft Office applications, including PowerPoint.
Preventing Future Read-Only Issues in PowerPoint
To avoid read-only issues in the future, consider the following tips:
- Save your presentations as editable files (not read-only).
- Make sure that you have the appropriate permissions to modify files on shared drives or network locations.
- Regularly back up your PowerPoint files to avoid data loss from corrupted or damaged files.
Additionally, it is important to keep your PowerPoint software up to date with the latest updates and patches. These updates often include bug fixes and security enhancements that can prevent read-only issues from occurring. It is also recommended to avoid using unsupported file formats or third-party plugins that may cause compatibility issues.
Tips and Tricks for Successfully Turning Off Read Only in PowerPoint
Turning off read-only mode in PowerPoint may seem simple, but sometimes it requires troubleshooting and experimentation to find the right solution. Here are some additional tips and tricks to help you successfully turn off read-only mode:
- Make sure that you have the latest version of PowerPoint installed to ensure compatibility with your files.
- If you’re having trouble saving changes to a presentation, try copying and pasting the contents into a new presentation and saving that instead.
- If you have password-protected a presentation, make sure to keep track of the password and grant others access as needed.
By following the steps and tips outlined in this article, you should be able to turn off read-only mode in PowerPoint and prevent future read-only issues. Remember to save your files as editable files and maintain regular backups to stay ahead of any potential data loss issues.
Another useful tip is to check the file properties to ensure that the file is not set to read-only. To do this, right-click on the file and select “Properties.” Under the “General” tab, make sure that the “Read-only” box is unchecked. If it is checked, uncheck it and click “Apply” and “OK.”
By humans, for humans - Best rated articles:
Excel report templates: build better reports faster, top 9 power bi dashboard examples, excel waterfall charts: how to create one that doesn't suck, beyond ai - discover our handpicked bi resources.
Explore Zebra BI's expert-selected resources combining technology and insight for practical, in-depth BI strategies.

We’ve been experimenting with AI-generated content, and sometimes it gets carried away. Give us a feedback and help us learn and improve! 🤍
Note: This is an experimental AI-generated article. Your help is welcome. Share your feedback with us and help us improve.


Contribute to the Microsoft 365 and Office forum! Click here to learn more 💡
April 9, 2024
Contribute to the Microsoft 365 and Office forum!
Click here to learn more 💡
PowerPoint Forum Top Contributors: Steve Rindsberg - John Korchok - Bob Jones AKA: CyberTaz ✅
May 10, 2024
PowerPoint Forum Top Contributors:
Steve Rindsberg - John Korchok - Bob Jones AKA: CyberTaz ✅
- Search the community and support articles
- Microsoft 365 and Office
- Search Community member
Ask a new question
How to share unedited version of powerpoint with ms forms to students
I am trying to share a read only version of a powerpoint to students as I don't want them saving the slides or making changes to it. At the end of the course there is a quiz that I have inserted from MS Forms. When I try and share the powerpoint on onedrive if I share it as a read only and no download option, it also makes the Forms a read only. Is there a way to share the presentation on one drive and avoid it being downloaded and allow the quiz to be completed?
- Subscribe to RSS feed
Report abuse
Reported content has been submitted
Replies (1)
- Microsoft Agent |
Dear Kawthar.h
If your Forms link is inserted into a file that you don't have edit permissions for, you can't open it directly. I noticed that you want to share files with students, and I want to confirm if you are using Teams, and if so, you can know that sharing the Forms link in Teams, and doing so will also collect responses.
If you encounter any problems during this process, please feel free to contact me
Was this reply helpful? Yes No
Sorry this didn't help.
Great! Thanks for your feedback.
How satisfied are you with this reply?
Thanks for your feedback, it helps us improve the site.
Thanks for your feedback.
Question Info
- For business
- Norsk Bokmål
- Ελληνικά
- Русский
- עברית
- العربية
- ไทย
- 한국어
- 中文(简体)
- 中文(繁體)
- 日本語
- Windows Password
- iOS Devices
- Windows Server
How to Remove or Disable Read-only in PowerPoint Presentation
11.07.2019 / Joe / office
When we enable read only feature in PowerPoint presentation, we do not want any changes from others. But if you get a PowerPoint presentation from others and want to remove/disable read-only mode, how can you do? Now in this article, we will list possible cases for you to remove or disable read only in PowerPoint presentation.
Case 1: The PowerPoint is marked as final for read only
Case 2: the powerpoint is restricted editing and you have the password, case 3: without password, you can only reach the read only powerpoint presentation.

If your PowerPoint presentation is set with Marked as Final, you will see a yellow message bar at the top of the presentation as the screenshot shows. You can click Edit Anyway to edit the presentation every time.

When you have the modify password, there are multiple methods to remove read only restriction from PowerPoint presentation.
Step 1: Directly enter the password to open the presentation.

Step 2: Click File > Save as on the left top corner.

Step 3: Click Tools > General options in the Save as interface.

Step 5: You will be backed to the Save as interface, click the Save button and confirm this operation.

After that, the read-only password is removed and it is convenient to edit the presentation content.
If you forgot or lost the editing password, how can you get rid of the password restriction to edit the read only PowerPoint presentation? You need the PowerPoint read only password remover . iSunshare PowerPoint Unprotect Genius is highly recommended here. This software can remove read only password from PowerPoint 97/2000/2003/2007/2010/2013/2016/2019 presentation.
Step 1: Open the software and click the Add button to import the read only ppt/pptx file.
Step 2: After the file is listed in the File Name box, you can click the Start button.
Step 3: In the end, you will get the unprotected PowerPoint presentation under the source presentation, which you can open it without password restriction.

If your PowerPoint presentation is in .*ppt format, you will get the editing password recovered in the end. Then, you can enter the password and follow the steps in Case 2 to disable read only mode.
Related Articles:
- How to Remove or Disable Read Only in Excel File
- How to Enable Read Only Mode in Word Document
- How to Edit Encrypted Read Only PowerPoint
- How to Make a MS PowerPoint 2010 Presentation Read Only
- How to Unlock Read Only PowerPoint Presentation with or without Password
One Reply to “How to Remove or Disable Read-only in PowerPoint Presentation”
Thanks for this post, it is quite helpful to me! Ways easier to understand than anything else out there. I think, the password to open PowerPoint will be more difficult to remove or recover than the editing password.
Comments are closed.
Recent Posts
- How to Export Passwords from iPhone
- Error Solved—You Must Enable System Protection on This Drive
- How to Bypass FRP on Vivo Phones with or without PC
- How to Bypass Remote Management on iPhone/iPad
- How to Transfer iPhone Photos to iPad
Recent Comments
- art history on Easy Fixes to Windows 11 Backup Options Missing
- Health Fitness on Solved-Encrypt Contents to Secure Data is Greyed out in Windows 11/10
- admin on How to Put a Password on a Flash Drive in Windows 10
- admin on How to Reset Windows 10/11 Forgotten Administrator Password
- graliontorile on How to Reset Windows 10/11 Forgotten Administrator Password
- Entries feed
- Comments feed
- WordPress.org
Purdue Online Writing Lab Purdue OWL® College of Liberal Arts
Welcome to the Purdue Online Writing Lab

Welcome to the Purdue OWL
This page is brought to you by the OWL at Purdue University. When printing this page, you must include the entire legal notice.
Copyright ©1995-2018 by The Writing Lab & The OWL at Purdue and Purdue University. All rights reserved. This material may not be published, reproduced, broadcast, rewritten, or redistributed without permission. Use of this site constitutes acceptance of our terms and conditions of fair use.
The Online Writing Lab at Purdue University houses writing resources and instructional material, and we provide these as a free service of the Writing Lab at Purdue. Students, members of the community, and users worldwide will find information to assist with many writing projects. Teachers and trainers may use this material for in-class and out-of-class instruction.
The Purdue On-Campus Writing Lab and Purdue Online Writing Lab assist clients in their development as writers—no matter what their skill level—with on-campus consultations, online participation, and community engagement. The Purdue Writing Lab serves the Purdue, West Lafayette, campus and coordinates with local literacy initiatives. The Purdue OWL offers global support through online reference materials and services.
A Message From the Assistant Director of Content Development
The Purdue OWL® is committed to supporting students, instructors, and writers by offering a wide range of resources that are developed and revised with them in mind. To do this, the OWL team is always exploring possibilties for a better design, allowing accessibility and user experience to guide our process. As the OWL undergoes some changes, we welcome your feedback and suggestions by email at any time.
Please don't hesitate to contact us via our contact page if you have any questions or comments.
All the best,
Social Media
Facebook twitter.
We explain and teach technology, solve tech problems and help you make gadget buying decisions.
Top 7 Fixes for Animations Not Working in PowerPoint on Windows

Pankil is a Civil Engineer turned freelance writer. Since his arrival at Guiding Tech in 2021, he delves into the world of how-tos, and troubleshooting guides for Android, iOS, and Windows. Besides his new-found love for mechanical keyboards, he's a disciplined footfall fan and loves international travel with his wife.
The artful integration of animations can help you transform a mundane slideshow into a captivating visual treat. Microsoft PowerPoint offers a variety of animations that you can apply to text, images, and other objects to make your presentation dynamic . But what if these animations stop working in PowerPoint for Windows?

Whether animations are playing incorrectly or refuse to play at all, this guide can help. It includes a few useful tips to get PowerPoint animations working again on your Windows 10 or 11 PC.
1. Check Animation Order and Triggers
Before you try anything else, it’s a good idea to check the set animation effects and triggers in your PowerPoint presentation . Here’s how you can go about it.
Step 1: Open your PowerPoint presentation, switch to the Animations tab at the top, and select the Animation Pane option from the Advanced Animation group.

Step 2: From the Animation Pane settings, you’ll see a list of all animations on the right side. Make sure all the animations are listed in the desired order. If not, use the up and down arrows to reorder them.

Step 3: Right-click on animations to change their trigger. Then, click the Play button to check your animations.

Repeat the above steps to check the animation effects and triggers for all your slides. If the animations don’t play even after that, continue with the fixes below.
2. Check Slideshow Settings
Microsoft PowerPoint may not play any animations during slide shows if you have accidentally enabled the ‘Show without animations’ option. Here’s how to turn it off.
Step 1: Open your PowerPoint presentation, switch to the Slide Show tab, and click the Set Up Slide Show button.

Step 2: Under Show options, clear the ‘Show without animation’ checkbox. Then, click OK.

After that, press F5 to start the slideshow and check if your animations work.
3. Click the Record Button
Is PowerPoint not playing animations when you try to record your presentation ? That could happen if you scroll through your slides and haven’t clicked the Record button. Here’s what you need to do.
Step 1: Open your presentation in Microsoft PowerPoint. Switch to the Record tab and click the From Beginning or From Current Slide button.

Step 2: Click the Record button at the top. After that, PowerPoint will play and record your presentation with animations.

4. Toggle Off Hardware Acceleration
Such issues with animations can also occur if the hardware graphics acceleration feature malfunctions in PowerPoint. You can try turning this feature off momentarily to see if that fixes problems with PowerPoint animations.
Step 1: Open PowerPoint on your PC and click the File menu at the top-left corner.

Step 2: Select Options from the left sidebar.

Step 3: Select the Advanced tab. In the right pane, scroll down to the Display section and clear the checkbox that reads ‘Disable Slide Show hardware graphics acceleration.’ Then, click OK.

After completing the above steps, check if the issue is still there.
5. Open PowerPoint in Safe Mode
At times, third-party add-ins can conflict with Microsoft PowerPoint, causing the animation pane to not show up. If you suspect that to be the case, you can open PowerPoint in safe mode. For that, press the Windows + R keyboard shortcut to open the Run dialog box. Type powerpnt /safe in the Open field and press Enter.

After opening PowerPoint in safe mode, check if your animations work. If they do, it’s likely that one of your add-ins is causing the problem. To identify it, you will need to disable all add-ins and then re-enable them one by one.
Step 1: Open PowerPoint and click the File menu at the top-left corner.
Step 2: Select Options from the left pane.
Step 3: In the PowerPoint Options window, switch to the Add-ins tab. Click the drop-down menu next to Manage and select COM Add-ins. Then, click the Go button next to it.

Step 4: Uncheck all the boxes to disable your add-ins and click OK.

Restart Microsoft PowerPoint and enable your add-ins one at a time. You will need to check the animations after enabling each add-in. When you find the problematic add-in, consider removing it for good.
6. Repair Your Presentation
If animations are not working only on a specific PowerPoint presentation, you can try repairing it. To do so, use these steps:
Step 1: Open Microsoft PowerPoint and click the File menu at the top-left corner.
Step 2: Select Open from the left sidebar and click the Browse option.

Step 3: Browse and select your file. Click the downward arrow next to Open to select Open and Repair.

Wait for PowerPoint to repair your presentation and open it. After that, check if the issue still occurs.
7. Run the Office Repair Tool
If nothing works, there may be an issue with some of the core files associated with Microsoft PowerPoint . In that case, your best option is to run the Office repair tool, which can automatically find and fix issues with Office apps like PowerPoint.
Step 1: Press the Windows + R keyboard shortcut to open the Run dialog box. Type appwiz.cpl in the box and press Enter.

Step 2: Select the Microsoft Office suite and click the Change button.

Step 3: Select the Online Repair option and click Repair.

Animate Brilliance
Adding animations to your PowerPoint presentations is an effective way to keep your audience engaged. Such issues with PowerPoint shouldn’t force you to settle for a boring presentation or seek an alternative. Going through the above tips should solve the underlying issue and restore normalcy.
Was this helpful?
Last updated on 05 December, 2023
The above article may contain affiliate links which help support Guiding Tech. However, it does not affect our editorial integrity. The content remains unbiased and authentic.

The article above may contain affiliate links which help support Guiding Tech. The content remains unbiased and authentic and will never affect our editorial integrity.
DID YOU KNOW

Pankil Shah
More in windows.

Top 5 Ways to Fix “A Driver Cannot Load on This Device” Error on Windows 11

How to Enable or Disable Mouse Click Sound in Windows 10 and 11
Join the newsletter.
Get Guiding Tech articles delivered to your inbox.
Use a screen reader to show your presentation with PowerPoint
This article is for people with visual or cognitive impairments who use a screen reader program such as Microsoft's Narrator, JAWS, or NVDA with the Microsoft 365 products. This article is part of the Microsoft 365 screen reader support content set where you can find more accessibility information on our apps. For general help, visit Microsoft Support home or Fixes or workarounds for recent office issues .
Use PowerPoint with your keyboard and a screen reader to deliver your presentation to the audience using the Presenter View or Slide Show view. To make the most of your presentation, we recommend that you use the Presenter View . We have tested it with Narrator, JAWS, and NVDA, but it might work with other screen readers as long as they follow common accessibility standards and techniques.
In the Slide Show view, the Presenter View starts automatically when you are connected to a second display. In the Presenter View , you can work with your notes as you present, while the audience sees only your slides.

New Microsoft 365 features are released gradually to Microsoft 365 subscribers, so your app might not have these features yet. To learn how you can get new features faster, join the Office Insider program .
To learn more about screen readers, go to How screen readers work with Microsoft 365 .
In this topic
Start a slide show, display a black screen.
Open your presentation in PowerPoint.
To start the slide show, press F5.
If you're connected to a second display, the Presenter View starts automatically. If you're working on a single monitor, to switch to the Presenter View while you're presenting, press Shift+F10, R or the Menu key and then R.
To navigate the slides, do the following:
To move to the next slide, press Page down.
To go to the previous slide, press Page up.
To go to a certain slide, type the slide number and press Enter.
To open the context menu, press Shift+F10 or the Menu key. To navigate the options in the menu, press the Down arrow key. The screen reader announces the items as you move.
To exit the slide show, press Esc.
Use keyboard shortcuts to deliver your presentation using Presenter View
When in the Presenter View , you can use the following keyboard shortcuts that can help you deliver your PowerPoint presentation:
To pause your presentation and display a blank black screen, press B.
To return to the presentation and show the slides again, press Esc.
Tip: To display a blank white screen instead of a black screen, press W. To show the slides, press W again.
Use a screen reader to read or add speaker notes and comments in PowerPoint
Use a screen reader to print presentations in PowerPoint
Use keyboard shortcuts to deliver PowerPoint presentations
Basic tasks to create a presentation in PowerPoint with a screen reader
Set up your device to work with accessibility in Microsoft 365
Use a screen reader to explore and navigate PowerPoint
What's new in Microsoft 365
Use PowerPoint with your keyboard and VoiceOver, the built-in macOS screen reader, to deliver your presentation to the audience using the Slide Show view or Presenter View . In the Slide Show view, your presentation is shown on your computer screen the same way your audience sees it. In the Presenter View , you can keep your presentation with the speaker notes on your computer screen, while the audience sees the notes-free slides projected to another screen.
This topic assumes that you are using the built-in macOS screen reader, VoiceOver. To learn more about using VoiceOver, go to VoiceOver Getting Started Guide .
Deliver your presentation on two screens using Presenter View
To start the slide show, do one of the following:
To start the slide show from the first slide, press Command+Shift+Return.
To start the slide show from the current slide, press Command+Return.
To move to the next slide, press either the Right or Down arrow key or Spacebar.
To go to the previous slide, press the Left or Up arrow key or Delete.
By using two screens and Presenter View , you can run other programs and access the speaker notes on one screen while the audience sees the slides on the other screen.
Make sure that your computer can support multiple monitors and the second monitor or computer is connected to your computer.
If you're not already sharing your screen, press Command+F2 on the computer you want to show the presentation on.
On your computer, press Option+Return to start presenting in Presenter View .
Your speaker notes and slides are available on your screen, while the other screen shows the presentation only.
Tip: If the speaker notes are shown on the wrong screen, you can swap the displays. Press Control+Option+I to open the Item Chooser , and type Swap Displays button . Press Control+Option+Spacebar to select the button, and then press Control+Option+Spacebar to swap. The focus stays on the button. To navigate away from the button, press the Right arrow key.
To move to the next slide, press N. To return to the previous slide, press P.
To move to the presenter notes section, press Control+Option+Right or Left arrow key repeatedly until you hear: "Notes pane, layout area." Press Control+Option+Shift+Down arrow key to select, and VoiceOver reads the notes. To exit the notes pane, press Control+Option+Shift+Up arrow key.
To stop presenting, press Esc.
To pause your presentation and display a blank black screen during presenting, press B.
To return to the presentation and show the slides, press B again.
Use PowerPoint with VoiceOver, the built-in iOS screen reader, to navigate through the slides of your presentation. Learn how to start, navigate, and end the slide show, and how to use a black slide to hide the presentation.
This topic assumes that you are using the built-in iOS screen reader, VoiceOver. To learn more about using VoiceOver, visit Apple accessibility .
Progress through the slides
Hide the presentation.
Do one of the following:
To start the slide show from the slide currently in focus, swipe right until you hear "Start slide show from this slide, button," and double-tap the screen.
To start the slide show from the first slide in your presentation, tap near the top of the screen with four fingers, swipe right until you hear "Show ribbon," and then double-tap the screen. You hear the name of the currently selected tab. Double-tap the screen, swipe right or left until you hear "Slide show, tab, " and double-tap the screen. Swipe right until you hear "Play slide show from start," and then double-tap the screen.
In your slide show presentation, do one of the following:
To proceed to the next slide, swipe left with three fingers.
To go back to the previous slide, swipe right with three fingers.
VoiceOver reads the slide number and title as you land on a slide. To read the rest of the slide contents, swipe right. The focus moves to the next text box and VoiceOver reads the contents.
When you hear "End of slide show," there are no more slides to show. To exit a slide show, swipe left with three fingers.
If you want to exit a slide show right away before reaching the end of your presentation, swipe down with three fingers to show the toolbar. Then swipe left or right until you hear "End slide show, button," and double-tap the screen.
In your slide show presentation, swipe down with three fingers to show the toolbar.
Swipe left or right until you hear "Slide show black, button," and double-tap to hide the presentation. The focus stays on the button.
To show the slides again, double-tap the screen. If you've moved the focus away from the button, swipe left or right until you hear "Slide show normal, button," and then double-tap the screen.
Use a screen reader to work with slides in PowerPoint
Use a screen reader to save your presentation in PowerPoint
Use PowerPoint for Android with TalkBack, the built-in Android screen reader, to navigate through the slides of your presentation. Learn how to start, navigate, and end the slide show, and how to use a black slide to hide the presentation.
This topic assumes that you are using the built-in Android screen reader, TalkBack. To learn more about using TalkBack, go to Android accessibility .
You can start a slide show from the editing or the reading view.
Swipe right or left until you hear: "Present button." Double-tap the screen to start the slide show.
While presenting your slide show, do one of the following:
To proceed to the next slide, swipe left with two fingers.
To go back to the previous slide, swipe right with two fingers.
TalkBack reads the slide number and title as you land on a slide. To read the rest of the slide contents, swipe right with one finger. The focus moves to the next element and Talkback reads the content. TalkBack announces a text element as "Content placeholder," followed by the text inside the placeholder.
When you hear "End of show button," you've reached the last slide in your presentation. To exit the slide show, swipe left with two fingers.
Pause your presentation and display a blank black screen.
While presenting your slide show, swipe up with three fingers to display the slide show toolbar.
Swipe left or right until you hear "Off, blank screen, switch," and then double-tap the screen. You hear: "On."
To show the slides again, double-tap the screen. You hear: "Off." If you've moved the focus away from the blank screen button, swipe left or right until you hear "On, blank screen, switch," and double-tap the screen.
Use PowerPoint for the web with your keyboard and a screen to deliver your presentation to the audience. We have tested it with Narrator in Microsoft Edge and JAWS and NVDA in Chrome, but it might work with other screen readers and web browsers as long as they follow common accessibility standards and techniques. You'll learn how to start, navigate, and end a slide show.
If you're using Narrator, switch off the Narrator scan mode. Press the SR key+Spacebar to toggle the scan mode off or on.
When you use PowerPoint for the web with a screen reader, use the full screen mode. Press F11 to toggle the full screen on or off.
When you use PowerPoint for the web, we recommend that you use Microsoft Edge as your web browser. Because PowerPoint for the web runs in your web browser, the keyboard shortcuts are different from those in the desktop program. For example, you’ll use Ctrl+F6 instead of F6 for jumping in and out of the commands. Also, common shortcuts like F1 (Help) and Ctrl+O (Open) apply to the web browser – not PowerPoint for the web.
To move the focus to the Slide Show tab, press Alt+Windows logo key, S.
To start a slide show from the first slide in the presentation, press B.
To start a slide show from the current slide, press C.
The slide show starts. To go to the next slide, press N. To go to the previous slide, press P.
To end the slide show, press Esc.
Use a screen reader to add and format text in PowerPoint
Technical support for customers with disabilities
Microsoft wants to provide the best possible experience for all our customers. If you have a disability or questions related to accessibility, please contact the Microsoft Disability Answer Desk for technical assistance. The Disability Answer Desk support team is trained in using many popular assistive technologies and can offer assistance in English, Spanish, French, and American Sign Language. Please go to the Microsoft Disability Answer Desk site to find out the contact details for your region.
If you are a government, commercial, or enterprise user, please contact the enterprise Disability Answer Desk .

Need more help?
Want more options.
Explore subscription benefits, browse training courses, learn how to secure your device, and more.

Microsoft 365 subscription benefits

Microsoft 365 training

Microsoft security

Accessibility center
Communities help you ask and answer questions, give feedback, and hear from experts with rich knowledge.

Ask the Microsoft Community

Microsoft Tech Community

Windows Insiders
Microsoft 365 Insiders
Find solutions to common problems or get help from a support agent.

Online support
Was this information helpful?
Thank you for your feedback.
How-To Geek
How to get microsoft office for free.
Don't want to pay for a subscription or buy the standalone version?
Quick Links
Use office online in a browser; it's free, sign up for a free one-month trial, get office free as a student or teacher, try the mobile apps on phones and small ipads, join someone's microsoft 365 home plan, free microsoft office alternatives, key takeaways.
There are a few ways to get Microsoft Office for free: You can use Office for free in your browser, you can sign up for a one-month free trial, or you may get access through your educational institution if you’re a student or teacher.
Microsoft Office normally starts at $70 per year, but there are quite a few ways to get it for free. We'll show you all the ways you can get Word, Excel, PowerPoint, and other Office applications without paying a cent.
Whether you're using a Windows PC, Mac, or Chromebook, you can use Microsoft Office for free in a web browser. The web-based versions of Office are simplified and won't work offline, but they still offer a powerful editing experience. You can open and create Word, Excel, and PowerPoint documents right in your browser.
To access these free web apps, just head to Office.com and sign in with a free Microsoft account. Click an application icon—like Word, Excel, or PowerPoint—to open the web version of that application.
You can also drag and drop a file from your computer onto the Office.com page. It will be uploaded to your Microsoft account's free OneDrive storage, and you can open it in the associated application.
Office's web applications have some limitations. These applications aren't quite as full featured as the classic Office desktop applications for Windows and Mac, and you can't access them offline. But they do offer surprisingly powerful Office applications, and they're completely free.
If you just need Microsoft Office for a short period of time, you can sign up for a one-month free trial. To find this offer, head to Microsoft's Try Microsoft 365 for free website, and sign up for the trial.
You will have to provide a credit card to sign up for the trial, and it will automatically renew after the month. However, you can cancel your subscription at any time—even right after signing up—to ensure you won't get billed. You can continue using Office for the rest of your free month after canceling.
After joining the trial, you can download full versions of these Microsoft Office applications for Windows PCs and Macs. You'll also get access to the full versions of the apps on other platforms, including larger iPads.
This trial will give you full access to a Microsoft 365 (formerly Office 365) Home plan. You'll get Word, Excel, PowerPoint, Outlook, OneNote, and 1TB of storage in OneDrive. You can share it with up to five other people. They'll each get access to the apps via their Microsoft account, and will have their own 1TB of storage for a combined 6TB of storage.
Microsoft also offers free 30-day evaluations of Microsoft 365 for Business , which is intended for businesses. You might be able to take advantage of both offers for two months of free Microsoft Office access.
Many educational institutions pay for Office 365 plans, allowing students and teachers to download the software for free.
To find out if your school participates, head to the Office 365 Education website, and enter your school email address. You'll be offered a free download if it's available to you through your school's plan.
Even if a university or college doesn't participate, it may offer Microsoft Office at a reduced cost to students and teachers through its bookstore. Check with your educational institution—or at least look on its website—for more details.
Microsoft's Office apps are free on smartphones, too. On an iPhone or Android phone, you can download the Office mobile apps to open, create, and edit documents for free.
On an iPad or Android tablet, these apps will only let you create and edit documents if you have a "device with a screen size smaller than 10.1 inches." On a larger tablet, you can install these apps to view documents, but you'll need a paid subscription to create and edit them.
In practice, this means Word, Excel, and PowerPoint offer a full experience for free on the iPad Mini and older 9.7-inch iPads. You'll need a paid subscription to get document-editing capabilities an iPad Pro or newer 10.2-inch iPads.
Microsoft 365 Home subscriptions are meant to be shared among multiple people. The $70 per year version offers Office for a single person, while the $100 per year subscription offers Office for up to six people. You'll get the full experience, with Office for Windows PCs, Macs, iPads, and other devices.
Anyone who pays for Microsoft 365 Home (formerly known as Office 365 Home) can share it with up to five other Microsoft accounts. It's very convenient: Sharing is managed through an Office "Sharing" page on Microsoft's account website. The main owner of the account can add five other Microsoft accounts, and each of those accounts will receive an invitation link.
After joining the group, each person can sign in with their own Microsoft account to download the Office apps—just as if they were paying for their own subscriptions. Each account will have a separate 1TB of OneDrive storage.
Microsoft says the subscription is meant for sharing among your "household." So, if you have a family member or even a roommate with this service, that person can add you to their subscription for free.
The Home plan is definitely the best deal if you're going to pay for Microsoft Office. If you can split a $100 per year subscription among six people, that's under $17 every year per person.
By the way, Microsoft partners with some employers to offer a discount on Office subscriptions for their employees. Check Microsoft's Home Use Program website to see if you qualify for a discount.
If you're looking for something else, consider choosing a different office application. There are completely free office suites that sport good compatibility with Microsoft Office documents, spreadsheets, and presentation files. Here are some of the best:
- LibreOffice is a free and open-source office application for Windows, Mac, Linux, and other operating systems. It's similar to the desktop versions of Microsoft Office , and it can even work with and create Office documents in common file types like DOCX documents, XLSX spreadsheets, and PPTX presentations. LibreOffice was based on OpenOffice. While OpenOffice is still around, LibreOffice has more developers and is now the more popular project. You can even make LibreOffice look like Microsoft Office .
- Apple iWork is a free collection of office applications for Mac, iPhone, and iPad users. This is Apple's competitor to Microsoft Office, and it used to be paid software before Apple made it free. Windows PC users can access a web-based version of iWork through the iCloud website, too.
- Google Docs is a capable collection of web-based office software. It stores your files in Google Drive , Google's online file storage service. Unlike Microsoft's Office web apps, you can even access Google Docs, Sheets, and Slides offline in Google Chrome.
There are many other alternatives, but these are some of the best.
If you just don't want to pay a monthly fee, you can still purchase a boxed copy of Microsoft Office. However, Office Home & Student 2021 costs $150, and you can only install it on one device.
Microsoft is slated to release a standalone version of Office 2024 , but it has not been released yet. Be sure to keep an eye out for it.
You won't get a free upgrade to the next major version of Office, either. If you're going to pay for Office, the subscription is probably the best deal —especially if you can split a paid plan with other people.
COMMENTS
It's by no means un-editable. Open the presentation that you want to make read-only, then click the "File" tab. Next, in the left-hand pane, select "Info." You'll now see a "Protect Presentation" section, which lets you (to an extent) protect against any editing of your presentation. Click "Protect Presentation."
1] Open the presentation you want to make read-only. The first step is to fire up the PowerPoint presentation you want to make read-only. Simply launch the program then, right away, you should see ...
First, open the read-only presentation and select the "File" tab. You'll be moved in the "Info" menu. Here, you'll see the "Protect Presentation" option is marked in yellow and has a message displayed next to it---the presentation has been marked as final to discourage any editing. Go ahead and select "Protect Presentation."
To make a PowerPoint Presentation read-only: Open your Powerpoint presentation. Choose File at the top left. Select Info on the bar on the left. Click Protect Presentation. In the pull-down menu ...
Open the desired PowerPoint presentation, and click on the " File " tab. Next, click on the " Info " tab from the options presented on the left part of the screen. Select the " Protect Presentation " option. From the dropdown, select " Always Open Read-Only ". Finally, save the file by pressing Ctrl+S.
In PowerPoint for the web, click the Share tab. Under Share, click Get a link. Under View only, click Create. Tip: Click Shorten to decrease the length of the URL that you share with others. Right-click the URL and click Copy. Under Share, click Send email. Enter the email address in the To box. Paste the URL in the message box, and click Share.
Here are the steps: Open the PowerPoint presentation you want to make read-only. Click on the "File" tab. Select "Info" on the left side of the menu. Click on "Protect Presentation" and choose "Mark as Final" from the drop-down menu. Marking a presentation as final sets it to read-only mode within PowerPoint.
Way1: Restrict Permission by People. 1. Open the PowerPoint that you want to set read-only protection. 2. In the ribbon, select the " File " tab. And then click the " Info " in the left of the panel. 3. Click the " Protection Presentation " function button, and then four options will show up. We will choose the second one " Restrict Permission ...
Step 2: Save the Presentation. Click on the "File" tab, then select "Save As." Choose the destination where you want to save your presentation. Before clicking "Save," locate the "Tools" button and click on "General Options." Step 3: Mark as Read-Only. In the "General Options" window, check the box that says "Read-only recommended."
Follow these simple steps to use Passper for PowerPoint to unlock a read-only presentation. Step 1: Download and install Passper for PowerPoint on your computer and then launch the program. In the main window, click on "Remove Restrictions". Step 2: Import the presentation into the program and then click on "Remove".
PowerPoint for the web. If you want to reuse some of the slides in a read-only presentation, you can download a copy to your computer and make changes to the copy. On the File tab, click Save As. Click Download. Pick the steps below for your browser to save and open the file.
2. Click the File tab. You'll see this in the editing ribbon above the document space with Animations and Home . 3. Click Protect Presentation. You'll see this with an icon of a lock to the right of the Info menu. A menu will drop down from the lock icon. 4. Click Mark as Final.
Step 2. Look for a " + " > " From File " button on the main screen. Click it. This lets you make a PDF from another file, like your PowerPoint. Step 3. A window will open. Find your PowerPoint file, click the " SamplePPT ," and open it. Step 4. After you pick your file, PDFelement changes your PPT to a PDF.
To password protect your presentation, open PowerPoint, click the "File" tab, click "Info" in the left-hand pane, and then click the "Protect Presentation" option. Next, click "Encrypt with Password" from the menu that appears. The Encrypt Document window will appear. Enter your password in the Password text box and then click "OK."
First, I suggest you right click the presentation > Open in PowerPoint Online > click Edit Document > Edit in Browser > to check if you can edit the presentation, then clicke EDIT IN POWERPOINT to see if there is any improvement. If the issue persists, I would like to confirm following information: 1.
In this video step by step has been discussed to making power point presentation as read only .How to Save Powerpoint Document as Read OnlyHow to save Powerp...
In PowerPoint for the web, click the Share tab. Under Share, click Get a link. Under View only, click Create. Tip: Click Shorten to decrease the length of the URL that you share with others. Right-click the URL and click Copy. Under Share, click Send email. Enter the email address in the To box. Paste the URL in the message box, and click Share.
Here are the steps. Open your PowerPoint presentation. Click on File > click on Info. Then click on Protect presentation. Select Always Open Read-Only. Now save your file by doing Ctrl + S. When you open your presentation above the presentation you will see it is marked as Read Only. As I said, the presentation is still editable by the person ...
To do that, simply go up to the Home tab and click on New Slide. This inserts a new slide in your presentation right after the one you were on. You can alternatively hit Ctrl+M on your keyboard to insert a new blank slide in PowerPoint. To learn more about this shortcut, see my guide on using Ctrl+M in PowerPoint.
To turn off read-only mode in PowerPoint, follow these steps: Locate the PowerPoint presentation file in Windows Explorer. Right-click on the file and select "Properties" from the context menu. In the Properties window, under the "General" tab, uncheck the "Read-only" attribute at the bottom. Click "Apply" and then "OK" to ...
I am trying to share a read only version of a powerpoint to students as I don't want them saving the slides or making changes to it. At the end of the course there is a quiz that I have inserted from MS Forms. When I try and share the powerpoint on onedrive if I share it as a read only and no download option, it also makes the Forms a read only.
When you have the modify password, there are multiple methods to remove read only restriction from PowerPoint presentation. Step 1: Directly enter the password to open the presentation. Step 2: Click File > Save as on the left top corner. Step 3: Click Tools > General options in the Save as interface. Step 4: Delete the password in Password to ...
Here's how: First, close PowerPoint by right-clicking on its icon from the taskbar and choosing the Close window. Next, open Run using Win+R and enter the below command in the Open box: powerpnt ...
Mission. The Purdue On-Campus Writing Lab and Purdue Online Writing Lab assist clients in their development as writers—no matter what their skill level—with on-campus consultations, online participation, and community engagement. The Purdue Writing Lab serves the Purdue, West Lafayette, campus and coordinates with local literacy initiatives.
PowerPoint for the web. If you want to reuse some of the slides in a read-only presentation, you can download a copy to your computer and make changes to the copy. On the File tab, click Save As. Click Download. Pick the steps below for your browser to save and open the file.
The focus is on the blank presentation option. Press Enter. If you're already editing a presentation and want to start a new blank presentation, press Alt+F, N, then L, and 1. Press the Tab key to move the focus to the title placeholder on the first slide and type the title. When you're done, press Esc.
Step 1: Open PowerPoint on your PC and click the File menu at the top-left corner. Step 2: Select Options from the left sidebar. Step 3: Select the Advanced tab. In the right pane, scroll down to ...
To go to the previous slide, press Page up. To go to a certain slide, type the slide number and press Enter. To open the context menu, press Shift+F10 or the Menu key. To navigate the options in the menu, press the Down arrow key. The screen reader announces the items as you move. To exit the slide show, press Esc.
Microsoft's Office apps are free on smartphones, too. On an iPhone or Android phone, you can download the Office mobile apps to open, create, and edit documents for free.. On an iPad or Android tablet, these apps will only let you create and edit documents if you have a "device with a screen size smaller than 10.1 inches."
A resume that uses wacky fonts, is riddled with typos and spelling errors, and is structured poorly won't make it to the finish line. Take the time to polish your resume so that it looks clean and appealing. Stick to standard fonts like Arial, Calibri, Georgia, Helvetica or Times New Roman. A font that's too elaborate or abstracted in its ...